Why we need state machine in Work Flow?
There is one important decision to make when creating a new workflow. Will the workflow be a sequential workflow, or a state machine workflow? Windows Workflow provides these two types out of the box. To answer the question, we have to decide who is in control.
A sequential workflow is a predictable workflow. The execution path might branch, or loop, or wait for an outside event to occur, but in the end, the sequential workflow will use the activities, conditions, and rules we've provided to march inevitably forward. The workflow is in control of the process.
A state-machine workflow is an event driven workflow. That is, the state machine workflow relies on external events to drive the workflow to completion. We define the legal states of the workflow, and the legal transitions between those states. The workflow is always in one of the states, and has to wait for an event to arrive before transitioning to a new state. Generally, the important decisions happen outside of the workflow. The state machine defines a structure to follow, but control belongs to the outside world.
We use a sequential workflow when we can encode most of the decision-making inside the workflow itself. We use a state machine workflow when the decision-making happens outside the workflow. In this chapter, we will take a closer look at how state machines operate.
个人觉得状态机更能反映出我们所观察的对象或事物的生命周期及状态。下面的一些例子。
What Is A State Machine?
State machines have been around in computer science for a long time. You'll find they are especially popular in reactive systems, like the software for video games and robotics. Designers use state machines to model a system using states, events, and transitions.
A state represents a situation or circumstance. In the diagram below, we have a state machine with two states: a "power on" state and a "power off" state. The machine will always be in one of these two states.

An event is some outside stimulus. In figure 1, we only have one type of event - a button click event. The state machine will respond to this event in either the "power on" or the "power off" state. Not all states have to respond to the same events.
A transition moves the state machine into a new state. A transition can only occur in response to an event. Transitions don't have to move the state machine to a new state - a transition could loop back to the same state. When the machine receives a button click event in the "power off" state, it transitions to the "power on" state. Conversely, if the machine is in the "power on" state and receives a button click event, it moves to the power off state.
Implied in the concept of a state transition is that some action will take place before or after the transition. A state machine doesn’t merely store state - it also executes code when events arrive. In our diagram the state machine would be controlling the flow of electricity by opening or closing a circuit when it arrives in a new state.
State Machines in Windows Workflow
The concepts introduced in above (states, events, and transitions) are the same concepts we use to build state machine workflows in Windows Workflow.
In WF, the StateActivity represents a state in a state machine workflow. As events arrive, the workflow will transition between these activities. A workflow must specify an initial state, which will be the starting state for the workflow. A workflow can optionally specify a completed state. The workflow will concluded when it transitions to the completed state.
An EventDrivenActivity represents an event handler in a state machine. We place these activities inside of State activities to represent the legal events for the state. Inside of an EventDrivenActivity, we can place a sequence of activities that will execute when the event arrives. The last activity in the sequence is commonly a SetStateActivity. A SetStateActivity specifies a transition to the next state.
Our First State Machine
We can build workflows using code only, XAML only, or a combination of code and XAML (code-separation). State machine workflows are no different in this respect. We will build the workflows in this chapter using the code-separation approach, although any of the authoring modes would work.
Our workflow will support a bug tracking application. Specifically, we will be tracking the life cycle of a software bug as the bug moves from an "Open" state to a "Closed" state. During its lifetime, a bug might also be in the "Assigned", "Resolved", and "Deferred" states.
Why use a state machine to model the workflow of bug fixes? Because is it impossible to model the choices a bug will need to reach a completed state. Think about the decision-making required at each step in a bug's life. A newly opened bug requires some evaluation. Is the bug a duplicate? Is the bug really a bug? Even if the bug really is a defect, not all defects move directly to someone's work queue. We must weigh the bug's severity against the project schedule and available resources to fix the bug. Since we can't put all of the intelligence we need into the workflow, we'll rely on external events to tell the workflow what decisions we've made.
OK, Now we know the situation . let's kick off the ball with .net 3.5 Anyway . i believe this will work the same way with .net 4.0 or higher version.
The workflow designer will now appear with our new state machine workflow. At this point, the Toolbox windows will be available and populated with activities from the base activity library. Initially, however, we can only use a subset of activities - the activities listed inside the BugFlowInitalState shape shown below.
Before we can begin to design our state machine, we are going to need some supporting code. Specifically, we need a service that will provide the events to drive the workflow.
Life Of A Bug
State machines will spend most of their time waiting for events to arrive from a local communication service. We know that we will need an interface that defines a communication service contract. The interface will define events that the service can raise to the workflow, and methods the workflow can invoke on the service. For this example, our communication is unidirectional - all we define are events the service will raise to the workflow.
public interface IBugService
{
event EventHandler<BugStateChangedEventArgs> BugOpened;
event EventHandler<BugStateChangedEventArgs> BugResolved;
event EventHandler<BugStateChangedEventArgs> BugClosed;
event EventHandler<BugStateChangedEventArgs> BugDeferred;
event EventHandler<BugStateChangedEventArgs> BugAssigned;
}
The event arguments for these events will require the service to pass along information the workflow can use during processing. For example, one useful piece of information will be a Bug object that carries all the attributes (title, description, assignment) of a bug.
public class BugStateChangedEventArgs : ExternalDataEventArgs
{
public BugStateChangedEventArgs(Guid instanceID, Bug bug)
: base(instanceID)
{
_bug = bug;
WaitForIdle = true;
}
private Bug _bug;
public Bug Bug
{
get { return _bug; }
set { _bug = value; }
}
}
The service that implements the IBugService interface will raise events when the status of a bug changes. The service might fire the event from a smart client application in response to a user manipulating the bug in the UI. Alternatively, the service might fire the event from an ASP.NET web service upon receiving updated bug information in a web service call. The point is that the workflow doesn't care why the event fires, and doesn’t care about the decisions leading up to the event. The workflow only cares that the event happens.
We will use a naïve implementation of the bug service interface and provide simple methods that raise events. Later in the chapter, we will use this service in a console mode program to raise events to the workflow.
{
public event EventHandler<BugStateChangedEventArgs> BugOpened;
public void OpenBug(Guid id, Bug bug)
{
if (BugOpened != null)
BugOpened(null, new BugStateChangedEventArgs(id, bug));
}
// and so on, for each event ...
Now that we know about the service contract our workflow will use, we can continue building our state machine.
The State Activity
The State activity represents a state in the state machine workflow. Not surprisingly, state activities are the backbone of event driven workflows. We can generally start a workflow design by dropping all the State activities we need from the Toolbox window into the designer. If we drop a State activity for each possible state of a software bug, we'll have a designer view like below.
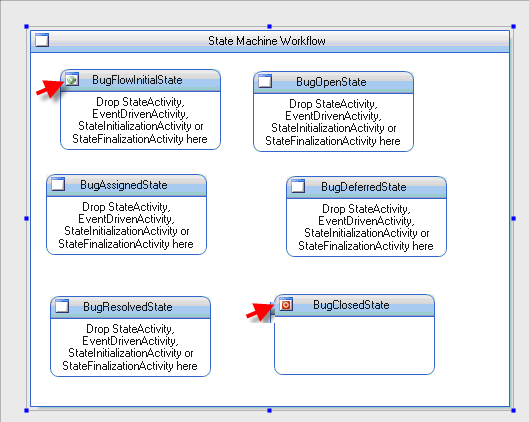
Notice two of the shapes in the above picutre use special icons in their upper left corner. The BugFlowInitialState shape has a green icon in the upper left because it is the initial state for the workflow. Every state machine workflow must have an initial state the workflow will enter on start-up. We can change the initial state by right-clicking another shape and selecting "Set As Initial State" from the context menu.
The BugClosedState has a red icon in the upper left because this is the completed state. A workflow is finished upon entering the completed state, but a completed state is optional. In many bug tracking systems, a bug can be re-opened from a closed state, but in our workflow we will make the closed state a completed state. We can set the completed state by right clicking a shape and selecting "Set As Completed State" from the context menu.
Our next step is to define the events the state machine will process in each state. We will define these events using an EventDriven activity.
The EventDriven Activity
The EventDriven activity is one of the few activities we can drag from the toolbox and drop inside a StateActivity. In the screen shot below, we've dropped an EventDrivenActivity inside of BugFlowInitialState. We've also used the Property window to change the activity's name to OnBugOpened.

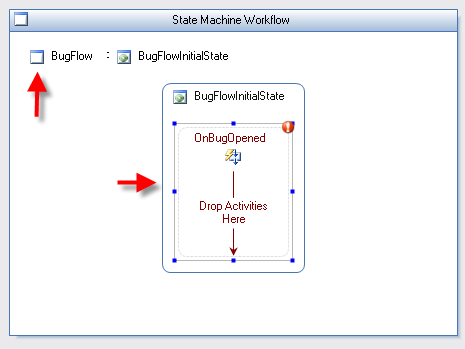
This detail view shows a "breadcrumb" navigation control along the top of the designer. The purpose of the breadcrumb is to let us know we are editing the BugFlowInitalState activity inside the BugFlow workflow. In the center of this view is a detailed view of the EventDrivenActivity we dropped inside the state. We see now the activity is a sequence activity that can hold additional child activities. There are a few restrictions, however.
The first activity in an EventDrivenActivity must implement the IEventActivity interface. Three activities from the base activity library meet this condition - the DelayActivity, the HandleExternalEventActivity, and the WebServiceInputActivity. All of our events come from a local communication service, so we will use a HandleExternalEventActivity to capture these signals.
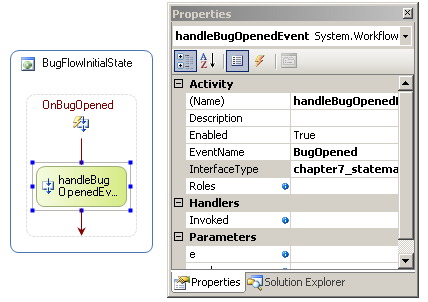
The picture below shows a HandleExternalEventActivity inside the OnBugOpened EventDrivenActivity. We've changed the activity's name to handleBugOpenedEvent and set its InterfaceType to reference the IBugService interface we defined earlier. Finally, we selected BugOpened as the name of the event to handle. We've done all the setup work we need to handle an event in our initial workflow state.
At this point, we could continue to add activities after the event handler. For example, we could add an activity to send notifications to team members about the new bug. The last activity we want to execute will be a SetState activity, which we cover next.
The SetState Activity
Incoming events force state machines to transition into new states. We can model transitions using the SetStateActivity, which can only appear inside state machine workflows. The SetStateActivity is relatively simple. The activity includes a TargetStateName property that points to the destination state. In the screen shot below, we've added a SetStateActivity to OnBugOpened and set the TargetStateName property to BugOpenState. The property editor for TargetStateName will include only valid state names in a drop down list for selection.


At this point, we can continue to add event driven activities to our workflow. We need to cover all the possible events and transitions in the life of a bug. One advantage of a state machine is that we control which events are legal in specific states. For example, we never want any state other than the initial state to handle a BugOpened event. We could also design our state machine so that a bug in the deferred state will only process a BugAssigned event. The picture below shows our state machine with all the events and transitions in place.
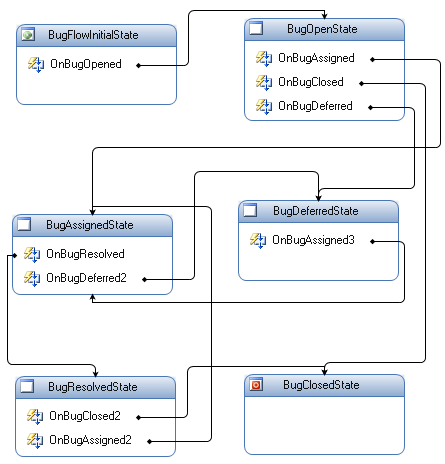
Notice how the BugClosedState does not process any events. This state is the completed state, and the workflow will not process any additional events.
>The StateInitialization and StateFinalization Activities
Two additional activities we can drop inside a StateActivity are the StateInitializationActivity and the StateFinalizationActivity. A state activity can have only one StateInitializationActivity and one StateFinalizationActivity.
Both of these activities will execute a set of child activities in sequence. The StateInitializationActivity runs when the state machines transitions into the state containing the initialization activity. Conversely, the StateFinalization activity will execute whenever the state machine transitions out of the state containing the finalization activity. Using these two activities, we can perform pre and post processing inside the states of our state machines.
Driving the State Machine
Starting a state machine workflow is no different from starting any other workflow. We first create an instance of the WorkflowRuntime class. We'll also need to add a local communication service implementing our IBugService interface.
dataExchange = new ExternalDataExchangeService();
workflowRuntime.AddService(dataExchange);
BugService bugService = new BugService();
dataExchange.AddService(bugService);
WorkflowInstance instance;
instance = workflowRuntime.CreateWorkflow(typeof(BugFlow));
instance.Start();
By the end of the code, we have a workflow instance up and running. In this next code snippet, we will invoke methods on our bug service, which will fire events to the state machine. We've carefully arranged the events to move through all the states in the workflow and finish successfully.
bug.Title = "Application crash while printing";
bugService.OpenBug(instance.InstanceId, bug);
bugService.DeferBug(instance.InstanceId, bug);
bugService.AssignBug(instance.InstanceId, bug);
bugService.ResolveBug(instance.InstanceId, bug);
bugService.CloseBug(instance.InstanceId, bug);
One of the advantages to using a state machine is that the workflow runtime will raise an exception if our application fires an event that the workflow current state doesn't handle. We can only fire the BugOpened event when the state machine is in its initial state, and we can only fire the BugResolved event when the workflow is in an assigned state. The workflow runtime will ensure our application follows the process described by the state machine.
In a real bug tracking application, it may take weeks or more for a bug to reach a closed state. Fortunately, state machine workflows can take advantage of workflow services, like tracking and persistence. A persistence service could save the state of our workflow and unload the instance from memory, then reload the instance when an event arrives weeks later.
There is something else unusual about our example. Our application knows the state of the workflow as it fires each event. A real application might not have this intimate knowledge of the workflow. Our application might not remember the state of a two-month-old bug, in which case it won't know the legal events to fire, either. Fortunately, Windows Workflow makes this information available.
Inspecting State Machines
Think about the user interface that we want to provide for our bug tracking service. We wouldn't want to give the user the option to create exceptions. For instance, we wouldn't want to offer a "Close This Bug" button when the bug is in a state that will not transition to the closed state. Instead, we want the user interface to reflect the current state of the bug and only allow the user to perform legal actions. We can do this with the help of the StateMachineWorkflowInstance class.
StateMachineWorkflowInstance
The StateMachineWorkflowInstance class provides an API for us to manage and query a state machine workflow. As shown in the class diagram below, this API includes properties we can use to fetch the current state name and find the legal transitions for the state. The class also includes a method to set the state of the state machine. Although we generally want the bug to follow the workflow we've designed in our state machine, we could use the SetState method from an administrator's override screen to put the bug back into its initial state, or to force the bug into a closed state (or any state in-between).
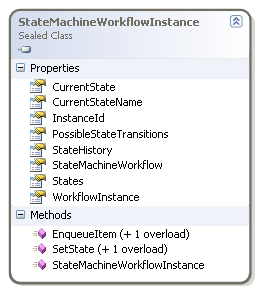
Let's modify our original example to call the following method. We will call this DumpWorkflow method just after calling the bug service's AssignBug method, so the workflow should be in the "Assigned" state.
{
StateMachineWorkflowInstance instance =
new StateMachineWorkflowInstance(runtime, instanceID);
Console.WriteLine("Workflow ID: {0}", instanceID);
Console.WriteLine("Current State: {0}",
instance.CurrentStateName);
Console.WriteLine("Possible Transitions: {0}",
instance.PossibleStateTransitions.Count);
foreach (string name in instance.PossibleStateTransitions)
{
Console.WriteLine("\t{0}", name);
}
}
This code first retrieves a workflow instance object using the workflow runtime and a workflow ID. We then print out the name of the current state of the workflow, the number of legal transitions, and the names of the legal transitions.

We can use the information above to customize the user interface. If the user were to open this particular bug in an application, we'd provide buttons to mark the bug as resolved, or defer the bug. These are the only legal transitions in the current state.
Another interesting property on the StateMachineWorkflowInstance class is the StateHistory property. As you might imagine, this property can give us a list of all the states the workflow has seen. If you remember our discussion of tracking services from Hosting Windows Workflow, you might remember the tracking service does a thorough job of recording the execution history of a workflow. If you guessed that the StateHistory property would use the built-in tracking service of WF, you'd have guessed right!
State Machine Tracking
Hosting Windows Workflow provides all the details we needed to configure, initialize, and consume tracking and trace information, so we won't recover the same ground here. In order to make use of the StateHistory property, we have to configure the workflow runtime to use a tracking service. If we try to use the StateHistory property without a tracking service in place, we'll only create an InvalidOperationException.
Note: as of this writing, the StateHistory property doesn't work if we configure the tracking service declaratively in app.config or web.config. Instead, we have to programmatically configure the tracking service with a connection string and pass the service to the workflow
trackingService = new SqlTrackingService(
ConfigurationManager.ConnectionStrings["WorkflowDB"].ConnectionString);
trackingService.UseDefaultProfile = true;
workflowRuntime.AddService(trackingService);
We can use the classes like SqlTrackingQuery to investigate the history of our state machine, or we can use the StateMachineWorkflowInstance class and the StateHistory property to do all the work for us. Let's call the following method just before closing our bug.
{
StateMachineWorkflowInstance instance =
new StateMachineWorkflowInstance(runtime, instanceID);
Console.WriteLine("State History:");
foreach (string name in instance.StateHistory)
{
Console.WriteLine("\t{0}", name);
}
}
This code gives us the output shown below - a list of the states the workflow has seen, starting with the most recently visited state.
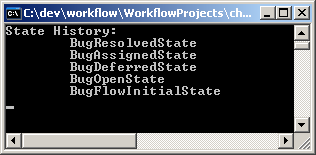
Note: we can only use the StateMachineWorkflowInstance class while the workflow is still running. Once the workflow completes, we have to fall back to the tracking service and use tracking service queries to read the history of a state machine.
Hierarchical State Machines
Our first state machine was relatively simple, but it did represent the basic design for a conventional state machines. Sometimes, however, this straightforward approach can be difficult to manage. Imagine if the workflow for our bug tracking software required us to allow a user to close or assign a bug - regardless of the current state of the bug. We'd have to add event driven activities for the assigned and closed event to every state in the workflow (except the completed state). This might be fine when we only have a handful of states, but can become tedious and error prone as the state machine grows.
Fortunately, there is an easier solution. A hierarchical state machine allows us to nest child states inside of parent states. The child states inherit the event driven activities of their parent. If every state in our bug tracking workflow needs to handle the "bug closed" event with the same behaviour, we only need to add one event driven activity to a parent state, and add our bug states as children of this parent.
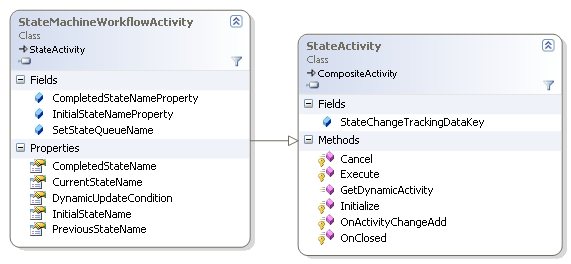
As it turns out, the state machine workflow itself is an instance of the StateMachineWorkflowActivity class, which derives from the StateActivity class.
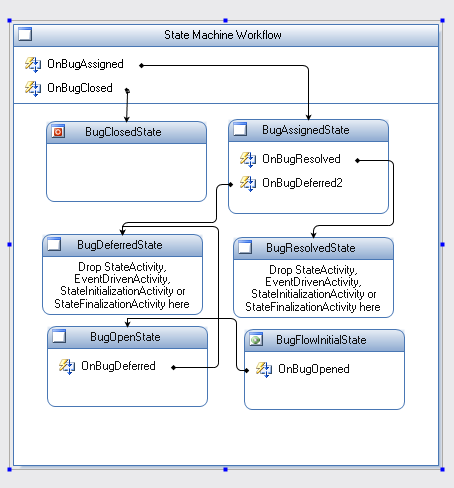
You'll notice this step has reduced the complexity of our state machine a bit. In fact, the BugDefferedState and BugResolvedState activities have no event driven activities inside them at all. Instead, they'll inherit the behavior of the parent and process only the OnBugAssigned and OnBugDeferred events. All the other states will inherit these event driven activities, too. Hierarchical state machines are a good fit for business exceptions, like when a customer cancels an order. If the customer cancels, we have to stop the workflow no matter the current state.
With hierarchical state machines, it is important to realize that a SetState activity can only target a leaf state - that is a state with no child states.
Summary
In this chapter we've looked at state machines in Windows Workflow. State machines consist of states, events, and transitions. Windows Workflow provides all the acvtivities we need to model these constituent pieces. State machines will typically be driven by a local communication service or web service requests, and the workflow runtime services, like tracking and persistence, work alongside state machines the same way they work with sequential workflows. Finally, hierarchical state machines enable us to extract common event driven activities and place them into a parent state.
this excellent article is from the great our predecessors. K. Scott Allen(odetocode)
参考文档:http://www.stateworks.com/active/download/TN9-Flowchart-is-not-State-Machine.pdf(what is the difference between flowchart and statemachine)
http://peace.snu.ac.kr/research/peace/data/user_manual/08_FSM%20Model%20Specification.pdf(what is FSM)
http://www.shopify.com/technology/3383012-why-developers-should-be-force-fed-state-machines (we do need state machine)
posted on 2012-06-11 20:54 malaikuangren 阅读(612) 评论(0) 编辑 收藏 举报


