Mac OS 完整搭建MNMP(2019-02-16)

Mac OS 完整搭建MNMP (Mac+Nginx+Mysql+Php)
Homebrew
Homebrew又叫Brew,是MacOS上的软件包管理工具,能在Mac中方便的安装软件或者卸载软件,和linux系统中的yum非常相似,只需要一个命令,非常方便。
官方网站:http://brew.sh
安装方法:
$ /usr/bin/ruby -e "$(curl -fsSL https://raw.githubusercontent.com/Homebrew/install/master/install)"
检验安装成功方法:
$ brew doctor
查看命令帮助:
$ brew --help
Example usage:
  brew search [TEXT|/REGEX/]
  brew info [FORMULA...]
  brew install FORMULA...
  brew update
  brew upgrade [FORMULA...]
  brew uninstall FORMULA...
  brew list [FORMULA...]

Troubleshooting:
  brew config
  brew doctor
  brew install --verbose --debug FORMULA

Contributing:
  brew create [URL [--no-fetch]]
  brew edit [FORMULA...]

Further help:
  brew commands
  brew help [COMMAND]
  man brew
  https://docs.brew.sh
安装常用软件包:
$ brew install wget
$ brew install autoconf
$ brew install openssl
Mysql
安装方法:
$ brew install mysql
设置 Mysql 开机启动方法,如果不需要可跳过:
$ ln -sfv /usr/local/opt/mysql/*.plist ~/Library/LaunchAgents
launchctl load ~/Library/LaunchAgents/homebrew.mxcl.mysql.plist
初始化、启动方法,如果不需要可跳过:
#正常初始化
/usr/local/opt/mysql/bin/mysql_secure_installation
#若出错请启动服务
brew services start mysql
安全配置方法(Terminal 终端会提示[EnglishVersion]):
> Enter current password for root (enter for none):
#直接 Enter,因为没有设置过
> Change the root password? [Y/n]
#是否更改 root 用户的密码
> Remove anonymous users? [Y/n]
#不需要,键入 Y
> Disallow root login remotely? [Y/n]
#禁止root远程登录,建议键入 Y
> Remove test database and access to it? [Y/n]
#删除测试数据表,建议键入 Y
> Reload privilege tables now? [Y/n]
#确保设置生效,键入 Y
检验安装成功方法:
#查看端口
ps aux | grep mysql
#测试 Mysql 连接 如果没有初始化的root的密码是空,不需要输入密码即可进去
mysql -uroot -p你设置的密码
为了直观,这里我以密码:123456为例,测试Mysql连接时键入:
mysql -uroot -p123456
安装 Phpmyadmin 方法:
$ brew install phpmyadmin
Php
Mac HomeBrew [2018-03-31]起弃用homebrew/php,php版本改名(如:php71 => php@7.1),无法像以前直接搜索各个版本对应扩展直接安装如:brew install php71-redis,可采用pecl安装php对应扩展,以php@7.1为例
移除原来的homebrew/php tap(没有的安装过的忽略):
$ brew untap homebrew/tap
查看所有php的版本:
$ brew search php
==> Formulae
brew-php-switcher      php-code-sniffer       php@7.1                phplint                phpmyadmin
php                    php-cs-fixer           php@7.2                phpmd                  phpunit

==> Casks
homebrew/cask/eclipse-php                                 homebrew/cask/netbeans-php
安装 Php@7.1:
brew install php@7.1
配置 Php@7.1的环境变量(替换Mac自带的php环境变量路径):
$ echo 'export PATH="$(brew --prefix php@7.1)/bin:$PATH"' >> ~/.bash_profile
$ echo 'export PATH="$(brew --prefix php@7.1)/sbin:$PATH"' >> ~/.bash_profile
$ echo 'export PATH="/usr/local/bin:/usr/local/sbib:$PATH"' >> ~/.bash_profile
$ source ~/.bash_profile
查看刚安装的php版本信息:
$ php -v
PHP 7.1.25 (cli) (built: Dec  7 2018 08:20:45) ( NTS )
Copyright (c) 1997-2018 The PHP Group
Zend Engine v3.1.0, Copyright (c) 1998-2018 Zend Technologies
    with Zend OPcache v7.1.25, Copyright (c) 1999-2018, by Zend Technologies
采用pecl安装php对应扩展
查看pecl的版本信息:
$ pecl version
PEAR Version: 1.10.5
PHP Version: 7.1.25
Zend Engine Version: 3.1.0
Running on: Darwin bogon 18.2.0 Darwin Kernel Version 18.2.0: Thu Dec 20 20:46:53 PST 2018; root:xnu-4903.241.1~1/RELEASE_X86_64 x86_64
查看当前php包含那些扩展:
$ php -m
[PHP Modules]
bcmath
bz2
calendar
Core
ctype
curl
date
dba
dom
exif
fileinfo
filter
ftp
gd
gettext
gmp
hash
iconv
intl
json
ldap
libxml
mbstring
mcrypt
mysqli
mysqlnd
odbc
openssl
pcntl
pcre
PDO
pdo_dblib
pdo_mysql
PDO_ODBC
pdo_pgsql
pdo_sqlite
pgsql
Phar
phpdbg_webhelper
posix
pspell
readline
Reflection
session
shmop
SimpleXML
soap
sockets
SPL
sqlite3
standard
sysvmsg
sysvsem
sysvshm
tidy
tokenizer
wddx
xml
xmlreader
xmlrpc
xmlwriter
xsl
Zend OPcache
zip
zlib

[Zend Modules]
Zend OPcache
pecl安装扩展
安装xdebug扩展:
$ pecl install xdebug
安装redis扩展:
$ pecl install redis
Build process completed successfully
Installing '/usr/local/Cellar/php@7.1/7.1.25/pecl/20160303/redis.so'
install ok: channel://pecl.php.net/redis-4.2.0
Extension redis enabled in php.ini
缺什么扩展使用pecl安装即可。会自动添加到php.ini配置文件中。
php-fpm配置
查看当前php-fpm信息:
$ php-fpm -v
PHP 7.1.25 (fpm-fcgi) (built: Dec  7 2018 08:20:52)
Copyright (c) 1997-2018 The PHP Group
Zend Engine v3.1.0, Copyright (c) 1998-2018 Zend Technologies
    with Zend OPcache v7.1.25, Copyright (c) 1999-2018, by Zend Technologies
测试一下php-fpm配置文件,方便找到php-fpm配置文件存放的位置:
$ php-fpm -t
[16-Feb-2019 15:54:11] NOTICE: configuration file /usr/local/etc/php/7.1/php-fpm.conf test is successful
修改php-fpm配置文件:
$ vim /usr/local/etc/php/7.1/php-fpm.conf
找到pid相关,去掉pid = run/php-fpm.pid前的“;”, 那么php-fpm的pid文件就会自动产生在 /usr/local/var/run/php-fpm.pid,保存退出。
php-fpm验证与启动
测试php-fpm配置
$ php-fpm -t
或者
$ php-fpm -c /usr/local/etc/php/7.1/php.ini -y /usr/local/etc/php/7.1/php-fpm.conf -t
NOTICE: configuration file /usr/local/etc/php/7.1/php-fpm.conf test is successful
启动php-fpm
$ php-fpm -D
或者
$ php-fpm -c /usr/local/etc/php/7.2/php.ini -y /usr/local/etc/php/7.2/php-fpm.conf -D
这时候如果出现不用理会
[16-Feb-2019 16:06:51] NOTICE: [pool www] 'user' directive is ignored when FPM is not running as root
[16-Feb-2019 16:06:51] NOTICE: [pool www] 'group' directive is ignored when FPM is not running as root
查看php-fpm进程:
$ ps aux | grep php-fpm
linyan           22889   0.0  0.0  4268020    780 s000  S+    4:13下午   0:00.00 grep php-fpm
linyan           22873   0.0  0.0  4482608    640   ??  S     4:06下午   0:00.00 php-fpm -D
linyan           22872   0.0  0.0  4482608    636   ??  S     4:06下午   0:00.00 php-fpm -D
linyan           22871   0.0  0.0  4482864   1124   ??  Ss    4:06下午   0:00.02 php-fpm -D
关闭php-fpm:
$ kill 22871
或者
$ kill -INT `cat /usr/local/var/run/php-fpm.pid`
重启php-fpm:
$ kill -USR2 `cat /usr/local/var/run/php-fpm.pid`
USR1亦通常被用来告知应用程序重载配置文件;例如,向Apache HTTP服务器发送一个USR1信号将导致以下步骤的发生:停止接受新的连接,等待当前连接停止,重新载入配置文件,重新打开日志文件,重启服务器,从而实现相对平滑的不关机的更改。
SIGUSR1 用户自定义信号 默认处理:进程终止
SIGUSR2 用户自定义信号 默认处理:进程终止
kill 命令介绍
-l  信号,若果不加信号的编号参数,则使用“-l”参数会列出全部的信号名称
-a  当处理当前进程时,不限制命令名和进程号的对应关系
-p  指定kill 命令只打印相关进程的进程号,而不发送任何信号
-s  指定发送信号
-u  指定用户
php-fpm设置开机启动
n -sfv /usr/local/opt/php72/*.plist ~/Library/LaunchAgents
launchctl load ~/Library/LaunchAgents/homebrew.mxcl.php56.plist
安装 composer
$ curl -sS https://getcomposer.org/installer | php mv composer.phar /usr/local/bin/composer
#改为国内源
$ composer config -g repo.packagist composer https://packagist.phpcomposer.com
Nginx
安装 Nginx:
查看版本
$ brew search nginx
$ brew info nginx
ginx: stable 1.15.8 (bottled), HEAD
HTTP(S) server and reverse proxy, and IMAP/POP3 proxy server
https://nginx.org/
Not installed
From: https://github.com/Homebrew/homebrew-core/blob/master/Formula/nginx.rb
==> Dependencies
Required: openssl ✔, pcre ✔
==> Options
--HEAD
    Install HEAD version
==> Caveats
Docroot is: /usr/local/var/www

The default port has been set in /usr/local/etc/nginx/nginx.conf to 8080 so that
nginx can run without sudo.

nginx will load all files in /usr/local/etc/nginx/servers/.

To have launchd start nginx now and restart at login:
  brew services start nginx
Or, if you don't want/need a background service you can just run:
  nginx
==> Analytics
install: 25,969 (30 days), 96,067 (90 days), 438,395 (365 days)
install_on_request: 24,806 (30 days), 89,756 (90 days), 394,102 (365 days)
build_error: 0 (30 days)
执行安装
$ brew install nginx
==> Downloading https://homebrew.bintray.com/bottles/nginx-1.15.8.mojave.bottle.3.tar.gz
######################################################################## 100.0%
==> Pouring nginx-1.15.8.mojave.bottle.3.tar.gz
==> Caveats
Docroot is: /usr/local/var/www

The default port has been set in /usr/local/etc/nginx/nginx.conf to 8080 so that
nginx can run without sudo.

nginx will load all files in /usr/local/etc/nginx/servers/.

To have launchd start nginx now and restart at login:
  brew services start nginx
Or, if you don't want/need a background service you can just run:
  nginx
==> Summary
🍺  /usr/local/Cellar/nginx/1.15.8: 25 files, 2MB
启动 Nginx:
测试配置文件
$ nginx -t
nginx: the configuration file /usr/local/etc/nginx/nginx.conf syntax is ok
nginx: configuration file /usr/local/etc/nginx/nginx.conf test is successful
启动nginx
$ sudo nginx
或者
$ nginx
查看nginx启动情况
$ ps aux | grep nginx
linyan           23921   0.0  0.0  4268020    780 s000  S+    4:50下午   0:00.00 grep nginx
linyan           23919   0.0  0.0  4291632   1044   ??  S     4:50下午   0:00.00 nginx: worker process
linyan           23918   0.0  0.0  4291388    536   ??  Ss    4:50下午   0:00.00 nginx: master process nginx
打开浏览器访问:localhost:8080测试

重新加载配置|重启|停止|退出 nginx
$ nginx -s reload|reopen|stop|quit
也可以使用Mac的launchctl来启动|停止 nginx
$ launchctl unload ~/Library/LaunchAgents/homebrew.mxcl.nginx.plist
$ launchctl load -w ~/Library/LaunchAgents/homebrew.mxcl.nginx.plist
设置 Nginx 开机启动方法
$ ln -sfv /usr/local/opt/nginx/*.plist ~/Library/LaunchAgents
$ launchctl load ~/Library/LaunchAgents/homebrew.mxcl.nginx.plist
设置 Nginx 监听端口权限
$ sudo chown root:wheel /usr/local/Cellar/nginx/1.15.8/bin/nginx
$ sudo chmod u+s /usr/local/Cellar/nginx/1.15.8/bin/nginx
配置Nginx.conf
创建配置需要用到的目录:
$ mkdir -p /usr/local/var/logs/nginx #创建日志目录
$ mkdir -p /usr/local/etc/nginx/sites-available #创建虚拟机目录
$ mkdir -p /usr/local/etc/nginx/sites-enabled #创建使用中的虚拟机目录
$ mkdir -p /usr/local/etc/nginx/conf.d #创建配置文件目录
$ mkdir -p /usr/local/etc/nginx/ssl #创建存放ssl文件目录
$ sudo mkdir -p /var/www #创建项目目录,默认是/var/local/usr/www
$ sudo chown :staff /var/www #更改所属组为所有普通用户
$ sudo chmod 775 /var/www #更改目录权限
编辑器编辑 nginx.conf
$ vim /usr/local/etc/nginx/nginx.conf
pid        /usr/local/var/run/nginx.pid;
events {
    worker_connections  256;
}
http {
    include       mime.types;
    default_type  application/octet-stream;

    log_format  main  '$remote_addr - $remote_user [$time_local] "$request" '
                      '$status $body_bytes_sent "$http_referer" '
                      '"$http_user_agent" "$http_x_forwarded_for"';

    access_log  /usr/local/var/logs/access.log  main;

    sendfile        on;
    keepalive_timeout  65;
    port_in_redirect off;

    include /usr/local/etc/nginx/sites-enabled/*;
}
配置php-fpm 配置文件
$ vim /usr/local/etc/nginx/conf.d/php-fpm
location ~ \.php$ {
    try_files                   $uri = 404;
    fastcgi_pass                127.0.0.1:9000;
    fastcgi_index               index.php;
    fastcgi_intercept_errors    on;
    include /usr/local/etc/nginx/fastcgi.conf;
}
nginx 虚拟机配置
创建 info.php index.html 404.html 403.html文件到 /var/www 下面
$ vim /var/www/info.php
<?php phpinfo();?>
$ vim /var/www/index.html
<html><head><meta charset="UTF-8"><title>Default Page</title></head><body><h1 align="center">Default</h1></body></html>
$ vim /var/www/403.html
<html><head><meta charset="UTF-8"><title>403 Page</title></head><body><h1 align="center">Default</h1></body></html>
$ vim /var/www/404.html
<html><head><meta charset="UTF-8"><title>404 Page</title></head><body><h1 align="center">Default</h1></body></html>
配置虚拟主机配置文件
$ vim /usr/local/etc/nginx/sites-available/default
server {
    listen       80;
    server_name  localhost;
    root         /var/www/;

    access_log  /usr/local/var/logs/nginx/default.access.log  main;

    location / {
        index  index.html index.htm index.php;
        autoindex   on;
        include     /usr/local/etc/nginx/conf.d/php-fpm;
    }

    location = /info {
        allow   127.0.0.1;
        deny    all;
        rewrite (.*) /.info.php;
    }

    error_page  404     /404.html;
    error_page  403     /403.html;
}
配置SSL虚拟主机配置文件
$ vim /usr/local/etc/nginx/sites-available/default-ssl
server {
    listen       443;
    server_name  localhost;
    root       /var/www/;

    access_log  /usr/local/var/logs/nginx/default-ssl.access.log  main;

    ssl                  on;
    ssl_certificate      ssl/localhost.crt;
    ssl_certificate_key  ssl/localhost.key;

    ssl_session_timeout  5m;

    ssl_protocols  SSLv2 SSLv3 TLSv1;
    ssl_ciphers  HIGH:!aNULL:!MD5;
    ssl_prefer_server_ciphers   on;

    location / {
        include   /usr/local/etc/nginx/conf.d/php-fpm;
    }

    location = /info {
        allow   127.0.0.1;
        deny    all;
        rewrite (.*) /.info.php;
    }

    error_page  404     /404.html;
    error_page  403     /403.html;
}
配置phpmyadmin虚拟主机配置文件
$ vim /usr/local/etc/nginx/sites-available/phpmyadmin
server {
    listen       306;
    server_name  localhost;
    root    /usr/local/share/phpmyadmin;

    error_log   /usr/local/var/logs/nginx/phpmyadmin.error.log;
    access_log  /usr/local/var/logs/nginx/phpmyadmin.access.log main;

    ssl                  on;
    ssl_certificate      ssl/phpmyadmin.crt;
    ssl_certificate_key  ssl/phpmyadmin.key;

    ssl_session_timeout  5m;

    ssl_protocols  SSLv2 SSLv3 TLSv1;
    ssl_ciphers  HIGH:!aNULL:!MD5;
    ssl_prefer_server_ciphers   on;

    location / {
        index  index.html index.htm index.php;
        include   /usr/local/etc/nginx/conf.d/php-fpm;
    }
}
配置 SSL
$ openssl req -new -newkey rsa:4096 -days 365 -nodes -x509 -subj "/C=US/ST=State/L=Town/O=Office/CN=localhost" -keyout /usr/local/etc/nginx/ssl/localhost.key -out /usr/local/etc/nginx/ssl/localhost.crt
$ openssl req -new -newkey rsa:4096 -days 365 -nodes -x509 -subj "/C=US/ST=State/L=Town/O=Office/CN=phpmyadmin" -keyout /usr/local/etc/nginx/ssl/phpmyadmin.key -out /usr/local/etc/nginx/ssl/phpmyadmin.crt
创建虚拟主机软连接并开启
$ ln -sfv /usr/local/etc/nginx/sites-available/default /usr/local/etc/nginx/sites-enabled/default
$ ln -sfv /usr/local/etc/nginx/sites-available/default-ssl /usr/local/etc/nginx/sites-enabled/default-ssl
$ ln -sfv /usr/local/etc/nginx/sites-available/phpmyadmin /usr/local/etc/nginx/sites-enabled/phpmyadmin
ln 必要参数:

-b 删除,覆盖以前建立的链接
-d 允许超级用户制作目录的硬链接
-f 强制执行
-i 交互模式,文件存在则提示用户是否覆盖
-n 把符号链接视为一般目录
-s 软链接(符号链接)
-v 显示详细的处理过程
重新装载 nginx
$ sudo nginx -s reload
测试 nginx 开启情况
http://localhost
http://localhost/info.php
http://localhost/404.html
https://localhost/index.html(SSL)
https://localhost/info.php(SSL)
https://localhost/404.html(SSL)
https://localhost:306(SSL)
错误问题解决方法:
1 root登陆phpmyadmin时 mysqli_real_connect(): The server requested authentication method unknown to the client [sha256_password]
在MySQL 8.0.11中,caching_sha2_password是默认的身份验证插件,而不是以往的mysql_native_password。有关此更改对服务器操作的影响以及服务器与客户端和连接器的兼容性的信息,请参阅caching_sha2_password作为首选的身份验证插件。
从8.0.11版本起,不再像mysql5.7及以前版本那样,设置用户密码时默认的验证方式为caching_sha2_password,如果发现升级mysql8.0.11后原有的程序不能连接mysql,可迅速在mysql command line client客户端用下面的命令设置成mysql5.7及以前版本的密码验证方式,同时MYSQL8.0.11下修改密码的方式与原先也不大一样,原先的部分修改密码的命令在mysql8.0.11下不能使用。
有时候只是因为内网访问使用测试服务器,不想设置复杂的密码,比如root:123456
但是新版 mysql 加入密码安全度检测机制,导致报错
解决方法如下:
mysql> SHOW VARIABLES LIKE 'validate_password%';
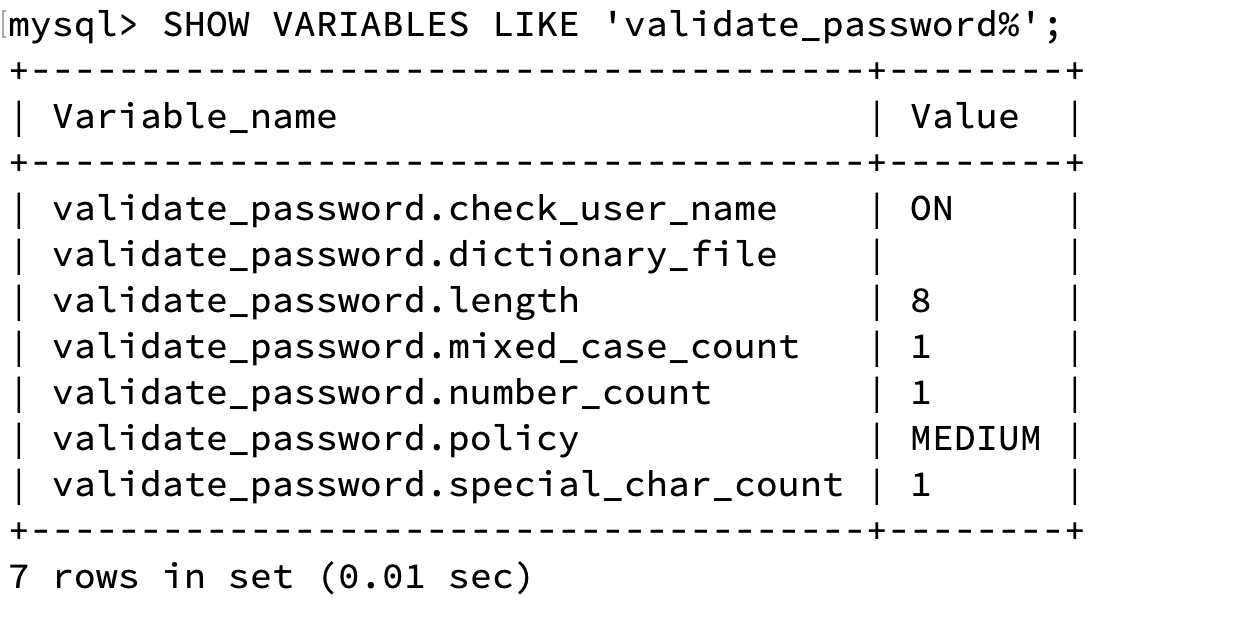
修改变量:
mysql>set global validate_password.policy=0;
mysql>set global validate_password.length=4;
然后退出后再执行
mysql_secure_installation
继续重置root密码就可以设置为123456了。
mysql > use mysql
mysql > ALTER USER 'root'@'localhost' IDENTIFIED WITH mysql_native_password BY '你的密码';
mysql > FLUSH PRIVILEGES;
重新登陆你的phpmyadmin就可以了!

 浙公网安备 33010602011771号