Netty中CompositeByteBuf的理解以及读写操作
CompositeByteBuf实际上是一个虚拟化的ByteBuf,作为一个ByteBuf特殊的子类,可以用来对多个ByteBuf统一操作,一般情况下,CompositeByteBuf对多个ByteBuf操作并不会出现复制拷贝操作,只是保存原来ByteBuf的引用。
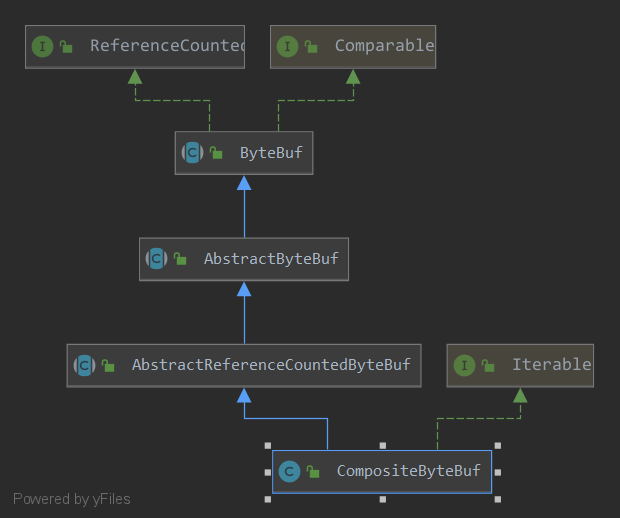
在正式开始介绍·CompositeByteBuf之前 需要先介绍一下CompositeByteBuf的一个重要的内部类Component .
(在CompositeByteBuf中保存有一个Component 类型的数组,这是整个CompositeByteBuf实现的关键数据结构。)
Component 称之为组件,是对原始ByteBuf的包装的数据结构
Component 含几个有重要的属性
final ByteBuf srcBuf; // the originally added buffer
int srcAdjustment; // index of the start of this CompositeByteBuf relative to srcBuf
int offset; // offset of this component within this CompositeByteBuf
int endOffset; // end offset of this component within this CompositeByteBuf
-
srcBuf
指向原始的一个ByteBuf 保证不需要复制原始的ByteBuf 就可以达到读写的目的
adjustment 标记经过Component包装后在整个现有坐标和现在坐标的偏移量 -
srcAdjustment
srcBuf 的开始坐标相对于整个ConpositeByteBuf的相对坐标
-
offset
标记经过Component包装后开始位置的坐标的实际坐标
-
endOffset
标记经过Component包装后结束位置的坐标的实际坐标
所以在内部,只要通过offset和endOffset 将每一个component 所代表的ByteBuf 连接起来 就可以将全部的ByteBuf 视为一个ByteBuf
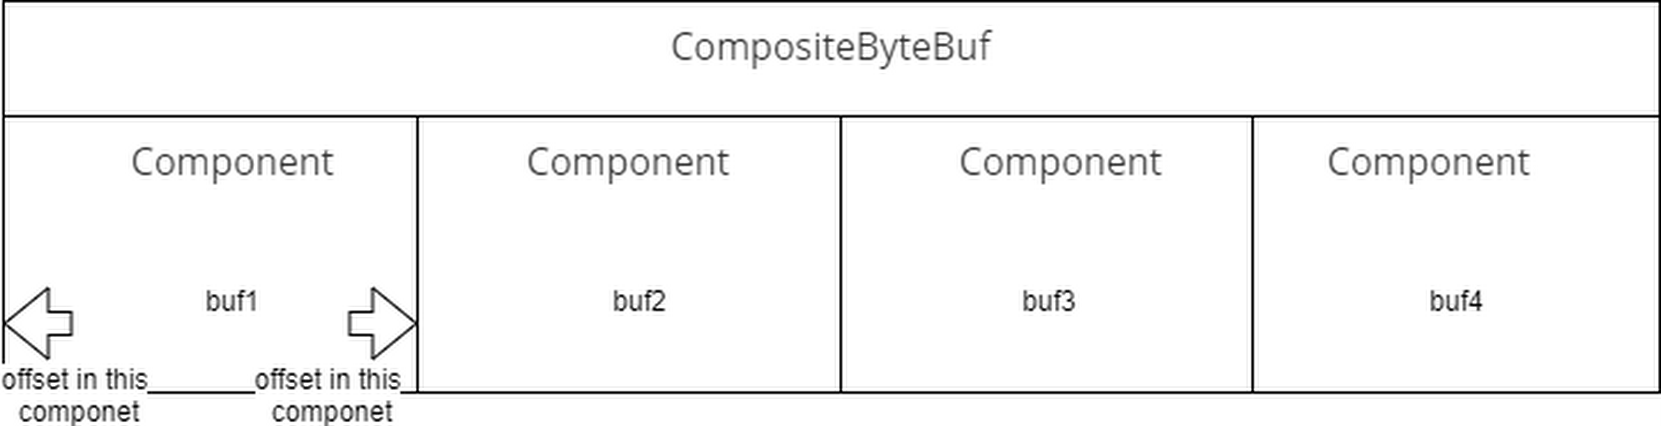
所以我们可以这样认为,在CompositeByteBuf 中,保存着一个包装有原始ByteBuf引用以及ByteBuf在当前的CompositeByteBuf 的相对位置的实例集合.
那么这个虚拟化的ByteBuf是如何生成的,以及是如何读写底层的数据结构的ByteBuf
我们来看一下其中的一个构造函数
    CompositeByteBuf(ByteBufAllocator alloc, boolean direct, int maxNumComponents,
                     ByteBuf[] buffers, int offset) {
        this(alloc, direct, maxNumComponents, buffers.length - offset);
//        第二个参数cIndex=0 表示新增加的buffers插入到0开始的位置 原来的组件往后移动
        addComponents0(false, 0, buffers, offset);
//        如果需要 合并全部组件为一个组件
        consolidateIfNeeded();
//        设置已经写满 不可再写 可以从头开始读取
        setIndex0(0, capacity());
    }
其中最重要的是addComponents0的这个函数,因为初始化时组件数组为空,所以我们应该从第一个位置开始新增新的组件
//    将buffer从arrOffset开始的元素依此添加到cIndex开始的组件数组中
    private CompositeByteBuf addComponents0(boolean increaseWriterIndex,
                                            final int cIndex, ByteBuf[] buffers, int arrOffset) {
        final int len = buffers.length, count = len - arrOffset;//count 真正增加的数量
        // only set ci after we've shifted so that finally block logic is always correct
        int ci = Integer.MAX_VALUE;
        try {
//            检查是否支持在cIndex位置开始添加
            checkComponentIndex(cIndex);
//            如果是插入到现有集合的元素中的话  移动组件到合适的位置
            shiftComps(cIndex, count); // will increase componentCount
//           nextOffset 表示插入的第一个组件的所对应的byteBuf起始位置在整个CompositeByteBuf(实际上也是一个ByteBuf)的位置
            int nextOffset = cIndex > 0 ? components[cIndex - 1].endOffset : 0;
            for (ci = cIndex; arrOffset < len; arrOffset++, ci++) {
                ByteBuf b = buffers[arrOffset];
                if (b == null) {
                    break;
                }
//                新建一个组件用于存放 记录全局位置
                Component c = newComponent(ensureAccessible(b), nextOffset);
//                保存到组件数组中
                components[ci] = c;
//                下一个组件的起始位置等于上一个组件的endOffset 实际上是上一个组件的nextOffset+len
                nextOffset = c.endOffset;
            }
            return this;
        } finally {
            // ci is now the index following the last successfully added component
            if (ci < componentCount) {
                if (ci < cIndex + count) {
//                如果添加完毕 还有部分组件的空间没有使用
//                实际上是部分因为元素为空无法添加进来
//                 那么实际上在最后的地方是存在空的数组元素的 需要释放掉
                    // we bailed early
                    removeCompRange(ci, cIndex + count);
                    for (; arrOffset < len; ++arrOffset) {
//                        释放掉没有添加到组件的其他byteBuf
                        ReferenceCountUtil.safeRelease(buffers[arrOffset]);
                    }
                }
//                需要更新一下被插入元素的后续偏移量
//
                updateComponentOffsets(ci); // only need to do this here for components after the added ones
            }
//            如果需要更新写的坐标的 todo 写入正常? 是否正常都应该更新!
//             需要添加写入的为真正添加的坐标
            if (increaseWriterIndex && ci > cIndex && ci <= componentCount) {
                writerIndex += components[ci - 1].endOffset - components[cIndex].offset;
            }
        }
    }
然后新建新的组件操作
@SuppressWarnings("deprecation")
    private Component newComponent(final ByteBuf buf, final int offset) {
        final int srcIndex = buf.readerIndex();
        final int len = buf.readableBytes();

        // unpeel any intermediate outer layers (UnreleasableByteBuf, LeakAwareByteBufs, SwappedByteBuf)
        ByteBuf unwrapped = buf;
        int unwrappedIndex = srcIndex;
        while (unwrapped instanceof WrappedByteBuf || unwrapped instanceof SwappedByteBuf) {
            unwrapped = unwrapped.unwrap();
        }

        // unwrap if already sliced
        if (unwrapped instanceof AbstractUnpooledSlicedByteBuf) {
            unwrappedIndex += ((AbstractUnpooledSlicedByteBuf) unwrapped).idx(0);
            unwrapped = unwrapped.unwrap();
        } else if (unwrapped instanceof PooledSlicedByteBuf) {
            unwrappedIndex += ((PooledSlicedByteBuf) unwrapped).adjustment;
            unwrapped = unwrapped.unwrap();
        } else if (unwrapped instanceof DuplicatedByteBuf || unwrapped instanceof PooledDuplicatedByteBuf) {
            unwrapped = unwrapped.unwrap();
        }

        // We don't need to slice later to expose the internal component if the readable range
        // is already the entire buffer
//        如果整个buf都是可以被读取的 则保存一个切片
        final ByteBuf slice = buf.capacity() == len ? buf : null;

        return new Component(buf.order(ByteOrder.BIG_ENDIAN), srcIndex,
                unwrapped.order(ByteOrder.BIG_ENDIAN), unwrappedIndex, offset, len, slice);
    }
调用Component的构造方法,将原始的byteBuf和经过解包的byteBuf已经相应的偏移值保存起来
Component(ByteBuf srcBuf, int srcOffset, ByteBuf buf, int bufOffset,
          int offset, int len, ByteBuf slice) {
    this.srcBuf = srcBuf;
    this.srcAdjustment = srcOffset - offset;
    this.buf = buf;
    this.adjustment = bufOffset - offset;
    this.offset = offset;
    this.endOffset = offset + len;
    this.slice = slice;
}
接下来看看给定一个的CompositeByteBuf实例的下标,如何读取一个字节
以下面的方法为例
    @Override
    public byte getByte(int index) {
//        通过下标在组件数组中找到合适的组件实例
        Component c = findComponent(index);
//        将下标转换为组件实例中(对应的ByteBuf)的下标读取
        return c.buf.getByte(c.idx(index));
    }
    private Component findComponent(int offset) {
        Component la = lastAccessed;
//       如果最近访问过 那么最近读取这个组件可能就是我们要的
//        一个缓存 优化 实际上也可以不要 性能差一些
        if (la != null && offset >= la.offset && offset < la.endOffset) {
            ensureAccessible();
            return la;
        }

        checkIndex(offset);
//        二分查找
        return findIt(offset);
    }
    private Component findIt(int offset) {
//        遍历组件 找到这个组件应该满足offset<=index<=endOffset
        for (int low = 0, high = componentCount; low <= high; ) {
            int mid = low + high >>> 1;
            Component c = components[mid];
            if (offset >= c.endOffset) {
                low = mid + 1;
            } else if (offset < c.offset) {
                high = mid - 1;
            } else {
                lastAccessed = c;
                return c;
            }
        }

        throw new Error("should not reach here");
    }
到这里已经找到那个合适的组件实例了 只要将全局的index 转换为组件实例的局部index 就可以获得对应的字节值返回了 即组件实例的idx方法
        int idx(int index) {
//            加上相对位置的偏移量 这个实际是一个负值
            return index + adjustment;
        }
而写入也是一样的情况 ,找个合适的组件实例,转换为实例的局部下标 写入即可
@Override
public CompositeByteBuf setByte(int index, int value) {
    Component c = findComponent(index);
    c.buf.setByte(c.idx(index), value);
    return this;
}
参考
《Netty 实战》
netty version 4.1.45.Final


【推荐】国内首个AI IDE,深度理解中文开发场景,立即下载体验Trae
【推荐】编程新体验,更懂你的AI,立即体验豆包MarsCode编程助手
【推荐】抖音旗下AI助手豆包,你的智能百科全书,全免费不限次数
【推荐】轻量又高性能的 SSH 工具 IShell:AI 加持,快人一步
· AI与.NET技术实操系列:向量存储与相似性搜索在 .NET 中的实现
· 基于Microsoft.Extensions.AI核心库实现RAG应用
· Linux系列:如何用heaptrack跟踪.NET程序的非托管内存泄露
· 开发者必知的日志记录最佳实践
· SQL Server 2025 AI相关能力初探
· winform 绘制太阳,地球,月球 运作规律
· 震惊!C++程序真的从main开始吗?99%的程序员都答错了
· 【硬核科普】Trae如何「偷看」你的代码?零基础破解AI编程运行原理
· 超详细:普通电脑也行Windows部署deepseek R1训练数据并当服务器共享给他人
· AI与.NET技术实操系列(五):向量存储与相似性搜索在 .NET 中的实现