线程常用问题
1、线程创建方式
-
继承Thread
class MyThread extends Thread{ @overwrite public void run(){ } } -
实现Runable
class MyRunable implements Runable{ @overwrite public void run(){ } } class Test1{ public static void main(String[] args) { MyRunable runable = new MyRunable(); new Thread(runable,"aaa").start(); } } -
实现Callable
public class MyCallable implements Callable<Integer> {
    @Override
    public Integer call() throws Exception {
        return null;
    }
}

class Test{
    public static void main(String[] args) throws ExecutionException, InterruptedException {
        MyCallable myCallable = new MyCallable();
        FutureTask<Integer> futureTask = new FutureTask<>(myCallable);
        new Thread(futureTask,"bb").start();
        System.out.println(futureTask.get());


    }
}
总结:
1、在主线程中需要执行比较耗时的操作时,但又不想阻塞主线程时,可以把这些作业交给 Future 对象在后台完成, 当主线程将来需要时,就可以通过 Future对象获得后台作业的计算结果或者执行状态
2、一般 FutureTask 多用于耗时的计算,主线程可以在完成自己的任务后,再去获取结果
3、仅在计算完成时才能检索结果;如果计算尚未完成,则阻塞 get 方法。一旦计算完成,就不能再重新开始或取消计算。 get 方法而获取结果只有在计算完成时获取,否则会一直阻塞直到任务转入完成状态,然后会返回结果或者抛出异常。
4、结果只计算一次
2、JUC常用辅助类
- CountDownLatch: 减少计数
- CyclicBarrier: 循环栅栏
- Semaphore: 信号灯
CountDownLatch 减少计数
例:等班里六人走后关门
public class CountDownLatchDemo {
    public static void main(String[] args) throws InterruptedException {
        CountDownLatch countDownLatch = new CountDownLatch(6);
        for (int i = 1; i <= 6; i++) {
            new Thread(() -> {
                try {
                    TimeUnit.SECONDS.sleep(1);
                } catch (InterruptedException e) {
                    e.printStackTrace();
                }
                System.out.println(Thread.currentThread().getName() + "离开教室");
                countDownLatch.countDown();

            }, "同学" + i).start();
        }
        countDownLatch.await();
        System.out.println("全部结束,关上教室");
    }
}
CyclicBarrier: 循环栅栏
例:集七龙珠召唤神龙
public class CyclicBarrierDemo {
    private static final int NUM = 7;

    public static void main(String[] args) {
        CyclicBarrier cyclicBarrier = new CyclicBarrier(NUM, () -> {
            System.out.println("集齐" + NUM + "颗龙珠,召唤神龙");
        });
        //开始集龙珠
        for (int i = 1; i <= 7; i++) {
            int num = i;
            new Thread(() -> {
                System.out.println(Thread.currentThread().getName() + "收集到" + num + "号龙珠");
                try {
                    cyclicBarrier.await();
                } catch (InterruptedException e) {
                    e.printStackTrace();
                } catch (BrokenBarrierException e) {
                    e.printStackTrace();
                }
            }, "龙珠" + String.valueOf(i) + "号").start();
        }
    }
}
Semaphore 信号灯
例:六辆车抢三个车位
public class SemaphoreDemo {
    public static void main(String[] args) {
        Semaphore semaphore = new Semaphore(3);

        for (int i = 1; i <= 6; i++) {
            new Thread(() -> {
                try {
                    semaphore.acquire();
                    System.out.println(Thread.currentThread().getName() + "找到车位");
                    TimeUnit.SECONDS.sleep(2);
                } catch (InterruptedException e) {
                    e.printStackTrace();
                } finally {
                    System.out.println(Thread.currentThread().getName() + "离开车位-----");
                    semaphore.release();
                }
            }, "车辆" + i).start();
        }
    }
}
3、读写锁
读锁:共享锁
写锁:独占锁
public class MyCache {
    private volatile Map<String, Object> map = new HashMap();
    ReadWriteLock rWLock = new ReentrantReadWriteLock();

    public void put(String key, Object value) {
        rWLock.writeLock().lock();
        try {
            System.out.println(Thread.currentThread().getName() + "开始写:" + key);
            TimeUnit.SECONDS.sleep(1);
            map.put(key, value);
            System.out.println(Thread.currentThread().getName() + "写完:" + key);
        } catch (Exception e) {
            e.printStackTrace();
        } finally {
            rWLock.writeLock().unlock();
        }
    }

    public Object get(String key) {
        Object result = null;
        rWLock.readLock().lock();
        try {
            System.out.println(Thread.currentThread().getName() + "开始获取数据:" + key);
            TimeUnit.SECONDS.sleep(1);
            result = map.get(key);
            System.out.println(Thread.currentThread().getName() + "获取数据完毕:" + key);
        } catch (Exception e) {
            e.printStackTrace();
        } finally {
            rWLock.readLock().unlock();
        }
        return result;
    }
}

class Test {
    public static void main(String[] args) {
        MyCache myCache = new MyCache();
        for (int i = 1; i <= 10; i++) {
            final int num = i;
            new Thread(() -> {
                myCache.put(String.valueOf(num), String.valueOf(num));
            }, String.valueOf(i)).start();
        }
        for (int i = 1; i <= 10; i++) {
            final int num = i;
            new Thread(() -> {
                myCache.get(String.valueOf(num));
            }, String.valueOf(i)).start();
        }

    }
}
4、BlockingQueue阻塞队列
public class BlockingQueueDemo {
    public static void main(String[] args) throws InterruptedException {
        BlockingQueue<String> blockingQueue = new ArrayBlockingQueue<>(3);
        //第一组
        System.out.println(blockingQueue.add("a"));
        System.out.println(blockingQueue.add("b"));
        System.out.println(blockingQueue.add("c"));
        System.out.println(blockingQueue.element());
        //System.out.println(blockingQueue.add("x"));
        System.out.println(blockingQueue.remove());
        System.out.println(blockingQueue.remove());
        System.out.println(blockingQueue.remove());
        //System.out.println(blockingQueue.remove());
        //第二组
        System.out.println(blockingQueue.offer("a"));
        System.out.println(blockingQueue.offer("b"));
        System.out.println(blockingQueue.offer("c"));
        System.out.println(blockingQueue.offer("x"));
        System.out.println(blockingQueue.poll());
        System.out.println(blockingQueue.poll());
        System.out.println(blockingQueue.poll());
        System.out.println(blockingQueue.poll());
        //第三组
        blockingQueue.put("a");
        blockingQueue.put("b");
        blockingQueue.put("c");
        //blockingQueue.put("x");
        System.out.println(blockingQueue.take());
        System.out.println(blockingQueue.take());
        System.out.println(blockingQueue.take());
        System.out.println(blockingQueue.take());
        //第四组
        System.out.println(blockingQueue.offer("a"));
        System.out.println(blockingQueue.offer("b"));
        System.out.println(blockingQueue.offer("c"));
        System.out.println(blockingQueue.offer("a", 3L, TimeUnit.SECONDS));
    }
}
5、ThreadPool 线程池
创建线程池方式
- newCachedThreadPool 根据性能调整线程池数
- newFixedThreadPool 固定线程池数
- newSingleThreadExecutor 单线程
- ThreadPoolExecutor 自定义线程池
-
七大参数
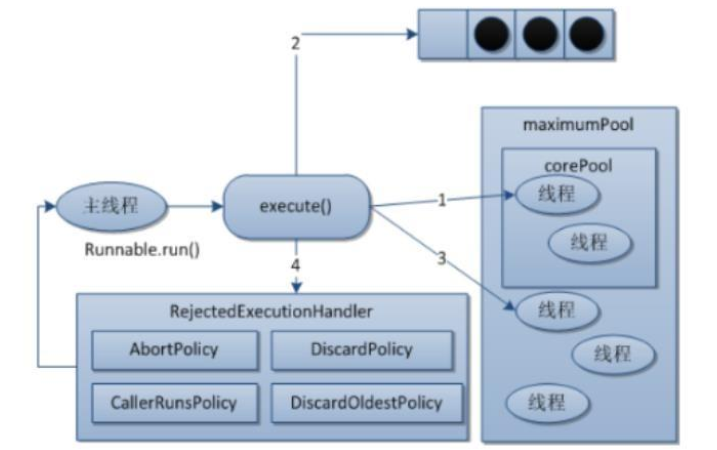
o corePoolSize 线程池的核心线程数 o maximumPoolSize 能容纳的最大线程数 o keepAliveTime 空闲线程存活时间 o unit 存活的时间单位 o workQueue 存放提交但未执行任务的队列 o threadFactory 创建线程的工厂类 o handler 等待队列满后的拒绝策略 -
四大策略
CallerRunsPolicy: 当触发拒绝策略,只要线程池没有关闭的话,则使用调用
线程直接运行任务。一般并发比较小,性能要求不高,不允许失败。但是,由
于调用者自己运行任务,如果任务提交速度过快,可能导致程序阻塞,性能效
率上必然的损失较大
AbortPolicy: 丢弃任务,并抛出拒绝执行 RejectedExecutionException 异常
信息。线程池默认的拒绝策略。必须处理好抛出的异常,否则会打断当前的执
行流程,影响后续的任务执行。
DiscardPolicy: 直接丢弃,其他啥都没有
DiscardOldestPolicy: 当触发拒绝策略,只要线程池没有关闭的话,丢弃阻塞
队列 workQueue 中最老的一个任务,并将新任务加入
-
public class ThreadPoolDemo {
    public static void main(String[] args) {
        //1、单线程
        ExecutorService threadPool1 = Executors.newSingleThreadExecutor();
        //2、固定线程
        ExecutorService threadPool2 = Executors.newFixedThreadPool(10);
        //3、根据性能创建线程
        ExecutorService threadPool3 = Executors.newCachedThreadPool();
        //4、自定义线程
        ThreadPoolExecutor threadPool4 = new ThreadPoolExecutor(
                5,
                10,
                10,
                TimeUnit.SECONDS,
                new ArrayBlockingQueue<>(5),
                Executors.defaultThreadFactory(),
                new ThreadPoolExecutor.AbortPolicy()
        );

        for (int i = 0; i < 15; i++) {
            threadPool4.execute(() -> {
                System.out.println(Thread.currentThread().getName() + "执行");
            });
        }
//        threadPool1.shutdown();
//        threadPool2.shutdown();
//        threadPool3.shutdown();
        threadPool4.shutdown();
    }
}
原理
6、Fork/Join
1、任务分割:首先 Fork/Join 框架需要把大的任务分割成足够小的子任务,如果子任务比较大的话还要对子任务进行继续分割
2、执行任务并合并结果:分割的子任务分别放到双端队列里,然后几个启动线程分别从双端队列里获取任务执行。子任务执行完的结果都放在另外一个队列里,启动一个线程从队列里取数据,然后合并这些数据。

在 Java 的 Fork/Join 框架中,使用两个类完成上述操作
3、• ForkJoinTask:我们要使用 Fork/Join 框架,首先需要创建一个 ForkJoin 任务。该类提供了在任务中执行 fork 和 join 的机制。通常情况下我们不需要直接集成 ForkJoinTask 类,只需要继承它的子类, Fork/Join 框架提供了两个子类:
	a.RecursiveAction:用于没有返回结果的任务
	b.RecursiveTask:用于有返回结果的任务
• ForkJoinPool:ForkJoinTask 需要通过 ForkJoinPool 来执行
• RecursiveTask: 继承后可以实现递归(自己调自己)调用的任务Fork/Join 框架的实现原理
ForkJoinPool 由 ForkJoinTask 数组和 ForkJoinWorkerThread 数组组成,
ForkJoinTask 数组负责将存放以及将程序提交给 ForkJoinPool,而
ForkJoinWorkerThread 负责执行这些任务。
-
Fork 方法的实现原理: 当我们调用 ForkJoinTask 的 fork 方法时,程序会把任务放在 ForkJoinWorkerThread 的 pushTask 的 workQueue 中,异步地执行这个任务,然后立即返回结果
public final ForkJoinTask<V> fork() {
		Thread t;
		if ((t = Thread.currentThread()) instanceof ForkJoinWorkerThread)
			((ForkJoinWorkerThread)t).workQueue.push(this);
		else
			ForkJoinPool.common.externalPush(this);
		return this;
	}
pushTask 方法把当前任务存放在 ForkJoinTask 数组队列里。然后再调用
ForkJoinPool 的 signalWork()方法唤醒或创建一个工作线程来执行任务。代
码如下:final void push(ForkJoinTask<?> task) { ForkJoinTask<?>[] a; ForkJoinPool p; int b = base, s = top, n; if ((a = array) != null) { // ignore if queue removed int m = a.length - 1; // fenced write for task visibility U.putOrderedObject(a, ((m & s) << ASHIFT) + ABASE, task); U.putOrderedInt(this, QTOP, s + 1); if ((n = s - b) <= 1) { if ((p = pool) != null) p.signalWork(p.workQueues, this); } else if (n >= m) growArray(); } } -
join 方法原理:Join 方法的主要作用是阻塞当前线程并等待获取结果。让我们一起看看
ForkJoinTask 的 join 方法的实现,代码如下:public final V join() { int s; if ((s = doJoin() & DONE_MASK) != NORMAL) reportException(s); return getRawResult(); } private int doJoin() { int s; Thread t; ForkJoinWorkerThread wt; ForkJoinPool.WorkQueue w; return (s = status) < 0 ? s : ((t = Thread.currentThread()) instanceof ForkJoinWorkerThread) ? (w = (wt = (ForkJoinWorkerThread)t).workQueue). tryUnpush(this) && (s = doExec()) < 0 ? s : wt.pool.awaitJoin(w, this, 0L) : externalAwaitDone(); } final int doExec() { int s; boolean completed; if ((s = status) >= 0) { try { completed = exec(); } catch (Throwable rex) { return setExceptionalCompletion(rex); } if (completed) s = setCompletion(NORMAL); } return s; }
案例:1+2+3+4......10000,每1000个任务切分一次任务
public class ForkJoinDemo {
    public static void main(String[] args) throws ExecutionException, InterruptedException {
        MyTask task = new MyTask(0, 10_000);
        ForkJoinPool forkJoinPool = new ForkJoinPool();
        ForkJoinTask<Integer> forkJoinTask = forkJoinPool.submit(task);
        Integer result = forkJoinTask.get();
        System.out.println("结果为:" + result);
        forkJoinPool.shutdown();
    }

}

class MyTask extends RecursiveTask<Integer> {
    private static final int NUM = 1000;
    private int begin;
    private int end;
    private int result;

    public MyTask(int begin, int end) {
        this.begin = begin;
        this.end = end;
    }

    @Override
    protected Integer compute() {
        System.out.println("开始:" + begin + "------------" + end + "开始累加");
        if ((end - begin) <= NUM) {
            for (int i = begin; i <= end; i++) {
                result += i;
            }
        } else {
            int middle = (end + begin) / 2;
            MyTask myTask1 = new MyTask(begin, middle);
            MyTask myTask2 = new MyTask(middle + 1, end);
            myTask1.fork();
            myTask2.fork();

            result = myTask1.join() + myTask2.join();

        }
        return result;
    }
}
输出结果
开始:0------------10000开始累加
开始:0------------5000开始累加
开始:5001------------10000开始累加
开始:0------------2500开始累加
开始:5001------------7500开始累加
开始:5001------------6250开始累加
开始:5001------------5625开始累加
开始:5626------------6250开始累加
开始:6251------------7500开始累加
开始:0------------1250开始累加
开始:6251------------6875开始累加
开始:6876------------7500开始累加
开始:7501------------10000开始累加
开始:0------------625开始累加
开始:7501------------8750开始累加
开始:7501------------8125开始累加
开始:1251------------2500开始累加
开始:2501------------5000开始累加
开始:1251------------1875开始累加
开始:8126------------8750开始累加
开始:626------------1250开始累加
开始:3751------------5000开始累加
开始:8751------------10000开始累加
开始:8751------------9375开始累加
开始:9376------------10000开始累加
开始:4376------------5000开始累加
开始:1876------------2500开始累加
开始:2501------------3750开始累加
开始:2501------------3125开始累加
开始:3751------------4375开始累加
开始:3126------------3750开始累加
结果为:50005000

 浙公网安备 33010602011771号