OpenStack03-安装OpenStack
- 安装说明文档:https://docs.openstack.org/install-guide/openstack-services.html
- 配置文件说明:https://docs.openstack.org/ocata/config-reference/
- 下载虚拟机镜像:https://docs.openstack.org/image-guide/
1、准备基础虚拟机
1.1、安装服务器
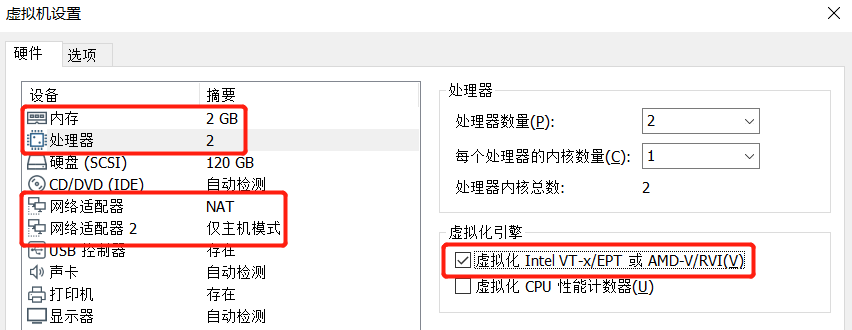
1..1、虚拟机配置
- 内存:2G(越大越好)
- 处理器:2个(越多越好)
- 必须勾选虚拟化功能,否则openstack无法启动云主机。
- 网路适配器:2个
- 一个基于NAT
- 一个基于仅主机
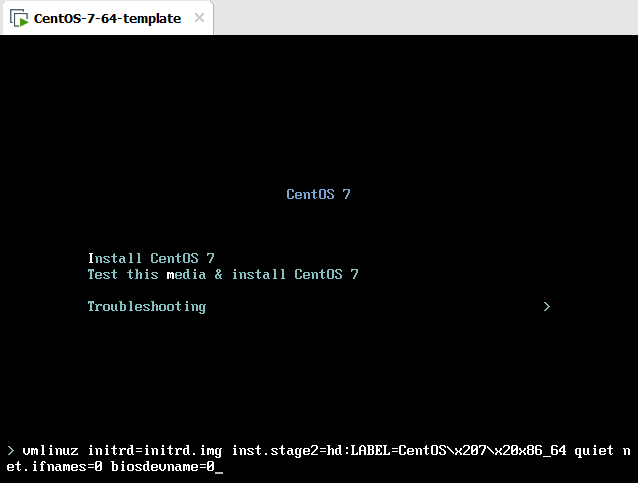
1.1.2、设置网卡名称
- 在进入安装界面的时候把光标移动到Install CentOS7,按下tab键,在后面输入“net.ifnames=0 biosdevname=0”回车即可。
1.1.2、安装配置
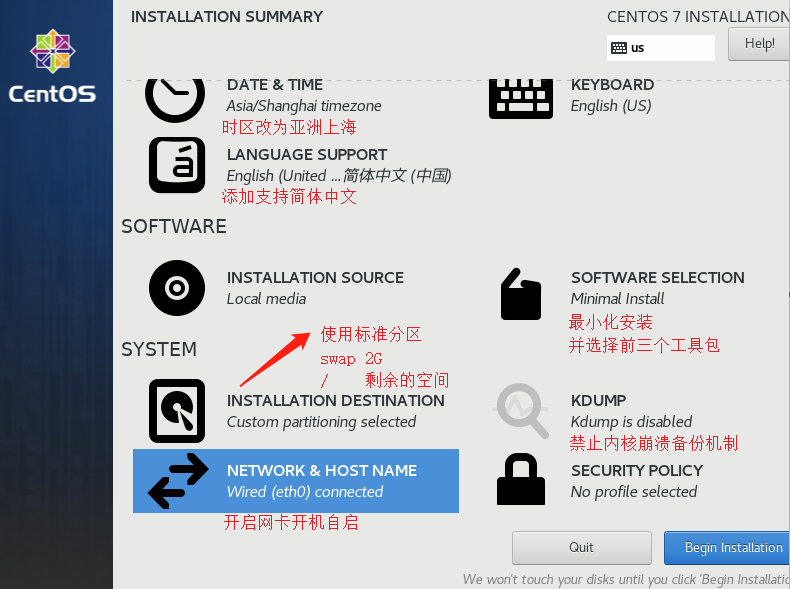
1.2、服务器配置
1.2.1、配置网络
1、配置eth0网卡(NAT)
- 能上网就行,有些选项删掉了
]# vi /etc/sysconfig/network-scripts/ifcfg-eth0
TYPE="Ethernet"
BOOTPROTO="static"       #使用静态IP
NAME="eth0"
DEVICE="eth0"
ONBOOT="yes"             #在系统启动时激活网卡
IPADDR=10.1.1.222        #设置机器IP
NETMASK=255.255.255.0    #设置网络掩码
GATEWAY=10.1.1.2         #设置网关IP
DNS1=114.114.114.114     #设置DNS
2、配置eth1网卡(仅主机)
]# vi /etc/sysconfig/network-scripts/ifcfg-eth1
TYPE=Ethernet
BOOTPROTO=static
NAME=eth1
DEVICE=eth1
ONBOOT=yes
IPADDR=192.168.1.222
NETMASK=255.255.255.0
3、重启网络服务
]# systemctl restart network.service
4、查看网卡配置

1.2.2、修改hostname
]# vi /etc/hostname
centos7
1.2.3、关闭防火墙、SELinux和NetworkManager
//关闭防火墙
]# systemctl disable firewalld.service
]# systemctl stop firewalld.service

//关闭SELinux
]# vi /etc/selinux/config
SELINUX=disabled
]# setenforce 0

//关闭NetworkManager
]# systemctl disable NetworkManager.service
]# systemctl stop NetworkManager.service
1.2.4、优化ssh
//修改sshd的配置文件
]# vi /etc/ssh/sshd_config
PasswordAuthentication yes
GSSAPIAuthentication no
UseDNS no

//重启sshd服务
]# systemctl restart sshd
1.2.5、安装常用的基础命令
- 注意,不推荐使用epel源,因为可能会有不兼容的问题。
]# yum install vim tar zip unzip tree telnet lsof ntpdate tcpdump wget gcc gcc-c++ make python-devel pam-devel screen \
    rsync psmisc lrzsz lsb nfs-utils openssl openssl-devel libevent libevent-devel iotop bc glibc glibc-devel bash-completion \
    pcre pcre-devel zlib-devel net-tools libevent libevent-devel bc systemd-devel traceroute bridge-utils
1.2.5、同步时间
- 注意,OpenStack使用队列进行异步操作,对时间同步要求比较严格。
//(1)同步时间
]# ntpdate time1.aliyun.com

//(2)将系统时间写入硬件时钟
]# hwclock -w

//(3)设置同步时间的定时任务
]# vim /var/spool/cron/root
*/30 * * * * /usr/sbin/ntpdate time1.aliyun.com && hwclock -w
1.2.6、关机做快照
- 后面所有需要的机器都会以该快照为基础进行创建。
]# poweroff
2、开始安装OpenStack
2.1、OpenStack的部署架构图

2.2、机器规划
- 使用上面的虚拟机模板创建5个虚拟机。
- 10.1.1.11:CentOSLinuxrelease7.7.1908(Core),内存4G,CPU 2核。openstack控制节点
- 10.1.1.12:CentOSLinuxrelease7.7.1908(Core),内存2G,CPU 2核。openstack计算节点
- 10.1.1.13:CentOSLinuxrelease7.7.1908(Core),内存2G,CPU 2核。openstack计算节点
- 10.1.1.14:CentOSLinuxrelease7.7.1908(Core),内存2G,CPU 2核。公共组件
- 10.1.1.15:CentOSLinuxrelease7.7.1908(Core),内存2G,CPU 2核。高可用
- 在所有openstack节点添加hosts
]# vim /etc/hosts
10.1.1.15 openstack-haproxy-vip
3、启用OpenStack存储库
- 安装OpenStack,必须先在所有机器上安装OpenStack存储库。
1、查看可以使用的OpenStack存储库
//查看可以使用yum安装的OpenStack版本
]# yum list centos-release-openstack*
可安装的软件包
centos-release-openstack-queens.noarch                                   1-2.el7.centos                                    extras
centos-release-openstack-rocky.noarch                                    1-1.el7.centos                                    extras
centos-release-openstack-stein.noarch                                    1-1.el7.centos                                    extras
centos-release-openstack-train.noarch                                    1-1.el7.centos                                    extras
2、安装OpenStack存储库
]# yum install centos-release-openstack-train
3、安装RDO存储库,启用OpenStack存储库
]# yum install https://rdoproject.org/repos/rdo-release.rpm
4、安装haproxy
- 在10.1.1.15上安装haproxy。
1、安装haproxy
]# yum install haproxy
2、配置haproxy
//原文件仅保留global和defaults段,并追加一下内容
]# vim /etc/haproxy/haproxy.cfg
listen haproxy-status
    bind :18080
    stats enable
    stats uri /haproxystatus
    stats auth admin:admin
    stats admin if TRUE
    stats realm Haproxy\ status
    stats refresh 10s
    stats hide-version

listen openstack-mysql-3306
    bind 10.1.1.15:3306
    mode tcp
    server 10.1.1.14-3306 10.1.1.14:3306 check inter 3 fall 3 rise 5
listen openstack-rabbitmq-5672
    bind 10.1.1.15:5672
    mode tcp
    server 10.1.1.14-5672 10.1.1.14:5672 check inter 3 fall 3 rise 5
listen openstack-memcached-11211
    bind 10.1.1.15:11211
    mode tcp
    server 10.1.1.14-11211 10.1.1.14:11211 check inter 3 fall 3 rise 5

listen openstack-keystone-5000
    bind 10.1.1.15:5000
    mode tcp
    server 10.1.1.11-5000 10.1.1.11:5000 check inter 3 fall 3 rise 5
listen openstack-glance-9292
    bind 10.1.1.15:9292
    mode tcp
    server 10.1.1.11-9292 10.1.1.11:9292 check inter 3 fall 3 rise 5
listen openstack-placement-8778
    bind 10.1.1.15:8778
    mode tcp
    server 10.1.1.11-8778 10.1.1.11:8778 check inter 3 fall 3 rise 5
listen openstack-nova-8774
    bind 10.1.1.15:8774
    mode tcp
    server 10.1.1.11-8774 10.1.1.11:8774 check inter 3 fall 3 rise 5
listen openstack-nova-8775
    bind 10.1.1.15:8775
    mode tcp
    server 10.1.1.11-8775 10.1.1.11:8775 check inter 3 fall 3 rise 5
listen openstack-neutron-9696
    bind 10.1.1.15:9696
    mode tcp
    server 10.1.1.11-9696 10.1.1.11:9696 check inter 3 fall 3 rise 5

listen openstack-vnc-6080
    bind 10.1.1.15:6080
    mode tcp
    server 10.1.1.11-6080 10.1.1.11:6080 check inter 3 fall 3 rise 5

listen openstack-dashboard-80
    bind 10.1.1.15:80
    mode tcp
    server 10.1.1.11-80 10.1.1.11:80 check inter 3 fall 3 rise 5

listen openstack-cinder
    bind 10.1.1.15:8776
    mode tcp
    server 10.1.1.11-8776 10.1.1.11:8776 check inter 3 fall 3 rise 5
3、启动haproxy
]# systemctl enable haproxy.service
]# systemctl start haproxy.service
5、安装OpenStack依赖的服务
- 在10.1.1.14上安装mysql、rabbitmq和memcached。
- 在安装mariadb、RabbitMQ和Memcached前,也要“启用OpenStack存储库”,这样这三个服务就可以使用由openstack yum源提供的rpm包了。
5.1、安装mariadb-server
1、安装mariadb-server
]# yum install mariadb mariadb-server
2、配置mariadb-server
]# vim /etc/my.cnf.d/openstack.cnf
[mysqld]
bind-address = 0.0.0.0

default-storage-engine = innodb
innodb_file_per_table = on
max_connections = 4096
collation-server = utf8_general_ci
character-set-server = utf8
3、启动mariadb.service
]# systemctl enable mariadb.service
]# systemctl start mariadb.service
4、mariadb安全设置
]# mysql_secure_installation
5.2、安装RabbitMQ
1、安装RabbitMQ
]# yum install rabbitmq-server
2、启动RabbitMQ
]# systemctl enable rabbitmq-server.service
]# systemctl start rabbitmq-server.service
3、添加RabbitMQ用户
//(1)添加openstack用户
]# rabbitmqctl add_user openstack openstack123

//(2)允许 openstack用户进行配置、写入和读取访问:
]# rabbitmqctl set_permissions openstack ".*" ".*" ".*"
4、开启RabbitMQ的管理页面
- 开启rabbitmq_management插件后,RabbitMQ会默认增加一个端口15672。
]# rabbitmq-plugins enable rabbitmq_management
5.3、安装Memcached
1、安装Memcached
]# yum install memcached
2、配置Memcached
]# vim /etc/sysconfig/memcached
PORT="11211"
USER="memcached"
MAXCONN="1024"
CACHESIZE="64"
OPTIONS="-l 0.0.0.0,::1"
3、启动Memcached
]# systemctl enable memcached.service
]# systemctl start memcached.service
6、安装OpenStack的命令行工具
- 在10.1.1.11上安装openstack命令行工具(openstack控制节点)。
]# yum install python-openstackclient openstack-selinux
7、安装Keystone(Identity service)
- 在10.1.1.11上安装keystone(openstack控制节点)。
7.1、前提条件
-
创建MySQL用户
//(1)登录MySQL
]# mysql -u root -p

//(2)创建MySQL数据库
MariaDB [(none)]> CREATE DATABASE keystone;

//(3)创建MySQL用户,并授权
MariaDB [(none)]> GRANT ALL PRIVILEGES ON keystone.* TO 'keystone'@'%' IDENTIFIED BY 'keystone123';
7.2、安装和配置keystone
7.2.1、安装keystone
- 在安装openstack-keystone前,要“启用OpenStack存储库”,使用由openstack yum源提供的rpm包。
]# yum install openstack-keystone httpd mod_wsgi python2-PyMySQL
7.2.2、配置keystone
- 配置要连接的数据库和
]# vim /etc/keystone/keystone.conf
//连接mysql
[database]
connection = mysql+pymysql://keystone:keystone123@openstack-haproxy-vip/keystone

//配置Fernet令牌(再次登录时,keystone会检查用户的令牌,而不是查询数据库)
[token]
provider = fernet
- 也可以使用配置工具openstack-config进行配置


//安装配置工具
yum install openstack-utils.noarch

//配置cinder
openstack-config --set /etc/keystone/keystone.conf database connection mysql+pymysql://keystone:keystone123@openstack-haproxy-vip/keystone
openstack-config --set /etc/keystone/keystone.conf token provider fernet
7.2.3、初始化keystone数据库
- 会在keystone数据库中创建许多数据表。
]# su -s /bin/sh -c "keystone-manage db_sync" keystone
7.2.4、创建Fernet令牌的key
- 这两个命令会分别在/etc/keystone/下创建一个目录用于存放key。
- 允许在另一个操作系统用户/组(user/group)下运行keystone。
//为Fernet令牌创建加密key
]# keystone-manage fernet_setup --keystone-user keystone --keystone-group keystone

//用于加密和解密凭据秘密的key。
]# keystone-manage credential_setup --keystone-user keystone --keystone-group keystone
7.2.5、初始化Keystone服务
//执行基本的引导过程
]# keystone-manage bootstrap --bootstrap-password admin123 \
  --bootstrap-admin-url http://openstack-haproxy-vip:5000/v3/ \
  --bootstrap-internal-url http://openstack-haproxy-vip:5000/v3/ \
  --bootstrap-public-url http://openstack-haproxy-vip:5000/v3/ \
  --bootstrap-region-id RegionOne
- 参数说明:
- --bootstrap-password OS_BOOTSTRAP_PASSWORD:bootstrap用户的密码
- --bootstrap-admin-url OS_BOOTSTRAP_ADMIN_URL:在keystone引导过程中,注册keystone的API(管理网络)。例如,http://127.0.0.1:5000/v3
- --bootstrap-internal-url OS_BOOTSTRAP_INTERNAL_URL:在keystone引导过程中,注册keystone的API(内部网络)。例如http://127.0.0.1:5000/v3
- --bootstrap-public-url OS_BOOTSTRAP_PUBLIC_URL:在keystone引导过程中,注册keystone的API(共有网络)。例如http://127.0.0.1:5000/v3
- --bootstrap-region-id OS_BOOTSTRAP_REGION_ID:初始的region_id端点将在keystone引导过程中放置。
7.3、配置Apache
1、修改apache的配置文件
- 配置选项ServerName指向控制器节点。
]# vim /etc/httpd/conf/httpd.conf
ServerName 10.1.1.11:80
2、创建wsgi-keystone.conf的连接
]# ln -s /usr/share/keystone/wsgi-keystone.conf /etc/httpd/conf.d/
7.4、启动keystone
- keystone是一个htttpd程序。
1、启动apache
]# systemctl enable httpd.service
]# systemctl start httpd.service
2、测试Keystone的API
]# curl 10.1.1.11:5000
{"versions": {"values": [{"status": "stable", "updated": "2019-07-19T00:00:00Z", "media-types": [{"base": "application/json", "type": "application/vnd.openstack.identity-v3+json"}], "id": "v3.13", "links": [{"href": "http://10.1.1.11:5000/v3/", "rel": "self"}]}]}}

]# curl openstack-haproxy-vip:5000
{"versions": {"values": [{"status": "stable", "updated": "2019-07-19T00:00:00Z", "media-types": [{"base": "application/json", "type": "application/vnd.openstack.identity-v3+json"}], "id": "v3.13", "links": [{"href": "http://openstack-haproxy-vip:5000/v3/", "rel": "self"}]}]}}
7.5、创建OpenStack客户端的认证脚本
1、创建OpenStack的管理帐户(admin)的认证脚本
- 认证脚本创建后,就可以执行openstack命令了(相当于kubectl)
//创建连接Keystone的认证脚本(这些值是keystone-manage bootstrap创建的默认值)
]# vim admin-openrc
export OS_PROJECT_DOMAIN_NAME=Default
export OS_USER_DOMAIN_NAME=Default
export OS_PROJECT_NAME=admin
export OS_USERNAME=admin
export OS_PASSWORD=admin123
export OS_AUTH_URL=http://openstack-haproxy-vip:5000/v3
export OS_IDENTITY_API_VERSION=3
export OS_IMAGE_API_VERSION=2
2、使用openstack命令
- 例如,查看用户信息。
//(1)加载环境变量
]# source admin-openrc

//(2)执行openstack命令
]# openstack user list
+----------------------------------+-------+
| ID                               | Name  |
+----------------------------------+-------+
| e0327c9801a845468c382d6c659bb659 | admin |
+----------------------------------+-------+
3、验证用户“admin”的身份令牌
//(1)取消临时环境变量OS_AUTH_URL和OS_PASSWORD
]# unset OS_AUTH_URL OS_PASSWORD

//(2)验证用户“admin”的身份令牌(要输入两次密码)
]# openstack token issue \
  --os-auth-url http://openstack-haproxy-vip:5000/v3 \
  --os-project-domain-name Default \
  --os-user-domain-name Default \
  --os-project-name admin \
  --os-username admin
7.6、创建域、项目、用户和角色
7.5.1、创建域和项目(必须创建)
- 安装后续的组件时会使用域“default”和项目“service”。
//(1)source admin凭据以管理员身份访问的Keystone
]# source admin-openrc

//(2)创建默认域“default”(注意,默认域在“初始化Keystone”时已经创建了)
]# openstack domain create --description "The default domain" default

//(3)创建项目“service”
]# openstack project create --domain default --description "Service Project" service
7.5.2、创建测试账户(可以不创建)
1、创建域、项目、用户和角色
//(1)创建默认域“default”(注意,默认域在“初始化Keystone”时已经创建了)
]# openstack domain create --description "The default domain" default

//(2)创建项目“myproject”
]# openstack project create --domain default --description "myproject Project" myproject

//(3)创建用户“myuser”
]# openstack user create --domain default --password-prompt myuser

//(4)创建角色“myrole”
]# openstack role create myrole

//(5)将角色“myrole”添加(绑定)到myproject项目和myuser用户中
]# openstack role add --project myproject --user myuser myrole
2、创建OpenStack的myuser帐户的认证脚本
//创建连接Keystone的认证脚本
]# vim myuser-openrc
export OS_PROJECT_DOMAIN_NAME=Default
export OS_USER_DOMAIN_NAME=Default
export OS_PROJECT_NAME=myproject
export OS_USERNAME=myuser
export OS_PASSWORD=myuser
export OS_AUTH_URL=http://openstack-haproxy-vip:5000/v3
export OS_IDENTITY_API_VERSION=3
export OS_IMAGE_API_VERSION=2
3、使用myuser-openrc脚本
//(1)加载变量
]# source myuser-openrc

//(2)执行openstack命令
]# openstack token issue
8、安装Glance(Image service)
- 下载镜像:https://docs.openstack.org/image-guide/
- 在10.1.1.11上安装glance(openstack控制节点)。
8.1、前提条件
8.1.1、创建MySQL用户
//(1)登录MySQL
]# mysql -u root -p

//(2)创建MySQL数据库
MariaDB [(none)]> CREATE DATABASE glance;

//(3)创建MySQL用户,并授权
MariaDB [(none)]> GRANT ALL PRIVILEGES ON glance.* TO 'glance'@'%' IDENTIFIED BY 'glance123';
8.1.2、创建glance服务的凭证
//(1)source admin凭据以管理员身份访问的Keystone
]# source admin-openrc

//(2)在Keystone上创建Glance用户
]# openstack user create --domain default --password-prompt glance

//(3)将角色“admin”添加(绑定)到项目“service”和用户“glance”中
]# openstack role add --project service --user glance admin
8.1.3、创建glance服务实体及注册API
//(1)创建glance服务实体(用于注册后端服务器,相当于k8s的service name)
]# openstack service create --name glance --description "OpenStack Image" image

//(2)注册glance服务的API(相当于k8s的pod)
]# openstack endpoint create --region RegionOne image public http://openstack-haproxy-vip:9292
]# openstack endpoint create --region RegionOne image internal http://openstack-haproxy-vip:9292
]# openstack endpoint create --region RegionOne image admin http://openstack-haproxy-vip:9292
8.2、安装和配置glance
8.2.1、安装和配置glance
]# yum install openstack-glance python2-PyMySQL python-memcached
8.2.2、配置glance
- “password = glance”是在Keystone上创建的Glance用户的密码,而不是mysql的密码。
]# vim /etc/glance/glance-api.conf
//配置数据库连接
[database]
connection = mysql+pymysql://glance:glance123@openstack-haproxy-vip/glance

//配置存储镜像
[glance_store]
stores = file,http
default_store = file
filesystem_store_datadir = /var/lib/glance/images/

//配置keystone认证
[keystone_authtoken]
www_authenticate_uri  = http://openstack-haproxy-vip:5000
auth_url = http://openstack-haproxy-vip:5000
memcached_servers = openstack-haproxy-vip:11211
auth_type = password
project_domain_name = Default
user_domain_name = Default
project_name = service
username = glance
password = glance

[paste_deploy]
flavor = keystone
- 也可以使用配置工具openstack-config进行配置
//安装配置工具
yum install openstack-utils.noarch

//配置glance-api
openstack-config --set /etc/glance/glance-api.conf database connection mysql+pymysql://glance:glance123@openstack-haproxy-vip/glance

openstack-config --set /etc/glance/glance-api.conf glance_store stores file,http
openstack-config --set /etc/glance/glance-api.conf glance_store default_store file
openstack-config --set /etc/glance/glance-api.conf glance_store filesystem_store_datadir /var/lib/glance/images/

openstack-config --set /etc/glance/glance-api.conf keystone_authtoken www_authenticate_uri http://openstack-haproxy-vip:5000
openstack-config --set /etc/glance/glance-api.conf keystone_authtoken auth_url http://openstack-haproxy-vip:5000
openstack-config --set /etc/glance/glance-api.conf keystone_authtoken memcached_servers openstack-haproxy-vip:11211
openstack-config --set /etc/glance/glance-api.conf keystone_authtoken auth_type password
openstack-config --set /etc/glance/glance-api.conf keystone_authtoken project_domain_name Default
openstack-config --set /etc/glance/glance-api.conf keystone_authtoken user_domain_name Default
openstack-config --set /etc/glance/glance-api.conf keystone_authtoken project_name service
openstack-config --set /etc/glance/glance-api.conf keystone_authtoken username glance
openstack-config --set /etc/glance/glance-api.conf keystone_authtoken password glance

openstack-config --set /etc/glance/glance-api.conf paste_deploy flavor keystone
8.2.3、初始化glance数据库
]# su -s /bin/sh -c "glance-manage db_sync" glance
8.3、启动glance
1、启动glance
]# systemctl enable openstack-glance-api.service
]# systemctl start openstack-glance-api.service
2、测试Glance的API
- 测试端口时,有数据返回即可。
]# curl 10.1.1.11:9292
{"versions": [{"status": "CURRENT", "id": "v2.9", "links": [{"href": "http://10.1.1.11:9292/v2/", "rel": "self"}]}, {"status": "SUPPORTED", "id": "v2.7", "links": [{"href": "http://10.1.1.11:9292/v2/", "rel": "self"}]}, {"status": "SUPPORTED", "id": "v2.6", "links": [{"href": "http://10.1.1.11:9292/v2/", "rel": "self"}]}, {"status": "SUPPORTED", "id": "v2.5", "links": [{"href": "http://10.1.1.11:9292/v2/", "rel": "self"}]}, {"status": "SUPPORTED", "id": "v2.4", "links": [{"href": "http://10.1.1.11:9292/v2/", "rel": "self"}]}, {"status": "SUPPORTED", "id": "v2.3", "links": [{"href": "http://10.1.1.11:9292/v2/", "rel": "self"}]}, {"status": "SUPPORTED", "id": "v2.2", "links": [{"href": "http://10.1.1.11:9292/v2/", "rel": "self"}]}, {"status": "SUPPORTED", "id": "v2.1", "links": [{"href": "http://10.1.1.11:9292/v2/", "rel": "self"}]}, {"status": "SUPPORTED", "id": "v2.0", "links": [{"href": "http://10.1.1.11:9292/v2/", "rel": "self"}]}]}

]# curl openstack-haproxy-vip:9292
{"versions": [{"status": "CURRENT", "id": "v2.9", "links": [{"href": "http://openstack-haproxy-vip:9292/v2/", "rel": "self"}]}, {"status": "SUPPORTED", "id": "v2.7", "links": [{"href": "http://openstack-haproxy-vip:9292/v2/", "rel": "self"}]}, {"status": "SUPPORTED", "id": "v2.6", "links": [{"href": "http://openstack-haproxy-vip:9292/v2/", "rel": "self"}]}, {"status": "SUPPORTED", "id": "v2.5", "links": [{"href": "http://openstack-haproxy-vip:9292/v2/", "rel": "self"}]}, {"status": "SUPPORTED", "id": "v2.4", "links": [{"href": "http://openstack-haproxy-vip:9292/v2/", "rel": "self"}]}, {"status": "SUPPORTED", "id": "v2.3", "links": [{"href": "http://openstack-haproxy-vip:9292/v2/", "rel": "self"}]}, {"status": "SUPPORTED", "id": "v2.2", "links": [{"href": "http://openstack-haproxy-vip:9292/v2/", "rel": "self"}]}, {"status": "SUPPORTED", "id": "v2.1", "links": [{"href": "http://openstack-haproxy-vip:9292/v2/", "rel": "self"}]}, {"status": "SUPPORTED", "id": "v2.0", "links": [{"href": "http://openstack-haproxy-vip:9292/v2/", "rel": "self"}]}]}
8.4、验证
1、下载镜像
]# wget http://download.cirros-cloud.net/0.4.0/cirros-0.4.0-x86_64-disk.img
2、上传镜像
]# glance image-create --name "cirros-0.4.0-x86_64-disk" \
  --file cirros-0.4.0-x86_64-disk.img \
  --disk-format qcow2 --container-format bare \
  --visibility public
3、查看镜像
//查看镜像在数据库中的信息
]# glance image-list
+--------------------------------------+--------------------------+
| ID                                   | Name                     |
+--------------------------------------+--------------------------+
| f41326c0-bc66-4d15-922f-780234caf33d | cirros-0.4.0-x86_64-disk |
+--------------------------------------+--------------------------+

//查看镜像在存储上的信息
]# ls -l /var/lib/glance/images/
-rw-r----- 1 glance glance 12716032 2月  25 17:05 f41326c0-bc66-4d15-922f-780234caf33d
9、安装Placement
- 在10.1.1.11上安装placement(openstack控制节点)。
9.1、前提条件
9.1.1、创建MySQL用户
//(1)登录MySQL
]# mysql -u root -p

//(2)创建MySQL数据库
MariaDB [(none)]> CREATE DATABASE placement;

//(3)创建MySQL用户,并授权
MariaDB [(none)]> GRANT ALL PRIVILEGES ON placement.* TO 'placement'@'%' IDENTIFIED BY 'placement123';
9.1.2、创建placement服务的凭证
//(1)source admin凭据以管理员身份访问的Keystone
]# source admin-openrc

//(2)在Keystone上创建placement用户
]# openstack user create --domain default --password-prompt placement

//(3)将角色“admin”添加(绑定)到项目“service”和用户“placement”中
]# openstack role add --project service --user placement admin
9.1.3、创建placement服务实体及注册API
//(1)创建placement服务实体(用于注册后端服务器,相当于k8s的service name)
]# openstack service create --name placement --description "Placement API" placement

//(2)注册placement服务的API(相当于k8s的pod)
]# openstack endpoint create --region RegionOne placement public http://openstack-haproxy-vip:8778
]# openstack endpoint create --region RegionOne placement internal http://openstack-haproxy-vip:8778
]# openstack endpoint create --region RegionOne placement admin http://openstack-haproxy-vip:8778
9.2、安装和配置placement
9.2.1、安装placement
]# yum install openstack-placement-api python2-PyMySQL python-memcached
9.2.2、配置placement
- “password = placement”是在Keystone上创建的placement用户的密码,而不是mysql的密码。
]# vim /etc/placement/placement.conf
//配置数据库连接
[placement_database]
connection = mysql+pymysql://placement:placement123@openstack-haproxy-vip/placement

//配置keystone认证
[api]
auth_strategy = keystone

[keystone_authtoken]
auth_url = http://openstack-haproxy-vip:5000/v3
memcached_servers = openstack-haproxy-vip:11211
auth_type = password
project_domain_name = Default
user_domain_name = Default
project_name = service
username = placement
password = placement
- 也可以使用配置工具openstack-config进行配置
//安装配置工具
yum install openstack-utils.noarch

//配置placement
openstack-config --set /etc/placement/placement.conf placement_database connection mysql+pymysql://placement:placement123@openstack-haproxy-vip/placement

openstack-config --set /etc/placement/placement.conf api auth_strategy keystone

openstack-config --set /etc/placement/placement.conf keystone_authtoken auth_url http://openstack-haproxy-vip:5000/v3
openstack-config --set /etc/placement/placement.conf keystone_authtoken memcached_servers openstack-haproxy-vip:11211
openstack-config --set /etc/placement/placement.conf keystone_authtoken auth_type password
openstack-config --set /etc/placement/placement.conf keystone_authtoken project_domain_name Default
openstack-config --set /etc/placement/placement.conf keystone_authtoken user_domain_name Default
openstack-config --set /etc/placement/placement.conf keystone_authtoken project_name service
openstack-config --set /etc/placement/placement.conf keystone_authtoken username placement
openstack-config --set /etc/placement/placement.conf keystone_authtoken password placement
9.2.3、初始化placement数据库
- 忽略此输出中的任何弃用消息。
]# su -s /bin/sh -c "placement-manage db sync" placement
9.2.4、配置httpd
- 请在httpd中追加改段配置,否则在请求8778端口时会报错:AH01630: client denied by server configuration: /usr/bin/placement-api
//在00-placement-api.conf配置文件中追加
]# vim /etc/httpd/conf.d/00-placement-api.conf
<Directory /usr/bin/>
   <IfVersion >= 2.4>
      Require all granted
   </IfVersion>
   <IfVersion < 2.4>
      Order allow,deny
      Allow from all
   </IfVersion>
</Directory>
9.3、启动placement
- placement是一个htttpd程序。
1、重启httpd
- placement会在httpd的配置目录添加一个配置文件/etc/httpd/conf.d/00-placement-api.conf
]# systemctl restart httpd
2、测试Placement的API
- 测试端口时,有数据返回即可。
]# curl 10.1.1.11:8778
{"versions": [{"status": "CURRENT", "min_version": "1.0", "max_version": "1.36", "id": "v1.0", "links": [{"href": "", "rel": "self"}]}]}

]# curl openstack-haproxy-vip:8778
{"versions": [{"status": "CURRENT", "min_version": "1.0", "max_version": "1.36", "id": "v1.0", "links": [{"href": "", "rel": "self"}]}]}
9.4、验证
//(1)source admin凭据以管理员身份访问的Keystone
]# source admin-openrc

//(2)检查状态
]# placement-status upgrade check
+----------------------------------+
| Upgrade Check Results            |
+----------------------------------+
| Check: Missing Root Provider IDs |
| Result: Success                  |
| Details: None                    |
+----------------------------------+
| Check: Incomplete Consumers      |
| Result: Success                  |
| Details: None                    |
+----------------------------------+
10、安装nova(控制节点)
- 在10.1.1.11上安装nova(openstack控制节点)。
10.1、前提条件
10.1.1、创建MySQL用户
//(1)登录MySQL
]# mysql -u root -p

//(2)创建数据库
MariaDB [(none)]> CREATE DATABASE nova_api;
MariaDB [(none)]> CREATE DATABASE nova;
MariaDB [(none)]> CREATE DATABASE nova_cell0;

//(3)创建mysql用户,并授权(注意,这里只有一个MySQL用户)
MariaDB [(none)]> GRANT ALL PRIVILEGES ON nova_api.* TO 'nova'@'%' IDENTIFIED BY 'nova123';
MariaDB [(none)]> GRANT ALL PRIVILEGES ON nova.* TO 'nova'@'%' IDENTIFIED BY 'nova123';
MariaDB [(none)]> GRANT ALL PRIVILEGES ON nova_cell0.* TO 'nova'@'%' IDENTIFIED BY 'nova123';
10.1.2、创建nova服务的凭证
//(1)source admin凭据以管理员身份访问的Keystone
]# source admin-openrc

//(2)在Keystone上创建nova用户
]# openstack user create --domain default --password-prompt nova

//(3)将角色“admin”添加(绑定)到项目“service”和用户“nova”中
]# openstack role add --project service --user nova admin
10.1.3、创建nova服务实体及注册API
//(1)创建nova服务实体(用于注册后端服务器,相当于k8s的service name)
]# openstack service create --name nova --description "OpenStack Compute" compute

//(2)注册nova服务的API(相当于k8s的pod)
]# openstack endpoint create --region RegionOne compute public http://openstack-haproxy-vip:8774/v2.1
]# openstack endpoint create --region RegionOne compute internal http://openstack-haproxy-vip:8774/v2.1
]# openstack endpoint create --region RegionOne compute admin http://openstack-haproxy-vip:8774/v2.1
10.2、安装和配置nova
10.2.1、安装nova
]# yum install openstack-nova-api openstack-nova-conductor openstack-nova-novncproxy openstack-nova-scheduler python2-PyMySQL python-memcached
10.2.2、配置nova
]# vim /etc/nova/nova.conf
//仅启用计算和元数据 API
//连接RabbitMQ
//启用对网络服务的支持
[DEFAULT]
enabled_apis = osapi_compute,metadata

transport_url = rabbit://openstack:openstack123@openstack-haproxy-vip:5672/

use_neutron = true
firewall_driver = nova.virt.firewall.NoopFirewallDriver

//连接MySQL
[api_database]
connection = mysql+pymysql://nova:nova123@openstack-haproxy-vip/nova_api

[database]
connection = mysql+pymysql://nova:nova123@openstack-haproxy-vip/nova

//配置keystone认证
[api]
auth_strategy = keystone

[keystone_authtoken]
www_authenticate_uri = http://openstack-haproxy-vip:5000/
auth_url = http://openstack-haproxy-vip:5000/
memcached_servers = openstack-haproxy-vip:11211
auth_type = password
project_domain_name = Default
user_domain_name = Default
project_name = service
username = nova
password = nova

//启用VNC(本机IP地址)
[vnc]
enabled = true
server_listen = 10.1.1.11
server_proxyclient_address = 10.1.1.11

//连接镜像服务
[glance]
api_servers = http://openstack-haproxy-vip:9292

//锁文件
[oslo_concurrency]
lock_path = /var/lib/nova/tmp

//连接placement
[placement]
region_name = RegionOne
project_domain_name = Default
project_name = service
auth_type = password
user_domain_name = Default
auth_url = http://openstack-haproxy-vip:5000/v3
username = placement
password = placement
- 也可以使用配置工具openstack-config进行配置
//安装配置工具
yum install openstack-utils.noarch

//配置nova
openstack-config --set /etc/nova/nova.conf DEFAULT enabled_apis osapi_compute,metadata
openstack-config --set /etc/nova/nova.conf DEFAULT transport_url rabbit://openstack:openstack123@openstack-haproxy-vip:5672/
openstack-config --set /etc/nova/nova.conf DEFAULT use_neutron true
openstack-config --set /etc/nova/nova.conf DEFAULT firewall_driver nova.virt.firewall.NoopFirewallDriver

openstack-config --set /etc/nova/nova.conf api_database connection mysql+pymysql://nova:nova123@openstack-haproxy-vip/nova_api
openstack-config --set /etc/nova/nova.conf database connection mysql+pymysql://nova:nova123@openstack-haproxy-vip/nova
openstack-config --set /etc/nova/nova.conf api auth_strategy keystone

openstack-config --set /etc/nova/nova.conf keystone_authtoken www_authenticate_uri http://openstack-haproxy-vip:5000/
openstack-config --set /etc/nova/nova.conf keystone_authtoken auth_url http://openstack-haproxy-vip:5000/
openstack-config --set /etc/nova/nova.conf keystone_authtoken memcached_servers openstack-haproxy-vip:11211
openstack-config --set /etc/nova/nova.conf keystone_authtoken auth_type password
openstack-config --set /etc/nova/nova.conf keystone_authtoken project_domain_name Default
openstack-config --set /etc/nova/nova.conf keystone_authtoken user_domain_name Default
openstack-config --set /etc/nova/nova.conf keystone_authtoken project_name service
openstack-config --set /etc/nova/nova.conf keystone_authtoken username nova
openstack-config --set /etc/nova/nova.conf keystone_authtoken password nova

openstack-config --set /etc/nova/nova.conf vnc enabled true
openstack-config --set /etc/nova/nova.conf vnc server_listen 10.1.1.11
openstack-config --set /etc/nova/nova.conf vnc server_proxyclient_address 10.1.1.11

openstack-config --set /etc/nova/nova.conf glance api_servers http://openstack-haproxy-vip:9292

openstack-config --set /etc/nova/nova.conf oslo_concurrency lock_path /var/lib/nova/tmp

openstack-config --set /etc/nova/nova.conf placement region_name RegionOne
openstack-config --set /etc/nova/nova.conf placement project_domain_name Default
openstack-config --set /etc/nova/nova.conf placement project_name service
openstack-config --set /etc/nova/nova.conf placement auth_type password
openstack-config --set /etc/nova/nova.conf placement user_domain_name Default
openstack-config --set /etc/nova/nova.conf placement auth_url http://openstack-haproxy-vip:5000/v3
openstack-config --set /etc/nova/nova.conf placement username placement
openstack-config --set /etc/nova/nova.conf placement password placement
10.2.3、初始化数据库
//(1)初始化nova-api数据库
]# su -s /bin/sh -c "nova-manage api_db sync" nova

//(2)注册cell0数据库
]# su -s /bin/sh -c "nova-manage cell_v2 map_cell0" nova

//(3)创建cell1单元格
]# su -s /bin/sh -c "nova-manage cell_v2 create_cell --name=cell1 --verbose" nova

//(4)初始化nova数据库(忽略告警信息)
]# su -s /bin/sh -c "nova-manage db sync" nova

//(5)验证cell0和cell1是否正确注册
]# su -s /bin/sh -c "nova-manage cell_v2 list_cells" nova
+-------+--------------------------------------+-----------------------------------------------------+------------------------------------------------------------+----------+
|  名称 |                 UUID                 |                    Transport URL                    |                         数据库连接                         | Disabled |
+-------+--------------------------------------+-----------------------------------------------------+------------------------------------------------------------+----------+
| cell0 | 00000000-0000-0000-0000-000000000000 |                        none:/                       | mysql+pymysql://nova:****@openstack-haproxy-vip/nova_cell0 |  False   |
| cell1 | 8877bcdd-2555-4e66-be12-154dcba5bb3b | rabbit://openstack:****@openstack-haproxy-vip:5672/ |    mysql+pymysql://nova:****@openstack-haproxy-vip/nova    |  False   |
+-------+--------------------------------------+-----------------------------------------------------+------------------------------------------------------------+----------+
10.3、启动nova
1、启动nova
]# systemctl enable \
    openstack-nova-api.service \
    openstack-nova-scheduler.service \
    openstack-nova-conductor.service \
    openstack-nova-novncproxy.service
]# systemctl start \
    openstack-nova-api.service \
    openstack-nova-scheduler.service \
    openstack-nova-conductor.service \
    openstack-nova-novncproxy.service
2、测试nova的API
]# curl 10.1.1.11:8774
{"versions": [{"status": "SUPPORTED", "updated": "2011-01-21T11:33:21Z", "links": [{"href": "http://10.1.1.11:8774/v2/", "rel": "self"}], "min_version": "", "version": "", "id": "v2.0"}, {"status": "CURRENT", "updated": "2013-07-23T11:33:21Z", "links": [{"href": "http://10.1.1.11:8774/v2.1/", "rel": "self"}], "min_version": "2.1", "version": "2.79", "id": "v2.1"}]}

]# curl openstack-haproxy-vip:8774
{"versions": [{"status": "SUPPORTED", "updated": "2011-01-21T11:33:21Z", "links": [{"href": "http://openstack-haproxy-vip:8774/v2/", "rel": "self"}], "min_version": "", "version": "", "id": "v2.0"}, {"status": "CURRENT", "updated": "2013-07-23T11:33:21Z", "links": [{"href": "http://openstack-haproxy-vip:8774/v2.1/", "rel": "self"}], "min_version": "2.1", "version": "2.79", "id": "v2.1"}]}
11、安装nova(计算节点)
- 在10.1.1.12上安装nova(openstack计算节点)。
11.1、安装和配置nova
11.1.1、安装nova
]# yum install openstack-nova-compute python-memcached
11.1.2、配置nova
]# vim /etc/nova/nova.conf
//仅启用计算和元数据 API
//连接RabbitMQ
//启用对网络服务的支持
[DEFAULT]
enabled_apis = osapi_compute,metadata

transport_url = rabbit://openstack:openstack123@openstack-haproxy-vip

use_neutron = true
firewall_driver = nova.virt.firewall.NoopFirewallDriver

//配置keystone认证
[api]
auth_strategy = keystone

[keystone_authtoken]
www_authenticate_uri = http://openstack-haproxy-vip:5000/
auth_url = http://openstack-haproxy-vip:5000/
memcached_servers = openstack-haproxy-vip:11211
auth_type = password
project_domain_name = Default
user_domain_name = Default
project_name = service
username = nova
password = nova

//启用VNC(server_proxyclient_address是本机IP地址,novncproxy_base_url是管理节点的IP地址)
[vnc]
enabled = true
server_listen = 0.0.0.0
server_proxyclient_address = 10.1.1.12
novncproxy_base_url = http://openstack-haproxy-vip:6080/vnc_auto.html

//连接镜像服务
[glance]
api_servers = http://openstack-haproxy-vip:9292

//锁文件
[oslo_concurrency]
lock_path = /var/lib/nova/tmp

//连接placement
[placement]
region_name = RegionOne
project_domain_name = Default
project_name = service
auth_type = password
user_domain_name = Default
auth_url = http://openstack-haproxy-vip:5000/v3
username = placement
password = placement
- 也可以使用配置工具openstack-config进行配置
//安装配置工具
yum install openstack-utils.noarch

//配置nova
openstack-config --set /etc/nova/nova.conf DEFAULT enabled_apis osapi_compute,metadata
openstack-config --set /etc/nova/nova.conf DEFAULT transport_url rabbit://openstack:openstack123@openstack-haproxy-vip
openstack-config --set /etc/nova/nova.conf DEFAULT use_neutron true
openstack-config --set /etc/nova/nova.conf DEFAULT firewall_driver nova.virt.firewall.NoopFirewallDriver

openstack-config --set /etc/nova/nova.conf api auth_strategy keystone

openstack-config --set /etc/nova/nova.conf keystone_authtoken www_authenticate_uri http://openstack-haproxy-vip:5000/
openstack-config --set /etc/nova/nova.conf keystone_authtoken auth_url http://openstack-haproxy-vip:5000/
openstack-config --set /etc/nova/nova.conf keystone_authtoken memcached_servers openstack-haproxy-vip:11211
openstack-config --set /etc/nova/nova.conf keystone_authtoken auth_type password
openstack-config --set /etc/nova/nova.conf keystone_authtoken project_domain_name Default
openstack-config --set /etc/nova/nova.conf keystone_authtoken user_domain_name Default
openstack-config --set /etc/nova/nova.conf keystone_authtoken project_name service
openstack-config --set /etc/nova/nova.conf keystone_authtoken username nova
openstack-config --set /etc/nova/nova.conf keystone_authtoken password nova

openstack-config --set /etc/nova/nova.conf vnc enabled true
openstack-config --set /etc/nova/nova.conf vnc server_listen 0.0.0.0
openstack-config --set /etc/nova/nova.conf vnc server_proxyclient_address 10.1.1.12
openstack-config --set /etc/nova/nova.conf vnc novncproxy_base_url http://openstack-haproxy-vip:6080/vnc_auto.html

openstack-config --set /etc/nova/nova.conf glance api_servers http://openstack-haproxy-vip:9292

openstack-config --set /etc/nova/nova.conf oslo_concurrency lock_path /var/lib/nova/tmp

openstack-config --set /etc/nova/nova.conf placement region_name RegionOne
openstack-config --set /etc/nova/nova.conf placement project_domain_name Default
openstack-config --set /etc/nova/nova.conf placement project_name service
openstack-config --set /etc/nova/nova.conf placement auth_type password
openstack-config --set /etc/nova/nova.conf placement user_domain_name Default
openstack-config --set /etc/nova/nova.conf placement auth_url http://openstack-haproxy-vip:5000/v3
openstack-config --set /etc/nova/nova.conf placement username placement
openstack-config --set /etc/nova/nova.conf placement password placement
11.1.3、验证计算节点是否支持虚拟机的硬件加速
]# egrep -c '(vmx|svm)' /proc/cpuinfo
- 如果返回值是0,即计算节点不支持硬件加速,并且必须配置libvirt以使用QEMU而不是KVM。
- 注意,如果在创建虚拟机实例时在/var/log/nova/nova-compute.log中报错:Unexpected build failure, not rescheduling build.: UnicodeDecodeError: 'ascii' codec can't decode byte 0xe5 in position 0: ordinal not in range(128),也要进行如下修改。
]# vim /etc/nova/nova.conf
[libvirt]
virt_type = qemu
11.2、启动nova
]# systemctl enable libvirtd.service openstack-nova-compute.service
]# systemctl start libvirtd.service openstack-nova-compute.service
- 注意:忽略该报错,因为使用的时KVM,而不是AMD SEV。
2023-02-21 01:59:20.737 2826 INFO nova.virt.libvirt.host [req-57f0fbfc-6503-4030-ba2c-1a94cbdf5e45 - - - - -] kernel doesn't support AMD SEV
11.3、将计算节点添加到cell0数据库
- 每次添加新的计算节点时,都在控制节点上手动执行发现计算节点的命令。
//(1)source admin凭据以管理员身份访问的Keystone
]# source admin-openrc

//(2)查看计算机节点是否注册到了数据库
]# openstack compute service list --service nova-compute
+----+--------------+----------+------+---------+-------+----------------------------+
| ID | Binary       | Host     | Zone | Status  | State | Updated At                 |
+----+--------------+----------+------+---------+-------+----------------------------+
|  7 | nova-compute | hengha72 | nova | enabled | up    | 2023-02-25T10:08:01.000000 |
+----+--------------+----------+------+---------+-------+----------------------------+

//(3)发现计算节点
]# su -s /bin/sh -c "nova-manage cell_v2 discover_hosts --verbose" nova
Found 2 cell mappings.
Skipping cell0 since it does not contain hosts.
Getting computes from cell 'cell1': 8877bcdd-2555-4e66-be12-154dcba5bb3b
Checking host mapping for compute host 'hengha72': 14908fd7-b94b-47ff-be74-4cb69d0f6e7c
Creating host mapping for compute host 'hengha72': 14908fd7-b94b-47ff-be74-4cb69d0f6e7c
Found 1 unmapped computes in cell: 8877bcdd-2555-4e66-be12-154dcba5bb3b
- 或修改控制节点的配置文件,设置适当的间隔,进行自动发现计算节点。
- 每隔5m进行一次自动发现计算节点。
]# vim /etc/nova/nova.conf
[scheduler]
discover_hosts_in_cells_interval = 300
11.4、验证
- 在openstack的控制节点上进行验证。
1、source admin凭据以管理员身份访问的Keystone
]# source admin-openrc
2、列出服务组件,以验证是否成功启动和注册
- 控制节点上启用了两个业务组件,计算节点上启用了一个业务组件。
]# openstack compute service list
+----+----------------+----------+----------+---------+-------+----------------------------+
| ID | Binary         | Host     | Zone     | Status  | State | Updated At                 |
+----+----------------+----------+----------+---------+-------+----------------------------+
|  1 | nova-conductor | hengha71 | internal | enabled | up    | 2023-02-25T10:15:42.000000 |
|  5 | nova-scheduler | hengha71 | internal | enabled | up    | 2023-02-25T10:15:43.000000 |
|  7 | nova-compute   | hengha72 | nova     | enabled | up    | 2023-02-25T10:15:41.000000 |
+----+----------------+----------+----------+---------+-------+----------------------------+
3、列出身份(Identity)服务中的API,以验证与Identity服务的连通性
]# openstack catalog list
+-----------+-----------+----------------------------------------------------+
| Name      | Type      | Endpoints                                          |
+-----------+-----------+----------------------------------------------------+
| glance    | image     | RegionOne                                          |
|           |           |   internal: http://openstack-haproxy-vip:9292      |
|           |           | RegionOne                                          |
|           |           |   admin: http://openstack-haproxy-vip:9292         |
|           |           | RegionOne                                          |
|           |           |   public: http://openstack-haproxy-vip:9292        |
|           |           |                                                    |
| nova      | compute   | RegionOne                                          |
|           |           |   public: http://openstack-haproxy-vip:8774/v2.1   |
|           |           | RegionOne                                          |
|           |           |   internal: http://openstack-haproxy-vip:8774/v2.1 |
|           |           | RegionOne                                          |
|           |           |   admin: http://openstack-haproxy-vip:8774/v2.1    |
|           |           |                                                    |
| placement | placement | RegionOne                                          |
|           |           |   internal: http://openstack-haproxy-vip:8778      |
|           |           | RegionOne                                          |
|           |           |   admin: http://openstack-haproxy-vip:8778         |
|           |           | RegionOne                                          |
|           |           |   public: http://openstack-haproxy-vip:8778        |
|           |           |                                                    |
| keystone  | identity  | RegionOne                                          |
|           |           |   admin: http://openstack-haproxy-vip:5000/v3/     |
|           |           | RegionOne                                          |
|           |           |   internal: http://openstack-haproxy-vip:5000/v3/  |
|           |           | RegionOne                                          |
|           |           |   public: http://openstack-haproxy-vip:5000/v3/    |
|           |           |                                                    |
+-----------+-----------+----------------------------------------------------+
4、检查单元格和放置API是否成功工作,以及其他必要的先决条件是否到位
]# nova-status upgrade check
+--------------------------------+
| Upgrade Check Results          |
+--------------------------------+
| Check: Cells v2                |
| Result: Success                |
| Details: None                  |
+--------------------------------+
| Check: Placement API           |
| Result: Success                |
| Details: None                  |
+--------------------------------+
| Check: Ironic Flavor Migration |
| Result: Success                |
| Details: None                  |
+--------------------------------+
| Check: Cinder API              |
| Result: Success                |
| Details: None                  |
+--------------------------------+
12、安装neutron(控制节点)
- 在10.1.1.11上安装neutron(openstack控制节点)。
12.1、前提条件
12.1.1、创建MySQL用户
//(1)登录MySQL
]# mysql -u root -p

//(2)创建数据库
MariaDB [(none)]> CREATE DATABASE neutron;

//(3)创建mysql用户,并授权(注意,这里只有一个MySQL用户)
MariaDB [(none)]> GRANT ALL PRIVILEGES ON neutron.* TO 'neutron'@'%' IDENTIFIED BY 'neutron123';
12.1.2、创建neutron服务的凭证
//(1)source admin凭据以管理员身份访问的Keystone
]# source admin-openrc

//(2)在Keystone上创建neutron用户
]# openstack user create --domain default --password-prompt neutron

//(3)将角色“admin”添加(绑定)到项目“service”和用户“neutron”中
]# openstack role add --project service --user neutron admin
12.1.3、创建neutron服务实体及注册API
//(1)创建neutron服务实体(用于注册后端服务器,相当于k8s的service name)
]# openstack service create --name neutron --description "OpenStack Networking" network

//(2)注册neutron服务的API(相当于k8s的pod)
]# openstack endpoint create --region RegionOne network public http://openstack-haproxy-vip:9696
]# openstack endpoint create --region RegionOne network internal http://openstack-haproxy-vip:9696
]# openstack endpoint create --region RegionOne network admin http://openstack-haproxy-vip:9696
12.2、安装和配置neutron(Provider networks)
12.2.1、安装neutron
]# yum install openstack-neutron openstack-neutron-ml2 openstack-neutron-linuxbridge ebtables python2-PyMySQL python-memcached
12.2.2、配置各服务组件
- 配置文件说明:https://docs.openstack.org/ocata/config-reference/networking/samples/
1、配置neutron
]# vim /etc/neutron/neutron.conf
//启用 Modular Layer 2 (ML2) 插件并禁用其他插件
//连接RabbitMQ
//使用keystone进行认证
//配置Networking以通知Compute网络拓扑更改
[DEFAULT]
core_plugin = ml2
service_plugins =

transport_url = rabbit://openstack:openstack123@openstack-haproxy-vip

auth_strategy = keystone

notify_nova_on_port_status_changes = true
notify_nova_on_port_data_changes = true

//连接MySQL
[database]
connection = mysql+pymysql://neutron:neutron123@openstack-haproxy-vip/neutron

//连接keystone
[keystone_authtoken]
www_authenticate_uri = http://openstack-haproxy-vip:5000
auth_url = http://openstack-haproxy-vip:5000
memcached_servers = openstack-haproxy-vip:11211
auth_type = password
project_domain_name = default
user_domain_name = default
project_name = service
username = neutron
password = neutron

//连接nova(没有就追加到文件的最后)
[nova]
auth_url = http://openstack-haproxy-vip:5000
auth_type = password
project_domain_name = default
user_domain_name = default
region_name = RegionOne
project_name = service
username = nova
password = nova

//锁文件
[oslo_concurrency]
lock_path = /var/lib/neutron/tmp
- 也可以使用配置工具openstack-config进行配置
//安装配置工具
yum install openstack-utils.noarch

//配置neutron
openstack-config --set /etc/neutron/neutron.conf DEFAULT core_plugin ml2
openstack-config --set /etc/neutron/neutron.conf DEFAULT service_plugins
openstack-config --set /etc/neutron/neutron.conf DEFAULT transport_url rabbit://openstack:openstack123@openstack-haproxy-vip
openstack-config --set /etc/neutron/neutron.conf DEFAULT auth_strategy keystone
openstack-config --set /etc/neutron/neutron.conf DEFAULT notify_nova_on_port_status_changes true
openstack-config --set /etc/neutron/neutron.conf DEFAULT notify_nova_on_port_data_changes true

openstack-config --set /etc/neutron/neutron.conf database connection mysql+pymysql://neutron:neutron123@openstack-haproxy-vip/neutron

openstack-config --set /etc/neutron/neutron.conf keystone_authtoken www_authenticate_uri http://openstack-haproxy-vip:5000
openstack-config --set /etc/neutron/neutron.conf keystone_authtoken auth_url http://openstack-haproxy-vip:5000
openstack-config --set /etc/neutron/neutron.conf keystone_authtoken memcached_servers openstack-haproxy-vip:11211
openstack-config --set /etc/neutron/neutron.conf keystone_authtoken auth_type password
openstack-config --set /etc/neutron/neutron.conf keystone_authtoken project_domain_name default
openstack-config --set /etc/neutron/neutron.conf keystone_authtoken user_domain_name default
openstack-config --set /etc/neutron/neutron.conf keystone_authtoken project_name service
openstack-config --set /etc/neutron/neutron.conf keystone_authtoken username neutron
openstack-config --set /etc/neutron/neutron.conf keystone_authtoken password neutron

openstack-config --set /etc/neutron/neutron.conf oslo_concurrency lock_path /var/lib/neutron/tmp

openstack-config --set /etc/neutron/neutron.conf nova auth_url http://openstack-haproxy-vip:5000
openstack-config --set /etc/neutron/neutron.conf nova auth_type password
openstack-config --set /etc/neutron/neutron.conf nova project_domain_name default
openstack-config --set /etc/neutron/neutron.conf nova user_domain_name default
openstack-config --set /etc/neutron/neutron.conf nova region_name RegionOne
openstack-config --set /etc/neutron/neutron.conf nova project_name service
openstack-config --set /etc/neutron/neutron.conf nova username nova
openstack-config --set /etc/neutron/neutron.conf nova password nova
2、第2层网络插件(ML2)
- (1)修改ml2_conf.ini配置文件
]# vim /etc/neutron/plugins/ml2/ml2_conf.ini
//启用平面和 VLAN 网络
//禁用自助服务网络
//启用 Linux 桥接机制
//启用端口安全扩展驱动程序
[ml2]
type_drivers = flat,vlan

tenant_network_types =

mechanism_drivers = linuxbridge

extension_drivers = port_security

//将提供者虚拟网络配置为平面网络(自定义网络名称)
[ml2_type_flat]
flat_networks = providerhengha

//启用ipset以提高安全组规则的效率(关闭安全组,改为false)
[securitygroup]
enable_ipset = true
-
- 也可以使用配置工具openstack-config进行配置
//安装配置工具
yum install openstack-utils.noarch

//配置nova
openstack-config --set /etc/neutron/plugins/ml2/ml2_conf.ini ml2 type_drivers flat,vlan
openstack-config --set /etc/neutron/plugins/ml2/ml2_conf.ini ml2 tenant_network_types
openstack-config --set /etc/neutron/plugins/ml2/ml2_conf.ini ml2 mechanism_drivers linuxbridge
openstack-config --set /etc/neutron/plugins/ml2/ml2_conf.ini ml2 extension_drivers port_security

openstack-config --set /etc/neutron/plugins/ml2/ml2_conf.ini ml2_type_flat flat_networks providerhengha

openstack-config --set /etc/neutron/plugins/ml2/ml2_conf.ini securitygroup enable_ipset true
- (2)网络服务初始化需要使用插件
]# ln -s /etc/neutron/plugins/ml2/ml2_conf.ini /etc/neutron/plugin.ini
3、配置Linux网桥代理
- (1)配置linuxbridge_agent.ini文件
]# vim /etc/neutron/plugins/ml2/linuxbridge_agent.ini
//将提供商虚拟网络映射到提供商物理网络接口(自定义网络名称:网卡名)
[linux_bridge]
physical_interface_mappings = providerhengha:eth0

//禁用VXLAN覆盖网络
[vxlan]
enable_vxlan = false

//启用安全组并配置 Linux bridge iptables 防火墙驱动程序(关闭安全组,改为false)
[securitygroup]
enable_security_group = true
firewall_driver = neutron.agent.linux.iptables_firewall.IptablesFirewallDriver
- 也可以使用配置工具openstack-config进行配置
//安装配置工具
yum install openstack-utils.noarch

//配置linuxbridge_agent
openstack-config --set /etc/neutron/plugins/ml2/linuxbridge_agent.ini linux_bridge physical_interface_mappings providerhengha:eth0

openstack-config --set /etc/neutron/plugins/ml2/linuxbridge_agent.ini vxlan enable_vxlan false

openstack-config --set /etc/neutron/plugins/ml2/linuxbridge_agent.ini securitygroup enable_security_group true
openstack-config --set /etc/neutron/plugins/ml2/linuxbridge_agent.ini securitygroup firewall_driver neutron.agent.linux.iptables_firewall.IptablesFirewallDriver
- (2)Linux操作系统内核支持网桥过滤器
//(1)设置内核参数
]# vim /etc/sysctl.conf
net.bridge.bridge-nf-call-iptables = 1
net.bridge.bridge-nf-call-ip6tables = 1

//(2)使设置的内核参数生效
]# modprobe br_netfilter
]# sysctl -p
4、配置DHCP代理
]# vim /etc/neutron/dhcp_agent.ini
[DEFAULT]
interface_driver = linuxbridge
dhcp_driver = neutron.agent.linux.dhcp.Dnsmasq
enable_isolated_metadata = true
- 也可以使用配置工具openstack-config进行配置
//安装配置工具
yum install openstack-utils.noarch

//配置dhcp_agent
openstack-config --set /etc/neutron/dhcp_agent.ini DEFAULT interface_driver linuxbridge
openstack-config --set /etc/neutron/dhcp_agent.ini DEFAULT dhcp_driver neutron.agent.linux.dhcp.Dnsmasq
openstack-config --set /etc/neutron/dhcp_agent.ini DEFAULT enable_isolated_metadata true
5、配置元数据代理
- nova会通过这里的配置连接到neutron上,并获取各节点的元信息(通过nova的8775端口)。
]# vim /etc/neutron/metadata_agent.ini
//配置元数据主机
//共享密钥
[DEFAULT]
nova_metadata_host = openstack-haproxy-vip
metadata_proxy_shared_secret = hengha123
- 也可以使用配置工具openstack-config进行配置
//安装配置工具
yum install openstack-utils.noarch

//配置metadata_agen
openstack-config --set /etc/neutron/metadata_agent.ini DEFAULT nova_metadata_host openstack-haproxy-vip
openstack-config --set /etc/neutron/metadata_agent.ini DEFAULT metadata_proxy_shared_secret hengha123
6、配置nova(Compute service)以使用网络服务
- (1)修改nova.conf配置文件
- nova会通过这里的配置连接到neutron上。
]# vim /etc/nova/nova.conf
[neutron]
auth_url = http://openstack-haproxy-vip:5000
auth_type = password
project_domain_name = default
user_domain_name = default
region_name = RegionOne
project_name = service
username = neutron
password = neutron
service_metadata_proxy = true
metadata_proxy_shared_secret = hengha123
-
- 也可以使用配置工具openstack-config进行配置
//安装配置工具
yum install openstack-utils.noarch

//配置nova
openstack-config --set /etc/nova/nova.conf neutron auth_url http://openstack-haproxy-vip:5000
openstack-config --set /etc/nova/nova.conf neutron auth_type password
openstack-config --set /etc/nova/nova.conf neutron project_domain_name default
openstack-config --set /etc/nova/nova.conf neutron user_domain_name default
openstack-config --set /etc/nova/nova.conf neutron region_name RegionOne
openstack-config --set /etc/nova/nova.conf neutron project_name service
openstack-config --set /etc/nova/nova.conf neutron username neutron
openstack-config --set /etc/nova/nova.conf neutron password neutron
openstack-config --set /etc/nova/nova.conf neutron service_metadata_proxy true
openstack-config --set /etc/nova/nova.conf neutron metadata_proxy_shared_secret hengha123
- (2)重启nova-api服务
]# systemctl restart openstack-nova-api.service
12.2.3、初始化数据库
]# su -s /bin/sh -c "neutron-db-manage --config-file /etc/neutron/neutron.conf \
  --config-file /etc/neutron/plugins/ml2/ml2_conf.ini upgrade head" neutron
12.3、启动neutron
1、启动neutron
]# systemctl enable neutron-server.service neutron-linuxbridge-agent.service \
    neutron-dhcp-agent.service neutron-metadata-agent.service
]# systemctl start neutron-server.service neutron-linuxbridge-agent.service \
    neutron-dhcp-agent.service neutron-metadata-agent.service
2、测试neutron的API
]# curl 10.1.1.11:9696
{"versions": [{"status": "CURRENT", "id": "v2.0", "links": [{"href": "http://10.1.1.11:9696/v2.0/", "rel": "self"}]}]}

]# curl openstack-haproxy-vip:9696
{"versions": [{"status": "CURRENT", "id": "v2.0", "links": [{"href": "http://openstack-haproxy-vip:9696/v2.0/", "rel": "self"}]}]}
13、安装neutron(计算节点)
- 在10.1.1.12上安装neutron(openstack计算节点)。
13.1、安装和配置neutron(Provider networks)
13.1.1、安装neutron
]# yum install openstack-neutron openstack-neutron-ml2 openstack-neutron-linuxbridge ebtables python-memcached
13.1.2、配置各服务组件
1、配置neutron
]# vim /etc/neutron/neutron.conf
//连接RabbitMQ
//使用keystone进行认证
[DEFAULT]
transport_url = rabbit://openstack:openstack123@openstack-haproxy-vip

auth_strategy = keystone

//连接keystone
[keystone_authtoken]
www_authenticate_uri = http://openstack-haproxy-vip:5000
auth_url = http://openstack-haproxy-vip:5000
memcached_servers = openstack-haproxy-vip:11211
auth_type = password
project_domain_name = default
user_domain_name = default
project_name = service
username = neutron
password = neutron

//锁文件
[oslo_concurrency]
lock_path = /var/lib/neutron/tmp
- 也可以使用配置工具openstack-config进行配置
//安装配置工具
yum install openstack-utils.noarch

//配置neutron
openstack-config --set /etc/neutron/neutron.conf DEFAULT transport_url rabbit://openstack:openstack123@openstack-haproxy-vip
openstack-config --set /etc/neutron/neutron.conf DEFAULT auth_strategy keystone

openstack-config --set /etc/neutron/neutron.conf keystone_authtoken www_authenticate_uri http://openstack-haproxy-vip:5000
openstack-config --set /etc/neutron/neutron.conf keystone_authtoken auth_url http://openstack-haproxy-vip:5000
openstack-config --set /etc/neutron/neutron.conf keystone_authtoken memcached_servers openstack-haproxy-vip:11211
openstack-config --set /etc/neutron/neutron.conf keystone_authtoken auth_type password
openstack-config --set /etc/neutron/neutron.conf keystone_authtoken project_domain_name default
openstack-config --set /etc/neutron/neutron.conf keystone_authtoken user_domain_name default
openstack-config --set /etc/neutron/neutron.conf keystone_authtoken project_name service
openstack-config --set /etc/neutron/neutron.conf keystone_authtoken username neutron
openstack-config --set /etc/neutron/neutron.conf keystone_authtoken password neutron

openstack-config --set /etc/neutron/neutron.conf oslo_concurrency lock_path /var/lib/neutron/tmp
2、配置Linux网桥代理
- (1)配置linuxbridge_agent.ini文件
]# vim /etc/neutron/plugins/ml2/linuxbridge_agent.ini
//将提供商虚拟网络映射到提供商物理网络接口(自定义网络名称:网卡名)
[linux_bridge]
physical_interface_mappings = providerhengha:eth0

//禁用VXLAN覆盖网络
[vxlan]
enable_vxlan = false

//启用安全组并配置 Linux bridge iptables 防火墙驱动程序(关闭安全组,改为false)
[securitygroup]
enable_security_group = true
firewall_driver = neutron.agent.linux.iptables_firewall.IptablesFirewallDriver
-
- 也可以使用配置工具openstack-config进行配置
//安装配置工具
yum install openstack-utils.noarch

//配置linuxbridge_agent
openstack-config --set /etc/neutron/plugins/ml2/linuxbridge_agent.ini linux_bridge physical_interface_mappings providerhengha:eth0

openstack-config --set /etc/neutron/plugins/ml2/linuxbridge_agent.ini vxlan enable_vxlan false

openstack-config --set /etc/neutron/plugins/ml2/linuxbridge_agent.ini securitygroup enable_security_group true
openstack-config --set /etc/neutron/plugins/ml2/linuxbridge_agent.ini securitygroup firewall_driver neutron.agent.linux.iptables_firewall.IptablesFirewallDriver
- (2)Linux操作系统内核支持网桥过滤器
//(1)设置内核参数
]# vim /etc/sysctl.conf
net.bridge.bridge-nf-call-iptables = 1
net.bridge.bridge-nf-call-ip6tables = 1

//(2)使设置的内核参数生效
]# modprobe br_netfilter
]# sysctl -p
3、配置nova(Compute service)以使用网络服务
- (1)修改nova.conf配置文件
]# vim /etc/nova/nova.conf
[neutron]
auth_url = http://openstack-haproxy-vip:5000
auth_type = password
project_domain_name = default
user_domain_name = default
region_name = RegionOne
project_name = service
username = neutron
password = neutron
-
- 也可以使用配置工具openstack-config进行配置
//安装配置工具
yum install openstack-utils.noarch

//配置nova
openstack-config --set /etc/nova/nova.conf neutron auth_url http://openstack-haproxy-vip:5000
openstack-config --set /etc/nova/nova.conf neutron auth_type password
openstack-config --set /etc/nova/nova.conf neutron project_domain_name default
openstack-config --set /etc/nova/nova.conf neutron user_domain_name default
openstack-config --set /etc/nova/nova.conf neutron region_name RegionOne
openstack-config --set /etc/nova/nova.conf neutron project_name service
openstack-config --set /etc/nova/nova.conf neutron username neutron
openstack-config --set /etc/nova/nova.conf neutron password neutron
- (2)重启nova-compute服务
]# systemctl restart openstack-nova-compute.service
13.2、启动neutron
]# systemctl enable neutron-linuxbridge-agent.service
]# systemctl start neutron-linuxbridge-agent.service
13.3、验证
- 在openstack的控制节点上进行验证。
]# openstack network agent list
+--------------------------------------+--------------------+----------+-------------------+-------+-------+---------------------------+
| ID                                   | Agent Type         | Host     | Availability Zone | Alive | State | Binary                    |
+--------------------------------------+--------------------+----------+-------------------+-------+-------+---------------------------+
| 15d67ad8-db15-47dc-ad14-592e34257195 | Linux bridge agent | hengha72 | None              | :-)   | UP    | neutron-linuxbridge-agent |
| 1a20c08b-e8c2-4372-b43b-8e74f2364553 | DHCP agent         | hengha71 | nova              | :-)   | UP    | neutron-dhcp-agent        |
| 8f9c88f5-fe67-497c-b005-69c060616327 | Linux bridge agent | hengha71 | None              | :-)   | UP    | neutron-linuxbridge-agent |
| 983a0601-add8-4437-9be2-2038e5255b97 | Metadata agent     | hengha71 | None              | :-)   | UP    | neutron-metadata-agent    |
+--------------------------------------+--------------------+----------+-------------------+-------+-------+---------------------------+
14、启动一个虚拟机实例
- 在10.1.1.11上创建虚拟机实例(openstack控制节点)。
14.1、创建虚拟网络(Provider networks)
1、source admin凭据以管理员身份访问的Keystone
]# source admin-openrc
2、创建一个虚拟网路
//在物理网络“providerhengha”上创建一个虚拟网路“providerhengha-net”
]# openstack network create --share --external --provider-physical-network providerhengha \
    --provider-network-type flat providerhengha-net
- --share:允许所有project(项目)使用虚拟网络。
- --external:将虚拟网络定义为外部网络。默认是内部网络--internal
- --provider-physical-network provider和--provider-network-type flat:将平面虚拟网络连接到主机的eth0接口上的物理网络。
3、在虚拟网路中创建一个子网
]# openstack subnet create --network providerhengha-net --dns-nameserver 114.114.114.114 --gateway 10.1.1.2 \
  --allocation-pool start=10.1.1.100,end=10.1.1.200 --subnet-range 10.1.1.0/24 providerhengha-net-sub
- --dns-nameserver:子网的DNS。
- --gateway:子网的网关。
- --allocation-pool start=<ip-address>,end=<ip-address>:子网的IP地址池
- --subnet-range:子网的网络(如果没有指定--allocation-pool则为必选项,否则为可选项)
14.2、创建虚拟机
14.2.1、创建实例类型m1.nano
]# openstack flavor create --id 0 --vcpus 1 --ram 64 --disk 1 m1.nano
- --ram <size-mb>:内存大小,单位是MB(default 256M)
- --disk <size-gb>:磁盘大小,单位是GB(default 0G)
- --vcpus <vcpus>:CPU数量(default 1)
14.2.2、创建ssh的密钥对
//(1)source admin凭据以管理员身份访问的Keystone
]# source admin-openrc

//(2)创建ssh的密钥对
]# ssh-keygen -q -N ""
]# openstack keypair create --public-key ~/.ssh/id_rsa.pub mykey
+-------------+-------------------------------------------------+
| Field       | Value                                           |
+-------------+-------------------------------------------------+
| fingerprint | 26:23:12:e3:af:2b:a4:c9:3f:2c:74:1e:ff:17:bd:31 |
| name        | mykey                                           |
| user_id     | e0327c9801a845468c382d6c659bb659                |
+-------------+-------------------------------------------------+

//(3)查看ssh密钥对
]# openstack keypair list
+-------+-------------------------------------------------+
| Name  | Fingerprint                                     |
+-------+-------------------------------------------------+
| mykey | 26:23:12:e3:af:2b:a4:c9:3f:2c:74:1e:ff:17:bd:31 |
+-------+-------------------------------------------------+
14.2.3、添加安全组规则
- 默认情况下,默认安全组(default security group )应用于所有实例,包括拒绝远程访问实例的防火墙规则。对于CirrOS之类的Linux映像,建议至少允许ICMP (ping)和安全shell (SSH)。
//允许ping
]# openstack security group rule create --proto icmp default

//允许SSH
]# openstack security group rule create --proto tcp --dst-port 22 default
14.2.4、创建虚拟机
1、查看创建虚拟机需要的信息
//(1)查看虚拟机实例类型
]# openstack flavor list
+----+---------+-----+------+-----------+-------+-----------+
| ID | Name    | RAM | Disk | Ephemeral | VCPUs | Is Public |
+----+---------+-----+------+-----------+-------+-----------+
| 0  | m1.nano |  64 |    1 |         0 |     1 | True      |
+----+---------+-----+------+-----------+-------+-----------+

//(2)查看网络
]# openstack network list
+--------------------------------------+--------------------+--------------------------------------+
| ID                                   | Name               | Subnets                              |
+--------------------------------------+--------------------+--------------------------------------+
| 9832ff03-522a-47bf-9cff-af6c26f57160 | providerhengha-net | bc465b01-8050-4ad6-80ce-26ee215a4b29 |
+--------------------------------------+--------------------+--------------------------------------+

//(3)查看安全组
]# openstack security group list
+--------------------------------------+---------+-------------+----------------------------------+------+
| ID                                   | Name    | Description | Project                          | Tags |
+--------------------------------------+---------+-------------+----------------------------------+------+
| 88bc5f13-26b9-447e-b843-13bd7e43711a | default | 缺省安全组  | b2bd23da7eba40a0986b616a8b52341b | []   |
+--------------------------------------+---------+-------------+----------------------------------+------+

//(4)查看镜像
]# openstack image list
+--------------------------------------+--------------------------+--------+
| ID                                   | Name                     | Status |
+--------------------------------------+--------------------------+--------+
| f41326c0-bc66-4d15-922f-780234caf33d | cirros-0.4.0-x86_64-disk | active |
+--------------------------------------+--------------------------+--------+

//(5)查看ssh密钥对
]# openstack keypair list
+-------+-------------------------------------------------+
| Name  | Fingerprint                                     |
+-------+-------------------------------------------------+
| mykey | 26:23:12:e3:af:2b:a4:c9:3f:2c:74:1e:ff:17:bd:31 |
+-------+-------------------------------------------------+
2、创建虚拟机
]# openstack server create --flavor m1.nano --nic net-id=9832ff03-522a-47bf-9cff-af6c26f57160 \
    --security-group default --image cirros-0.4.0-x86_64-disk --key-name mykey hengha-cirros-01
3、查看虚拟机状态
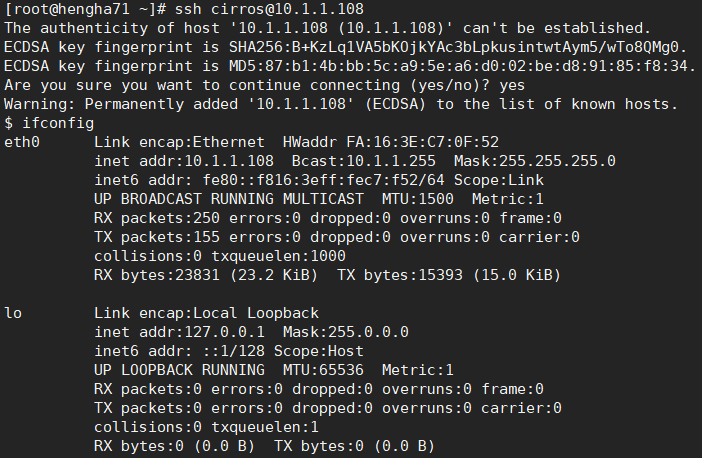
]# openstack server list
+--------------------------------------+------------------+--------+-------------------------------+--------------------------+---------+
| ID                                   | Name             | Status | Networks                      | Image                    | Flavor  |
+--------------------------------------+------------------+--------+-------------------------------+--------------------------+---------+
| 41e74a8b-e046-4f19-8af3-694f4cf1adbe | hengha-cirros-01 | ACTIVE | providerhengha-net=10.1.1.108 | cirros-0.4.0-x86_64-disk | m1.nano |
+--------------------------------------+------------------+--------+-------------------------------+--------------------------+---------+
- 使用ssh访问该虚拟机
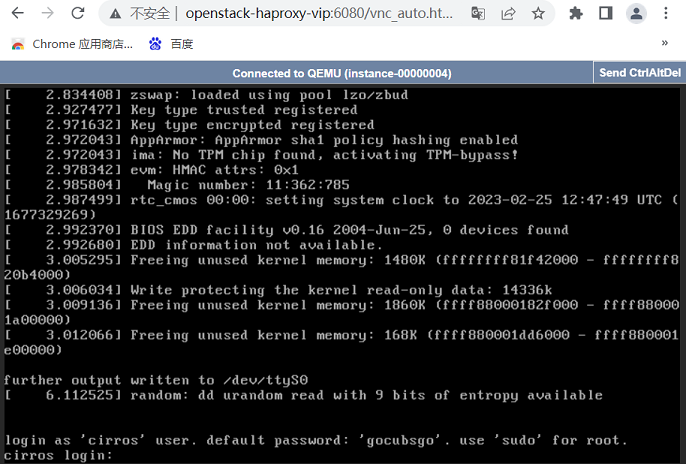
4、使用虚拟控制台访问实例
- 获取虚拟网络计算(VNC)会话URL,并从web浏览器访问它。
]# openstack console url show hengha-cirros-01
+-------+------------------------------------------------------------------------------------------------------+
| Field | Value                                                                                                |
+-------+------------------------------------------------------------------------------------------------------+
| type  | novnc                                                                                                |
| url   | http://openstack-haproxy-vip:6080/vnc_auto.html?path=%3Ftoken%3D0260ab2f-d25a-42dc-b106-c7438a1cb84c |
+-------+------------------------------------------------------------------------------------------------------+
- 使用url访问该虚拟机
15、扩容控制和计算节点
1、扩容控制节点
- 除了不进行数据库初始化外,其他全部一样。
2、扩容计算节点
- 全部一样。
16、安装dashboard
- 在10.1.1.11上安装dashboard(openstack控制节点)。
16.1、安装和配置dashboard
16.1.1、安装dashboard
]# yum install openstack-dashboard python-memcached
16.1.2、配置dashboard
1、配置local_settings文件
]# vim /etc/openstack-dashboard/local_settings
//配置dashboard的所在机器的IP,启用Identity API版本3。
OPENSTACK_HOST = "openstack-haproxy-vip"
OPENSTACK_KEYSTONE_URL = "http://%s:5000/v3" % OPENSTACK_HOST

//允许访问的域名列表
ALLOWED_HOSTS = ['10.1.1.11', 'openstack-haproxy-vip']

//配置memcached
SESSION_ENGINE = 'django.contrib.sessions.backends.cache'
CACHES = {
    'default': {
         'BACKEND': 'django.core.cache.backends.memcached.MemcachedCache',
         'LOCATION': 'openstack-haproxy-vip:11211',
    }
}

//启用域
OPENSTACK_KEYSTONE_MULTIDOMAIN_SUPPORT = True

//配置各API的版本
OPENSTACK_API_VERSIONS = {
    "identity": 3,
    "image": 2,
    "volume": 3,
}

//配置登录dashboard时,默认的域
OPENSTACK_KEYSTONE_DEFAULT_DOMAIN = "Default"

//配置登录dashboard时,默认的角色(role)
OPENSTACK_KEYSTONE_DEFAULT_ROLE = "user"

//如果是提供者网络,请关闭对三层组网的支持。
OPENSTACK_NEUTRON_NETWORK = {
    'enable_router': False,
    'enable_quotas': False,
    'enable_distributed_router': False,
    'enable_ha_router': False,
    'enable_lb': False,
    'enable_firewall': False,
    'enable_vpn': False,
    'enable_fip_topology_check': False,
}

//配置时区
TIME_ZONE = "Asia/Shanghai"
2、配置openstack-dashboard.conf文件
]# vim /etc/httpd/conf.d/openstack-dashboard.conf
WSGIApplicationGroup %{GLOBAL}
16.2、启动dashboard
- dashboard是一个htttpd程序。
1、启动前必须指明WEBROOT
]# vim /etc/openstack-dashboard/local_settings
WEBROOT = '/dashboard'
2、启动httpd
]# systemctl restart httpd.service
16.3、使用dashboard
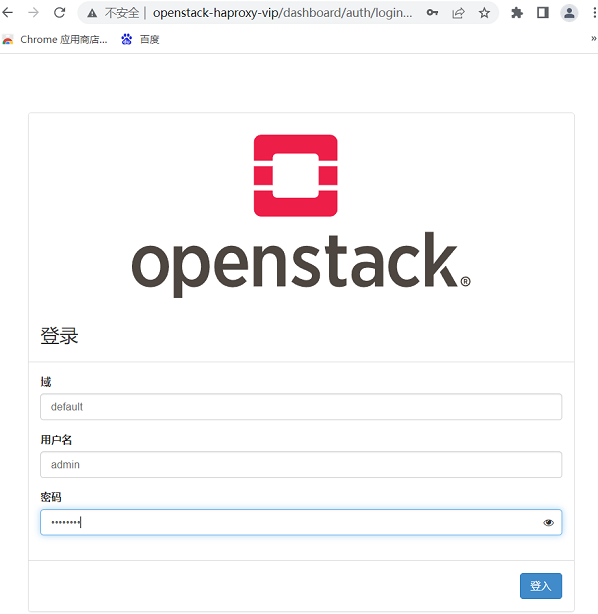
16.3.1、登录dashboard
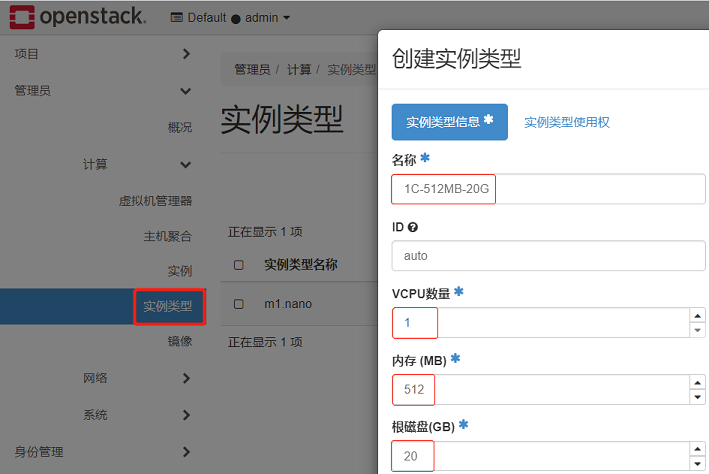
16.3.2、创建虚拟机实例类型
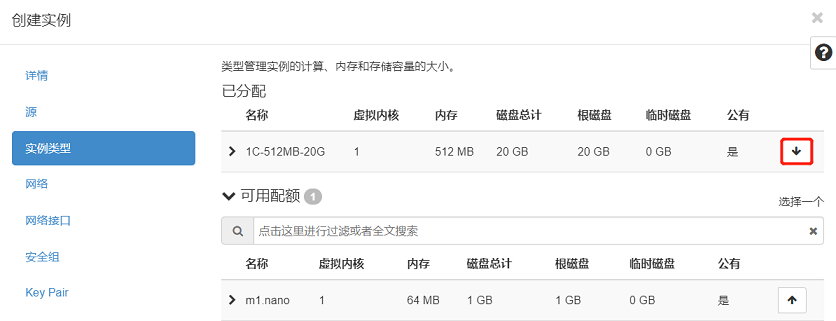
- 1C-512MB-20G:1C是cup数量,512MB是内存空间,20G是磁盘空间。
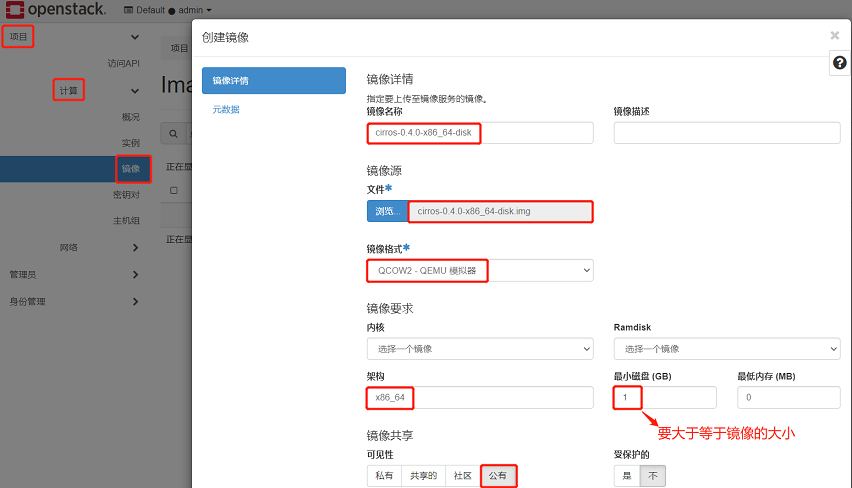
16.3.4、上传镜像
16.3.5、创建虚拟机
1、虚拟机名称和数量
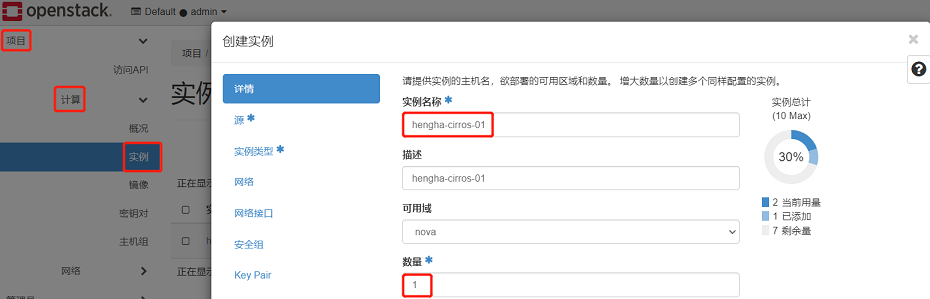
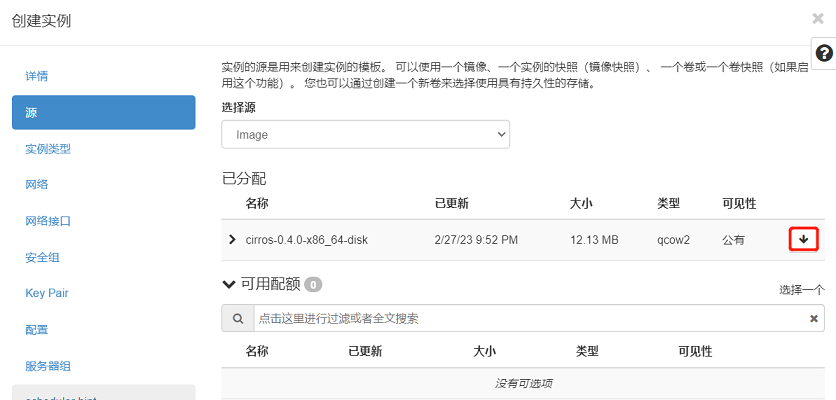
2、选择虚拟机镜像
3、选择虚拟机实例类型
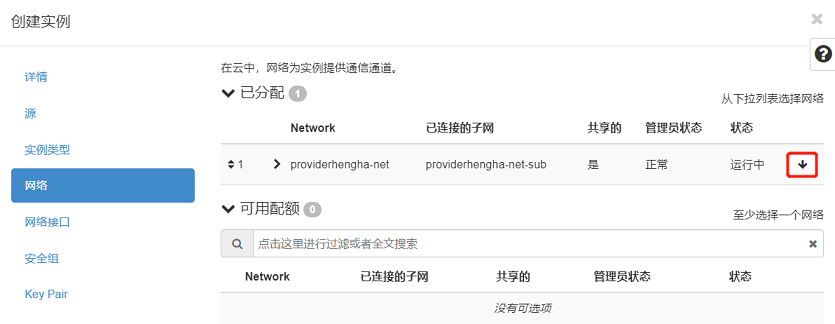
4、选择虚拟网路
5、选择安全组

17、安装cinder(控制节点)
- 在10.1.1.11上安装cinder控制节点(openstack控制节点)。
17.1、前提条件
17.1.1、创建MySQL用户
//(1)登录MySQL
]# mysql -u root -p

//(2)创建数据库
MariaDB [(none)]> CREATE DATABASE cinder;

//(3)创建mysql用户,并授权(注意,这里只有一个MySQL用户)
MariaDB [(none)]> GRANT ALL PRIVILEGES ON cinder.* TO 'cinder'@'%' IDENTIFIED BY 'cinder123';
17.1.2、创建cinder服务的凭证
//(1)source admin凭据以管理员身份访问的Keystone
]# source admin-openrc

//(2)在Keystone上创建cinder用户
]# openstack user create --domain default --password-prompt cinder

//(3)将角色“admin”添加(绑定)到项目“service”和用户“cinder”中
]# openstack role add --project service --user cinder admin
17.1.3、创建cinder服务实体及注册API
//(1)创建cinder服务实体(用于注册后端服务器,相当于k8s的service name)
]# openstack service create --name cinderv2 --description "OpenStack Block Storage" volumev2
]# openstack service create --name cinderv3 --description "OpenStack Block Storage" volumev3

//(2)注册cinder服务的API(相当于k8s的pod)
]# openstack endpoint create --region RegionOne volumev2 public http://openstack-haproxy-vip:8776/v2/%\(project_id\)s
]# openstack endpoint create --region RegionOne volumev2 internal http://openstack-haproxy-vip:8776/v2/%\(project_id\)s
]# openstack endpoint create --region RegionOne volumev2 admin http://openstack-haproxy-vip:8776/v2/%\(project_id\)s

]# openstack endpoint create --region RegionOne volumev3 public http://openstack-haproxy-vip:8776/v3/%\(project_id\)s
]# openstack endpoint create --region RegionOne volumev3 internal http://openstack-haproxy-vip:8776/v3/%\(project_id\)s
]# openstack endpoint create --region RegionOne volumev3 admin http://openstack-haproxy-vip:8776/v3/%\(project_id\)s
17.2、安装和配置cinder
10.2.1、安装cinder
]# yum install openstack-cinder python2-PyMySQL python-memcached
17.2.2、配置各服务组件
1、配置cinder
]# vim /etc/cinder/cinder.conf
[DEFAULT]
//连接RabbitMQ
transport_url = rabbit://openstack:openstack123@openstack-haproxy-vip
//使用keystone进行认证
auth_strategy = keystone
//控制节点的管理接口(IP地址)
my_ip = 10.1.1.11

//连接MySQL
[database]
connection = mysql+pymysql://cinder:cinder123@openstack-haproxy-vip/cinder

//设置连接keystone的信息
[keystone_authtoken]
www_authenticate_uri = http://openstack-haproxy-vip:5000
auth_url = http://openstack-haproxy-vip:5000
memcached_servers = openstack-haproxy-vip:11211
auth_type = password
project_domain_name = default
user_domain_name = default
project_name = service
username = cinder
password = cinder

//锁文件
[oslo_concurrency]
lock_path = /var/lib/cinder/tmp
- 也可以使用配置工具openstack-config进行配置
//安装配置工具
yum install openstack-utils.noarch

//配置cinder
openstack-config --set /etc/cinder/cinder.conf DEFAULT transport_url rabbit://openstack:openstack123@openstack-haproxy-vip
openstack-config --set /etc/cinder/cinder.conf DEFAULT auth_strategy keystone
openstack-config --set /etc/cinder/cinder.conf DEFAULT my_ip 10.1.1.11

openstack-config --set /etc/cinder/cinder.conf database connection mysql+pymysql://cinder:cinder123@openstack-haproxy-vip/cinder

openstack-config --set /etc/cinder/cinder.conf keystone_authtoken www_authenticate_uri http://openstack-haproxy-vip:5000
openstack-config --set /etc/cinder/cinder.conf keystone_authtoken auth_url http://openstack-haproxy-vip:5000
openstack-config --set /etc/cinder/cinder.conf keystone_authtoken memcached_servers openstack-haproxy-vip:11211
openstack-config --set /etc/cinder/cinder.conf keystone_authtoken auth_type password
openstack-config --set /etc/cinder/cinder.conf keystone_authtoken project_domain_name default
openstack-config --set /etc/cinder/cinder.conf keystone_authtoken user_domain_name default
openstack-config --set /etc/cinder/cinder.conf keystone_authtoken project_name service
openstack-config --set /etc/cinder/cinder.conf keystone_authtoken username cinder
openstack-config --set /etc/cinder/cinder.conf keystone_authtoken password cinder

openstack-config --set /etc/cinder/cinder.conf oslo_concurrency lock_path /var/lib/cinder/tmp
2、配置nova
]# vim /etc/nova/nova.conf
[cinder]
os_region_name = RegionOne
- 也可以使用配置工具openstack-config进行配置
//安装配置工具
yum install openstack-utils.noarch

//配置nova
openstack-config --set /etc/nova/nova.conf cinder os_region_name RegionOne
17.2.3、初始化数据库
]# su -s /bin/sh -c "cinder-manage db sync" cinder
17.2、启动cinder
]# systemctl enable openstack-cinder-api.service openstack-cinder-scheduler.service
]# systemctl start openstack-cinder-api.service openstack-cinder-scheduler.service
18、安装cinder(储存节点)
- 在10.1.1.15上安装cinder存储节点(任意其他机器)。
18.1、安装和配置cinder
18.1.1、安装cinder
]# yum install openstack-cinder targetcli python-keystone python2-PyMySQL python-memcached
18.1.2、配置cinder
]# vim /etc/cinder/cinder.conf
[DEFAULT]
//使用keystone进行认证
auth_strategy = keystone
//连接RabbitMQ
transport_url = rabbit://openstack:openstack123@openstack-haproxy-vip
//连接glance
glance_api_servers = http://openstack-haproxy-vip:9292
//存储节点的IP地址
my_ip = 10.1.1.15
//启用后端存储块,后端名称是自定义的
enabled_backends = storage_name

//连接mysql
[database]
connection = mysql+pymysql://cinder:cinder123@openstack-haproxy-vip/cinder

//设置连接keystone的信息
[keystone_authtoken]
www_authenticate_uri = http://openstack-haproxy-vip:5000
auth_url = http://openstack-haproxy-vip:5000
memcached_servers = openstack-haproxy-vip:11211
auth_type = password
project_domain_name = default
user_domain_name = default
project_name = service
username = cinder
password = cinder

//锁文件
[oslo_concurrency]
lock_path = /var/lib/cinder/tmp
- 也可以使用配置工具openstack-config进行配置
//安装配置工具
yum install openstack-utils.noarch

//配置cinder
openstack-config --set /etc/cinder/cinder.conf DEFAULT auth_strategy keystone
openstack-config --set /etc/cinder/cinder.conf DEFAULT transport_url rabbit://openstack:openstack123@openstack-haproxy-vip
openstack-config --set /etc/cinder/cinder.conf DEFAULT glance_api_servers http://openstack-haproxy-vip:9292
openstack-config --set /etc/cinder/cinder.conf DEFAULT my_ip 10.1.1.15
openstack-config --set /etc/cinder/cinder.conf DEFAULT enabled_backends storage_name

openstack-config --set /etc/cinder/cinder.conf database connection mysql+pymysql://cinder:cinder123@openstack-haproxy-vip/cinder

openstack-config --set /etc/cinder/cinder.conf keystone_authtoken www_authenticate_uri http://openstack-haproxy-vip:5000
openstack-config --set /etc/cinder/cinder.conf keystone_authtoken auth_url http://openstack-haproxy-vip:5000
openstack-config --set /etc/cinder/cinder.conf keystone_authtoken memcached_servers openstack-haproxy-vip:11211
openstack-config --set /etc/cinder/cinder.conf keystone_authtoken auth_type password
openstack-config --set /etc/cinder/cinder.conf keystone_authtoken project_domain_name default
openstack-config --set /etc/cinder/cinder.conf keystone_authtoken user_domain_name default
openstack-config --set /etc/cinder/cinder.conf keystone_authtoken project_name service
openstack-config --set /etc/cinder/cinder.conf keystone_authtoken username cinder
openstack-config --set /etc/cinder/cinder.conf keystone_authtoken password cinder

openstack-config --set /etc/cinder/cinder.conf oslo_concurrency lock_path /var/lib/cinder/tmp
18.2、启动cinder
]# systemctl enable openstack-cinder-volume.service target.service
]# systemctl start openstack-cinder-volume.service target.service
18.3、对接LVM
18.3.1、创建LVM存储卷
- 在cinder存储节点上创建LVM存储卷
1、在cinder存储节点上添加两块磁盘
//(1)添加两个磁盘:5G和10G

//(2)重新扫描SCSI总线添加设备
]# echo '- - -' >/sys/class/scsi_host/host0/scan

//(3)查看新的添加的磁盘
]# fdisk -l
Disk /dev/sda: 128.8 GB, 128849018880 bytes, 251658240 sectors
   Device Boot      Start         End      Blocks   Id  System
/dev/sda1            2048     4196351     2097152   82  Linux swap / Solaris
/dev/sda2   *     4196352   251658239   123730944   83  Linux

Disk /dev/sdb: 5368 MB, 5368709120 bytes, 10485760 sectors
Disk /dev/sdc: 10.7 GB, 10737418240 bytes, 20971520 sectors
2、安装工具
]# yum install lvm2 device-mapper-persistent-data
3、启动lvm2-lvmetad服务
]# systemctl enable lvm2-lvmetad.service
]# systemctl start lvm2-lvmetad.service
4、创建LVM物理卷
]# pvcreate /dev/sdb
]# pvcreate /dev/sdc
5、创建LVM卷组
]# vgcreate cinder-ssd /dev/sdb
]# vgcreate cinder-sata /dev/sdc
6、查看LVM信息
//查看物理卷
]# pvs
  PV         VG          Fmt  Attr PSize   PFree
  /dev/sdb   cinder-ssd  lvm2 a--   <5.00g  <5.00g
  /dev/sdc   cinder-sata lvm2 a--  <10.00g <10.00g

//查看卷组
]# vgs
  VG          #PV #LV #SN Attr   VSize   VFree
  cinder-sata   1   0   0 wz--n- <10.00g <10.00g
  cinder-ssd    1   0   0 wz--n-  <5.00g  <5.00g

//查看逻辑卷(由openstack创建,此时为空)
]# lvs
18.3.2、cinder对接LVM
1、修改lvm.conf
- 添加过滤器:"a/sdb/"表示要允许的,"r/.*/"表示拒绝剩余的
//在devices段中添加
]# vim /etc/lvm/lvm.conf
devices {
        filter = [ "a/sdb/", "a/sdc/","r/.*/"]
}
2、配置cinder.conf
]# vim /etc/cinder/cinder.conf
[DEFAULT]
//启用后端存储块,后端名称是自定义的(段落名称)
enabled_backends = ssd,sata

[ssd]
//驱动程序
volume_driver = cinder.volume.drivers.lvm.LVMVolumeDriver
//LVM的卷组名称
volume_group = cinder-ssd
//存储协议
target_protocol = iscsi
target_helper = lioadm
//openstack中的卷类型
volume_backend_name = ssd

[sata]
volume_driver = cinder.volume.drivers.lvm.LVMVolumeDriver
volume_group = cinder-sata
target_protocol = iscsi
target_helper = lioadm
volume_backend_name = sata
- 也可以使用配置工具openstack-config进行配置
//安装配置工具
yum install openstack-utils.noarch

//配置cinder
openstack-config --set /etc/cinder/cinder.conf DEFAULT enabled_backends ssd,sata

openstack-config --set /etc/cinder/cinder.conf ssd volume_driver cinder.volume.drivers.lvm.LVMVolumeDriver
openstack-config --set /etc/cinder/cinder.conf ssd volume_group cinder-ssd
openstack-config --set /etc/cinder/cinder.conf ssd target_protocol iscsi
openstack-config --set /etc/cinder/cinder.conf ssd target_helper lioadm
openstack-config --set /etc/cinder/cinder.conf ssd volume_backend_name ssd

openstack-config --set /etc/cinder/cinder.conf sata volume_driver cinder.volume.drivers.lvm.LVMVolumeDriver
openstack-config --set /etc/cinder/cinder.conf sata volume_group cinder-sata
openstack-config --set /etc/cinder/cinder.conf sata target_protocol iscsi
openstack-config --set /etc/cinder/cinder.conf sata target_helper lioadm
openstack-config --set /etc/cinder/cinder.conf sata volume_backend_name sata
3、重启cinder
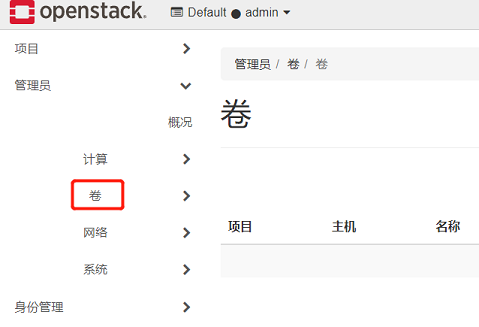
]# systemctl restart openstack-cinder-volume.service
- 重启cinder后,重新登录dashboard可以看到管理页面上多了个标题“卷”
4、验证
]# openstack volume service list
]# openstack volume service list
+------------------+---------------+------+---------+-------+----------------------------+
| Binary           | Host          | Zone | Status  | State | Updated At                 |
+------------------+---------------+------+---------+-------+----------------------------+
| cinder-scheduler | centos71      | nova | enabled | up    | 2023-03-05T10:52:22.000000 |
| cinder-volume    | centos75@ssd  | nova | enabled | up    | 2023-03-05T10:52:25.000000 |
| cinder-volume    | centos75@sata | nova | enabled | up    | 2023-03-05T10:52:25.000000 |
+------------------+---------------+------+---------+-------+----------------------------+
18.4、对接NFS
18.4.1创建NFS服务器
- 在10.1.1.14上安装NFS(任意其他机器)。
1、安装nfs
]# yum install nfs-utils rpcbind
2、配置nfs
]# vim /etc/exports
/data/ 10.1.1.0/24(rw,async,no_root_squash,no_all_squash)
3、启动nfs
- 先启动rpcbind.service,再启动nfs.service。
]# systemctl enable rpcbind.service
]# systemctl enable nfs.service

]# systemctl start rpcbind.service
]# systemctl start nfs.service
18.3.2、cinder对接NFS
1、查看nfs服务器共享的目录
]# showmount -e 10.1.1.14
Export list for 10.1.1.14:
/data/ 10.1.1.0/24
2、配置cinder.conf
]# vim /etc/cinder/cinder.conf
[DEFAULT]
enabled_backends = sata,ssd,nfs

[nfs]
volume_driver = cinder.volume.drivers.nfs.NfsDriver
nfs_shares_config = /etc/cinder/nfs_shares
volume_backend_name = nfs
- 也可以使用配置工具openstack-config进行配置
//安装配置工具
yum install openstack-utils.noarch

//配置cinder
openstack-config --set /etc/cinder/cinder.conf DEFAULT enabled_backends sata,ssd,nfs

openstack-config --set /etc/cinder/cinder.conf nfs volume_driver cinder.volume.drivers.nfs.NfsDriver
openstack-config --set /etc/cinder/cinder.conf nfs nfs_shares_config /etc/cinder/nfs_shares
openstack-config --set /etc/cinder/cinder.conf nfs volume_backend_name nfs
3、配置nfs_shares_config
]# vim /etc/cinder/nfs_shares
10.1.1.14:/data
4、重启cinder
]# systemctl restart openstack-cinder-volume.service
5、验证
]# openstack volume service list
+------------------+---------------+------+---------+-------+----------------------------+
| Binary           | Host          | Zone | Status  | State | Updated At                 |
+------------------+---------------+------+---------+-------+----------------------------+
| cinder-scheduler | centos71      | nova | enabled | up    | 2023-03-05T11:54:12.000000 |
| cinder-volume    | centos75@ssd  | nova | enabled | up    | 2023-03-05T11:54:15.000000 |
| cinder-volume    | centos75@sata | nova | enabled | up    | 2023-03-05T11:54:15.000000 |
| cinder-volume    | centos75@nfs  | nova | enabled | up    | 2023-03-05T11:54:12.000000 |
+------------------+---------------+------+---------+-------+----------------------------+
18.5、创建卷
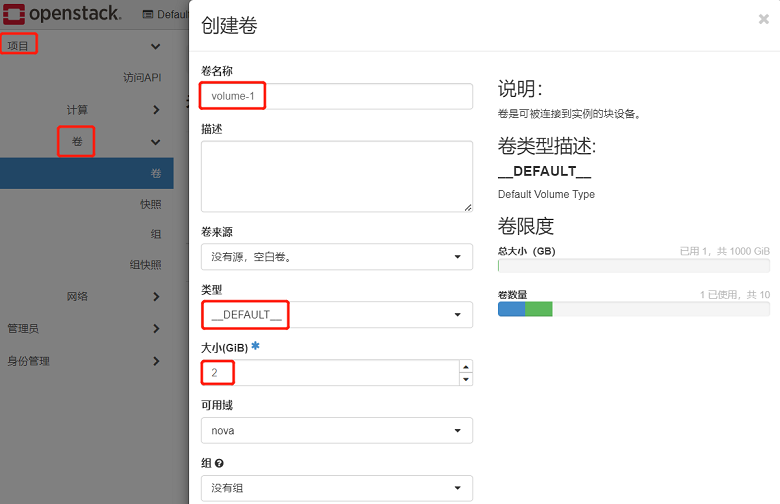
18.5.1、使用默认卷类型
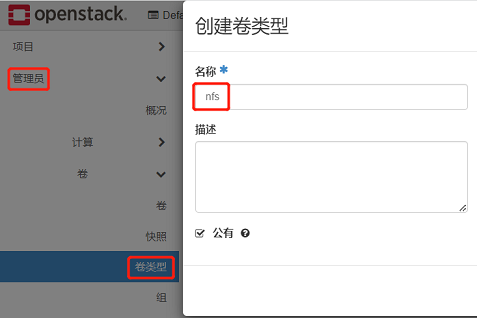
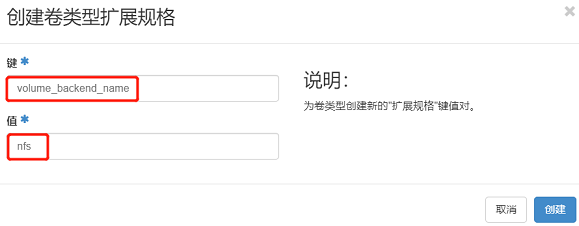
18.5.2、创建自定义卷类型
1、创建卷类型
2、点击卷类型扩展规格
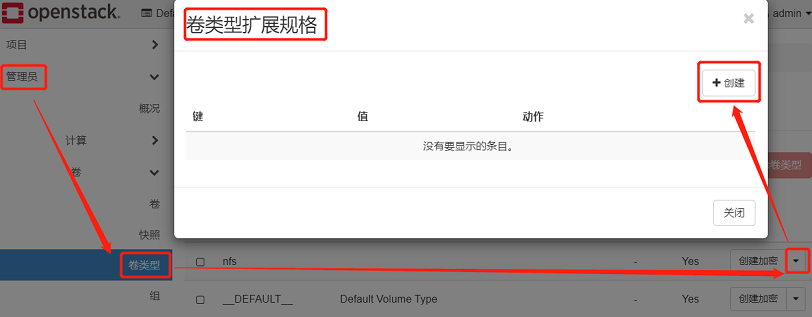
3、添加键值对
- 在/etc/cinder/cinder.conf中定义的配置项。
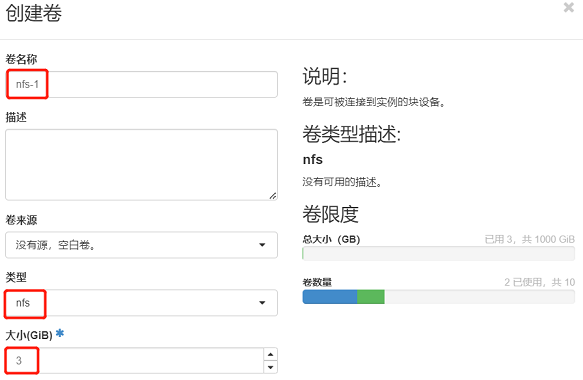
4、创建卷
18.6、使用卷
1、将卷附加到虚拟机上

2、使用卷
//(1)连接到虚拟机
]# ssh cirros@10.1.1.143

//(2)产看磁盘信息
# fdisk -l
Disk /dev/vda: 1 GiB, 1073741824 bytes, 2097152 sectors
Device     Start     End Sectors  Size Type
/dev/vda1  18432 2097118 2078687 1015M Linux filesystem
/dev/vda15  2048   18431   16384    8M EFI System

Disk /dev/vdb: 3 GiB, 3221225472 bytes, 6291456 sectors

//(3)格式化新磁盘
# mkfs.ext4 /dev/vdb

//(4)挂载新磁盘
# mount /dev/vdb /mnt/
19、自定义虚拟机镜像
- 创建镜像说明文档:https://docs.openstack.org/image-guide/create-images-manually.html
- 在10.1.1.13上创建自定义镜像(openstack计算节点)
19.1、基于centos的ISO创建镜像
1、下载centos的ISO镜像
- http://mirrors.aliyun.com/centos/7.9.2009/isos/x86_64/CentOS-7-x86_64-Minimal-2009.iso
2、安装创建虚拟机镜像的工具
]# yum install qemu-kvm qemu-kvm-tools libvirt virt-manager virt-install
3、启动libvirtd
]# systemctl start libvirtd.service
]# systemctl status libvirtd.service
4、创建KVM虚拟机
//(1)创建虚拟机镜像文件
]# qemu-img create -f qcow2 /apps/images/CentOS-7-x86_64-2009.qcow2 10G

//(2)创建虚拟机
]# virt-install --name CentOS-7-x86_64-2009 --virt-type kvm --os-variant rhel7 \
    --memory 1024 --vcpus 1 --disk path=/apps/images/CentOS-7-x86_64-2009.qcow2 --network network=default \
    --graphics vnc,listen=0.0.0.0 --noautoconsole --cdrom /apps/iso/CentOS-7-x86_64-Minimal-2009.iso
5、使用VNC Viewer连接虚拟机进行安装
//(1)查看虚拟机
]# virsh list --all
 Id    名称                         状态
----------------------------------------------------
 1     CentOS-7-x86_64-2009         running

//(2)显示虚拟机的VNC编号
]# virsh vncdisplay CentOS-7-x86_64-2009
:0
- (3)使用VNC Viewer连接虚拟机
- 配置网卡名称,在进入安装界面的时候把光标移动到Install CentOS7,按下tab键,在后面输入“net.ifnames=0 biosdevname=0”回车即可。
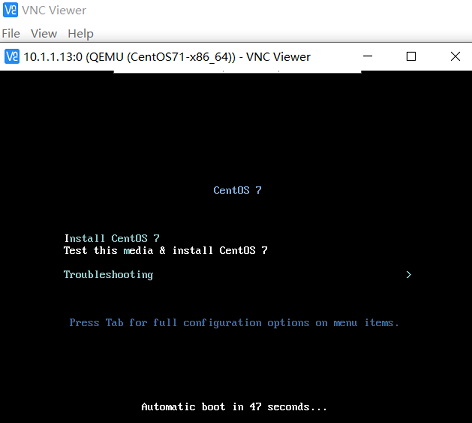
- (4)配置虚拟机
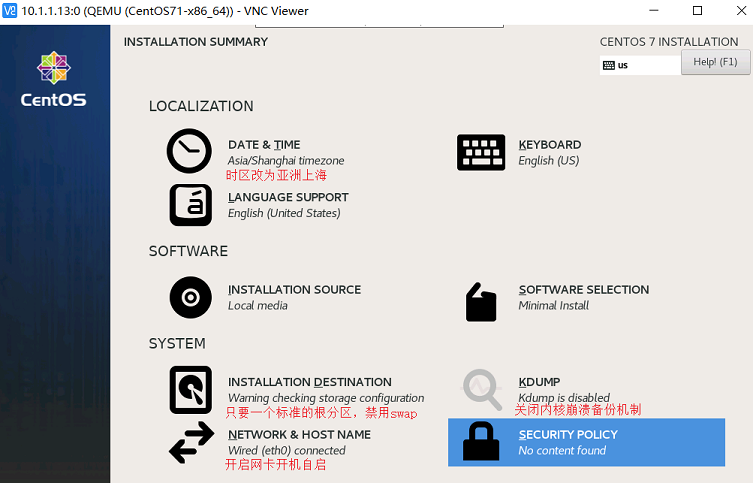
19.2、基于官方CentOS-GenericCloud创建镜像
- 下载官方镜像:
- CentOS 7.7镜像:http://cloud.centos.org/centos/7/images/CentOS-7-x86_64-GenericCloud-1907.qcow2.xz
- Ubuntu 18.04镜像:https://cloud-images.ubuntu.com/bionic/current/bionic-server-cloudimg-amd64.img
1、修改CentOS-GenericCloud镜像的root用户密码
]# yum install libguestfs-tools

]# virt-customize -a /apps/images/CentOS-7-x86_64-GenericCloud-1907.qcow2 --root-password password:root
2、创建KVM虚拟机
]# virt-install --name CentOS-7-x86_64-GenericCloud-1907 --virt-type kvm --os-variant rhel7 --boot hd \
    --memory 1024 --vcpus 1 --disk /apps/images/CentOS-7-x86_64-GenericCloud-1907.qcow2 --network network=default \
    --graphics vnc,listen=0.0.0.0 --noautoconsole
19.3、优化虚拟机镜像
19.3.1、安装cloud-init
- cloud-init会自动从元数据服务器获取公钥,并将密钥放入帐户中。
- cloud-init服务会自动调整系统的很多参数(/etc/cloud/cloud.cfg)
- 平常一般会将cloud-init服务关闭
//(1)安装cloud-init
]# yum install cloud-init

//(2)设置cloud-init服务开机自启
]# systemctl enable cloud-init
19.3.2、优化sshd
//修改sshd的配置文件
]# vi /etc/ssh/sshd_config
PasswordAuthentication yes
GSSAPIAuthentication no
UseDNS no

//重启sshd服务
]# systemctl restart sshd
19.3.3、设置OpenStack控制节点免密登录
- 在控制节点上执行
]# ssh-keygen -t rsa -P ""

]# ssh-copy-id root@<domain_ip>
19.3.4、设置console登录虚拟机
//(1)修改KVM虚拟机的内核参数(/boot/grub2/grub.cfg)
]# grubby --update-kernel=ALL --args="console=ttyS0,115200n8"

//(2)重启KVM虚拟机
]# reboot

//(3)连接虚拟机(“Ctrl + ]”退出虚拟机)
virsh console <domain>
19.3.5、安装常用命令
]# yum install vim
19.3.6、重启虚拟机
- 重启虚拟机,验证配置。
]# reboot
19.4、使用自定义虚拟机镜像
1、关闭虚拟机
]# virsh shutdown CentOS-7-x86_64-2009
2、将虚拟机镜像上传到Openstack上
//(1)查看虚拟机镜像
]# ls -lh /apps/images/
-rw------- 1 root root 11G 2月  28 23:22 CentOS-7-x86_64-2009.qcow2

//将镜像复制到Openstack的控制节点
]# scp /apps/images/CentOS-7-x86_64-2009.qcow2 root@10.1.1.11:/apps/images

//将镜像上传到Openstack上
]# glance image-create --name "CentOS-7-x86_64-2009" \
  --file /apps/images/CentOS-7-x86_64-2009.qcow2 \
  --disk-format qcow2 --container-format bare \
  --visibility public
3、使用Openstack创建虚拟机
19.5、安装ACPI服务
- 在宿主机中执行
- Acpid是一个用户空间的服务进程,它充当linux内核与应用程序之间通信的接口,负责将kernel中的电源管理事件转发给应用程序。
- 用于启动或关闭虚拟机实例。
]# yum install acpid

]# systemctl enable acpid
]# systemctl start acpid
19.6、拉伸磁盘
- 在KVM虚拟机中执行
- cloud-utils-growpart中包含允许使用cloud-init调整磁盘大小的工具。
//(1)安装cloud-utils-growpart
]# yum install cloud-utils-growpart

//(2)检查元数据服务器是否可以联通
]# curl http://169.254.169.254
1.0
2007-01-19
...

//(3)拉伸磁盘
]# systemctl restart cloud-init
1
# #

 浙公网安备 33010602011771号