监控-Prometheus04-服务发现
- Prometheus服务发现能够自动化检测分类,并且能够识别新目标和变更目标。也就是说,可以在容器平台或云平台中,自动发现并监控新目标或变更目标,动态进行数据采集和处理。
- Prometheus的服务发现的类型有:
- 基于文件的服务发现
- 基于DNS的服务发现
- 基于API的服务发现:Kubernetes、Consul、Azure...
- 服务发现的说明文档:https://prometheus.io/docs/prometheus/latest/configuration/configuration/
1、基于文件的服务发现
- 静态配置:通过修改prometheus.yml文件,将targets加入到监控系统(上一节使用的方式)。这种方式比较适用于只有少量主机或应用程序。
- 基于文件的服务发现只是比静态配置提高了的配置功能。
- 在Prometheus所支持的大部分服务发现方式中,这种方式不依赖第三方服务,是比较通用的服务发现方式。
- 文件可以是JSON或YAML格式的文件,但是文件扩展名必须是.json或.yaml。
- 每个文件中可以包含目标列表,定义格式和静态配置中的是一致的。
- Prometheus会定时从已经添加的JSON或YAML格式文件中读取新的targets信息。
- 基于文件的服务发现仍然是对配置文件进行修改的操作。如果你的应用环境中部署了配置管理工具,例如Ansible、SaltStack、Puppet等工具,再或配合CMDB(配置管理数据库)就可以使用编写好的模板生成服务器、容器或各类应用服务列表的动态配置文件,然后Prometheus定时刷新重新加载目标文件,最终实现服务自动发现功能。
示例:
global:
  scrape_interval: 15s
  evaluation_interval: 15s
alerting:
  alertmanagers:
  - static_configs:
    - targets:
rule_files:

scrape_configs:
#静态配置
- job_name: "static_node_exporter"
  static_configs:    #静态配置的关键字
  - targets:
    - 10.1.1.13:9100
    labels:
      "app": "node_exporter"
      "job": "node"
1.1、基础配置
1、基于文件的服务的文件
//JSON文件
[
  {
    "targets": [ "<host>", ... ],
    "labels": {
      "<labelname>": "<labelvalue>",
      ...
    }
  },
  ...
]

//YAML文件
- targets:
  - <host1>
  - <host2>
  labels:
    <labelname1>: <labelvalue1>
    <labelname2>: <labelvalue2>
2、prometheus.yml配置文件
//基于文件的服务发现
scrape_configs:
- job_name: <job_name>
  file_sd_configs:                  #基于文件的服务发现的关键字
  - files:
    - <filename_pattern>            #可以是以.json、.yml或.yaml结尾的文件,文件名可以使用*,例如tatgets/*.json
    refresh_interval: <duration>    #(可选的)重新读取文件的刷新间隔。默认60s
1.2、实现基于文件的服务发现
1、添加JSON或YAML文件
- 这两种文件可以使用一种即可,当然也可以一起使用。
//使用JSON文件添加10.1.1.11
]# vim /apps/prometheus/tatgets/node_service_discovery.json
[
  {
    "targets": ["10.1.1.11:9100"],
    "labels": {
      "app": "node_exporter",
      "job": "node"
    }
  }
]

//使用YAML文件添加10.1.1.12
]# vim /apps/prometheus/tatgets/node_service_discovery.yaml
- targets:
  - 10.1.1.12:9100
  labels:
    "app": "node_exporter"
    "job": "node"
2、修改prometheus.yml配置文件
]# vim /apps/prometheus/prometheus.yml
global:
  scrape_interval: 15s
  evaluation_interval: 15s
alerting:
  alertmanagers:
  - static_configs:
    - targets:
rule_files:

scrape_configs:
#静态配置
- job_name: "static_node_exporter"
  static_configs:
  - targets:
    - 10.1.1.13:9100
    labels:
      "app": "node_exporter"
      "job": "node"
#基于文件的服务发现
- job_name: "file_sd_nodes_exporter"
  file_sd_configs:
  - files:
    - tatgets/*.json
    refresh_interval: 60s
  - files:
    - tatgets/node_service_discovery.yaml
    refresh_interval: 60s
3、重新加载prometheus.yml配置文件
- 注意,只有在修改prometheus.yml配置文件后,才需要重新加载该文件。若是再向“基于文件的服务发现”的文件中添加target,不需要重新加载prometheus.yml配置文件。
//检查配置文件
promtool check config /apps/prometheus/prometheus.yml

//重新加载配置文件
]# kill -HUP PID
2、基于DNS的服务发现
- 基于DNS的服务发现针对一组DNS域名进行定期查询,以发现待监控的目标
- 查询时使用的DNS服务器由/etc/resolv.conf文件指定。
- 该发现机制依赖于A、AAAA和SRV资源记录,且仅支持该类方法,尚不支持RFC6763中的高级DNS发现方式。
2.1、基础配置
scrape_configs:
- job_name: <job_name>
  dns_sd_configs:                   #关键字
  - names: [<string>, ...]          #DNS资源的名称,例如百度的A记录是www.baidu.com.
    type: <string>                  #(可选的)要执行的DNS查询的类型,可用值有:SRV(默认值)、A、AAAA或MX。
    port: <int>                     #(可选的)当查询类型不是SRV时,必须使用的端口号
    refresh_interval: <duration>    #(可选的)刷新的时间间隔,默认30s
2.2、基于DNS的服务发现
1、解析域名
]# dig  www.baidu.com
...
;; ANSWER SECTION:
www.baidu.com.		71	IN	A	36.152.44.96
www.baidu.com.		71	IN	A	36.152.44.95
...
2、修改prometheus.yml配置文件
]# vim /apps/prometheus/prometheus.yml
global:
  scrape_interval: 15s
  evaluation_interval: 15s
alerting:
  alertmanagers:
  - static_configs:
    - targets:
rule_files:

scrape_config
#基于DNS的服务发现
- job_name: "DNS_sd_node_exporter"
  dns_sd_configs:
  - names: ["www.baidu.com."]
    type: A
    port: 80
    refresh_interval: 60s
3、重新加载prometheus.yml配置文件
//检查配置文件
promtool check config /apps/prometheus/prometheus.yml

//重新加载配置文件
]# kill -HUP PID
3、基于Consul的服务发现(注册中心)
3.1、Consul的基础概念
- 基于Consul的服务发现是一种使用网络的服务发现机制和配置工具,是使用Go语言开发的,部署安装简单,具有分布式、高可用性和极高的可扩展性。它提供了以下几个关键功能。
- 服务发现:Consul通过HTTP API和DNS进行服务注册和服务发现。对于外部服务(如SaaS提供者)也可以注册。
- 健康检查:Consul支持对各类服务运行状态的健康检查工作,能够迅速向管理员告警集群中的任何问题,可以防止将流量路由到问题或故障主机,可动态监视服务运行状况并适当更新服务注册表。
- 键/值存储:键/值存储可以灵活地进行存储动态配置、功能标记、协调和领导者选举等。简单的HTTP API使其易于在任何地方使用。
- 多数据中心:Consul支持单一数据中心,可扩展以支持多个数据中心,并且无须复杂的配置。
- 服务分割:通过自动TLS加密和基于身份的授权实现安全的服务间通信。
- Consul体系架构如图4-6所示。
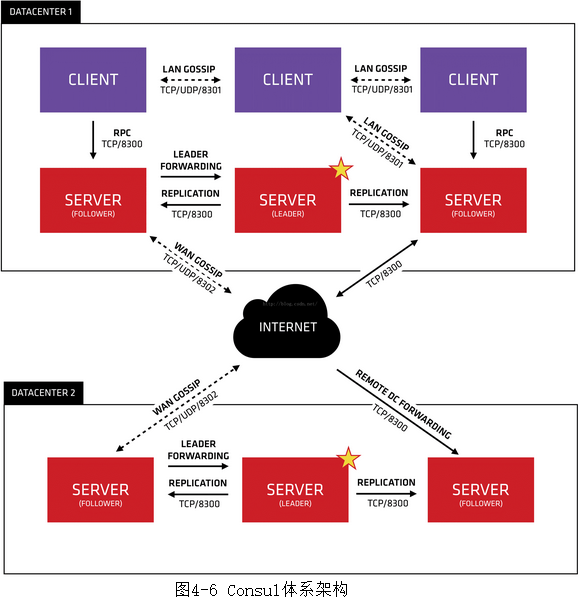
- 从图中可以看到在Consul体系架构中:
- Client(即客户)端模式是无状态的,它负责将所有RPC转发到Server(即服务器)的代理。Client执行的唯一后台活动是加入到LAN Gossip池。也就是说所有注册到当前节点的服务会被转发到Server中,而自身是不持久化这些信息。虽然这样会有资源开销,但仅仅是消耗少量的网络带宽。
- Server(即服务器)端模式是具有一组扩展功能的代理,包括参与Raft选举、集群状态维护和响应RPC查询。Server端与其他数据中心交互WAN Gossip,并将查询转发给Server Leader或远程数据中心。它可以持久化所有数据信息到本地,这样就算出现故障,信息也得以保存。Server Leader负责Server间注册信息的同步和各个节点的监控检查工作。
- LAN Gossip包含位于同一局域网或数据中心的节点。WAN Gossip仅包含Server,这些Server主要位于不同的数据中心,通常通过互联网或广域网进行通信。
- 依据官方说明可以看到图4-6中有两个数据中心,DATACENTER1和DATACENTER2,这表明Consul是支持多数据中心的。每一个数据中心都是由Server和Client共同组成。官方建议一个数据中心有3~5台Server最佳,这样可以实现可用性和性能二者之间的平衡。因为Server的增加势必会造成一致性(consensus)变慢。对于Client数量是没有限制的,随着业务的增加,Client会很容易地被扩容到成千甚至上万的数量级别。
- 在每个数据中心中,所有节点都要加入Gossip协议。这样设计有以下目的:
- 第一,不需要为客户端配置服务器的地址,发现是自动完成的;
- 第二,检测节点故障的工作不是放在服务器上,而是分布式的,这使得故障检测比心跳机制更具有可扩展性;
- 第三,可以被用作消息传递层,比如Leader选举事件。
- RPC(Remote Procedure Call),即远程过程调用协议,是一种通过网络从远程计算机程序上请求服务,而不需要了解底层网络技术的协议。RPC协议假定某些传输协议的存在,如TCP或UDP,为通信程序之间携带信息数据。在OSI网络通信模型中,RPC跨越了传输层和应用层。RPC使得开发包括网络分布式多程序在内的应用程序更加容易。
- Raft是一种共识算法,旨在替代Paxos。它通过逻辑分离使其比Paxos更容易理解,并被正式证明是安全的,并提供了一些额外的功能。它提供了一种在计算系统集群中分布状态机的通用方法,在一个特定的任期内,最多只能选举出一名领导者(Leader),确保集群中的每个节点都同意一系列相同的状态转换。
- Gossip是分布式系统中被广泛使用的协议,协议本身简单且通信性能好,主要用于实现分布式节点或者进程之间的信息交换,最终状态都达成一致。常用于P2P的通信和实现应用层多播。
3.2、Consul安装并启动
1、安装consul
- 需要在每一个被监控主机或容器上安装Consul。
//下载
]# wget https://releases.hashicorp.com/consul/1.13.2/consul_1.13.2_linux_amd64.zip

//创建consul存放目录
]# mkdir -p /apps/consul/{data,conf}

//解压
]# unzip consul_1.13.2_linux_amd64.zip -d /apps/consul/
2、启动consul
- 最简单的使用方法是开发者模式,在本地终端快速创建一个单节点的Consul环境。但是,此种模式不能在线上生产环境中使用,因为它不会持久化任何状态。
- Consul必须启动agent才可使用,它是运行在Consul集群中每个成员上的守护进程,该进程负责维护集群中成员信息、注册服务、查询响应、运行检查等功能。
- agent指令是Consul的核心,可以运行为Server或Client模式。
- 启动consul,开发模式:
//运行开发者模式的consul agent
]# /apps/consul/consul agent -dev -ui -client=0.0.0.0 -bind=10.1.1.11 -config-dir=/apps/consul/conf -data-dir=/apps/consul/data
- 查看当前consul集群中的所有节点信息
]# /apps/consul/consul members
Node         Address         Status  Type    Build   Protocol  DC   Partition  Segment
k8s-master1  10.1.1.11:8301  alive   server  1.13.2  2         dc1  default    <all>
- Consul运行需要监听至少6个不同的默认端口才能正常工作,这些默认端口使用TCP或UDP协议。
- 注意,当使用开发者模式在本地终端快速创建一个单节点的Consul环境时,即使用命令行选项-dev模式运行时,默认RPC监听端口为8502 TCP(本来是8400 TCP)。
]# netstat -npl | grep consul
//Server RPC端口,用于Client与Server通信或Server与Server通信
tcp        0      0 10.1.1.11:8300          0.0.0.0:*               LISTEN      32767/consul
//用于单个数据中心所有Client问通信
tcp        0      0 10.1.1.11:8301          0.0.0.0:*               LISTEN      32767/consul
udp        0      0 10.1.1.11:8301          0.0.0.0:*                           32767/consul
//用于单个或多个数据中心之间Server信息同步
tcp        0      0 10.1.1.11:8302          0.0.0.0:*               LISTEN      32767/consul
udp        0      0 10.1.1.11:8302          0.0.0.0:*                           32767/consul
//用于API接口或WEB UI访问
tcp6       0      0 :::8500                 :::*                    LISTEN      32767/consul
//所有agent都要使用的端口,用于处理从CLI来的RPC
tcp6       0      0 :::8502                 :::*                    LISTEN      32767/consul
tcp        0      0 10.1.1.11:8502          0.0.0.0:*               LISTEN      25242/consul
//用于解析DNS查询
tcp6       0      0 :::8600                 :::*                    LISTEN      32767/consul
udp6       0      0 :::8600                 :::*                                32767/consul
3.3、Consul服务注册
- Consul服务注册有两种方法:
- (1)定义配置文件服务注册方法,即在配置文件中定义服务来进行注册。
- (2)HTTP API服务注册方法,即在启动后由服务自身通过调用API进行自我注册。
- 将本地运行的node_exporter注册到Consul服务上。
1、创建JSON格式的配置文件
- 在配置目录中添加文件
- -config-dir=/apps/consul/conf
//定义单个Service
]# vim /apps/consul/conf/node_exporter01.json
{
    "service": {
        "id": "node_exporter",
        "name": "node_exporter",
        "tags": ["nodes01"],
        "address": "10.1.1.11",
        "port": 9100,
        "check": [{
            "http": "http://10.1.1.11:9100/metrics",
            "interval": "5s"
        }]
    }
}

//定义多个Services
]# vim /apps/consul/conf/node_exporter.json
{
  "services": [
        {
      "id": "node_exporter01",
      "name": "node_exporter",
      "tags": ["nodes"],
      "address": "10.1.1.13",
      "port": 9100,
      "check": [{
            "http": "http://10.1.1.13:9100/metrics",
            "interval": "5s"
      }]
    },
    {
      "id": "node_exporter02",
      "name": "node_exporter",
      "tags": ["nodes"],
      "address": "10.1.1.12",
      "port": 9100,
      "check": [{
        "http": "http://10.1.1.12:9100/metrics",
        "interval": "5s"
      }]
    }
  ]
}
- 配置文件内容说明如下:
- id:服务ID,可选提供项。
- name:服务名称,必须提供项。
- tags:服务的标签,自定义的可选提供项,用于区分主节点或辅助节点。
- address:地址字段,用于指定特定于服务的IP地址。默认情况下,使用agent的IP地址,因而不需要提供这个地址。可以理解为服务注册到Consul使用的IP,服务发现是发现的此IP地址。
- port:可以简单理解为服务注册到Consul使用的端口,服务发现也是发现address对应的端口。
2、重新加载配置内容
]# /apps/consul/consul reload
3、通过HTTP API和DNS两种方式进行服务发现
//通过HTTP API进行服务发现
]# curl http://10.1.1.11:8500/v1/catalog/service/node_exporter

//通过DNS进行服务发现
]# dig @10.1.1.11 -p 8600 node_exporter.service.consul
3.4、与Prometheus集成
- Consul完成服务注册和发现后,维护着整个应用环境中的所有服务信息。此时,通过Prometheus与Consul的交互便可取得上一小节已经注册的node_exporter的信息。
1、修改prometheus.yml配置文件
]# vim /apps/prometheus/prometheus.yml
global:
  scrape_interval: 15s
  evaluation_interval: 15s
alerting:
  alertmanagers:
  - static_configs:
    - targets:
rule_files:

scrape_configs:
#基于Consul的服务发现
- job_name: "consul_sd_node_exporter"
  consul_sd_configs:
  - server: 10.1.1.11:8500
    services:               #consul中的service.name
    - node_exporter
    tags:                   #consul中的service.tags。只监控service.name,且有该标签的
    - nodes
3、重新加载prometheus.yml配置文件
//检查配置文件
promtool check config /apps/prometheus/prometheus.yml

//重新加载配置文件
]# kill -HUP PID
4、Relabelling(重新打标)
- 构建基于文件的服务发现
//修改prometheus.yml配置文件
]# vim /apps/prometheus/prometheus.yml
global:
  scrape_interval: 15s
  evaluation_interval: 15s
alerting:
  alertmanagers:
  - static_configs:
    - targets:
rule_files:

scrape_configs:
- job_name: "file_sd_nodes_exporter"
  file_sd_configs:
  - files:
    - tatgets/*.yaml
    refresh_interval: 60s

//基于文件的服务发现的yaml文件
]# vim /apps/prometheus/tatgets/node_service_discovery.yaml
- targets:
  - 10.1.1.12:9100
  labels:
    "env": "test_node_exporter"
    "job": "node"
- targets:
  - 10.1.1.13:9100
  labels:
    "env": "dev_node_exporter"
    "job": "node"

//检查配置文件
promtool check config /apps/prometheus/prometheus.yml

//重新加载配置文件
]# kill -HUP PID
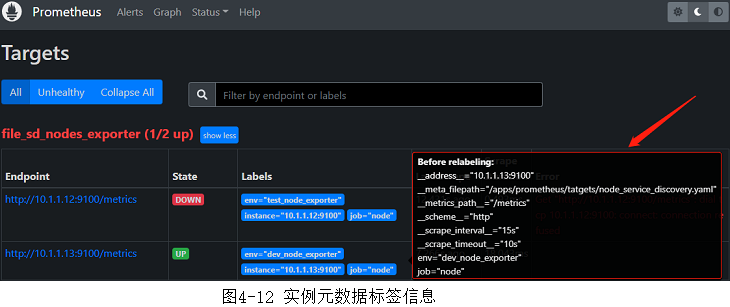
- 查看target的元数据标签
4.1、重新打标的基础
4.1.1、指标的生命周期
- Prometheus抓取指标的生命周期:
- 在每个scrape_interval期间,Prometheus都会检查配置文件中的作业(Job) ,并根据Job的配置生成target列表。
- 每个target上都有一组元数据(metadata)标签(即原始标签)。可以通过Prometheus Web UI中的targets页面中查看实例的元数据标签。当鼠标移动Labels栏里,可以自动显示默认标签,如图4-12所示。
- 根据配置文件中的relabel_configs配置,对target进行重新打标,生成target和其标签。
- 然后,去target抓取指标(会获取exporter的所有指标)。
- 对抓取到的指标根据配置文件中的metric_relabel_configs配置进行重新打标(即修改、删除、添加标签),存储修改后的指标。
- 在每个scrape_interval期间,Prometheus都会检查配置文件中的作业(Job) ,并根据Job的配置生成target列表。

- relabel_config可以实现的功能(对target生效):
- 对服务发现的target进行重新打标(根据元标签进行修改、删除、添加)
- 过滤服务发现的target,即只监控指定的target。
- metric_relabel_configs可以实现的功能(对指标生效):
- 删除不需要的指标。
- 删除敏感的或不需要的标签。
- 修改、添加指标的标签或标签格式。
4.1.2、重新打标基础语法
- 重新打标基础语法:
//重新打标的关键字
scrape_configs:
- job_name: <job_name>
  relabel_configs:                #对target进行重新打标
    [ - <relabel_config> ... ]
  metric_relabel_configs:         #对指标进行重新打标
    [ - <relabel_config> ... ]

//<relabel_config>的使用方法
#使用现有标签的值。可以指定多个标签,使用separator指定的连接符(默认是分号“;”)将这些标签的值连接成一个字符串(以后就叫做source_labels字符串)
[ source_labels: '[' <labelname> [, ...] ']' ]
[ separator: <string> | default = ; ]
#使用正则表达式从上面的标签值(多个标签值连接成的字符串)中获取一个子串。默认是整个字符串。可以使用正则表达式捕获组。
[ regex: <regex> | default = (.*) ]
#如果正则表达式匹配,则对其执行正则表达式替换。可以使用正则表达式捕获组。
[ replacement: <string> | default = $1 ]
#将上面获取的子串赋给新的标签(也可以是现有的标签,会覆盖其值)。
[ target_label: <labelname> ]
#指定正则表达式匹配执行的操作
[ action: <relabel_action> | default = replace ]
#采用源标签值的散列的模数。
[ modulus: <int> ]
- <regex>:是任何有效的正则表达式。正则表达式锚定在两端。要取消正则表达式的锚定,使用.*<regex>.*。
- replace、keep、drop、labelmap、labeldrop和labelkeep操作都需要使用它。
- <relabel_action>:要进行的操作。
- 替换标签
- replace:将replacement赋给target_label。如果regex(正则表达式)不匹配,则不进行替换。
- hashmod:将source_labels字符串进行hash,作为target_label的值。
- lowercase:将source_label的字符串转化为小写。
- uppercase:将source_label的字符串转化为大写。
- 删除targets
- keep:删除regex不能匹配source_labels字符串的targets。
- drop:删除regex能匹配source_labels字符串的targets。
- 创建或删除标签
- labelmap:使用regex对所有的标签名(不仅仅是source_labels中指定的)进行匹配判定,然后将匹配到的标签的值赋给replacement指定的新标签。(修改标签名,但标签值不变)
- labeldrop:使用regex对所有的标签名进行匹配判定,任何匹配的标签都将从标签集中删除。
- labelkeep:使用regex对所有的标签名进行匹配判定,任何不匹配的标签都将从标签集中删除。
- 替换标签
4.2、对target进行重新打标
- Target的内置标签以双下划线“__”开头。在默认情况下,被加载的Target包含以下元数据标签:
- __address__:当前目标实例的访问地址<host>:<port>。
- __metrics_path__:抓取目标指标的访问路径。
- __scheme__:抓取目标指标时的协议:http或https协议。
- __param_<name>:抓取目标指标时,使用的请求参数。
- 其中,instance标签的值与__address__相对应,这里发生了一次标签重写处理。
示例:
scrape_configs:
- job_name: "file_sd_nodes_exporter"
  relabel_configs:
#如果该target的几个标签的source_labels字符串可以被regex匹配,就添加一个新的标签endpoint
  - source_labels:              #将三个标签的值直接拼接起来得到"http10.1.1.12:9100/metrics"
    - __scheme__
    - __address__
    - __metrics_path__
    separator: ""
    regex: (http|https)(.*)     #使用regex匹配source_labels字符串,得到(http)(10.1.1.12:9100/metrics)
    replacement: ${1}://${2}    #使用捕获组拼接,得到"http://10.1.1.12:9100/metrics"
    target_label: endpoint      #将捕获组拼接的值赋给标签名endpoint,得到endpoint="http://10.1.1.12:9100/metrics"
    action: replace             #替换
#添加一个新的标签名"(en.*)_name"
  - regex: (en.*)               #使用regex匹配标签名
    replacement: ${1}_name
    action: labelmap
#删除掉标签名是(en.*)的标签
  - regex: (en.*)               #使用regex匹配标签名
    action: labeldrop
#如果标签env的值可以被(test.*)匹配,就过掉该target
  - source_labels:
    - env
    regex: (test.*)             #使用regex匹配source_labels字符串
    action: drop
4.2.1、添加一个标签
- 使用重新打标机制,给target添加一个新的标签endpoint="http://10.1.1.12:9100/metrics"。
1、修改prometheus.yml配置文件
//修改prometheus.yml配置文件
]# vim /apps/prometheus/prometheus.yml
global:
  scrape_interval: 15s
  evaluation_interval: 15s
alerting:
  alertmanagers:
  - static_configs:
    - targets:
rule_files:

scrape_configs:
- job_name: "file_sd_nodes_exporter"
  file_sd_configs:
  - files:
    - tatgets/*.yaml
    refresh_interval: 60s
  relabel_configs:
  - source_labels:              #将三个标签的值直接拼接起来得到"http10.1.1.12:9100/metrics"
    - __scheme__
    - __address__
    - __metrics_path__
    separator: ""
    regex: (http|https)(.*)     #使用正则匹配,得到(http)(10.1.1.12:9100/metrics)
    replacement: ${1}://${2}    #使用捕获组拼接,得到"http://10.1.1.12:9100/metrics"
    target_label: endpoint      #将捕获组拼接的值赋给标签名endpoint,得到endpoint="http://10.1.1.12:9100/metrics"
    action: replace             #替换
2、重新加载prometheus.yml配置文件
//检查配置文件
promtool check config /apps/prometheus/prometheus.yml

//重新加载配置文件
]# kill -HUP PID
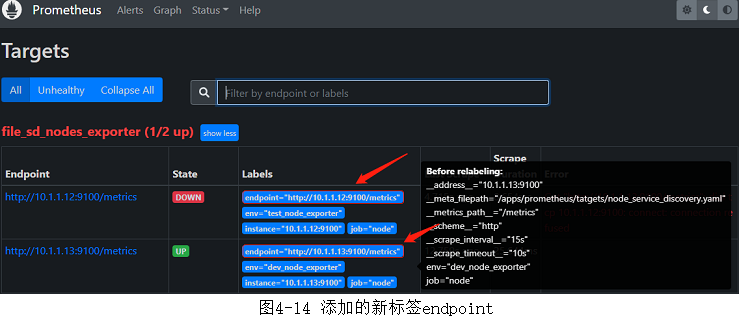
3、查看新添加的标签
- 重启Prometheus或热加载配置后,通过浏览器查看Prometheus Web UI中的信息,可以看到新标签endpoint已经被添加(和图4-12对比),如图4-14所示。
4.2.3、过滤target
- 使用重新打标机制过滤掉target,如果标签env的值可以被(test.*)匹配,就过掉该target。
1、修改prometheus.yml配置文件
//修改prometheus.yml配置文件
]# vim /apps/prometheus/prometheus.yml
global:
  scrape_interval: 15s
  evaluation_interval: 15s
alerting:
  alertmanagers:
  - static_configs:
    - targets:
rule_files:

scrape_configs:
- job_name: "file_sd_nodes_exporter"
  file_sd_configs:
  - files:
    - tatgets/*.yaml
    refresh_interval: 60s
  relabel_configs:
  - source_labels:
    - env
    regex: (test.*)
    action: drop
2、重新加载prometheus.yml配置文件
//检查配置文件
promtool check config /apps/prometheus/prometheus.yml

//重新加载配置文件
]# kill -HUP PID
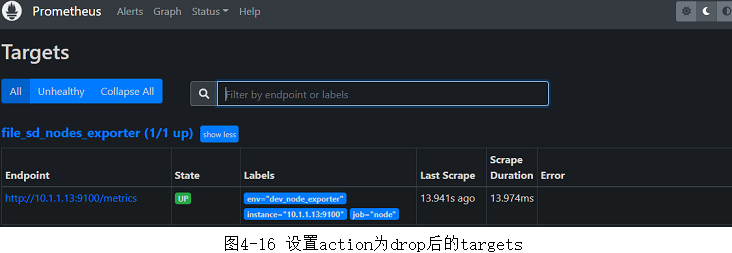
3、查看target
- 重启Prometheus或热加载配置后,通过浏览器查看Prometheus Web UI中的信息,可以看到regex: (test.*)匹配到的target被过滤掉了(和图4-12对比),如图4-16所示。
4.3、对指标进行重新打标
scrape_configs:
- job_name: "file_sd_nodes_exporter"
  metric_relabel_configs:
#如果该指标的标签__name__的值可以被(.*info.*)匹配,就过掉该指标(删除指标)
  - source_labels:
    - __name__
    regex: (.*info.*)           #使用regex匹配source_labels字符串。指标名称本身也是名为__name__的标签。
    action: drop
#删除掉标签名是(cp.*)的标签
  - regex: (cp.*)               #使用regex匹配标签名
    action: labeldrop
#添加一个新的标签名"(cp.*)_name"
  - regex: (cp.*)               #使用regex匹配标签名
    replacement: ${1}_name
    action: labelmap
- 注意,更改或添加标签会创建新的指标。
- 应该明确地使用各个标签,并尽可能保持不变,以避免创建出一个动态的数据环境。
- 标签是时间序列的唯一性约束,删除标签并导致时间序列重复时,可能会导致系统出现问题。
# #

 浙公网安备 33010602011771号