Vue面试专题(未完)
1.谈一下你对MVVM原理的理解
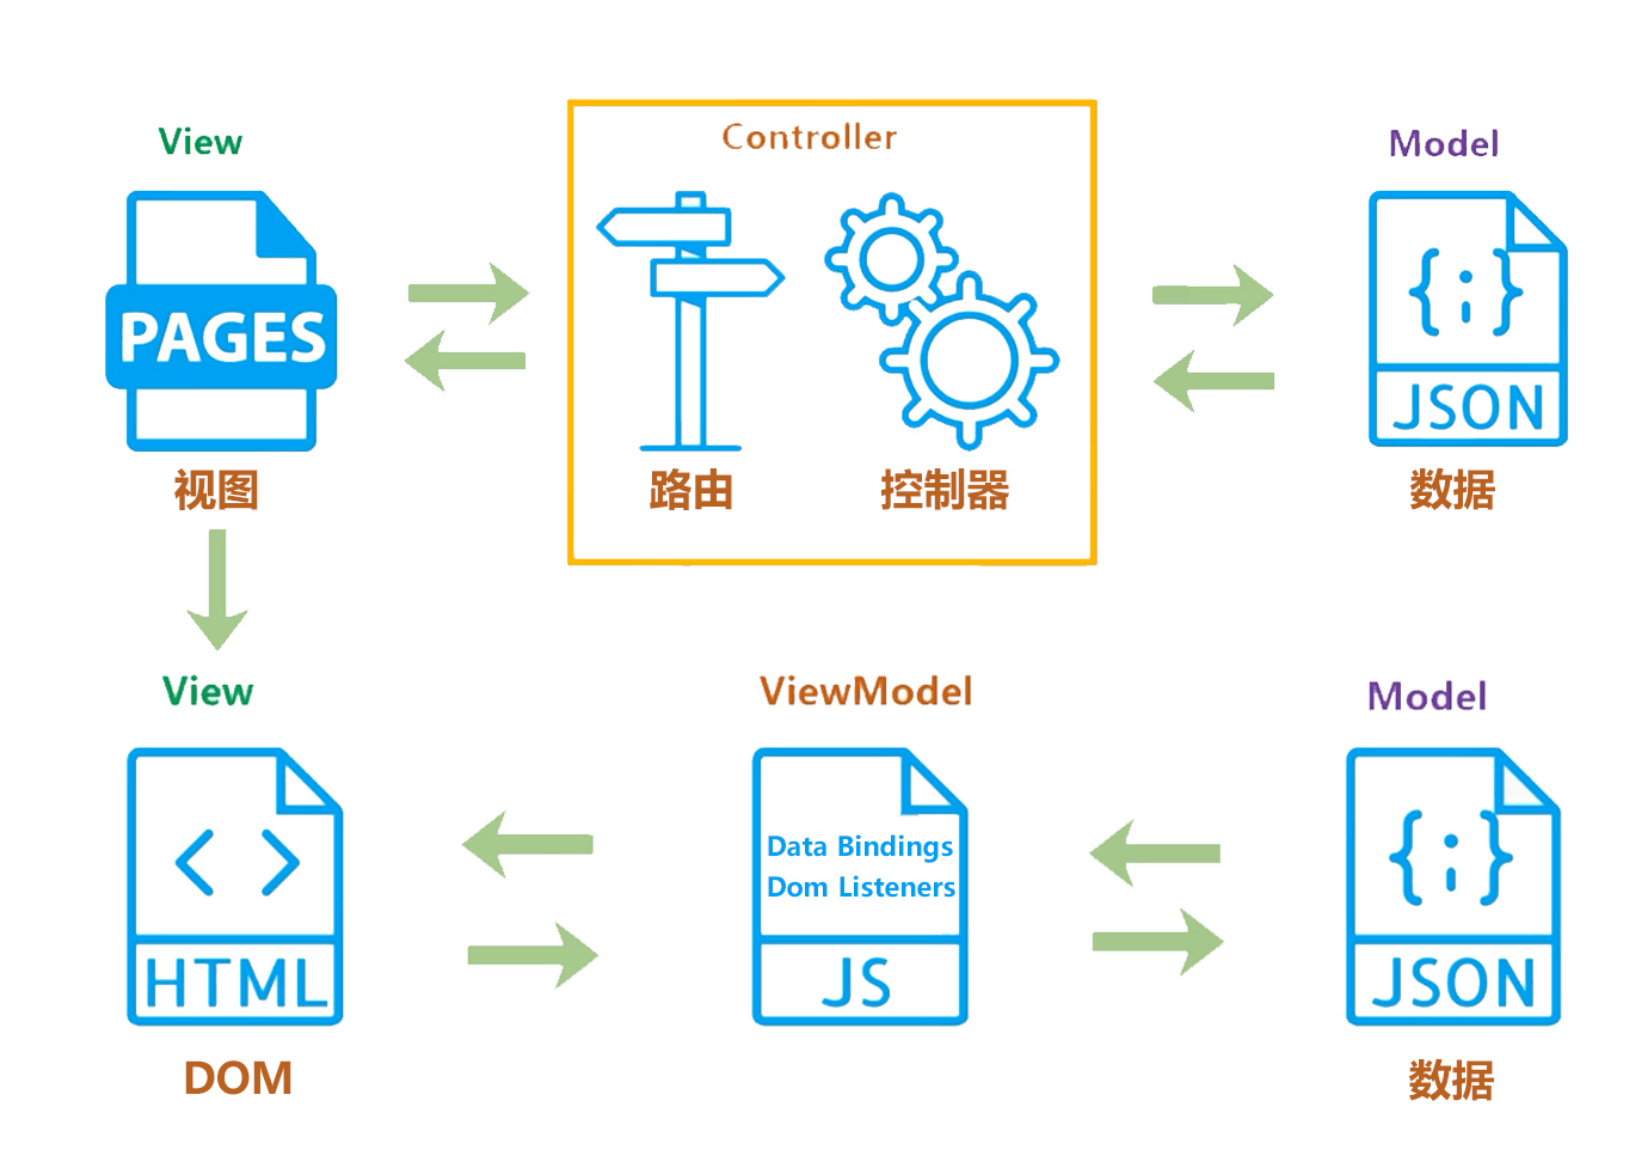
传统的 MVC 指的是,用户操作会请求服务端路由,路由会调用对应的控制器来处理,控制器会获取数
据。将结果返回给前端,页面重新渲染。
MVVM :传统的前端会将数据手动渲染到页面上, MVVM 模式不需要用户收到操作 dom 元素,将数据绑
定到 viewModel 层上,会自动将数据渲染到页面中,视图变化会通知 viewModel层 更新数据。
ViewModel 就是我们 MVVM 模式中的桥梁.
2.请说一下响应式数据的原理?
理解:
1.核心点: Object.defineProperty
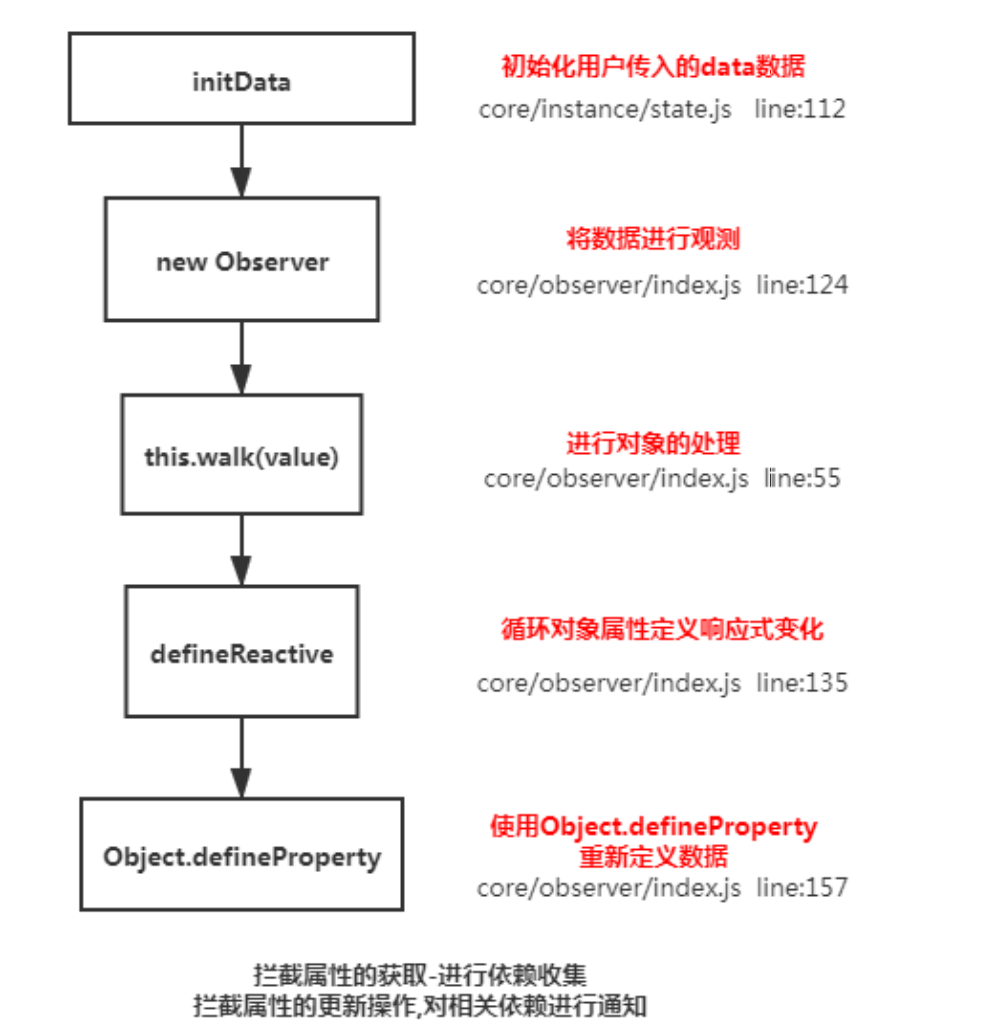
2.默认 Vue 在初始化数据时,会给 data 中的属性使用 Object.defineProperty 重新定义所有属
性,当页面取到对应属性时。会进行依赖收集(收集当前组件的watcher) 如果属性发生变化会通
知相关依赖进行更新操作。
原理:
Object.defineProperty(obj, key, {
    enumerable: true,
    configurable: true,
    get: function reactiveGetter() {
        const value = getter ? getter.call(obj) : val
        if (Dep.target) {
            dep.depend() // ** 收集依赖 ** /
            if (childOb) {
                childOb.dep.depend() if (Array.isArray(value)) {
                    dependArray(value)
                }
            }
        }
        return value
    },
    set: function reactiveSetter(newVal) {
        const value = getter ? getter.call(obj) : val
        if (newVal === value || (newVal !== newVal && value !== value)) {
            return
        }
        if (process.env.NODE_ENV !== 'production' && customSetter) {
            customSetter()
        }
        val = newVal
        childOb = !shallow && observe(newVal)
        dep.notify() /**通知相关依赖进行更新**/
    }
})
3.Vue中是如何检测数组变化?
理解:
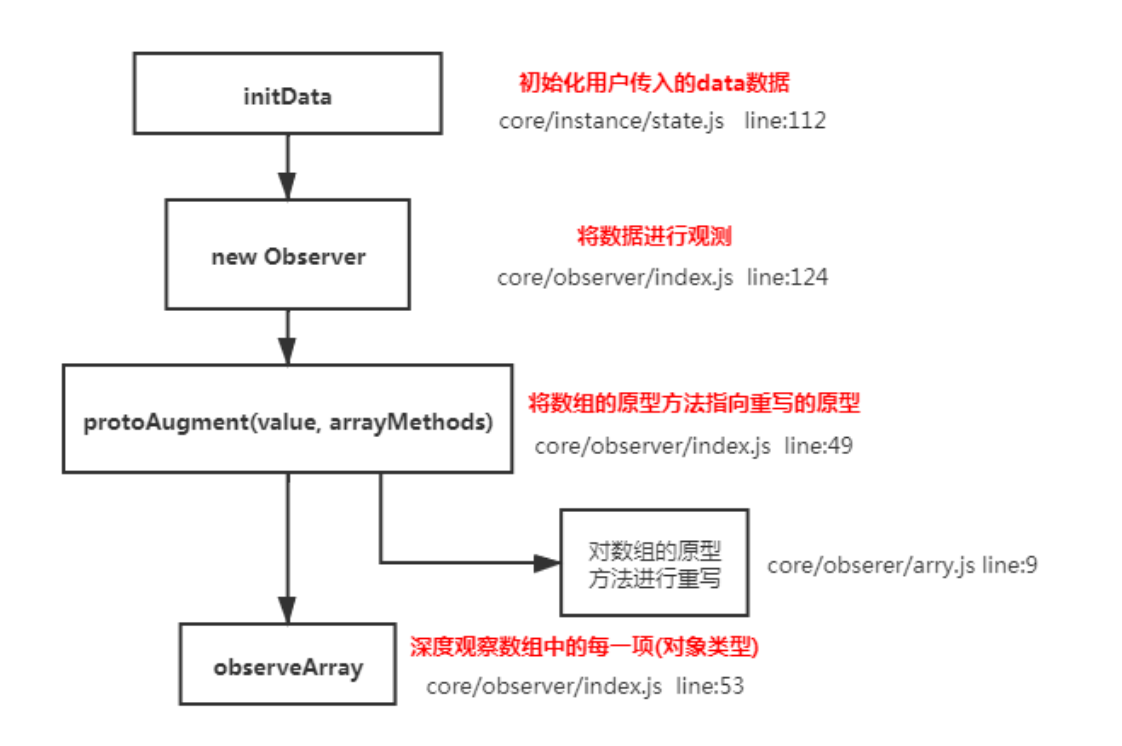
1、使用函数劫持的方式,重写了数组的方法
2、Vue 将 data 中的数组,进行了原型链重写。指向了自己定义的数组原型方法,这样当调用数组
api 时,可以通知依赖更新.如果数组中包含着引用类型。会对数组中的引用类型再次进行监控。
-
export const arrayMethods = Object.create(arrayProto)
const methodsToPatch = ['push', 'pop', 'shift', 'unshift', 'splice', 'sort', 'reverse']
methodsToPatch.forEach(function (method) { // 重写原型方法
    const original = arrayProto[method] // 调用原数组的方法
    def(arrayMethods, method, function mutator(...args) {
        const result = original.apply(this, args)
        const ob = this.__ob__
        let inserted
        switch (method) {
            case 'push':
            case 'unshift':
                inserted = args
                break
            case 'splice':
                inserted = args.slice(2)
                break
        }
        if (inserted) ob.observeArray(inserted) // notify change
        ob.dep.notify() // 当调用数组方法后,手动通知视图更新
        return result
    })
})
this.observeArray(value) // 进行深度监控
4.为何Vue采用异步渲染?
理解:
因为如果不采用异步更新,那么每次更新数据都会对当前组件进行重新渲染.所以为了性能考虑。 Vue
会在本轮数据更新后,再去异步更新视图!
原理:
update() {
    /* istanbul ignore else */
    if (this.lazy) {
        this.dirty = true
    } else if (this.sync) {
        this.run()
    } else {
        queueWatcher(this); // 当数据发生变化时会将watcher放到一个队列中批量更新
    }
}
export function queueWatcher(watcher: Watcher) {
    const id = watcher.id // 会对相同的watcher进行过滤
    if (has[id] == null) {
        has[id] = true
        if (!flushing) {
            queue.push(watcher)
        } else {
            let i = queue.length - 1
            while (i > index && queue[i].id > watcher.id) {
                i--
            }
            queue.splice(i + 1, 0, watcher)
        } // queue the flush
        if (!waiting) {
            waiting = true
            if (process.env.NODE_ENV !== 'production' && !config.async) {
                flushSchedulerQueue()
                return
            }
            nextTick(flushSchedulerQueue) // 调用nextTick方法 批量的进行更新
        }
    }
}
5.nextTick实现原理?
理解:(宏任务和微任务) 异步方法
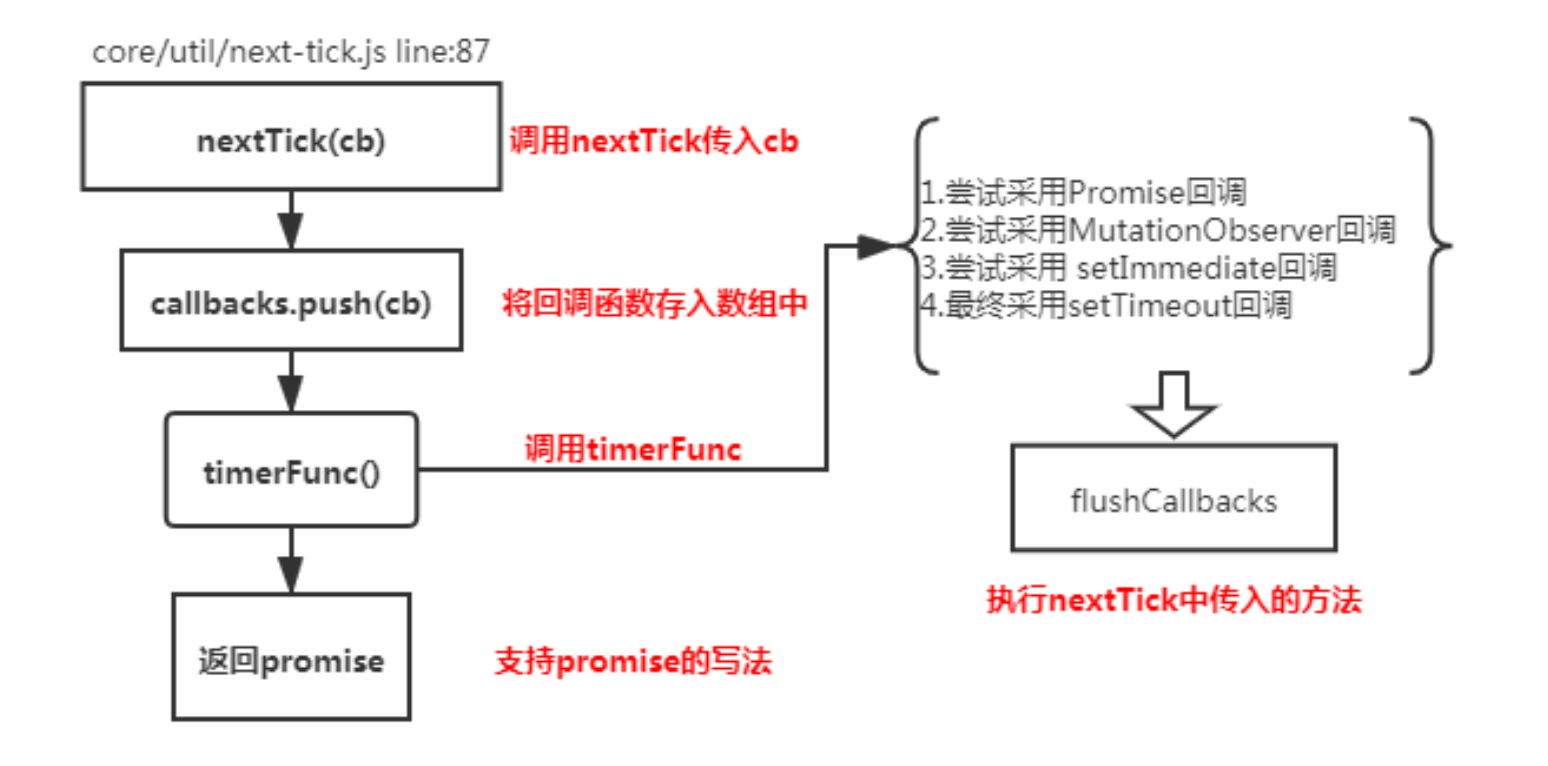
nextTick 方法主要是使用了宏任务和微任务,定义了一个异步方法.多次调用 nextTick 会将方法存入
队列中,通过这个异步方法清空当前队列。 所以这个 nextTick 方法就是异步方法
原理:
let timerFunc // 会定义一个异步方法
if (typeof Promise !== 'undefined' && isNative(Promise)) { // promise
    const p = Promise.resolve()
    timerFunc = () => {
        p.then(flushCallbacks)
        if (isIOS) setTimeout(noop)
    }
    isUsingMicroTask = true
} else if (!isIE && typeof MutationObserver !== 'undefined' && ( // MutationObserver
        isNative(MutationObserver) || MutationObserver.toString() === '[object MutationObserverConstructor]')) {
    let counter = 1
    const observer = new MutationObserver(flushCallbacks)
    const textNode = document.createTextNode(String(counter))
    observer.observe(textNode, {
        characterData: true
    })
    timerFunc = () => {
        counter = (counter + 1) % 2
        textNode.data = String(counter)
    }
    isUsingMicroTask = true
} else if (typeof setImmediate !== 'undefined') { // setImmediate
    timerFunc = () => {
        setImmediate(flushCallbacks)
    }
} else {
    timerFunc = () => { // setTimeout
        setTimeout(flushCallbacks, 0)
    }
} // nextTick实现
export function nextTick(cb ? : Function, ctx ? : Object) {
    let _resolve
    callbacks.push(() => {
        if (cb) {
            try {
                cb.call(ctx)
            } catch (e) {
                handleError(e, ctx, 'nextTick')
            }
        } else if (_resolve) {
            _resolve(ctx)
        }
    })
    if (!pending) {
        pending = true
        timerFunc()
    }
}
6.Vue中Computed的特点
理解:
默认 computed 也是一个 watcher 是具备缓存的,只要当依赖的属性发生变化时才会更新视图
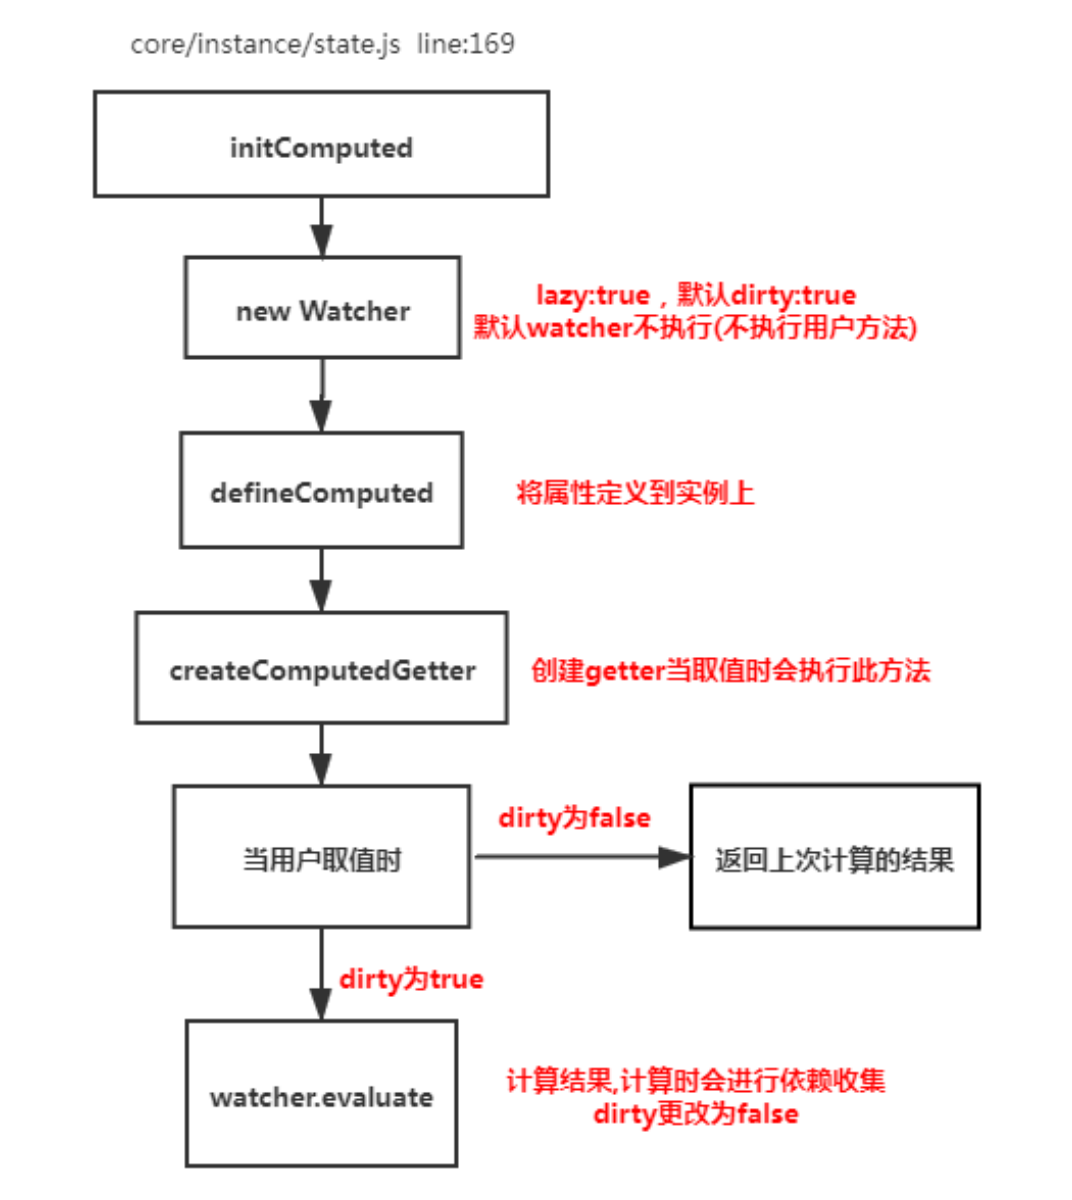
function initComputed(vm: Component, computed: Object) {
    const watchers = vm._computedWatchers = Object.create(null) const isSSR = isServerRendering() for (const key in computed) {
        const userDef = computed[key]
        const getter = typeof userDef === 'function' ? userDef : userDef.get
        if (!isSSR) { // create internal watcher for the computed property.
            watchers[key] = new Watcher(vm, getter || noop, noop, computedWatcherOptions)
        }
        // component-defined computed properties are already defined on the
        // component prototype. We only need to define computed properties defined
        // at instantiation here.
        if (!(key in vm)) {
            defineComputed(vm, key, userDef)
        } else if (process.env.NODE_ENV !== 'production') {
            if (key in vm.$data) {
                warn(`The computed property "${key}" is already defined in data.`, vm)
            } else if (vm.$options.props && key in vm.$options.props) {
                warn(`The computed property "${key}" is already defined as a prop.`, vm)
            }
        }
    }
}

function createComputedGetter(key) {
    return function computedGetter() {
        const watcher = this._computedWatchers && this._computedWatchers[key]
        if (watcher) {
            if (watcher.dirty) { // 如果依赖的值没发生变化,就不会重新求值
                watcher.evaluate()
            }
            if (Dep.target) {
                watcher.depend()
            }
            return watcher.value
        }
    }
}
7.Watch中的deep:true 是如何实现的
理解:
当用户指定了 watch 中的deep属性为 true 时,如果当前监控的值是数组类型。会对对象中的每
一项进行求值,此时会将当前 watcher 存入到对应属性的依赖中,这样数组中对象发生变化时也
会通知数据更新
原理:
function initComputed(vm: Component, computed: Object) {
    const watchers = vm._computedWatchers = Object.create(null) const isSSR = isServerRendering() for (const key in computed) {
        const userDef = computed[key]
        const getter = typeof userDef === 'function' ? userDef : userDef.get
        if (!isSSR) { // create internal watcher for the computed property.
            watchers[key] = new Watcher(vm, getter || noop, noop, computedWatcherOptions)
        }
        // component-defined computed properties are already defined on the
        // component prototype. We only need to define computed properties defined
        // at instantiation here.
        if (!(key in vm)) {
            defineComputed(vm, key, userDef)
        } else if (process.env.NODE_ENV !== 'production') {
            if (key in vm.$data) {
                warn(`The computed property "${key}" is already defined in data.`, vm)
            } else if (vm.$options.props && key in vm.$options.props) {
                warn(`The computed property "${key}" is already defined as a prop.`, vm)
            }
        }
    }
}

function createComputedGetter(key) {
    return function computedGetter() {
        const watcher = this._computedWatchers && this._computedWatchers[key]
        if (watcher) {
            if (watcher.dirty) { // 如果依赖的值没发生变化,就不会重新求值
                watcher.evaluate()
            }
            if (Dep.target) {
                watcher.depend()
            }
            return watcher.value
        }
    }
}
8.Vue组件的生命周期
理解:
要掌握每个生命周期什么时候被调用
beforeCreate 在实例初始化之后,数据观测(data observer) 之前被调用。
created 实例已经创建完成之后被调用。在这一步,实例已完成以下的配置:数据观测(data
observer),属性和方法的运算, watch/event 事件回调。这里没有$el
beforeMount 在挂载开始之前被调用:相关的 render 函数首次被调用。
mounted el 被新创建的 vm.$el 替换,并挂载到实例上去之后调用该钩子。
beforeUpdate 数据更新时调用,发生在虚拟 DOM 重新渲染和打补丁之前。
updated 由于数据更改导致的虚拟 DOM 重新渲染和打补丁,在这之后会调用该钩子。
beforeDestroy 实例销毁之前调用。在这一步,实例仍然完全可用。
destroyed Vue 实例销毁后调用。调用后, Vue 实例指示的所有东西都会解绑定,所有的事件
监听器会被移除,所有的子实例也会被销毁。 该钩子在服务器端渲染期间不被调用。
要掌握每个生命周期内部可以做什么事
created 实例已经创建完成,因为它是最早触发的原因可以进行一些数据,资源的请求。
mounted 实例已经挂载完成,可以进行一些DOM操作
beforeUpdate 可以在这个钩子中进一步地更改状态,这不会触发附加的重渲染过程。
updated 可以执行依赖于 DOM 的操作。然而在大多数情况下,你应该避免在此期间更改状态,
因为这可能会导致更新无限循环。 该钩子在服务器端渲染期间不被调用。
destroyed 可以执行一些优化操作,清空定时器,解除绑定事件
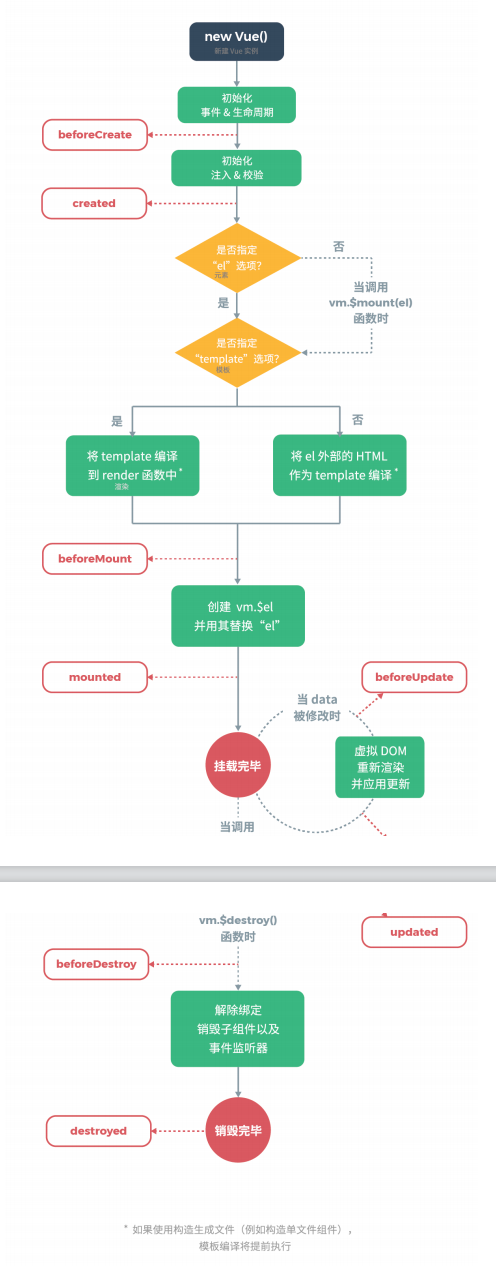
原理:

9.ajax请求放在哪个生命周期中
理解:
在created的时候,视图中的 dom 并没有渲染出来,所以此时如果直接去操 dom 节点,无法找到相
关的元素
在mounted中,由于此时 dom 已经渲染出来了,所以可以直接操作 dom 节点
一般情况下都放到 mounted 中,保证逻辑的统一性,因为生命周期是同步执行的, ajax 是异步执行的
服务端渲染不支持mounted方法,所以在服务端渲染的情况下统一放到created中
10.何时需要使用beforeDestroy
理解:
可能在当前页面中使用了 $on 方法,那需要在组件销毁前解绑。
清除自己定义的定时器
解除事件的绑定 scroll mousemove ....
11.Vue中模板编译原理
将 template 转化成 render 函数
function baseCompile(template: string, options: CompilerOptions) {
    const ast = parse(template.trim(), options) // 1.将模板转化成ast语法树
    if (options.optimize !== false) { // 2.优化树
        optimize(ast, options)
    }
    const code = generate(ast, options) // 3.生成树
    return {
        ast,
        render: code.render,
        staticRenderFns: code.staticRenderFns
    }
})
const ncname = `[a-zA-Z_][\\-\\.0-9_a-zA-Z]*`;
const qnameCapture = `((?:${ncname}\\:)?${ncname})`;
const startTagOpen = new RegExp(`^<${qnameCapture}`); // 标签开头的正则 捕获的内容是 标签名
const endTag = new RegExp(`^<\\/${qnameCapture}[^>]*>`); // 匹配标签结尾的 </div>
const attribute = /^\s*([^\s"'<>\/=]+)(?:\s*(=)\s*(?:"([^"]*)"+|'([^']*)'+| ([^\s"'=<>`]+)))?/; // 匹配属性的
const startTagClose = /^\s*(\/?)>/; // 匹配标签结束的 >
let root;
let currentParent;
let stack = []

function createASTElement(tagName, attrs) {
    return {
        tag: tagName,
        type: 1,
        children: [],
        attrs,
        parent: null
    }

}

function start(tagName, attrs) {
    let element = createASTElement(tagName, attrs);
    if (!root) {
        root = element;
    }
    currentParent = element;
    stack.push(element);
}

function chars(text) {
    currentParent.children.push({
        type: 3,
        text
    })
}

function end(tagName) {
    const element = stack[stack.length - 1];
    stack.length--;
    currentParent = stack[stack.length - 1];
    if (currentParent) {
        element.parent = currentParent;
        currentParent.children.push(element)
    }
}

function parseHTML(html) {
    while (html) {
        let textEnd = html.indexOf('<');
        if (textEnd == 0) {
            const startTagMatch = parseStartTag();
            if (startTagMatch) {
                start(startTagMatch.tagName, startTagMatch.attrs);
                continue;
            }
            const endTagMatch = html.match(endTag);
            if (endTagMatch) {
                advance(endTagMatch[0].length);
                end(endTagMatch[1])
            }
        }
        let text;
        if (textEnd >= 0) {
            text = html.substring(0, textEnd)
        }
        if (text) {
            advance(text.length);
            chars(text);
        }
    }

    function advance(n) {
        html = html.substring(n);
    }

    function parseStartTag() {
        const start = html.match(startTagOpen);
        if (start) {
            const match = {
                tagName: start[1],
                attrs: []
            }
            advance(start[0].length);
            let attr, end
            while (!(end = html.match(startTagClose)) && (attr = html.match(attribute))) {
                advance(attr[0].length);
                match.attrs.push({
                    name: attr[1],
                    value: attr[3]
                })
            }
            if (end) {
                advance(end[0].length);
                return match
            }
        }
    }
} // 生成语法树
parseHTML(`<div id="container"><p>hello<span>zf</span></p></div>`);

function gen(node) {
    if (node.type == 1) {
        return generate(node);
    } else {
        return `_v(${JSON.stringify(node.text)})`
    }
}

function genChildren(el) {
    const children = el.children;
    if (el.children) {
        return `[${children.map(c=>gen(c)).join(',')}]`
    } else {
        return false;
    }
}

function genProps(attrs) {
    let str = '';
    for (let i = 0; i < attrs.length; i++) {
        let attr = attrs[i];
        str += `${attr.name}:${attr.value},`;
    }
    return `{attrs:{${str.slice(0,-1)}}}`
}

function generate(el) {
    let children = genChildren(el);
    let code = `_c('${el.tag}'${ el.attrs.length? `,${genProps(el.attrs)}`:'' }${ children? `,${children}`:'' })`;
    return code;
} // 根据语法树生成新的代码
let code = generate(root);
let render = `with(this){return ${code}}`; // 包装成函数
let renderFn = new Function(render);
console.log(renderFn.toString());
12.Vue中v-if和v-show的区别
理解:
v-if 如果条件不成立不会渲染当前指令所在节点的 dom 元素
v-show 只是切换当前 dom 的显示或者隐藏
原理:
const VueTemplateCompiler = require('vue-template-compiler');
let r1 = VueTemplateCompiler.compile(`<div v-if="true"><span v-for="i in 3">hello</span></div>`);
/**
 with(this) { return (true) ? _c('div', _l((3), function (i) { return _c('span', [_v("hello")]) }), 0) : _e() }
 */
const VueTemplateCompiler = require('vue-template-compiler');
let r2 = VueTemplateCompiler.compile(`<div v-show="true"></div>`);
/** with(this) { return _c('div', { directives: [{ name: "show", rawName: "v-show", value: (true), expression: "true" }] }) }*/
// v-show 操作的是样式 定义在platforms/web/runtime/directives/show.js
bind(el: any, {
    value
}: VNodeDirective, vnode: VNodeWithData) {
    vnode = locateNode(vnode)
    const transition = vnode.data && vnode.data.transition
    const originalDisplay = el.__vOriginalDisplay = el.style.display === 'none' ? '' : el.style.display
    if (value && transition) {
        vnode.data.show = true
        enter(vnode, () => {
            el.style.display = originalDisplay
        })
    } else {
        el.style.display = value ? originalDisplay : 'none'
    }
}
13.为什么V-for和v-if不能连用
理解:
const VueTemplateCompiler = require('vue-template-compiler');
let r1 = VueTemplateCompiler.compile(`<div v-if="false" v-for="i in 3">hello</div>`);
/** with(this) { return _l((3), function (i) { return (false) ? _c('div', [_v("hello")]) : _e() }) }*/
console.log(r1.render);
v-for 会比 v-if 的优先级高一些,如果连用的话会把 v-if 给每个元素都添加一下,会造成性能问题
14.用vnode来描述一个DOM结构
虚拟节点就是用一个对象来描述真实的 dom 元素
function $createElement(tag, data, ...children) {
    let key = data.key;
    delete data.key;
    children = children.map(child => {
        if (typeof child === 'object') {
            return child
        } else {
            return vnode(undefined, undefined, undefined, undefined, child)
        }
    }) return vnode(tag, props, key, children);
}
export function vnode(tag, data, key, children, text) {
    return {
        tag, // 表示的是当前的标签名
        data, // 表示的是当前标签上的属性
        key, // 唯一表示用户可能传递
        children,
        text
    }
}
15.diff算法的时间复杂度
两个树的完全的 diff 算法是一个时间复杂度为 O(n3) , Vue 进行了优化·O(n3) 复杂度的问题转换成
O(n) 复杂度的问题(只比较同级不考虑跨级问题) 在前端当中, 你很少会跨越层级地移动Dom元素。 所
以 Virtual Dom只会对同一个层级的元素进行对比。
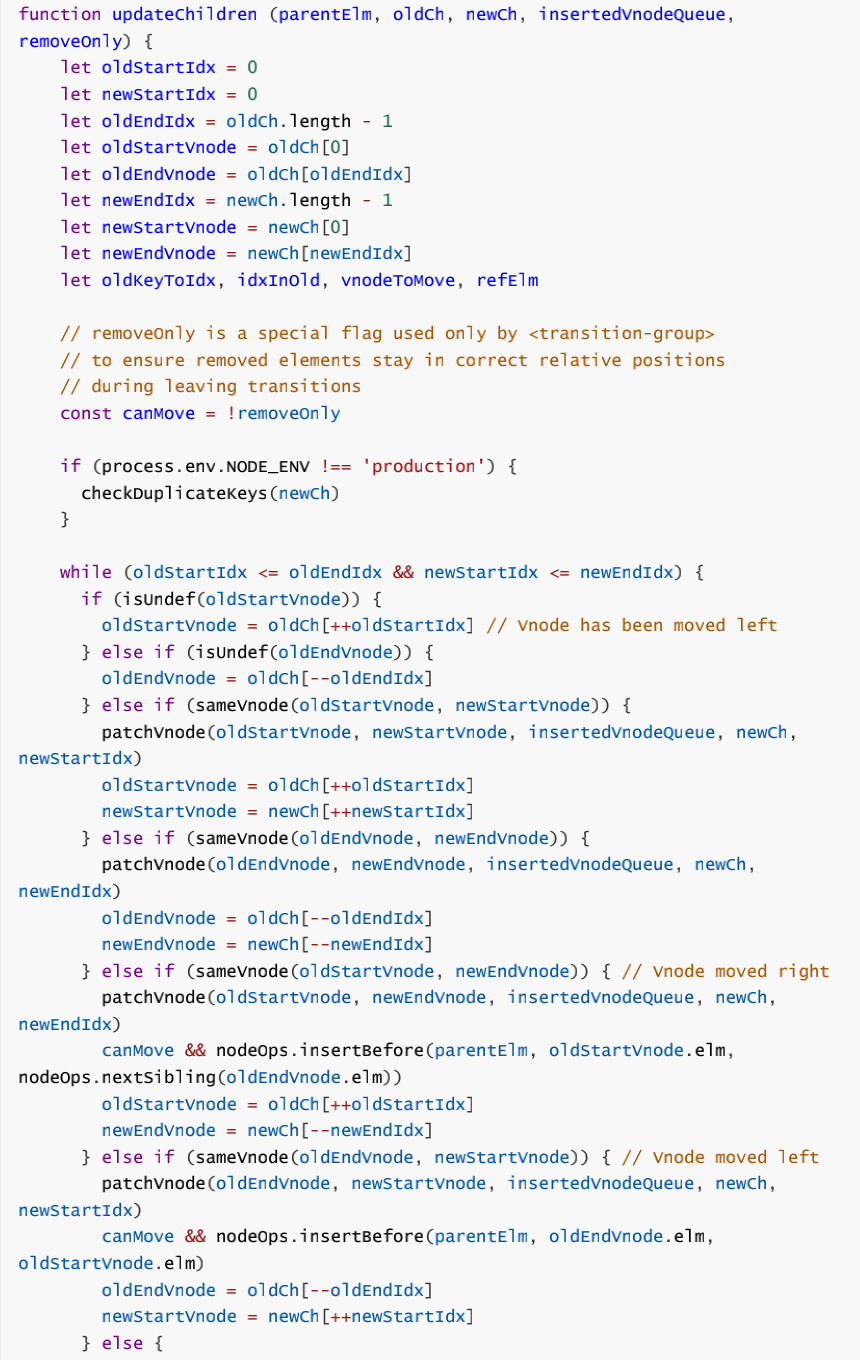
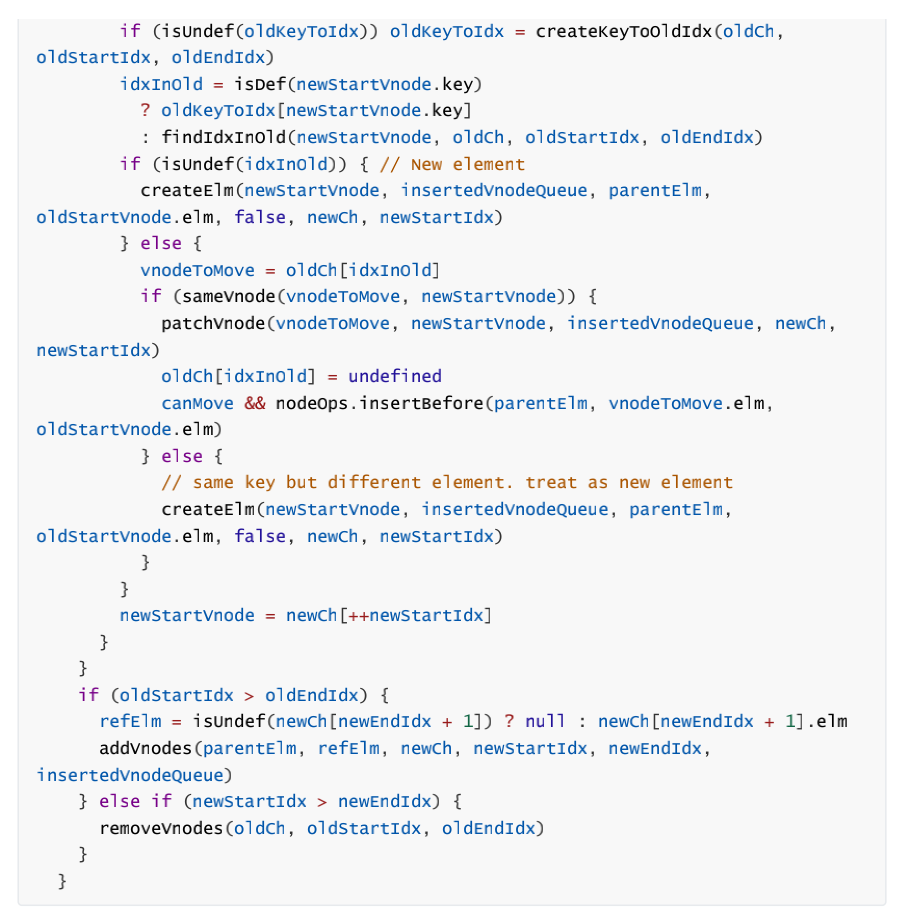
16.简述Vue中diff算法原理
理解:
1.先同级比较,在比较子节点
2.先判断一方有儿子一方没儿子的情况
3.比较都有儿子的情况
4.递归比较子节点
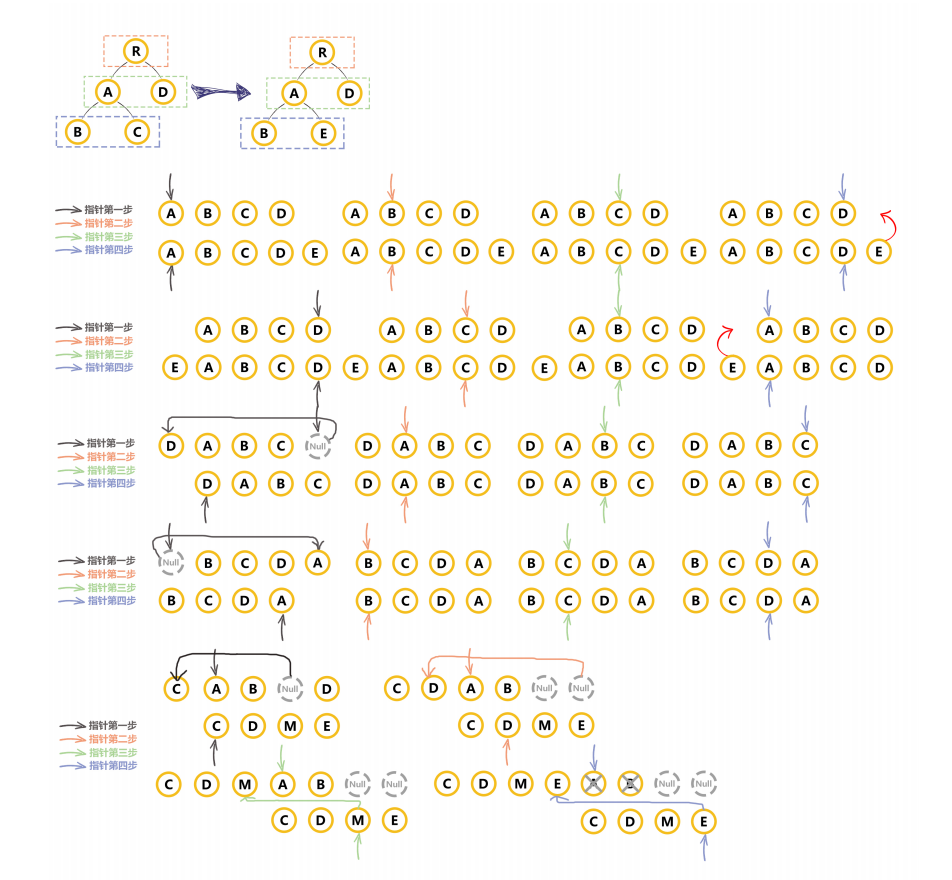
原理:
core/vdom/patch.js
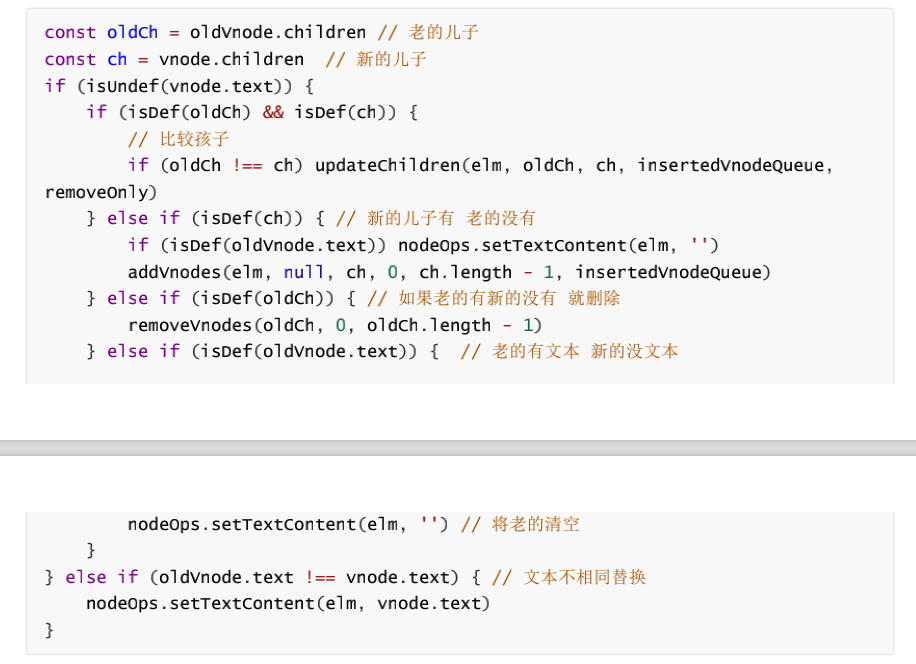
1.v-for中为什么要用key (图解)

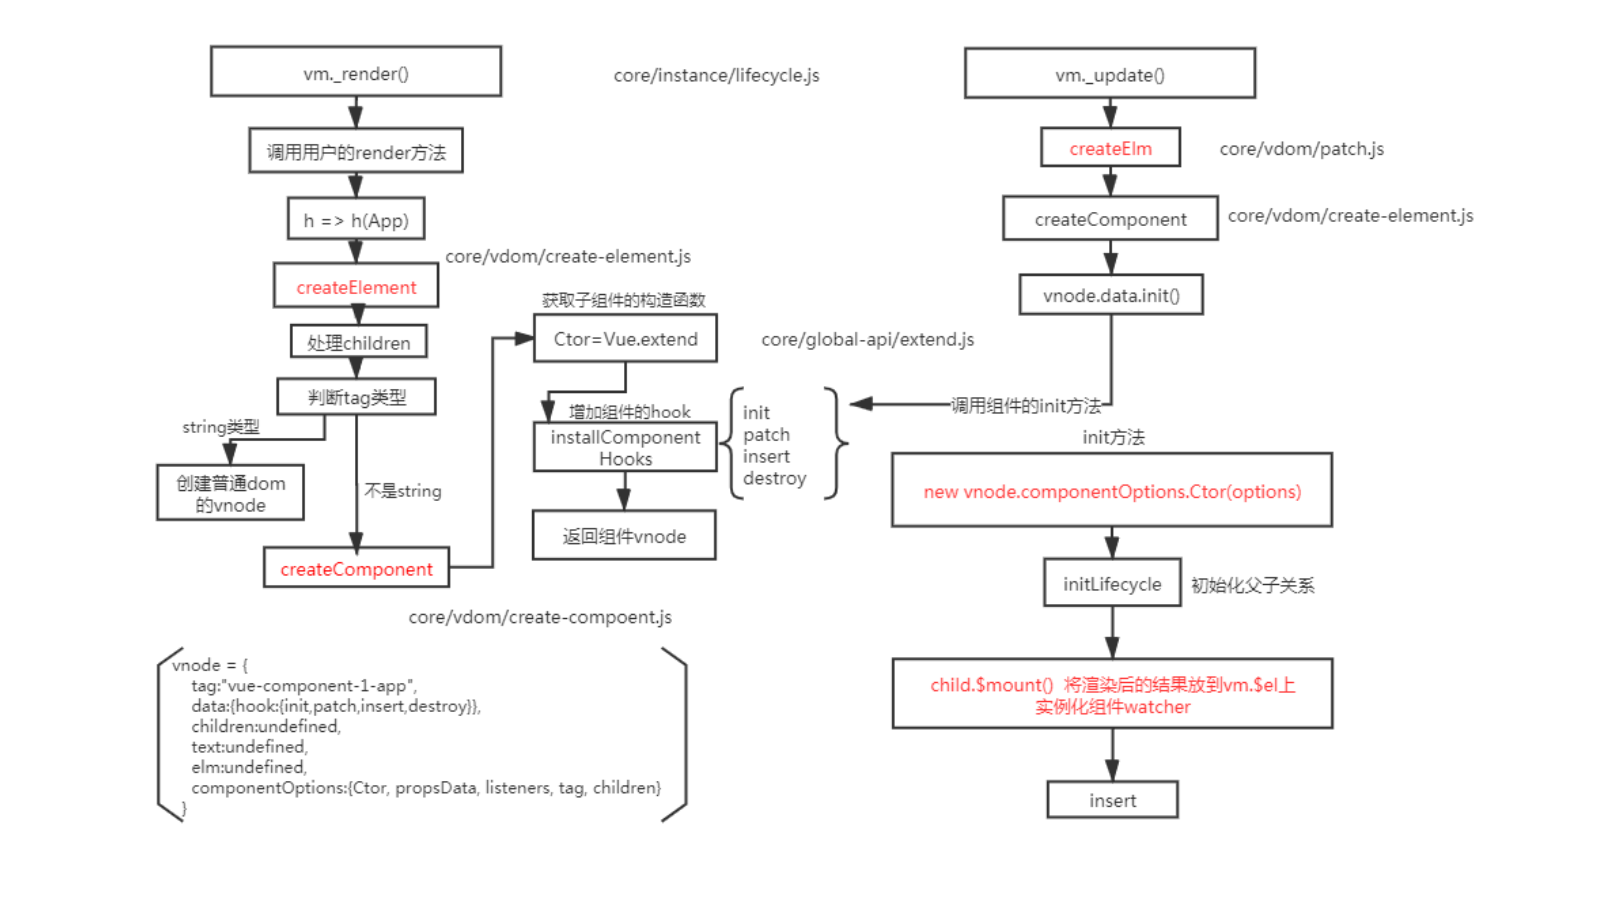
2.描述组件渲染和更新过程
理解:
渲染组件时,会通过 Vue.extend 方法构建子组件的构造函数,并进行实例化。最终手动调用
$mount() 进行挂载。更新组件时会进行 patchVnode 流程.核心就是diffff算法
3.组件中的 data为什么是一个函数?

理解:
同一个组件被复用多次,会创建多个实例。这些实例用的是同一个构造函数,如果 data 是一个对象的
话。那么所有组件都共享了同一个对象。为了保证组件的数据独立性要求每个组件必须通过 data 函数
返回一个对象作为组件的状态。
原理:
core/global-api/extend.js line:33

一个组件被使用多次,用的都是同一个构造函数。为了保证组件的不同的实例data不冲突,要求
data必须是一个函数,这样组件间不会相互影响
4.Vue中事件绑定的原理
Vue 的事件绑定分为两种一种是原生的事件绑定,还有一种是组件的事件绑定,
理解:
1.原生 dom 事件的绑定,采用的是 addEventListener 实现
2.组件绑定事件采用的是 $on 方法
原理:
事件的编译:


 浙公网安备 33010602011771号