
linux安装部署mysql5.7并配置主从复制
1.先将mysql的压缩包上传linux并解压
[root@hecs-102947 mysql]# pwd
/usr/local/mysql
[root@hecs-102947 mysql]# tar -zxvf mysql-5.7.27-linux-glibc2.12-x86_64.tar.gz
将mysql解压出来的文件进行重命名并移到/usr/local文件夹下
[root@hecs-102947 mysql]# mv mysql-5.7.27-linux-glibc2.12-x86_64 /usr/local/mysql
2. 创建用户
groupadd mysql
useradd -g mysql mysql -s /sbin/nologin
也可以直接写成这种 useradd -g mysql mysql -s /bin/bash
3.创建数据存储目录并赋予文件权限在/usr/local/mysql
[root@hecs-102947 mysql]#
[root@hecs-102947 mysql]# mkdir data
[root@hecs-102947 mysql]#
[root@hecs-102947 mysql]# chown -R mysql:mysql /usr/local/mysql/data/(数据存放地址)
4.切换用户进行测试
[root@hecs-102947 data]# su mysql
This account is currently not available.
[root@hecs-102947 data]# cat /etc/passwd | grep mysql
mysql:x:1001:1001::/home/mysql:/sbin/nologin
[root@hecs-102947 data]# vim /etc/passwd
[root@hecs-102947 data]#
[root@hecs-102947 data]#
[root@hecs-102947 data]# cat /etc/passwd | grep mysql
mysql:x:1001:1001::/home/mysql:/bin/bash
可以看到我切换成mysql时直接报错了,这是因为该服务器的shell禁止以这种命令进行登录
所以我切换成了 /bin/bash然后保存后就可以正常登录了
可以看到用户从root变成了mysql并且我可以正常访问之前授权的目录
[root@hecs-102947 data]# su mysql
[mysql@hecs-102947 data]$ ls
[mysql@hecs-102947 data]$ cd /usr/local/mysql/data/
[mysql@hecs-102947 data]$ ls
[mysql@hecs-102947 data]$
5.初始化数据库
#初始化 注意查看是否存在相关目录,若不存在,请新建
./bin/mysqld --user=mysql --basedir=/usr/local/mysql/ --datadir=/usr/local/mysql/data/ --initialize;
执行报错
./mysqld: error while loading shared libraries: libaio.so.1: cannot open shared object file: No such file or directory
可能是新的服务器环境,上面很多依赖都没有,对应它的报错信息进行安装
yum install -y libaio.so.1

yum install -y libaio
再重试初始化命令
[root@hecs-102947 bin]# ./mysqld --user=mysql --basedir=/usr/local/mysql/ --datadir=/usr/local/mysql/data/ --initialize;
2022-12-14T12:27:46.022130Z 0 [Warning] TIMESTAMP with implicit DEFAULT value is deprecated. Please use --explicit_defaults_for_timestamp server option (see documentation for more details).
2022-12-14T12:27:46.821234Z 0 [Warning] InnoDB: New log files created, LSN=45790
2022-12-14T12:27:46.861417Z 0 [Warning] InnoDB: Creating foreign key constraint system tables.
2022-12-14T12:27:46.922308Z 0 [Warning] No existing UUID has been found, so we assume that this is the first time that this server has been started. Generating a new UUID: b75b4871-7baa-11ed-8ab5-fa163e6ec524.
2022-12-14T12:27:46.924458Z 0 [Warning] Gtid table is not ready to be used. Table 'mysql.gtid_executed' cannot be opened.
2022-12-14T12:27:46.924782Z 1 [Note] A temporary password is generated for root@localhost: +.+#+dhp9IEg

这个是生成的临时密码需保存好
root@localhost: +.+#+dhp9IEg
6.mysql的配置
编辑/etc/my.cnf, 可能有些服务器没有这个需要新建
[mysqld]
user=mysql
basedir=/usr/local/mysql
datadir=/usr/local/mysql/data
socket=/tmp/mysql.sock
character-set-server=utf8
server_id=1
port=3306
7.建立mysql服务
#将目录切换到support-files执行将server服务复制到/etc/init.d/mysqld
cp -a mysql.server /etc/init.d/mysqld
#服务授权
chmod +x /etc/init.d/mysqld
chkconfig --add mysqld
#检查服务是否生效
chkconfig --list mysqld
实际操作
[root@hecs-102947 support-files]# pwd
/usr/local/mysql/support-files
[root@hecs-102947 support-files]# cp -a mysqld.server /etc/init.d/mysqld
cp: cannot stat 'mysqld.server': No such file or directory
[root@hecs-102947 support-files]# cp -a mysql.server /etc/init.d/mysqld
[root@hecs-102947 support-files]# chmod +x /etc/init.d/mysqld
[root@hecs-102947 support-files]# chkconfig --add mysqld
[root@hecs-102947 support-files]#
[root@hecs-102947 support-files]# chkconfig --list mysqld

Note: This output shows SysV services only and does not include native
      systemd services. SysV configuration data might be overridden by native
      systemd configuration.

      If you want to list systemd services use 'systemctl list-unit-files'.
      To see services enabled on particular target use
      'systemctl list-dependencies [target]'.

mysqld             0:off    1:off    2:on    3:on    4:on    5:on    6:off
[root@hecs-102947 support-files]#
8.启动mysql服务
启动之前先检查是否已存在mysql遗留进程
显示所有包含"mysqld"字符串的进程列表
ps -ef | grep mysqld
理论上只有一个,如果有其它的需要杀掉 kill pid(10132是pid)
[root@iZuf63rpbv7l8ahkbslwi6Z ~]# ps aux | grep mysqld
root 10132 0.0 0.0 221228 812 pts/0 R+ 14:43 0:00 grep --color=auto mysqld
# 启动
service mysql start;
# 查看启动状态
service mysql status;
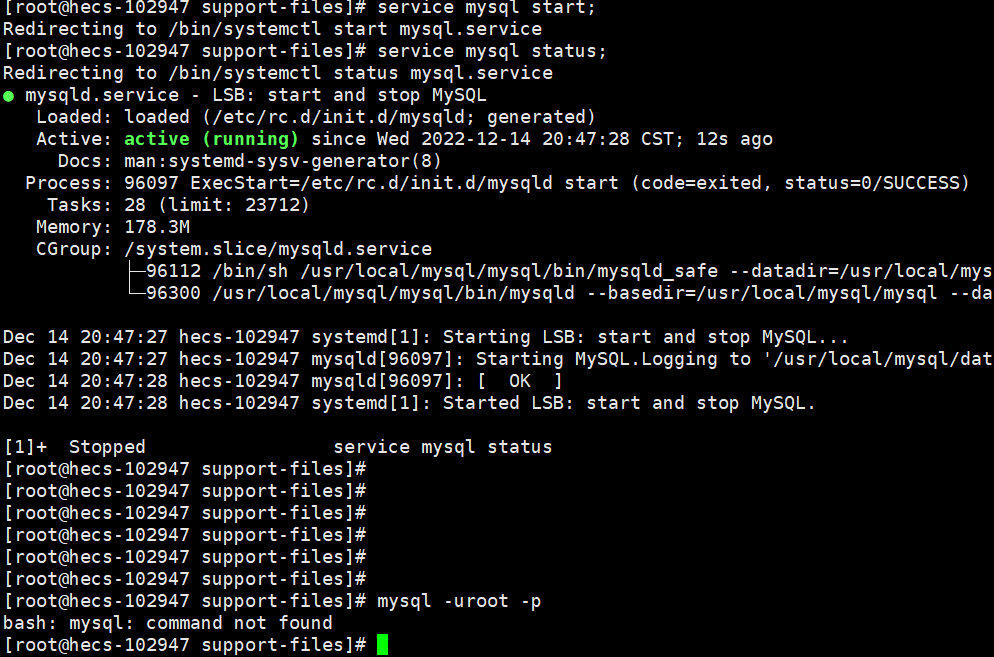
登录mysql
# 登陆
mysql -uroot -p
#输入初始化数据库操作时的临时密码
但从上面图片可以看出直接报找不到mysql命令,那么还需要将mysql命令加入全局命令里面
[root@hecs-102947 support-files]# ln -s /usr/local/mysql/bin/mysql /usr/bin/
[root@hecs-102947 support-files]# mysql -uroot -p
Enter password:
将之前的临时密码复制进去即可登录,里面打印了mysql的一些版本信息
[root@hecs-102947 support-files]# mysql -uroot -p
Enter password:
Welcome to the MySQL monitor.  Commands end with ; or \g.
Your MySQL connection id is 2
Server version: 5.7.27

Copyright (c) 2000, 2019, Oracle and/or its affiliates. All rights reserved.

Oracle is a registered trademark of Oracle Corporation and/or its
affiliates. Other names may be trademarks of their respective
owners.

Type 'help;' or '\h' for help. Type '\c' to clear the current input statement.

mysql>
修改新密码
#我这比较简单就123456
ALTER USER 'root'@'localhost' IDENTIFIED WITH mysql_native_password BY '123456';
9. 配置远程连接
在 my.cnf 的mysqld 下增加
default_authentication_plugin=mysql_native_password
修改完配置文件记得重启一下mysql服务
进行远程连接还需要执行几行命令
use mysql
#修改host的连接方式,%表示所有主机可连
update user set host ='%' where user='root';
#设置本地连接登录名及密码, 这一步执行如果报错直接执行下面刷新命令试试然后本地连接mysql测试
ALTER USER 'root'@'%' IDENTIFIED WITH mysql_native_password BY '123456';
#刷新mysql配置命令
FLUSH PRIVILEGES;
经测试本地可连接mysql
mysql集群主从复制
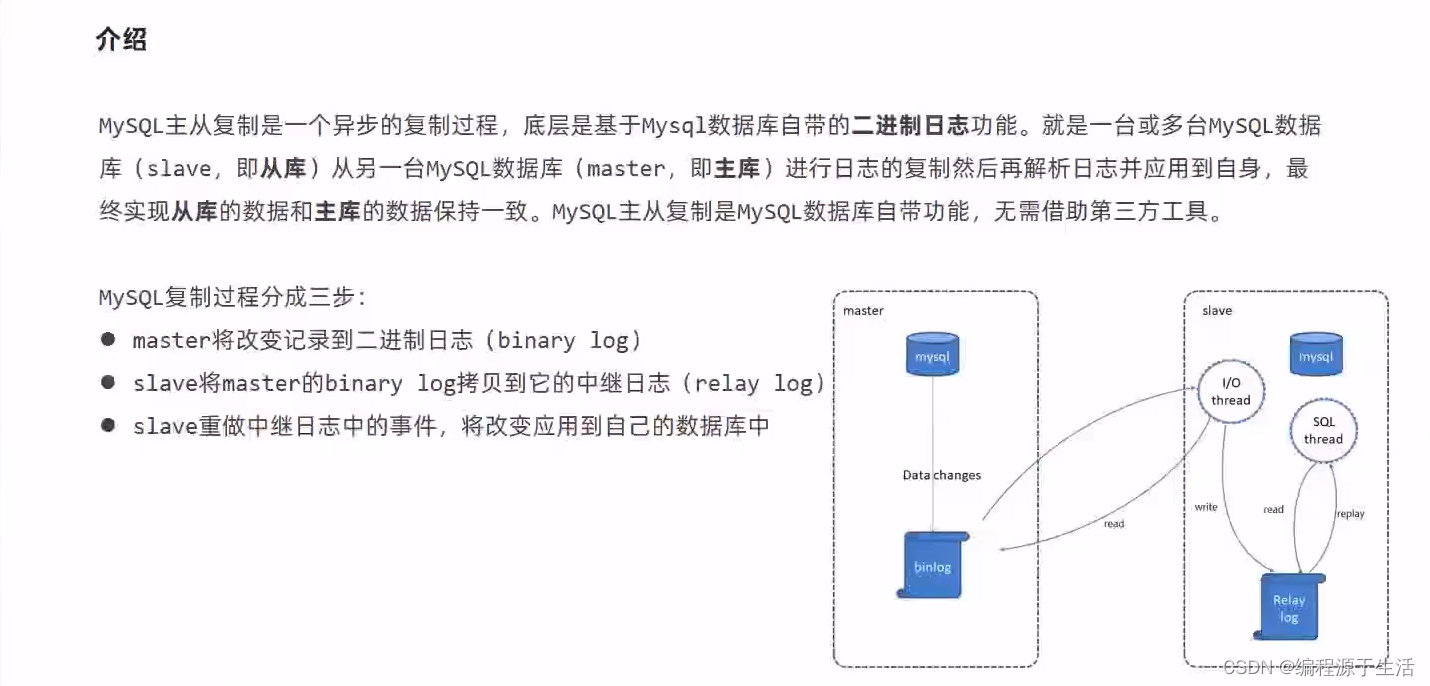
将上述单机安装mysql的方式在另一台服务器进行安装
配置主库master
1. 编辑/etc/my.cnf
#在原有的配置上新增这些配置
[mysqld]
#[必须]启用二进制日志
log-bin=mysql-bin
#[必须]服务器唯一ID
server-id=1
2. 重启mysql
#与上述单机启动停止命令大同小异
systemctl restart mysqld
3. 执行授权命令(执行mysql命令需先登上mysql: mysql -uroot -p)
GRANT REPLICATION SLAVE ON *.* to 'slaveUser'@'%' identified by '123456';
注:上面SQL的作用是创建一个用户slaveUser, 123456,并且给slaveUser用户授予REPLICATION SLAVE权限.常用于建立复制时所需要用到的用户权限,也就是slave必须被master授权具有该权限的用户,才能通过该用户复制.
4. 查看配置
show master status;
mysql> show master status;
+------------------+----------+--------------+------------------+-------------------+
| File             | Position | Binlog_Do_DB | Binlog_Ignore_DB | Executed_Gtid_Set |
+------------------+----------+--------------+------------------+-------------------+
| mysql-bin.000003 |      154 |              |                  |                   |
+------------------+----------+--------------+------------------+-------------------+
1 row in set (0.00 sec)
配置从库slave
1.配置/etc/my.cnf
[mysqld]
#slave配置
server-id=2
2.重启mysql
systemctl restart mysqld
3.修改主从复制的配置登录mysql
#master_host需替换自己的主mysql的ip
change master to master_host='127.0.0.1',master_user='slaveUser',master_password='123456',master_log_file='mysql-bin.000003',master_log_pos=154;
如果出现报错
ERROR 3021 (HY000): This operation cannot be performed with a running slave io thread; run STOP SLAVE IO_THREAD FOR CHANNEL '' first.
#停止slave线程
stop slave;
#重新执行该命令
change master to master_host='124.70.190.202',master_user='slaveUser',master_password='123456',master_log_file='mysql-bin.000003',master_log_pos=154;
start slave;
4.查看配置 show slave status;
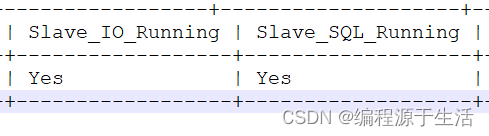
理论上有这两个标志就算是成功了, 下图是实际执行结果(备注: 结果太长可能会展示不下,但最终结果是正确的)
show slave status;
+----------------------------------+----------------+-------------+-------------+---------------+------------------+---------------------+------------------------------+---------------+-----------------------+------------------+-------------------+-----------------+---------------------+--------------------+------------------------+-------------------------+-----------------------------+------------+------------+--------------+---------------------+-----------------+-----------------+----------------+---------------+--------------------+--------------------+--------------------+-----------------+-------------------+----------------+-----------------------+-------------------------------+---------------+---------------+----------------+----------------+-----------------------------+------------------+--------------------------------------+-----------------------------------+-----------+---------------------+--------------------------------------------------------+--------------------+-------------+-------------------------+--------------------------+----------------+--------------------+--------------------+-------------------+---------------+----------------------+--------------+--------------------+
| Slave_IO_State                   | Master_Host    | Master_User | Master_Port | Connect_Retry | Master_Log_File  | Read_Master_Log_Pos | Relay_Log_File               | Relay_Log_Pos | Relay_Master_Log_File | Slave_IO_Running | Slave_SQL_Running | Replicate_Do_DB | Replicate_Ignore_DB | Replicate_Do_Table | Replicate_Ignore_Table | Replicate_Wild_Do_Table | Replicate_Wild_Ignore_Table | Last_Errno | Last_Error | Skip_Counter | Exec_Master_Log_Pos | Relay_Log_Space | Until_Condition | Until_Log_File | Until_Log_Pos | Master_SSL_Allowed | Master_SSL_CA_File | Master_SSL_CA_Path | Master_SSL_Cert | Master_SSL_Cipher | Master_SSL_Key | Seconds_Behind_Master | Master_SSL_Verify_Server_Cert | Last_IO_Errno | Last_IO_Error | Last_SQL_Errno | Last_SQL_Error | Replicate_Ignore_Server_Ids | Master_Server_Id | Master_UUID                          | Master_Info_File                  | SQL_Delay | SQL_Remaining_Delay | Slave_SQL_Running_State                                | Master_Retry_Count | Master_Bind | Last_IO_Error_Timestamp | Last_SQL_Error_Timestamp | Master_SSL_Crl | Master_SSL_Crlpath | Retrieved_Gtid_Set | Executed_Gtid_Set | Auto_Position | Replicate_Rewrite_DB | Channel_Name | Master_TLS_Version |
+----------------------------------+----------------+-------------+-------------+---------------+------------------+---------------------+------------------------------+---------------+-----------------------+------------------+-------------------+-----------------+---------------------+--------------------+------------------------+-------------------------+-----------------------------+------------+------------+--------------+---------------------+-----------------+-----------------+----------------+---------------+--------------------+--------------------+--------------------+-----------------+-------------------+----------------+-----------------------+-------------------------------+---------------+---------------+----------------+----------------+-----------------------------+------------------+--------------------------------------+-----------------------------------+-----------+---------------------+--------------------------------------------------------+--------------------+-------------+-------------------------+--------------------------+----------------+--------------------+--------------------+-------------------+---------------+----------------------+--------------+--------------------+
| Waiting for master to send event | 127.0.0.1      | slaveUser   |        3306 |            60 | mysql-bin.000003 |                 154 | hecs-406672-relay-bin.000002 |           320 | mysql-bin.000003      | Yes              | Yes               |                 |                     |                    |                        |                         |                             |          0 |            |            0 |                 154 |             533 | None            |                |             0 | No                 |                    |                    |                 |                   |                |                     0 | No                            |             0 |               |              0 |                |                             |                1 | b75b4871-7baa-11ed-8ab5-fa163e6ec524 | /usr/local/mysql/data/master.info |         0 |                NULL | Slave has read all relay log; waiting for more updates |              86400 |             |                         |                          |                |                    |                    |                   |             0 |                      |              |                    |
+----------------------------------+----------------+-------------+-------------+---------------+------------------+---------------------+------------------------------+---------------+-----------------------+------------------+-------------------+-----------------+---------------------+--------------------+------------------------+-------------------------+-----------------------------+------------+------------+--------------+---------------------+-----------------+-----------------+----------------+---------------+--------------------+--------------------+--------------------+-----------------+-------------------+----------------+-----------------------+-------------------------------+---------------+---------------+----------------+----------------+-----------------------------+------------------+--------------------------------------+-----------------------------------+-----------+---------------------+--------------------------------------------------------+--------------------+-------------+-------------------------+--------------------------+----------------+--------------------+--------------------+-------------------+---------------+----------------------+--------------+--------------------+
1 row in set (0.00 sec)
经本地测试, 在主库新增数据库/表/数据, 从库也会对应新增
主从复制进阶技术
1.主库配置需要复制的库
[mysqld]
#需要同步的数据库,如果有多个,复制多份指定数据库名即可
binlog_do_db=home
#不需要同步的数据库,如果有多个,复制多份指定数据库名即可
binlog-ignore-db=mysql
binlog-ignore-db=information_schema
binlog-ignore-db=performance_schema
binlog-ignore-db=sys
然后进行重启mysql, 本地测试在sys新建删除库表从库无反应, 而在home进行新建删除从库可以同步

 浙公网安备 33010602011771号