angularJs 技巧总结及最佳实践
强烈建议通读官方wiki文档,里面包含了FAQ,最佳实践,深入理解最核心的Directive及Scope等文章,
基础
1. 使用ng-repeat指令,为防止重复值发生的错误。加上track by $index。
<li ng-repeat="i in ctrl.list track by $index">{{ i }}</li>
2. 把控制器中与视图无关的逻辑都移到"服务(service)"中
3. 尽量要少操作DOM.这里有个简单的例子, 我们要做一个切换的按钮 (这个例子有点做作和有点长, 主要是为了表示一下很复杂的情况也是这样解决的.)
总结就是:
Don't wrap element inside of $(). All AngularJS elements are already jq-objects
Don't use jQuery to generate templates or DOM
这是官方阐明的
.directive( 'myDirective', function () {
    return {
        template: '<a class="btn">Toggle me!</a>',
        link: function ( scope, element, attrs ) {
            var on = false;

            $(element).click( function () {
                if ( on ) {
                    $(element).removeClass( 'active' );
                }
                else {
                    $(element).addClass( 'active' );
                }

                on = !on;
            });
        }
    };
});
这个例子中有些错误, 第一,jQuery是不需要的. 第二即使其他地方引入了jQuery,我们还是可以用 angular.element 来替换. 第三, 即使要使用jQuery, jqLite (angular.element) 也会在引入jQuery时优先使用jQuery. 所以不要用$,而是angular.element. 第四, jqLite 不需要包裹$, 在link函数中,element 已经是一个jQuery元素被传了进去. 第五,之前说过,模板中与逻辑混在一起。
改进后
.directive( 'myDirective', function () {
    return {
        scope: true,
        template: '<a class="btn" ng-class="{active: on}" ng-click="toggle()">Toggle me!</a>',
        link: function ( scope, element, attrs ) {
            scope.on = false;

            scope.toggle = function () {
                scope.on = !$scope.on;
            };
        }
    };
});
4. ng默认的解析标签是{{}},有时候会和其他模板引擎中的标签冲突,如Symfony的twig的模板。如要修改请使用 $interpolateProvider
var app = angular.module('myApp', []);
app.config(['$interpolateProvider', function($interpolateProvider) {
      $interpolateProvider.startSymbol('{[');
      $interpolateProvider.endSymbol(']}');
}]);
5. 重置form到初始状态,并清除之前的错误信息
// form.$setPristine()可以重置表单到dirty之前的状态,并且清除form上的ng-dirty类名
// accountForm是form元素的name属性值
 $scope.accountForm.$setPristine();
 $scope.accountForm.$setUntouched();
6. 有ng-if,没有ng-else,如果需要多条件判断,可以使用 ngSwitch
<ANY ng-switch="expression">
  <ANY ng-switch-when="matchValue1">...</ANY>
  <ANY ng-switch-when="matchValue2">...</ANY>
  <ANY ng-switch-default>...</ANY>
</ANY>
7. 如何获取某dom元素上的scope信息,参见 调试的时候特别方便。
指令Directive
指令是angular.js的核心,用法及API请参见官方文档。指令中一个重要概念是scope的理解,这篇官方文章也非常好。
1. 本质上,当写 directive 时令时。当我们设置了 link 参数,实际上是创建了一个 postLink() 链接函数,以便 compile() 函数可以定义链接函数。编译函数(compile)负责对模板DOM进行转换。 链接函数(link) 负责将作用域和 DOM 进行链接。
....
compile: function compile(tElement, tAttrs, transclude) {
      return {
        pre: function preLink(scope, iElement, iAttrs, controller) { ... },
        post: function postLink(scope, iElement, iAttrs, controller) { ... }
      }
    },
link: function postLink(scope, iElement, iAttrs) { ... }
...
个人理解compile函数的功能更强。
详情内容:[译]ng指令中的compile与link函数解析
2. directive中controller和link参数的作用差不多,区别是当需要暴露API给其他directive调用就使用controller,否则使用link。参见
3. directive动态加载不同的模板。 参见
angular.module("app", [])
.controller("DemoCtrl", ['$scope', function($scope){
  let vm  = this;
  vm.data = [
    {
      fieldTypeId: 1,
      title: 'first name'
    },
    {
      fieldTypeId: 2,
      title: 'this is text area'
    }
  ]
}])
.directive('magicField', function(){
  return {
    template: '<div ng-include="contentUrl"></div>',
    scope: {
      fieldTypeId: '@'
    },
    replace: true,
    link: function($scope, $element, $attrs){
      let template = ''
      if ($attrs.fieldTypeId == '1') {
        $scope.contentUrl = 'tpl/input.html'
      }
      else if ($attrs.fieldTypeId == '2') {
        $scope.contentUrl = 'tpl/textarea.html'
      }
    }
  }
})
html
<body ng-app="app">
<div ng-controller="DemoCtrl as vm">
  <div ng-repeat="field in vm.data">
    <magic-field data-field-type-id="{{field.fieldTypeId}}"></magic-field>
  </div>
</div>
</body>
4. 关于向父子controller中传递内容。
- `$emit` 只能向parent controller传递event与data
- `$broadcast` 只能向child controller传递event与data
- `$on` 用于接收event与data
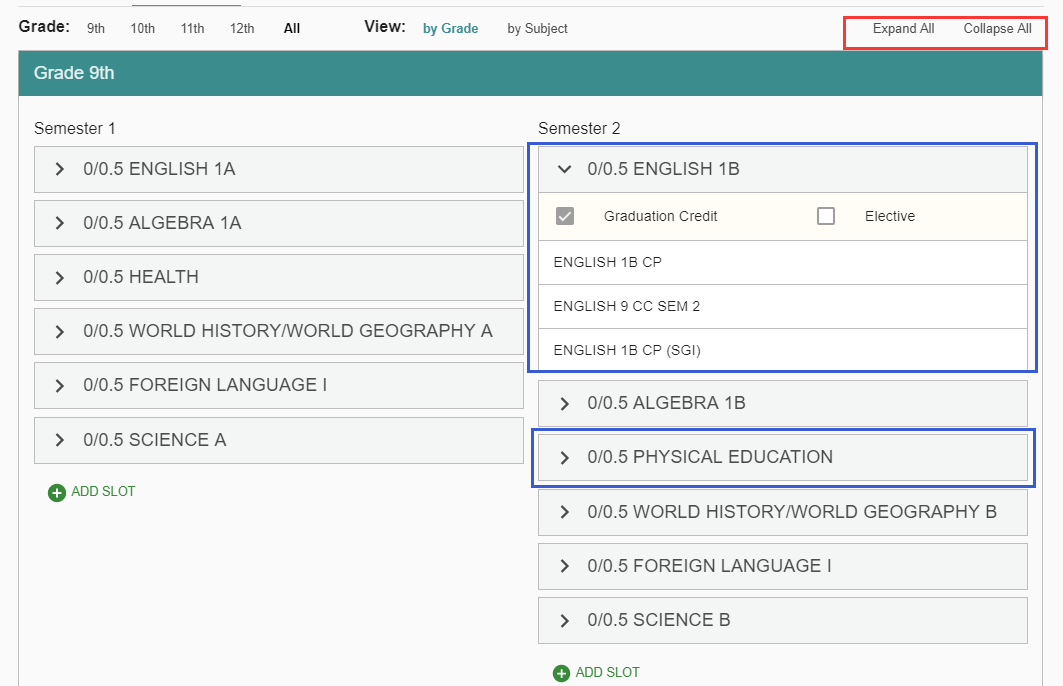
下面是一个例子有两个按钮Expand All和Collapse All。下面的蓝色框起来的都是一个一个Directive生成的组件。单击可展开和收缩。
点击Expand All可展开所有的组件
Expand All和Collapse All对应的方法是
        $scope.onExpandAllClicked = function () {
            $scope.$broadcast('expand');
        };
        $scope.onCollapseAllClicked = function () {
            $scope.$broadcast('collapse');
        };
Directive内部
$scope.$on('expand', function () {
     vm.expand = true;
});
$scope.$on('collapse', function () {
     vm.expand = false;
});

SPA
1. 开发SPA单页应用时,当在路由中已经指定了controller,就要把html中的移除,比如`<body ng-app="7minWorkout" ng-controller="WorkoutController">`,否则会有两个controller,会出现加载两次的情况。
$routeProvider.when('/workout', {
   templateUrl: 'partials/workout.html',
   controller: 'WorkoutController'
});
性能及优化
1. 使用一次性绑定提高性能。尤其是在ng-repeat中
<p>Hello {{::name}}!</p>

<custom-directive two-way-attribute="::oneWayExpression"></custom-directive>
2. 由于html不是区分标签和属性大小写的,如h1和H1,浏览器都能正确的解析。为避免出现问题angular会normalizes (标准化) 元素的标签名和属性名。用了匹配正确的directive。
normalizes过程是:
1. 移除元素/属性名字中开头的"x-"和"data-"
2. 将以':','-'或'_'分隔的名字转换为驼峰.
如:
<div ng-controller="Controller">
  Hello <input ng-model='name'> <hr/>
  <span ng-bind="name"></span> <br/>
  <span ng:bind="name"></span> <br/>
  <span ng_bind="name"></span> <br/>
  <span data-ng-bind="name"></span> <br/>
  <span x-ng-bind="name"></span> <br/>
</div>
他们的效果是一样的,转换后最终都是用到的ngBind指令。
再来个例子
//定义directive
.directive('matchTables', function () {
    return {
        restrict      : 'E',
        scope: {
            targetMatchesData: "=",
            isTargetOwner: "<"
        },


// 模版传参,注意大小写

<match-tables
    is-target-owner="isTargetOwner"
    target-matches-data="FormTargetData.Matches">
 </match-tables>
3. 生产环境的优化。参见官网。 注意有一条通过下面的代码来禁用M和C的指令。这个是1.6.x之后的版本才生效。
$compileProvider.commentDirectivesEnabled(false);
$compileProvider.cssClassDirectivesEnabled(false);
4. 如果升级1.6后使用directive(为迁移NG2方便,官方建议写component),指令中绑定的变量报undefined。
需要加上
$compileProvider.preAssignBindingsEnabled(true);
具体升级指导:https://code.angularjs.org/1.6.0/docs/guide/migration


