一、简介
MHA:
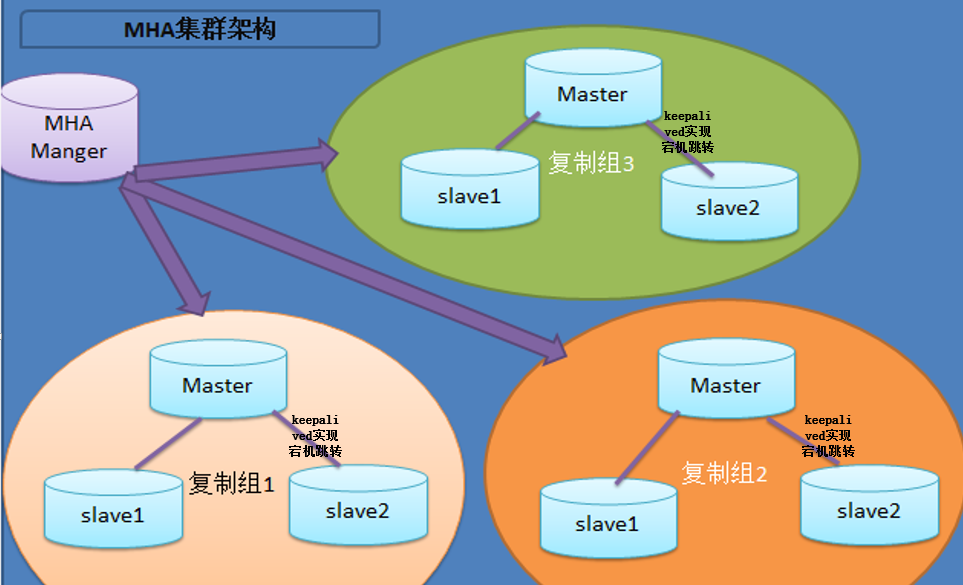
你可以把它看做是一个监控MySQL的工具,当master挂了之后,起一个slave作为master,另外一台slave重新作为新master的备库;
所以MHA的架构做好是三台数据库,并且已经提前做好了主从模式(一主两从),MHA可以管理多组MySQL主从集群;VIP的跳转也
是通过keepalived来实现的,总体的架构设计如下图所示(借助网上的图片):

Mycat:
实现读写分离、分库分表的一个开源的工具,我这里没有使用到分库分表的功能,只是单纯的做读写分离;mycat实现读写分离是在配置文件
中配置的,配置起来也比较的简单,下面会详细介绍,架构方面则是采用的如下图所示的架构模式:

二、MHA搭建安装
2.1 搭建(一主两从已经实现,这里不做阐述)
包分为两部分,一个是manager的包,另外一个是node包;包的下载地址为:https://pan.baidu.com/s/1D6v6yPeCTecaB68LwPZJ2A,密码:oyez
所有的节点都需要安装node包,然后所有的节点你都需要安装Perl的依赖包:perl-DBD-MySQL
如果还缺少其它包的话,那就见招拆招呗!!
还有一点需要注意:那个manager包你可以单独部署在一台服务器上,也可以部署在其中一台node节点上
所有的服务器建立key登录,互信任
2.1.1 manager节点
mkdir -p /etc/masterha && cp mha4mysql-manager-0.53/samples/conf/app1.cnf /etc/masterha/

 1 [server default]
 2 manager_workdir=/var/log/masterha/app1.log              //设置manager的工作目录
 3 manager_log=/var/log/masterha/app1/manager.log          //设置manager的日志
 4 master_binlog_dir=/data/mysql                         //设置master 保存binlog的位置,以便MHA可以找到master的日志,我这里的也就是mysql的数据目录
 5 master_ip_failover_script= /usr/local/bin/master_ip_failover    //设置自动failover时候的切换脚本
 6 master_ip_online_change_script= /usr/local/bin/master_ip_online_change  //设置手动切换时候的切换脚本
 7 password=123456         //设置mysql中root用户的密码,这个密码是前文中创建监控用户的那个密码
 8 user=root               设置监控用户root
 9 ping_interval=1         //设置监控主库,发送ping包的时间间隔,默认是3秒,尝试三次没有回应的时候自动进行railover
10 remote_workdir=/tmp     //设置远端mysql在发生切换时binlog的保存位置
11 repl_password=123456    //设置复制用户的密码
12 repl_user=repl          //设置复制环境中的复制用户名
13 report_script=/usr/local/send_report    //设置发生切换后发送的报警的脚本
14 secondary_check_script= /usr/local/bin/masterha_secondary_check -s server03 -s server02
15 shutdown_script=""      //设置故障发生后关闭故障主机脚本(该脚本的主要作用是关闭主机放在发生脑裂,这里没有使用)
16 ssh_user=root           //设置ssh的登录用户名
17
18 [server1]
19 hostname=192.168.0.50
20 port=3306
21
22 [server2]
23 hostname=192.168.0.60
24 port=3306
25 candidate_master=1   //设置为候选master,如果设置该参数以后,发生主从切换以后将会将此从库提升为主库,即使这个主库不是集群中事件最新的slave
26 check_repl_delay=0   //默认情况下如果一个slave落后master 100M的relay logs的话,MHA将不会选择该slave作为一个新的master,因为对于这个slave的恢复需要花费很长时间,通过设置check_repl_delay=0,MHA触发切换在选择一个新的master的时候将会忽略复制延时,这个参数对于设置了candidate_master=1的主机非常有用,因为这个候选主在切换的过程中一定是新的master
27
28 [server3]
29 hostname=192.168.0.70
30 port=3306
注意:
MHA在发生切换的过程中,从库的恢复过程中依赖于relay log的相关信息,所以这里要将relay log的自动清除设置为OFF,采用手动清除relay log的方式。在默认情况下,从服务器上的中继日志会在SQL线程执行完毕后被自动删除。但是在MHA环境中,这些中继日志在恢复其他从服务器时可能会被用到,因此需要禁用中继日志的自动删除功能。定期清除中继日志需要考虑到复制延时的问题。在ext3的文件系统下,删除大的文件需要一定的时间,会导致严重的复制延时。为了避免复制延时,需要暂时为中继日志创建硬链接,因为在linux系统中通过硬链接删除大文件速度会很快。(在mysql数据库中,删除大表时,通常也采用建立硬链接的方式)
MHA节点中包含了pure_relay_logs命令工具,它可以为中继日志创建硬链接,执行SET GLOBAL relay_log_purge=1,等待几秒钟以便SQL线程切换到新的中继日志,再执行SET GLOBAL relay_log_purge=0
检查各节点间的ssh通信:
masterha_check_ssh --conf=/etc/masterha/app1.cnf ;显示所有的都成功,才算是成功,不然就检查错误原因;我这里有两台节点之间总是检测不通过,手动测试互相连接都没问题,但就是通过这个脚本没法通过,我的解决办法是删除.ssh目录,重新生成公钥和秘钥,重新建立信任
然后再检查复制情况:
masterha_check_repl --conf=/etc/masterha/app1.cnf
在执行这个脚本之前,你需要先配置好keepalived,因为master_ip_failover这个脚本会去寻找keepalived的VIP,如果没有配置好keepalived,就先把master_ip_failover_script= /usr/local/bin/master_ip_failover这行给注释掉(app1.conf文件)
2.2 MHA引入keepalived(MySQL服务进程挂掉时通过MHA 停止keepalived)
要想把keepalived服务引入MHA,我们只需要修改切换是触发的脚本文件master_ip_failover即可,在该脚本中添加在master发生宕机时对keepalived的处理。

#!/usr/bin/env perl

use strict;
use warnings FATAL => 'all';

use Getopt::Long;

my (
    $command,          $ssh_user,        $orig_master_host, $orig_master_ip,
    $orig_master_port, $new_master_host, $new_master_ip,    $new_master_port
);

my $vip = '192.168.0.88';
my $ssh_start_vip = "/etc/init.d/keepalived start";
my $ssh_stop_vip = "/etc/init.d/keepalived stop";

GetOptions(
    'command=s'          => \$command,
    'ssh_user=s'         => \$ssh_user,
    'orig_master_host=s' => \$orig_master_host,
    'orig_master_ip=s'   => \$orig_master_ip,
    'orig_master_port=i' => \$orig_master_port,
    'new_master_host=s'  => \$new_master_host,
    'new_master_ip=s'    => \$new_master_ip,
    'new_master_port=i'  => \$new_master_port,
);

exit &main();

sub main {

    print "\n\nIN SCRIPT TEST====$ssh_stop_vip==$ssh_start_vip===\n\n";

    if ( $command eq "stop" || $command eq "stopssh" ) {

        my $exit_code = 1;
        eval {
            print "Disabling the VIP on old master: $orig_master_host \n";
            &stop_vip();
            $exit_code = 0;
        };
        if ($@) {
            warn "Got Error: $@\n";
            exit $exit_code;
        }
        exit $exit_code;
    }
    elsif ( $command eq "start" ) {

        my $exit_code = 10;
        eval {
            print "Enabling the VIP - $vip on the new master - $new_master_host \n";
            &start_vip();
            $exit_code = 0;
        };
        if ($@) {
            warn $@;
            exit $exit_code;
        }
        exit $exit_code;
    }
    elsif ( $command eq "status" ) {
        print "Checking the Status of the script.. OK \n";
        #`ssh $ssh_user\@cluster1 \" $ssh_start_vip \"`;
        exit 0;
    }
    else {
        &usage();
        exit 1;
    }
}

# A simple system call that enable the VIP on the new master
sub start_vip() {
    `ssh $ssh_user\@$new_master_host \" $ssh_start_vip \"`;
}
# A simple system call that disable the VIP on the old_master
sub stop_vip() {
     return 0  unless  ($ssh_user);
    `ssh $ssh_user\@$orig_master_host \" $ssh_stop_vip \"`;
}

sub usage {
    print
    "Usage: master_ip_failover --command=start|stop|stopssh|status --orig_master_host=host --orig_master_ip=ip --orig_master_port=port --new_master_host=host --new_master_ip=ip --new_master_port=port\n";
}
因为我不懂Perl,这个配置语法也是从网上找的,没有测试好使不好使;我这里使用zabbix的监控,触发脚本实现MySQL-master异常时,杀掉keepalived,使VIP跳转到新的master上
2.3 总结:
目前高可用方案可以一定程度上实现数据库的高可用,比如MMM,heartbeat+drbd,Cluster等。还有percona的Galera Cluster等。这些高可用软件各有优劣。在进行高可用方案选择时,主要是看业务还有对数据一致性方面的要求。最后出于对数据库的高可用和数据一致性的要求,推荐使用MHA架构。
三、mycat搭建
3.1 搭建
mycat的搭建比较容易,直接解压出来就可以了,主要就是看下配置文件的配置,主要就是server.xml和schema.xml
server.xml:(主要是配置mycat的用户名和密码,以及可以管理的库)

schema.xml:(配置读写分离)

3.2 集群搭建
两台或者多台mycat服务器配置都是一样的,中间也没有直接的联系,简介中的那个图说明的已经很明确了,是通过keepalived+nginx来实现代理转发到mycat,实现的高可用,这里就不做过多的阐述了
四、附加项
想必有的同学会问,为啥不使用四台服务器,两台master互为主备,中间通过keepalived实现VIP跳转,两台slave都change master to VIP,这样的话,也能实现高可用,而且不需要第三方的工具去监控跳转
缺点:
1、比如你们公司访问量很大,应用层已经针对不同的业务模块分组了,那么数据库这块也得分组,如果分三组的话,MHA的方案,最多使用十台服务器,而下面这种方案的话,需要12台服务器
2、MySQL master互为主从的话,对服务器的性能考验比较大,也容易出现各种问题,有一点数据不同步的话,slave就没法获取完整的数据
优点:
1、不需要第三方工具的依赖
2、学习成本也比较的低
五、总结
综上所述,建议大家搭建MHA的监控,实现宕机跳转的目的(这里说一下那个中继日志的作用就是用于恢复slave数据使用的)
FLUSH TABLES WITH READ LOCK (mysql 锁整个库实例)


