redis部署以及各种数据类型使用命令等详解
参考:https://www.cnblogs.com/pyyu/p/9843950.html redis博客地址
redis指定安装目录
Redis 是一个开源的使用 C 语言编写的键值对存储系统,可以用于数据库、缓存以及消息中间件等方面。
如果你想要指定 Redis 的安装目录,你可以在编译和安装 Redis 时通过配置参数来指定。
解决方案一:
在编译安装 Redis 时,可以使用 make PREFIX=/指定目录 install 命令来指定安装目录。
例如,如果你想要将 Redis 安装到 /usr/local/redis 目录下,你可以执行以下命令:
解决方案二:
如果你是在使用 Docker 来运行 Redis,你可以在运行 Docker 容器时通过 -v 参数来挂载数据卷,从而指定 Redis 的配置文件和数据文件存放的目录。
例如,如果你想要将 Redis 的配置文件 redis.conf 挂载到宿主机的 /etc/redis 目录,并将 Redis 的数据文件挂载到宿主机的 /var/redis/data 目录,你可以执行以下命令:
注意:
-
以上两种解决方案都是在安装或运行 Redis 时指定了目录,具体使用哪种方式取决于你的实际需求和环境。
-
在实际操作时,可能需要根据你的 Redis 版本和操作系统进行适当的调整。
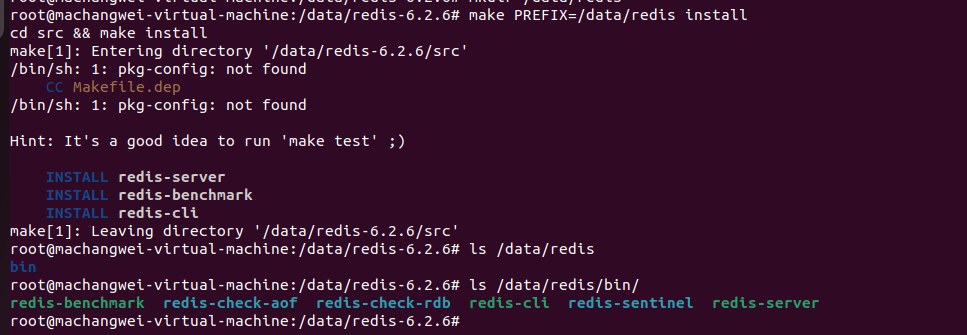
编译安装redis
开始部署
[root@mcw01 ~]$ ls
anaconda-ks.cfg  mongodb-linux-x86_64-3.2.8.tgz
[root@mcw01 ~]$ wget http://download.redis.io/releases/redis-4.0.10.tar.gz
--2022-03-05 18:27:02--  http://download.redis.io/releases/redis-4.0.10.tar.gz
Resolving download.redis.io (download.redis.io)... 45.60.125.1
Connecting to download.redis.io (download.redis.io)|45.60.125.1|:80... connected.
HTTP request sent, awaiting response... 200 OK
Length: 1738465 (1.7M) [application/octet-stream]

Saving to: ‘redis-4.0.10.tar.gz’

100%[====================>] 1,738,465   63.4KB/s   in 25s

2022-03-05 18:27:27 (68.2 KB/s) - ‘redis-4.0.10.tar.gz’ saved [1738465/1738465]

[root@mcw01 ~]$ ls
anaconda-ks.cfg  mongodb-linux-x86_64-3.2.8.tgz  redis-4.0.10.tar.gz
[root@mcw01 ~]$ tar xf redis-4.0.10.tar.gz
[root@mcw01 ~]$ ls
anaconda-ks.cfg  mongodb-linux-x86_64-3.2.8.tgz  redis-4.0.10  redis-4.0.10.tar.gz
[root@mcw01 ~]$ cd redis-4.0.10/
[root@mcw01 ~/redis-4.0.10]$ ls  #有makefile文件,就不需要./configure配置
00-RELEASENOTES  COPYING  Makefile   redis.conf       runtest-sentinel  tests
BUGS             deps     MANIFESTO  runtest          sentinel.conf     utils
CONTRIBUTING     INSTALL  README.md  runtest-cluster  src
[root@mcw01 ~/redis-4.0.10]$ make
报错 gcc命令没有找到:
cd hiredis && make static
make[3]: Entering directory `/root/redis-4.0.10/deps/hiredis'
gcc -std=c99 -pedantic -c -O3 -fPIC  -Wall -W -Wstrict-prototypes -Wwrite-strings -g -ggdb  net.c
make[3]: gcc: Command not found
make[3]: *** [net.o] Error 127
make[3]: Leaving directory `/root/redis-4.0.10/deps/hiredis'
make[2]: *** [hiredis] Error 2
make[2]: Leaving directory `/root/redis-4.0.10/deps'
make[1]: [persist-settings] Error 2 (ignored)
    CC adlist.o
/bin/sh: cc: command not found
make[1]: *** [adlist.o] Error 127
make[1]: Leaving directory `/root/redis-4.0.10/src'
make: *** [all] Error 2
#解决编译安装所需的依赖环境继续部署
um install gcc patch libffi-devel python-devel  zlib-devel bzip2-devel openssl-devel ncurses-devel sqlite-devel readline-devel tk-devel gdbm-devel db4-devel libpcap-devel xz-devel openssl openssl-devel -y


然后重新执行:
[root@mcw01 ~/redis-4.0.10]$ make  #发现报错没有某个目录或文件。在这之前编译失败了,目录被改变了部分,所以直接删除重新解压,然后make编译
......
Hint: It's a good idea to run 'make test' ;)

make[1]: Leaving directory `/root/redis-4.0.10/src'
[root@mcw01 ~/redis-4.0.10]$ ls
00-RELEASENOTES  COPYING  Makefile   redis.conf       runtest-sentinel  tests
BUGS             deps     MANIFESTO  runtest          sentinel.conf     utils
CONTRIBUTING     INSTALL  README.md  runtest-cluster  src
[root@mcw01 ~/redis-4.0.10]$ make install
cd src && make install
make[1]: Entering directory `/root/redis-4.0.10/src'
    CC Makefile.dep
make[1]: Leaving directory `/root/redis-4.0.10/src'
make[1]: Entering directory `/root/redis-4.0.10/src'

Hint: It's a good idea to run 'make test' ;)

    INSTALL install
    INSTALL install
    INSTALL install
    INSTALL install
    INSTALL install
make[1]: Leaving directory `/root/redis-4.0.10/src'
[root@mcw01 ~/redis-4.0.10]$
[root@mcw01 ~/redis-4.0.10]$ redis-c   #当编译好之后,就可以命令补全,也就是已经配置好环境变量了
redis-check-aof  redis-check-rdb  redis-cli
[root@mcw01 ~/redis-4.0.10]$
[root@mcw01 ~/redis-4.0.10]$ which redis-server  #默认编译安装到/usr/local下去了
/usr/local/bin/redis-server
[root@mcw01 ~/redis-4.0.10]$
redis服务端运行和客户端连接
[root@mcw01 ~]$ redis-server  #安装好之后,直接运行这个命令
24270:C 05 Mar 18:43:08.857 # oO0OoO0OoO0Oo Redis is starting oO0OoO0OoO0Oo
24270:C 05 Mar 18:43:08.857 # Redis version=4.0.10, bits=64, commit=00000000, modified=0, pid=24270, just started
24270:C 05 Mar 18:43:08.857 # Warning: no config file specified, using the default config. In order to specify a config file use redis-server /path/to/redis.conf
                _._
           _.-``__ ''-._
      _.-``    `.  `_.  ''-._           Redis 4.0.10 (00000000/0) 64 bit
  .-`` .-```.  ```\/    _.,_ ''-._
 (    '      ,       .-`  | `,    )     Running in standalone mode
 |`-._`-...-` __...-.``-._|'` _.-'|     Port: 6379
 |    `-._   `._    /     _.-'    |     PID: 24270
  `-._    `-._  `-./  _.-'    _.-'
 |`-._`-._    `-.__.-'    _.-'_.-'|
 |    `-._`-._        _.-'_.-'    |           http://redis.io
  `-._    `-._`-.__.-'_.-'    _.-'
 |`-._`-._    `-.__.-'    _.-'_.-'|
 |    `-._`-._        _.-'_.-'    |
  `-._    `-._`-.__.-'_.-'    _.-'
      `-._    `-.__.-'    _.-'
          `-._        _.-'
              `-.__.-'

24270:M 05 Mar 18:43:08.880 # Server initialized
24270:M 05 Mar 18:43:08.880 # WARNING overcommit_memory is set to 0! Background save may fail under low memory condition. To fix this issue add 'vm.overcommit_memory = 1' to /etc/sysctl.conf and then reboot or run the command 'sysctl vm.overcommit_memory=1' for this to take effect.
24270:M 05 Mar 18:43:08.880 # WARNING you have Transparent Huge Pages (THP) support enabled in your kernel. This will create latency and memory usage issues with Redis. To fix this issue run the command 'echo never > /sys/kernel/mm/transparent_hugepage/enabled' as root, and add it to your /etc/rc.local in order to retain the setting after a reboot. Redis must be restarted after THP is disabled.
24270:M 05 Mar 18:43:08.880 * Ready to accept connections


客户端连接:
[root@mcw01 ~]$ redis-cli 127.0.0.1 6379  ^C #我再开一个窗口,默认连接的ip 端口
[root@mcw01 ~]$ redis-cli  #连上之后,ping命令,返回pong,说明连接成功的
127.0.0.1:6379> ping
PONG
127.0.0.1:6379>
redis配置
[root@mcw01 ~]$ ln -s redis-4.0.10  redis
[root@mcw01 ~]$ ls
anaconda-ks.cfg  dump.rdb  mongodb-linux-x86_64-3.2.8.tgz  redis  redis-4.0.10  redis-4.0.10.tar.gz
[root@mcw01 ~]$ ls redis
00-RELEASENOTES  COPYING  Makefile   redis.conf       runtest-sentinel  tests
BUGS             deps     MANIFESTO  runtest          sentinel.conf     utils
CONTRIBUTING     INSTALL  README.md  runtest-cluster  src
[root@mcw01 ~]$ cd redis
[root@mcw01 ~/redis]$ egrep -v "^#|^$" redis.conf >mcwRedis.conf
[root@mcw01 ~/redis]$ cat mcwRedis.conf
bind 127.0.0.1
protected-mode yes  #保护模式开启,并且绑定ip是本机,应该是不支持远程访问,只支持本机访问。
port 6379
tcp-backlog 511
timeout 0
tcp-keepalive 300
daemonize no
supervised no
pidfile /var/run/redis_6379.pid
loglevel notice
logfile ""
databases 16
always-show-logo yes
save 900 1
save 300 10
save 60 10000
stop-writes-on-bgsave-error yes
rdbcompression yes
rdbchecksum yes
dbfilename dump.rdb
dir ./
slave-serve-stale-data yes
slave-read-only yes
repl-diskless-sync no
repl-diskless-sync-delay 5
repl-disable-tcp-nodelay no
slave-priority 100
lazyfree-lazy-eviction no
lazyfree-lazy-expire no
lazyfree-lazy-server-del no
slave-lazy-flush no
appendonly no
appendfilename "appendonly.aof"
appendfsync everysec
no-appendfsync-on-rewrite no
auto-aof-rewrite-percentage 100
auto-aof-rewrite-min-size 64mb
aof-load-truncated yes
aof-use-rdb-preamble no
lua-time-limit 5000
slowlog-log-slower-than 10000
slowlog-max-len 128
latency-monitor-threshold 0
notify-keyspace-events ""
hash-max-ziplist-entries 512
hash-max-ziplist-value 64
list-max-ziplist-size -2
list-compress-depth 0
set-max-intset-entries 512
zset-max-ziplist-entries 128
zset-max-ziplist-value 64
hll-sparse-max-bytes 3000
activerehashing yes
client-output-buffer-limit normal 0 0 0
client-output-buffer-limit slave 256mb 64mb 60
client-output-buffer-limit pubsub 32mb 8mb 60
hz 10
aof-rewrite-incremental-fsync yes
[root@mcw01 ~/redis]$
redis简单配置并启动
[root@mcw01 ~/redis]$ cat mcwRedis.conf
bind 10.0.0.11
protected-mode yes
port 6379
requirepass mcw123 #配置认证密码
daemonize yes #后台守护进程的方式开启
pidfile /var/run/redis_6379.pid
loglevel notice
logfile ""
[root@mcw01 ~/redis]$
[root@mcw01 ~/redis]$ ls
00-RELEASENOTES  COPYING  Makefile       README.md   runtest-cluster   src
BUGS             deps     MANIFESTO      redis.conf  runtest-sentinel  tests
CONTRIBUTING     INSTALL  mcwRedis.conf  runtest     sentinel.conf     utils
[root@mcw01 ~/redis]$ redis-server mcwRedis.conf  #指定配置文件启动。这应该是后面有注释导致的吧,去掉注释

*** FATAL CONFIG FILE ERROR ***
Reading the configuration file, at line 4
>>> 'requirepass mcw123 #配置认证密码'
Bad directive or wrong number of arguments


去掉注释,然后成功启动,这里不能在配置后面加注释,容易出错
[root@mcw01 ~/redis]$ vim mcwRedis.conf
[root@mcw01 ~/redis]$ cat mcwRedis.conf
bind 10.0.0.11
protected-mode yes
port 6379
requirepass mcw123
daemonize yes
pidfile /var/run/redis_6379.pid
loglevel notice
logfile ""
[root@mcw01 ~/redis]$ redis-server mcwRedis.conf
24391:C 05 Mar 19:10:38.749 # oO0OoO0OoO0Oo Redis is starting oO0OoO0OoO0Oo
24391:C 05 Mar 19:10:38.749 # Redis version=4.0.10, bits=64, commit=00000000, modified=0, pid=24391, just started
24391:C 05 Mar 19:10:38.749 # Configuration loaded
[root@mcw01 ~/redis]$
[root@mcw01 ~/redis]$ netstat -lntup|grep redis #成功启动了
tcp        0      0 10.0.0.11:6379          0.0.0.0:*               LISTEN      24392/redis-server
[root@mcw01 ~/redis]$
[root@mcw01 ~/redis]$ redis-cli  #现在直接这么连接就不行了
Could not connect to Redis at 127.0.0.1:6379: Connection refused
Could not connect to Redis at 127.0.0.1:6379: Connection refused
not connected>
[root@mcw01 ~/redis]$ redis-cli  -h 10.0.0.11 -p 6379   #指定ip端口连接
10.0.0.11:6379> ping
(error) NOAUTH Authentication required.
10.0.0.11:6379> auth mcw123
OK
10.0.0.11:6379> ping  #认证之后就可以正常执行命令了
PONG
10.0.0.11:6379>
set、get命令
10.0.0.11:6379> set name mcw
OK
10.0.0.11:6379> get name
"mcw"
10.0.0.11:6379> set age  18
OK
10.0.0.11:6379> get age  #它将值改为字符串类型的了
"18"
10.0.0.11:6379>
简单配置文件介绍
bind 192.168.182.130  #绑定服务端地址
protected-mode yes    #安全模式
port 6800        #端口
requirepass  haohaio                #密码
daemonize yes    #后台运行
pidfile /var/run/redis_6379.pid    #进程id文件
loglevel notice        #日志等级
logfile ""
redis在windows上部署
网盘地址包含redis管理工具 --> 链接:https://pan.baidu.com/s/1oxbrIONOZV_lelQsk3_dZw
提取码:muym
github 下载方式 :Releases · microsoftarchive/redis · GitHub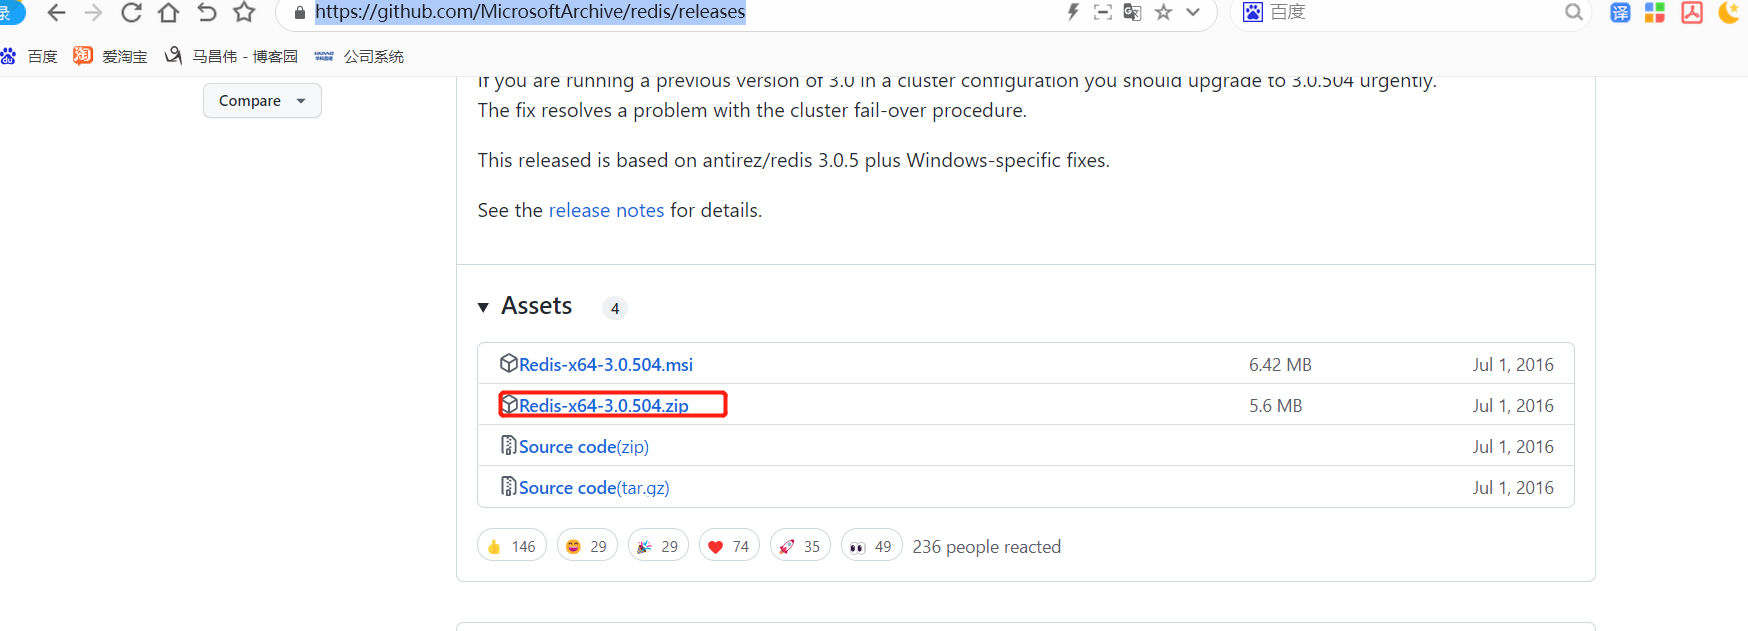
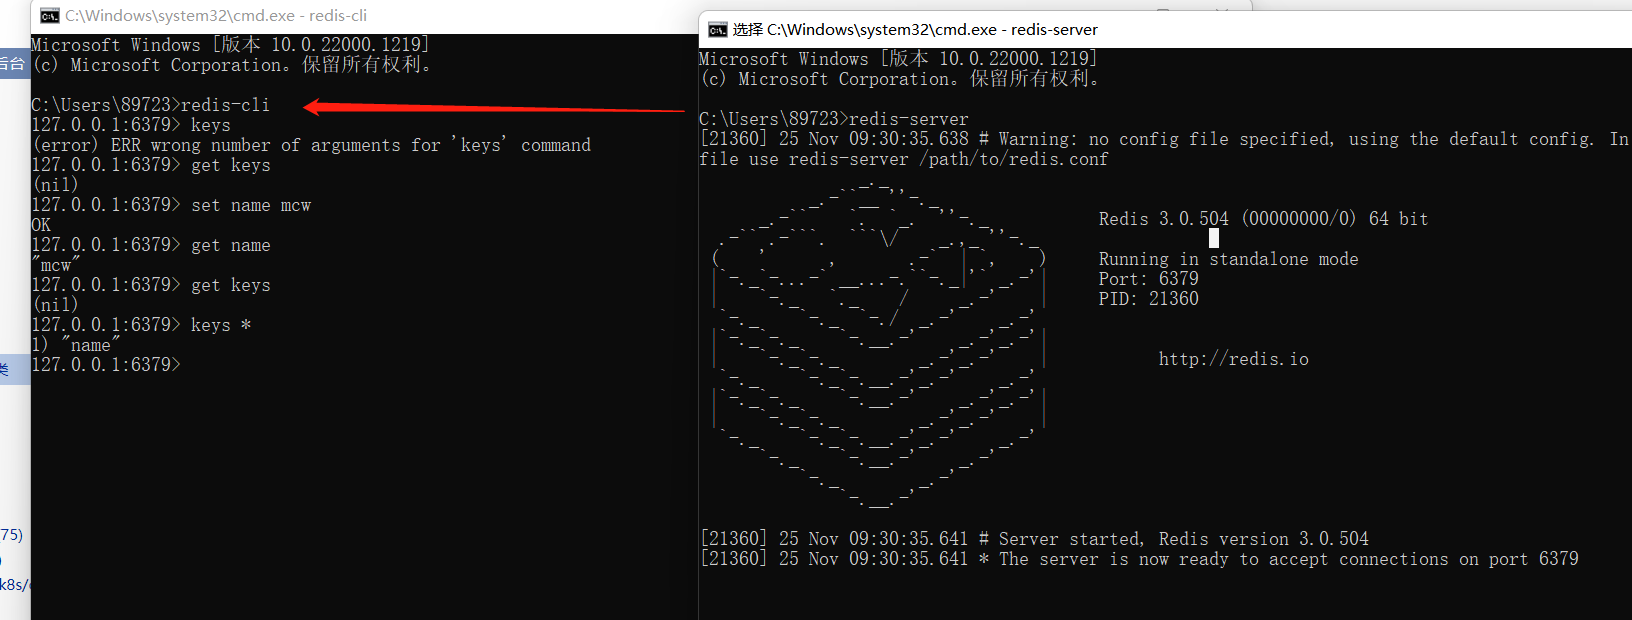
解压之后直接就能启动

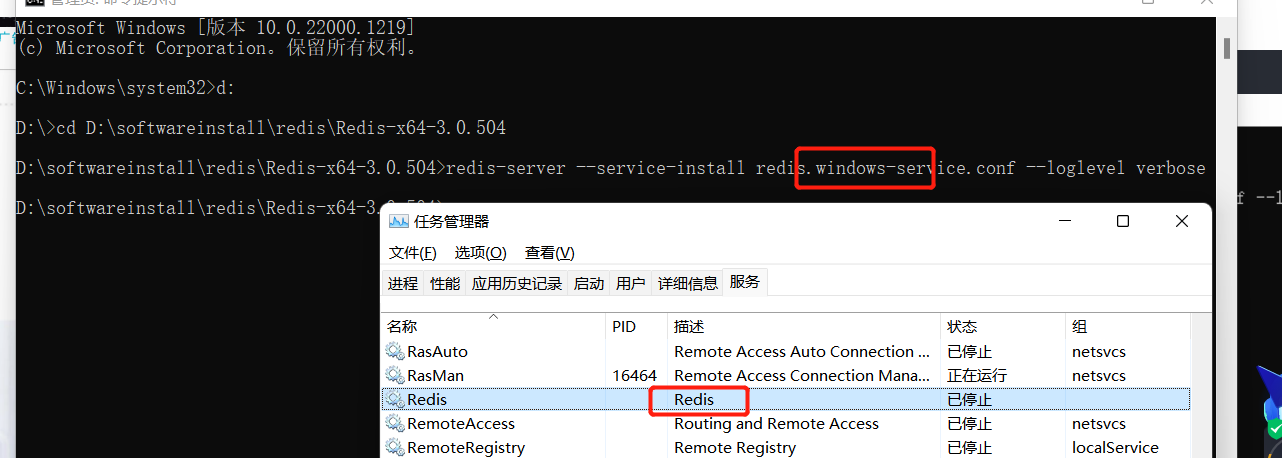
把服务变成后台运行,执行命令,将服务添加到服务列表中。未执行时是没有的
redis-server --service-install redis.windows-service.conf --loglevel verbose
常用命令
启动命令:
redis-server --service-start
卸载命令:
redis-server --service-uninstall
停止服务:
redis-server --service-stop
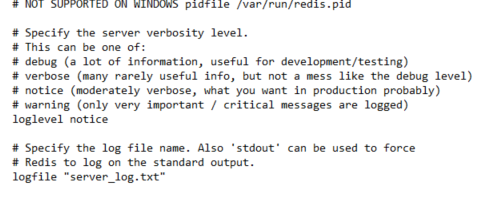
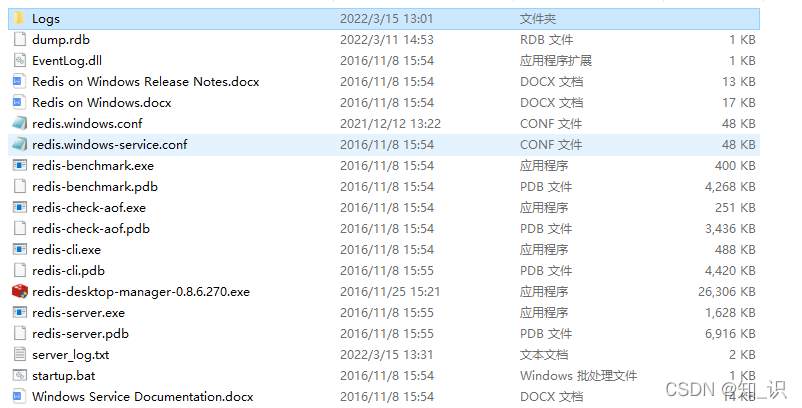
注:有一次意外断电后服务启动redis报错,这时候打开redis.windows-service.conf这个文件,查看logfile的路径,默认为logfile “Logs/server_log.txt”,如果当前目录缺乏Logs这个文件夹,单独启动redis是没问题的,因为redis.windows.conf没有配置logfile这个文件,用服务启动的时候就会报错,失败,需要手动创建Logs这个文件夹
redis.windows.conf日志配置如下:

redis.windows-service.conf日志配置如下:
解决方案:在redis解压目录下新建一个Logs文件夹
配置文件没做修改。没创建日志目录时,服务启动报错;创建好日志目录,服务启动成功,查看服务状态是运行状态
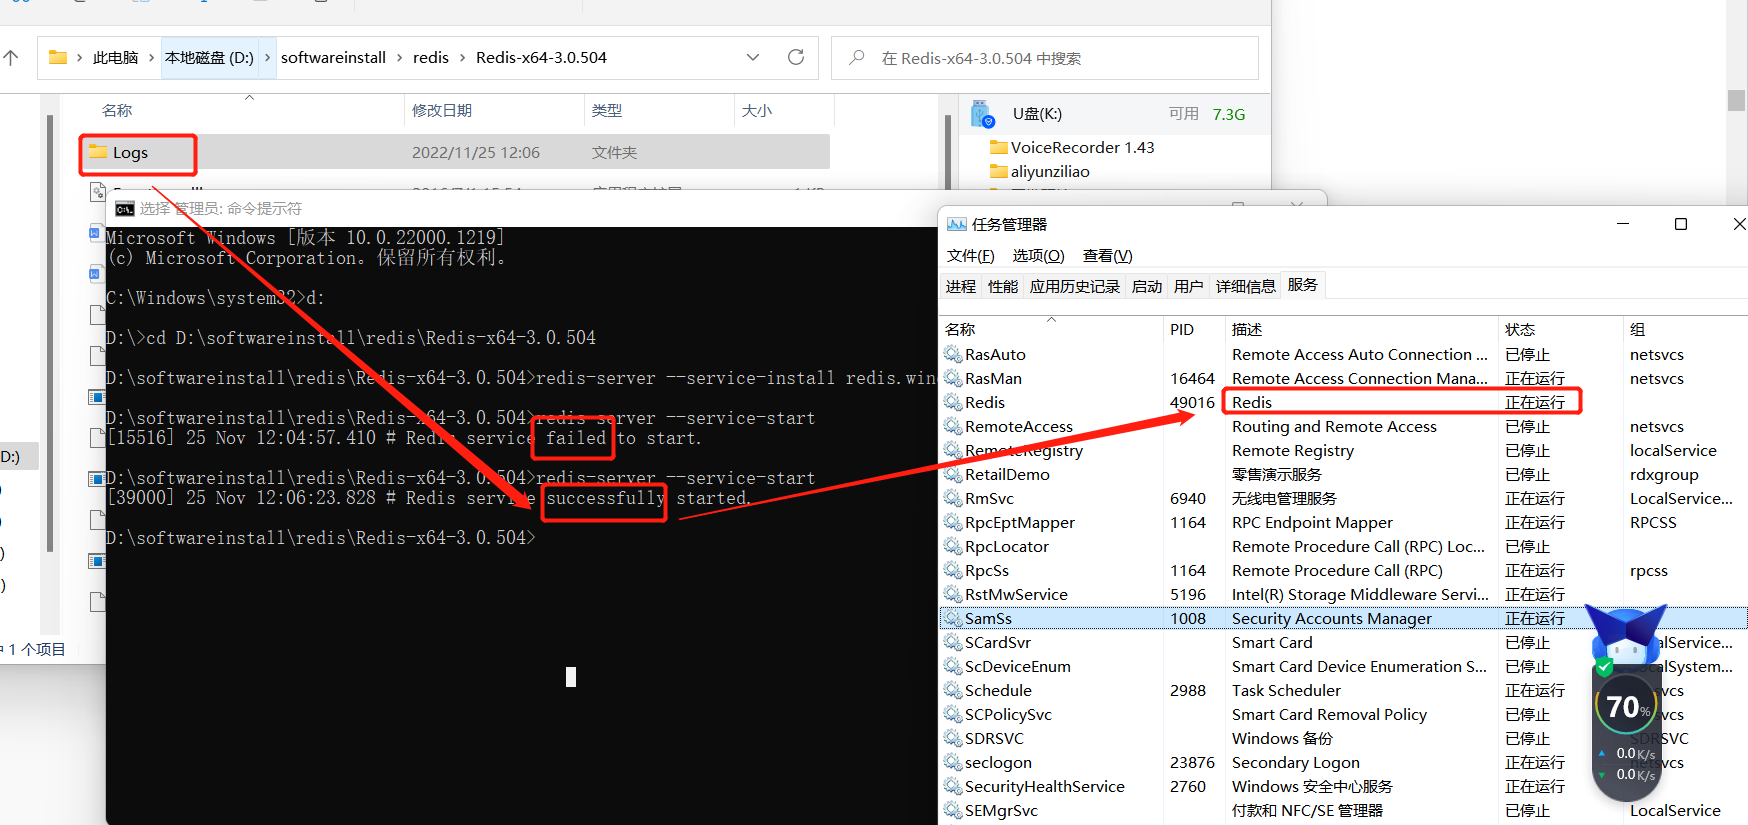
测试连接,此时服务已经是后台运行。客户端能成功连接并执行命令

redis基础数据类型
redis是一种高级的key:value存储系统,其中value支持五种数据类型
    字符串(strings)
    散列(hashes)
    列表(lists)
    集合(sets)
    有序集合(sorted sets)
redis命令
redis简单命令
keys * 查看所有key
type key 查看key类型
expire key seconds 过期时间
ttl key 查看key过期剩余时间 -2表示key已经不存在了
persist 取消key的过期时间 -1表示key存在,没有过期时间
exists key 判断key存在 存在返回1 否则0
del keys 删除key 可以删除多个
dbsize 计算key的数量
flushdb #清除redis所有key,慎用
flushdb #清除redis所有key,慎用
flushdb #清除redis所有key,慎用
keys *

10.0.0.11:6379> keys *
1) "age"
2) "name"
10.0.0.11:6379> set gender man
OK
10.0.0.11:6379> keys *
1) "gender"
2) "age"
3) "name"
10.0.0.11:6379>


keys *         查看所有key
10.0.0.11:6379> keys *
1) "age"
2) "name"
10.0.0.11:6379> set gender man
OK
10.0.0.11:6379> keys *
1) "gender"
2) "age"
3) "name"
10.0.0.11:6379>


type key      查看key类型
添加一个列表,查看key类型,是列表类型
10.0.0.11:6379> keys *
1) "gender"
2) "age"
3) "name"
10.0.0.11:6379> type name
string
10.0.0.11:6379> LPUSH paidui1 xiaoma mcw
(integer) 2
10.0.0.11:6379>
10.0.0.11:6379> keys *
1) "paidui1"
2) "gender"
3) "age"
4) "name"
10.0.0.11:6379> type paidui1
list
10.0.0.11:6379>


expire key seconds    过期时间
ttl key     查看key过期剩余时间        -2表示key已经不存在了

给已有的paidui1设置一个过期时间多少秒,然后ttl  key可以查看过期时间,当-2时就已经过期了,过期了就已经被移除了
10.0.0.11:6379> keys *
1) "paidui1"
2) "gender"
3) "age"
4) "name"
10.0.0.11:6379> EXPIRE paidui1 10
(integer) 1
10.0.0.11:6379> ttl paidui1
(integer) 2
10.0.0.11:6379> ttl paidui1
(integer) 1
10.0.0.11:6379> ttl paidui1
(integer) -2
10.0.0.11:6379> keys *
1) "gender"
2) "age"
3) "name"
10.0.0.11:6379>


persist     取消key的过期时间   -1表示key存在,没有过期时间

比如下面,将name设置50秒过期,当要取消name的过期时间,执行命令后,ttl值变成-1,就不会出现过期删除的情况了
10.0.0.11:6379> keys *
1) "gender"
2) "age"
3) "name"
10.0.0.11:6379> EXPIRE name 50
(integer) 1
10.0.0.11:6379> ttl name
(integer) 22
10.0.0.11:6379> ttl name
(integer) 19
10.0.0.11:6379> PERSIST name
(integer) 1
10.0.0.11:6379> ttl name
(integer) -1
10.0.0.11:6379> keys *
1) "gender"
2) "age"
3) "name"
10.0.0.11:6379>


exists key     判断key存在    存在返回1    否则0
10.0.0.11:6379> keys *
1) "gender"
2) "age"
3) "name"
10.0.0.11:6379> exists name
(integer) 1
10.0.0.11:6379> exists mcw
(integer) 0
10.0.0.11:6379>


del keys     删除key    可以删除多个
10.0.0.11:6379> keys *
1) "gender"
2) "age"
3) "name"
4) "myname"
10.0.0.11:6379> del myname
(integer) 1
10.0.0.11:6379> keys *
1) "gender"
2) "age"
3) "name"
10.0.0.11:6379>


dbsize         计算key的数量
10.0.0.11:6379> keys *
1) "gender"
2) "age"
3) "name"
10.0.0.11:6379> dbsize
(integer) 3
10.0.0.11:6379>


flushdb  #清除redis所有key,慎用
flushdb  #清除redis所有key,慎用
flushdb  #清除redis所有key,慎用
10.0.0.11:6379> keys *
1) "gender"
2) "age"
3) "name"
10.0.0.11:6379> flushdb
OK
10.0.0.11:6379> keys *
(empty list or set)
10.0.0.11:6379>
字符串类型命令
redis数据类型1,字符串类型,通过set命令,设置字符串类型的key
    strings类型
    set   设置key
    get   获取key
    append  追加string
    mset   设置多个键值对
    mget   获取多个键值对
    del  删除key
    incr  递增+1
    decr  递减-1
set   设置key
get   获取key
append  追加string

10.0.0.11:6379> set "name" "mcw"
OK
10.0.0.11:6379> get name
"mcw"
10.0.0.11:6379> append "name" "Haoren"
(integer) 9
10.0.0.11:6379> get name
"mcwHaoren"
10.0.0.11:6379>


mset   设置多个键值对
mget   获取多个键值对
10.0.0.11:6379> mset name2 "xiaoma" "name3" xiaohong
OK
10.0.0.11:6379> keys *
1) "name2"
2) "name"
3) "name3"
10.0.0.11:6379> get name2
"xiaoma"
10.0.0.11:6379> get name3
"xiaohong"
10.0.0.11:6379>
10.0.0.11:6379> mget name name2 name3
1) "mcwHaoren"
2) "xiaoma"
3) "xiaohong"
10.0.0.11:6379>


del  删除key
10.0.0.11:6379> keys *
1) "name2"
2) "name"
3) "name3"
10.0.0.11:6379> del name
(integer) 1
10.0.0.11:6379> del name2 name3
(integer) 2
10.0.0.11:6379> keys *
(empty list or set)
10.0.0.11:6379>


incr  递增+1
decr  递减-1
相当于把字符串转换为数字,计算后结果再改成字符串。
还可以减为负值
10.0.0.11:6379> keys *
(empty list or set)
10.0.0.11:6379> set "dian zan" 0
OK
10.0.0.11:6379> get "dian zan"
"0"
10.0.0.11:6379> incr "dian zan"
(integer) 1
10.0.0.11:6379> incr "dian zan"
(integer) 2
10.0.0.11:6379> get "dian zan"
"2"
10.0.0.11:6379> incr "dian zan"
(integer) 3
10.0.0.11:6379> get "dian zan"
"3"
10.0.0.11:6379> decr "dian zan"
(integer) 2
10.0.0.11:6379> get "dian zan"
"2"
10.0.0.11:6379>
10.0.0.11:6379> keys *
1) "dian zan"
10.0.0.11:6379>
10.0.0.11:6379> get "dian zan"
"2"
10.0.0.11:6379> decr "dian zan"
(integer) 1
10.0.0.11:6379> decr "dian zan"
(integer) 0
10.0.0.11:6379> decr "dian zan"
(integer) -1
10.0.0.11:6379> decr "dian zan"
(integer) -2
10.0.0.11:6379> decr "dian zan"
(integer) -3
list类型,双向队列
lpush 从列表左边插
rpush 从列表右边插
lrange 获取一定长度的元素 lrange key start stop
ltrim 截取一定长度列表
lpop 删除最左边一个元素
rpop 删除最右边一个元素
lpushx/rpushx key存在则添加值,不存在不处理
lpush         从列表左边插
从左边插入,再从左边获取,先插入的在里面后取出,后插入的在左边先取出
10.0.0.11:6379> keys *
(empty list or set)
10.0.0.11:6379> lpush paidui mcw1 mcw2 mcw3 mcw4
(integer) 4
10.0.0.11:6379> lrange paidui 0 -1
1) "mcw4"
2) "mcw3"
3) "mcw2"
4) "mcw1"
10.0.0.11:6379> lpush paidui mcw5
(integer) 5
10.0.0.11:6379> lrange paidui 0 -1
1) "mcw5"
2) "mcw4"
3) "mcw3"
4) "mcw2"
5) "mcw1"
10.0.0.11:6379>


rpush         从列表右边插
从列表左边取,第一个取出来的是最后推入的,最后一个取出的是第一个推入的。
可以想象成如下排队顺序, mcw5 mcw4 mcw3 mcw2 mcw1
当从右边推入mcw6的时候就是 :mcw5 mcw4 mcw3 mcw2 mcw1 mcw6
当从左边取数据的时候就是:
第一次取:mcw5
第二次取: mcw4
....
第六次取:mcw6
10.0.0.11:6379> lrange paidui 0 -1
1) "mcw5"
2) "mcw4"
3) "mcw3"
4) "mcw2"
5) "mcw1"
10.0.0.11:6379> rpush paidui mcw6
(integer) 6
10.0.0.11:6379> lrange paidui 0 -1
1) "mcw5"
2) "mcw4"
3) "mcw3"
4) "mcw2"
5) "mcw1"
6) "mcw6"


lrange          获取一定长度的元素  lrange key  start stop
取列表类型的数据,指定开始数据和结束数据,比如开始0,结束-1,这是取列表所有的值
10.0.0.11:6379> lrange paidui 0 -1
1) "mcw5"
2) "mcw4"
3) "mcw3"
4) "mcw2"
5) "mcw1"
10.0.0.11:6379>
10.0.0.11:6379> keys *
1) "paidui"
10.0.0.11:6379> type paidui
list
10.0.0.11:6379> get paidui   #列表类型不能用get取值
(error) WRONGTYPE Operation against a key holding the wrong kind of value
10.0.0.11:6379> lrange paid 0 -1  #不存在的键
(empty list or set)
10.0.0.11:6379>
10.0.0.11:6379> lrange paidui 0 -1
1) "mcw5"
2) "mcw4"
3) "mcw3"
4) "mcw2"
5) "mcw1"
10.0.0.11:6379>


ltrim               截取一定长度列表
根据查询可知列表数据顺序如下:mcw5 mcw4 mcw3 mcw2 mcw1
索引分别是:                   0    1    2     3    4
这里是从paidui左边截取,从索引1开始,从索引2结束,其中包含索引2的数据,截取之后,这个key的值就变成截取的值了mcw4 mcw3
然后从左边查询,第一个查出来的数据就是mcw4,第二个就是mcw3
10.0.0.11:6379> lrange paidui 0 -1
1) "mcw5"
2) "mcw4"
3) "mcw3"
4) "mcw2"
5) "mcw1"
10.0.0.11:6379> ltrim paidui 1 2
OK
10.0.0.11:6379> lrange paidui 0 -1
1) "mcw4"
2) "mcw3"
10.0.0.11:6379>


lpop                 删除最左边一个元素
rpop                     删除最右边一个元素
根据lrange可以列表数据的顺序是:mcw5 mcw4 mcw3 mcw2 mcw1 mcw6
所以从左边删除,删的是mcw5,从右边删除,删的是mcw6
10.0.0.11:6379> lrange paidui 0 -1
1) "mcw5"
2) "mcw4"
3) "mcw3"
4) "mcw2"
5) "mcw1"
6) "mcw6"
10.0.0.11:6379> lpop paidui
"mcw5"
10.0.0.11:6379> rpop paidui
"mcw6"
10.0.0.11:6379> lrange paidui 0 -1
1) "mcw4"
2) "mcw3"
3) "mcw2"
4) "mcw1"
10.0.0.11:6379>

lpushx/rpushx                key存在则添加值,不存在不处理
不存在返回个0。默认key不存在会创建key的
10.0.0.11:6379> keys *
1) "paidui"
10.0.0.11:6379> lpushx paid mcw0
(integer) 0
10.0.0.11:6379> keys *
1) "paidui"
10.0.0.11:6379> lpushx paidui mcw0
(integer) 5
10.0.0.11:6379> keys *
1) "paidui"
10.0.0.11:6379> lrange paidui 0 -1
1) "mcw0"
2) "mcw4"
3) "mcw3"
4) "mcw2"
5) "mcw1"
10.0.0.11:6379>
redis的集合,是一种无序的集合,集合中的元素没有先后顺序。
集合相关的操作也很丰富,如添加新元素、删除已有元素、取交集、取并集、取差集等。我们来看例子:
sadd/srem 添加/删除 元素
sismember 判断是否为set的一个元素
smembers 返回集合所有的成员
sdiff 返回一个集合和其他集合的差异
sinter 返回几个集合的交集
sunion 返回几个集合的并集
sadd/srem   添加/删除 元素
smembers    返回集合所有的成员
10.0.0.11:6379> keys *
(empty list or set)
10.0.0.11:6379> sadd zoo gou mao zhu  #添加
(integer) 3
10.0.0.11:6379> keys *
1) "zoo"
10.0.0.11:6379> type zoo
set
10.0.0.11:6379> smembers zoo  #查询
1) "mao"
2) "zhu"
3) "gou"
10.0.0.11:6379>
10.0.0.11:6379> srem zoo zhu  #删除
(integer) 1
10.0.0.11:6379> smembers zoo
1) "mao"
2) "gou"
10.0.0.11:6379>
新增成员
10.0.0.11:6379> keys *
1) "zoo"
10.0.0.11:6379> smembers zoo
1) "mao"
2) "gou"
10.0.0.11:6379> sadd zoo zhu #新增
(integer) 1
10.0.0.11:6379> smembers zoo
1) "mao"
2) "zhu"
3) "gou"
10.0.0.11:6379>


sismember   判断是否为set的一个元素
mao是集合zoo里的成员吗,是,返回的是1;
zhu是集合zoo里的成员吗,不是,返回的是0
10.0.0.11:6379> smembers zoo
1) "mao"
2) "gou"
10.0.0.11:6379> sismember zoo mao
(integer) 1
10.0.0.11:6379> sismember zoo zhu
(integer) 0
10.0.0.11:6379>


sdiff             返回一个集合和其他集合的差异
如下,sdiff 集合1 集合2
返回集合1中有的,而集合2中没有的。就是取差集
10.0.0.11:6379> keys *
1) "zoo2"
2) "zoo"
10.0.0.11:6379> smembers zoo
1) "mao"
2) "zhu"
3) "gou"
10.0.0.11:6379> smembers zoo2
1) "she"
2) "zhu"
3) "shu"
10.0.0.11:6379> sdiff zoo zoo2
1) "mao"
2) "gou"
10.0.0.11:6379> sdiff zoo2 zoo
1) "she"
2) "shu"
10.0.0.11:6379>


sinter           返回几个集合的交集
如下,几个集合应该不只是包含两个集合
10.0.0.11:6379> smembers zoo
1) "mao"
2) "zhu"
3) "gou"
10.0.0.11:6379> smembers zoo2
1) "she"
2) "zhu"
3) "shu"
10.0.0.11:6379> sinter zoo zoo2
1) "zhu"
10.0.0.11:6379> sinter zoo2 zoo
1) "zhu"
10.0.0.11:6379>


sunion          返回几个集合的并集
集合取并集,几个集合应该不只是能用两个集合
10.0.0.11:6379> smembers zoo
1) "mao"
2) "zhu"
3) "gou"
10.0.0.11:6379> smembers zoo2
1) "she"
2) "zhu"
3) "shu"
10.0.0.11:6379> sunion zoo zoo2
1) "she"
2) "zhu"
3) "gou"
4) "mao"
5) "shu"
10.0.0.11:6379>
.哈希数据结构
hashes即哈希。哈希是从redis-2.0.0版本之后才有的数据结构。
hashes存的是字符串和字符串值之间的映射,比如一个用户要存储其全名、姓氏、年龄等等,就很适合使用哈希。
hset 设置散列值
hget 获取散列值
hmset 设置多对散列值
hmget 获取多对散列值
hsetnx 如果散列已经存在,则不设置(防止覆盖key)
hkeys 返回所有fileds
hvals 返回所有values
hlen 返回散列包含域(field)的数量
hdel 删除散列指定的域(field)
hexists 判断是否存在
hset 设置散列值
hget  获取散列值
10.0.0.11:6379> hset stu1 name "mcw" age 18 height "170"
(integer) 3
10.0.0.11:6379> keys *
1) "stu1"
10.0.0.11:6379> type stu1
hash
10.0.0.11:6379> hget stu1 name
"mcw"
10.0.0.11:6379> hget stu1 age
"18"
10.0.0.11:6379> hget stu1 height
"170"
10.0.0.11:6379>
10.0.0.11:6379> hset new1 title "happy new year" content "ni hao"
(integer) 2
10.0.0.11:6379>


hmset  设置多对散列值
hmget  获取多对散列值
10.0.0.11:6379>
10.0.0.11:6379> keys *
1) "stu1"
2) "new1"
10.0.0.11:6379> hmget stu1 name age height
1) "mcw"
2) "18"
3) "170"
10.0.0.11:6379>


hsetnx   如果散列已经存在,则不设置(防止覆盖key)
10.0.0.11:6379> hsetnx stu2 name "mcw2" age 18 height "168"
(error) ERR wrong number of arguments for 'hsetnx' command
10.0.0.11:6379>
10.0.0.11:6379> hsetnx stu2 name "mcw2"
(integer) 1
10.0.0.11:6379> hsetnx stu2 name "mcw2"
(integer) 0
10.0.0.11:6379> keys *
1) "stu2"
2) "stu1"
3) "new1"
10.0.0.11:6379> hsetnx stu2 name "mcw1"
(integer) 0
10.0.0.11:6379> hget stu2 name  #存在stu2,使用hsetnx没被修改
"mcw2"
10.0.0.11:6379> hset stu2 name "mcw1"
(integer) 0
10.0.0.11:6379> hget stu2 name  #存在stu2,使用hset被修改了
"mcw1"
10.0.0.11:6379>


hkeys     返回所有fileds
10.0.0.11:6379> keys *
1) "stu2"
2) "stu1"
3) "new1"
10.0.0.11:6379> hkeys stu1
1) "name"
2) "age"
3) "height"
10.0.0.11:6379>


hvals     返回所有values
10.0.0.11:6379> keys *
1) "stu2"
2) "stu1"
3) "new1"
10.0.0.11:6379> hvals stu1
1) "mcw"
2) "18"
3) "170"
10.0.0.11:6379>


hlen      返回散列包含域(field)的数量
10.0.0.11:6379> keys *
1) "stu2"
2) "stu1"
3) "new1"
10.0.0.11:6379> hkeys stu1
1) "name"
2) "age"
3) "height"
10.0.0.11:6379> hlen stu1
(integer) 3
10.0.0.11:6379> hkeys new1
1) "title"
2) "content"
10.0.0.11:6379> hlen new1
(integer) 2
10.0.0.11:6379>


hdel     删除散列指定的域(field)
10.0.0.11:6379> keys *
1) "stu2"
2) "stu1"
3) "new1"
10.0.0.11:6379> type stu1
hash
10.0.0.11:6379>
10.0.0.11:6379> hkeys stu1
1) "name"
2) "age"
3) "height"
10.0.0.11:6379> hdel stu1 height  #删除指定字段
(integer) 1
10.0.0.11:6379> hkeys stu1
1) "name"
2) "age"
10.0.0.11:6379>


hexists    判断是否存在
10.0.0.11:6379> keys *
1) "stu2"
2) "stu1"
3) "new1"
10.0.0.11:6379> type stu1
hash
10.0.0.11:6379> hkeys stu1
1) "name"
2) "age"
10.0.0.11:6379> hexists stu1 name   #存在字段返回1
(integer) 1
10.0.0.11:6379> hexists stu1 height #不存在字段返回0
(integer) 0
10.0.0.11:6379>
发布订阅
主要应用:通知,公告
可以作为消息队列或者消息管道
一个发布,多个订阅
发布:广播电台频道能发送给所有接收这个频道的人声音信息
订阅:很多人都能接收到这个广播电台的消息
比如qq群公告:一个发布,多个订阅(接收到)
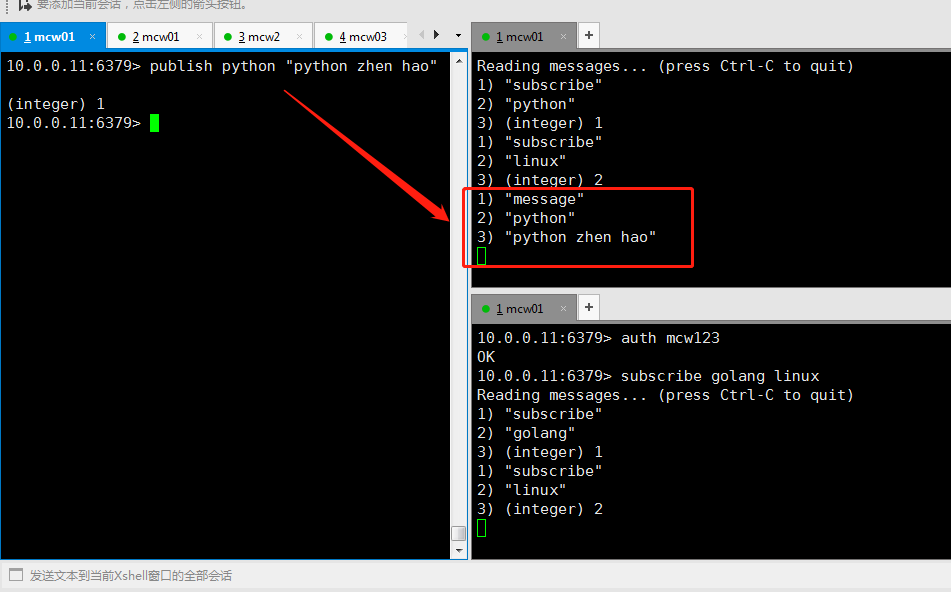
如下,一个发布者,两个订阅者,订阅者1订阅跟python和linux频道有关的消息;订阅者2订阅和golang和Linux有感的消息
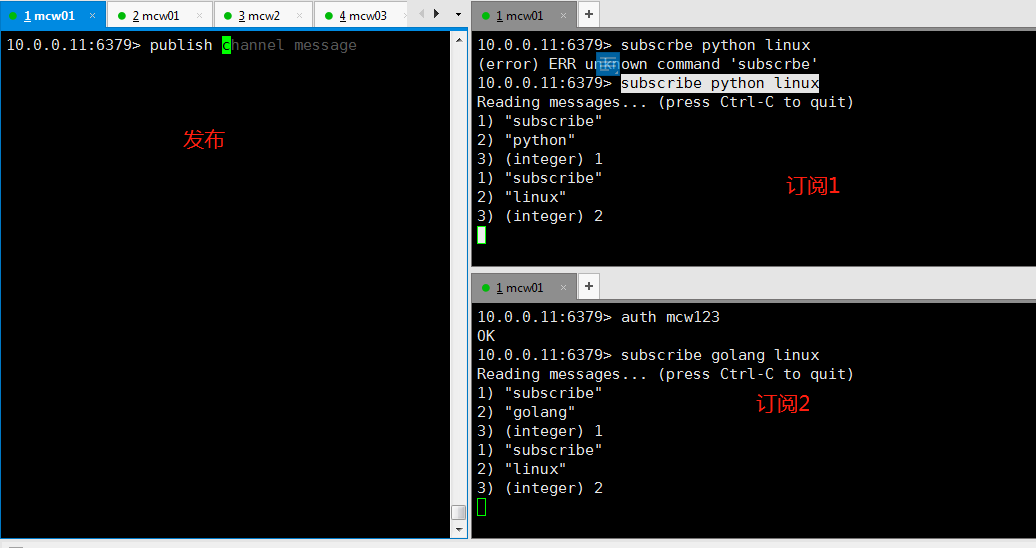
当发布者发布消息的时候,订阅者1接收到了订阅频道python发来的消息
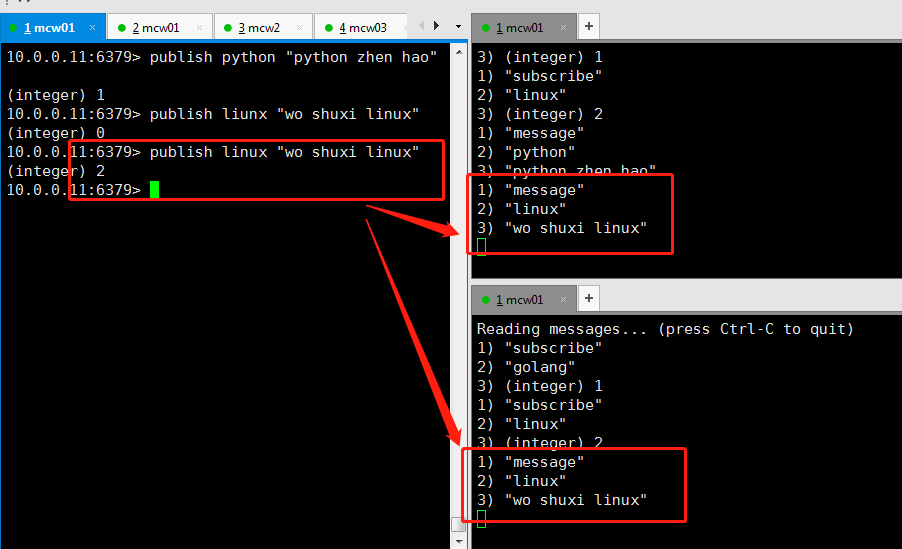
当发布者发布给linux频道的时候,两个订阅人都接收到了消息。发布者这里还返回了几个订阅人接收到了消息。上面那条写错了发布到一个没有人订阅的频道上,返回0个订阅者
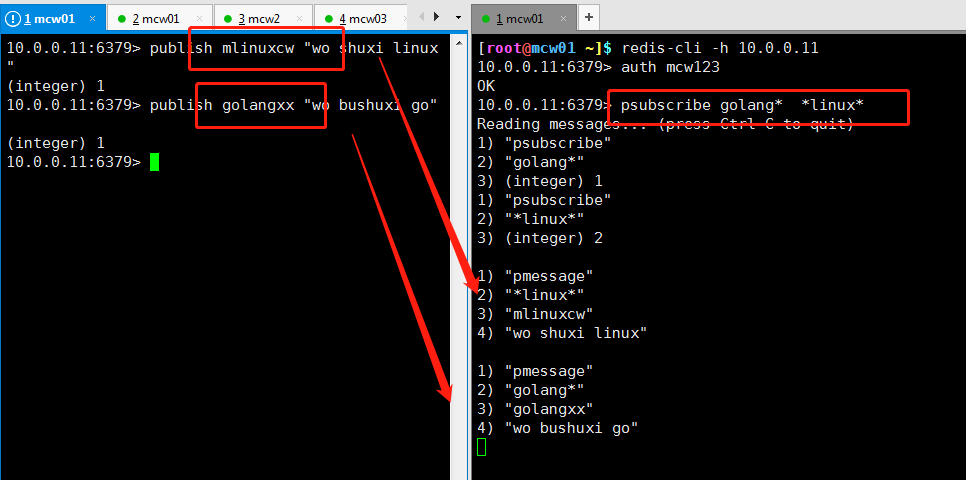
发布人发布的频道和接收的频道,这样写是需要精准判断,不能模糊匹配接收消息的

当订阅者这里使用psubscribe的时候,后面变成了模式

当订阅者使用psubscribe命令,且订阅的频道使用通配符的时候,那么发布者发布的能跟订阅者模糊匹配到的频道,就被订阅者接收到了
redis配置出错问题。
貌似配置里放了中文会受到影响
[root@mcw02 ~]$ redis-cli -h 10.0.0.12
10.0.0.12:6379> set name mcw
(error) DENIED Redis is running in protected mode because protected mode is enabled, no bind address was specified, no authentication password is requested to clients. In this mode connections are only accepted from the loopback interface. If you want to connect from external computers to Redis you may adopt one of the following solutions: 1) Just disable protected mode sending the command 'CONFIG SET protected-mode no' from the loopback interface by connecting to Redis from the same host the server is running, however MAKE SURE Redis is not publicly accessible from internet if you do so. Use CONFIG REWRITE to make this change permanent. 2) Alternatively you can just disable the protected mode by editing the Redis configuration file, and setting the protected mode option to 'no', and then restarting the server. 3) If you started the server manually just for testing, restart it with the '--protected-mode no' option. 4) Setup a bind address or an authentication password. NOTE: You only need to do one of the above things in order for the server to start accepting connections from the outside.
10.0.0.12:6379>
修改了配置:
[root@mcw02 ~]$ cat /etc/redis.conf
bind 10.0.0.12
protected-mode yes
port 6379
requirepass  haohaio
daemonize yes
pidfile /var/run/redis_6379.pid
loglevel notice
logfile ""
[root@mcw02 ~]$
指定配置文件启动
[root@mcw02 ~]$ redis-server /etc/redis.conf  &
[1] 90791
[root@mcw02 ~]$
[1]+  Done                    redis-server /etc/redis.conf
[root@mcw02 ~]$ ps -ef|grep redis
root      90792      1  0 13:55 ?        00:00:00 redis-server 10.0.0.12:6379
root      90803  90146  0 13:55 pts/2    00:00:00 grep --color=auto redis
可以正常访问
[root@mcw02 ~]$ redis-cli  -h 10.0.0.12 -a haohaio
10.0.0.12:6379> set name mcw
OK
10.0.0.12:6379> select 1
OK
10.0.0.12:6379[1]> select 10
OK
10.0.0.12:6379[10]>
redis-cli monitor
当执行这个命令的时候。会输出一些对redis的操作。比如连接的时候是command,其它命令的时候,显示命令
[root@mcw01 ~]# redis-cli
127.0.0.1:6379> keys *
1) "name"
127.0.0.1:6379> get name
"mcw"
127.0.0.1:6379> exit
[root@mcw01 ~]#
[root@mcw01 ~]# redis-cli monitor
OK
1704386946.898319 [0 127.0.0.1:50553] "COMMAND"
1704386956.919030 [0 127.0.0.1:50553] "keys" "*"
1704386962.664092 [0 127.0.0.1:50553] "get" "name"


【推荐】国内首个AI IDE,深度理解中文开发场景,立即下载体验Trae
【推荐】编程新体验,更懂你的AI,立即体验豆包MarsCode编程助手
【推荐】抖音旗下AI助手豆包,你的智能百科全书,全免费不限次数
【推荐】轻量又高性能的 SSH 工具 IShell:AI 加持,快人一步
· 无需6万激活码!GitHub神秘组织3小时极速复刻Manus,手把手教你使用OpenManus搭建本
· C#/.NET/.NET Core优秀项目和框架2025年2月简报
· 什么是nginx的强缓存和协商缓存
· 一文读懂知识蒸馏
· Manus爆火,是硬核还是营销?
2019-03-05 理想
2019-03-05 滕王阁序
2019-03-05 长恨歌
2019-03-05 激励自己的话
2018-03-05 Python杂篇