免交互批量分发公钥的实现
好像是,我有私钥,它有我的公钥,并且保存在它的authorized_keys文件中,那么我就能连接上它。因此我要想免密连接其它主机,我自己这里有公钥和私钥,我将公钥分发出去存放到对方的那个文件中,那么我就能免密连接。
paramiko怎么连接呢,应该就是我有私钥,你们都有我的公钥。我想连接某一台,那么直接把它的私钥复制到程序里,就能连接上。
生成公钥私钥
每次连接都要输入密码

上面链接配置文件名字错了,应为vim /etc/ssh/sshd_config
操作命令过程:
[root@mcw1 ~]# ls .ssh/
ls: cannot access .ssh/: No such file or directory
[root@mcw1 ~]# ssh-keygen -t rsa
Generating public/private rsa key pair.
Enter file in which to save the key (/root/.ssh/id_rsa):
Created directory '/root/.ssh'.
Enter passphrase (empty for no passphrase):
Enter same passphrase again:
Your identification has been saved in /root/.ssh/id_rsa.
Your public key has been saved in /root/.ssh/id_rsa.pub.
The key fingerprint is:
SHA256:Od+6HjBBrHeUA5MP8rwckdakM89XrZNf0/kOjRPB4eI root@mcw1
The key's randomart image is:
+---[RSA 2048]----+
| .+*.. . |
| ..Bo= o o |
| *== .. = .|
| . =Bo. o +o|
| oS+o E =oo|
| o= o *+|
| o . + +|
| o + |
| .+. .|
+----[SHA256]-----+
[root@mcw1 ~]# ls .ssh/
id_rsa id_rsa.pub
[root@mcw1 ~]# ls -ld .ssh/
drwx------ 2 root root 38 Jul 30 17:50 .ssh/
[root@mcw1 ~]# cat .ssh/id_rsa.pub >>.ssh/authorized_keys
[root@mcw1 ~]# chmod 600 .ssh/authorized_keys
单台免交互分发公钥:
参考:https://blog.51cto.com/vinsent/1970780
[root@mcw1 ~]# cat 3.sh
#!/usr/bin/expect
spawn ssh-copy-id -i /root/.ssh/id_rsa.pub 172.168.1.5
expect {
    "yes/no" { send "yes\n";exp_continue }      # 替你回答下载公钥是的提示
    "password" { send "123456\n" }         # 提示输入密码
}
interact
expect eof
多台批量免交互分发公钥:
[root@vinsent app]# cat ssh_auto.sh
#!/bin/bash
#------------------------------------------#
# FileName:             ssh_auto.sh
# Revision:             1.1.0
# Date:                 2017-07-14 04:50:33
# Author:               vinsent
# Email:                hyb_admin@163.com
# Website:              www.vinsent.cn
# Description:          This script can achieve ssh password-free login,
#                       and can be deployed in batches, configuration
#------------------------------------------#
# Copyright:            2017 vinsent
# License:              GPL 2+
#------------------------------------------#
[ ! -f /root/.ssh/id_rsa.pub ] && ssh-keygen -t rsa -P '' &>/dev/null  # 密钥对不存在则创建密钥
while read line;do
        ip=`echo $line | cut -d " " -f1`             # 提取文件中的ip
        user_name=`echo $line | cut -d " " -f2`      # 提取文件中的用户名
        pass_word=`echo $line | cut -d " " -f3`      # 提取文件中的密码
expect <<EOF
        spawn ssh-copy-id -i /root/.ssh/id_rsa.pub $user_name@$ip   # 复制公钥到目标主机
        expect {
                "yes/no" { send "yes\n";exp_continue}     # expect 实现自动输入密码
                "password" { send "$pass_word\n"}
        }
        expect eof
EOF

done < /root/host_ip.txt      # 读取存储ip的文件
host_ip.txt文件可以通过手动写(当然了这就显得不自动化)你可以使用扫描工具扫描你网络中的主机,然后配合awk等工具生成该文件。ip地址即登录用户名密码的文件实例:
这样就能批量执行命令了:

简单的设置免密登录
su - mcw
mkdir ~/.ssh/
cd ~/.ssh/
ssh-keygen -t rsa #一路往下回车
cat id_rsa.pub >> authorized_keys #将所有的公钥收集成一个文件,放在.ssh下
[root@mcw1 ~]$ vim authorized_keys
[root@mcw1 ~]$ cat authorized_keys
ssh-rsa AAAAB3NzaC1yc2EAAAADAQABAAABAQDJyw2D+DNS+JbwFUpD+Vy9h/D85quXYUZokNqsm5Uqq58LLteBnIo/1l5pE+oOtVaBFVjsMoGcLHXcNahJHHbRAcYAXJpuYYOcwE0t++BAqsG0jsLrpovyl0BZmDDDtotwm73anKCzHduJadi71j2eJ7U6dXHiSmKotJEpfy5vDe3nabvcbfKvOWU+ozzcIxjNDJxCTkhQHvokO+ZetioqLeWe8E4zfcL5w43YxTQfOBP1IDTKNJZmTCHJHhmAWmn5eaMn3OXSAZGqmjHC4+Ch0Mz9MMTW1r3xxz8hq6907PvA6PxMkyQaVzBdDOhN3n77canaRo2C1gkBkDWVGoW9 root@mcw2
[root@mcw1 ~]$ mv authorized_keys .ssh/
[root@mcw1 ~]$ cat .ssh/id_rsa.pub >>.ssh/authorized_keys
[root@mcw1 ~]$ cat .ssh/authorized_keys
ssh-rsa AAAAB3NzaC1yc2EAAAADAQABAAABAQDJyw2D+DNS+JbwFUpD+Vy9h/D85quXYUZokNqsm5Uqq58LLteBnIo/1l5pE+oOtVaBFVjsMoGcLHXcNahJHHbRAcYAXJpuYYOcwE0t++BAqsG0jsLrpovyl0BZmDDDtotwm73anKCzHduJadi71j2eJ7U6dXHiSmKotJEpfy5vDe3nabvcbfKvOWU+ozzcIxjNDJxCTkhQHvokO+ZetioqLeWe8E4zfcL5w43YxTQfOBP1IDTKNJZmTCHJHhmAWmn5eaMn3OXSAZGqmjHC4+Ch0Mz9MMTW1r3xxz8hq6907PvA6PxMkyQaVzBdDOhN3n77canaRo2C1gkBkDWVGoW9 root@mcw2
ssh-rsa AAAAB3NzaC1yc2EAAAADAQABAAABAQC7dFtB9jFGSYHKbxrF3mwbBfP3Ao9ijw88w/9lP0/pclX+0To7XWcJlA7V0W5kyHvUBK1pk96ISaWlGxESbW1Csr2RJA7/O/zmhVmjcizPmGg27MQZlBYVHV1jy5mJpEcXgleCOznsTp6jGodAlDrMKEEWeR/O7tE0Mzl1iPWxLagrz0UYhOGjfTR6gdZrTgKwDs1ha9aWp72vwsfcj/RT+Ci/qtp1aMVJAFV63FaOooL8pgjPb4DHbH03Z6PPsa3+1JCuUt2vv5/dVA1ieReNM2gpUHGarJ6LYmIfaacO+1tQ7E8qFn0HLxralwZI9d3XrcmqgTFCfyKpOR6vpNJl root@mcw1
经检验,只将mcw2的公钥集合到mcw1下,mcw1并不能免密登录mcw2。当将公钥集合同样放到mcw2下后,mcw1就能免密登录mcw2了
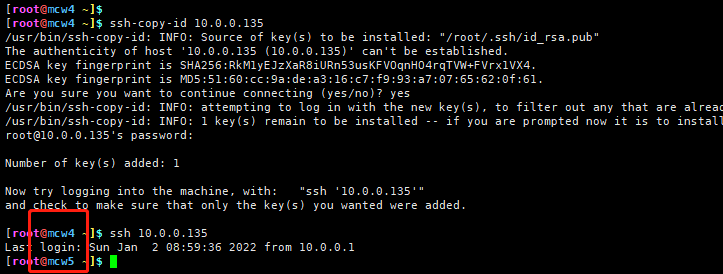
单台免密登录完整过程
[root@mcw4 ~]$ ssh-keygen
Generating public/private rsa key pair.
Enter file in which to save the key (/root/.ssh/id_rsa):
Created directory '/root/.ssh'.
Enter passphrase (empty for no passphrase):
Enter same passphrase again:
Your identification has been saved in /root/.ssh/id_rsa.
Your public key has been saved in /root/.ssh/id_rsa.pub.
The key fingerprint is:
SHA256:mv6P+3Lj/ZbsRs2Q5iPvOtoaYg4CH5RZla7jvLHhvpM root@mcw4
The key's randomart image is:
+---[RSA 2048]----+
|      ....       |
|     +  .        |
|    +  .       . |
|   .    .     +  |
|  . .  .S    o + |
|   o .oo    . + o|
|    oo*oo .  = o |
|     +EB.oo+. *  |
|     .B==B*++O+  |
+----[SHA256]-----+
[root@mcw4 ~]$
[root@mcw4 ~]$ ssh-copy-id 10.0.0.135
/usr/bin/ssh-copy-id: INFO: Source of key(s) to be installed: "/root/.ssh/id_rsa.pub"
The authenticity of host '10.0.0.135 (10.0.0.135)' can't be established.
ECDSA key fingerprint is SHA256:RkM1yEJzXaR8iURn53usKFVOqnHO4rqTVW+FVrx1VX4.
ECDSA key fingerprint is MD5:51:60:cc:9a:de:a3:16:c7:f9:93:a7:07:65:62:0f:61.
Are you sure you want to continue connecting (yes/no)? yes
/usr/bin/ssh-copy-id: INFO: attempting to log in with the new key(s), to filter out any that are already installed
/usr/bin/ssh-copy-id: INFO: 1 key(s) remain to be installed -- if you are prompted now it is to install the new keys
root@10.0.0.135's password:

Number of key(s) added: 1

Now try logging into the machine, with:   "ssh '10.0.0.135'"
and check to make sure that only the key(s) you wanted were added.

[root@mcw4 ~]$ ssh 10.0.0.135
Last login: Sun Jan  2 08:59:36 2022 from 10.0.0.1
[root@mcw5 ~]$

参考链接:
https://blog.51cto.com/vinsent/1970780
https://www.cnblogs.com/panchong/p/6027138.html


【推荐】国内首个AI IDE,深度理解中文开发场景,立即下载体验Trae
【推荐】编程新体验,更懂你的AI,立即体验豆包MarsCode编程助手
【推荐】抖音旗下AI助手豆包,你的智能百科全书,全免费不限次数
【推荐】轻量又高性能的 SSH 工具 IShell:AI 加持,快人一步
· Linux系列:如何用heaptrack跟踪.NET程序的非托管内存泄露
· 开发者必知的日志记录最佳实践
· SQL Server 2025 AI相关能力初探
· Linux系列:如何用 C#调用 C方法造成内存泄露
· AI与.NET技术实操系列(二):开始使用ML.NET
· 无需6万激活码!GitHub神秘组织3小时极速复刻Manus,手把手教你使用OpenManus搭建本
· C#/.NET/.NET Core优秀项目和框架2025年2月简报
· 什么是nginx的强缓存和协商缓存
· 一文读懂知识蒸馏
· Manus爆火,是硬核还是营销?