spring mvc 执行流程及源码解析
DispatcherServlet作为前端核心控制器,作用接收用户请求,响应结果,相当于转发器,中央处理器。有了DispatcherServlet减少了其它组件之间的耦合度。
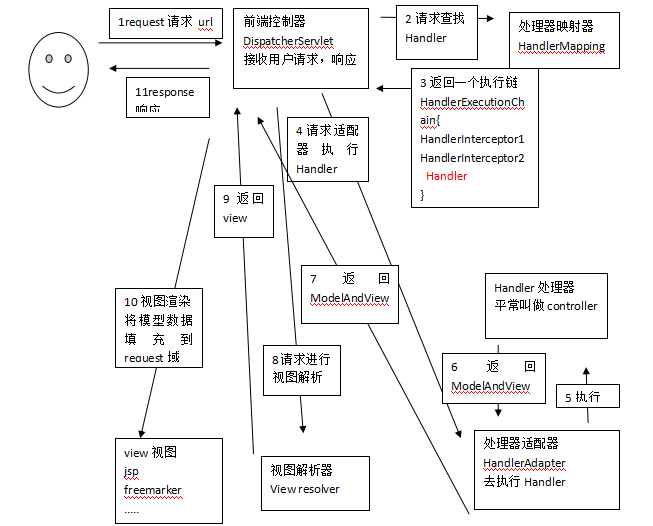
DispatcherServlet流程

第一步:发起请求到前端控制器(DispatcherServlet)
第二步:前端控制器请求HandlerMapping查找 Handler
可以根据xml配置、注解进行查找
第三步:处理器映射器HandlerMapping向前端控制器返回Handler
第四步:前端控制器调用处理器适配器去执行Handler
第五步:处理器适配器去执行Handler
第六步:Handler执行完成给适配器返回ModelAndView
第七步:处理器适配器向前端控制器返回ModelAndView
ModelAndView是springmvc框架的一个底层对象,包括 Model和view
第八步:前端控制器请求视图解析器去进行视图解析
根据逻辑视图名解析成真正的视图(jsp)
第九步:视图解析器向前端控制器返回View
第十步:前端控制器进行视图渲染
视图渲染将模型数据(在ModelAndView对象中)填充到request域
第十一步:前端控制器向用户响应结果
DispatcherServlet 逻辑处理源码解析
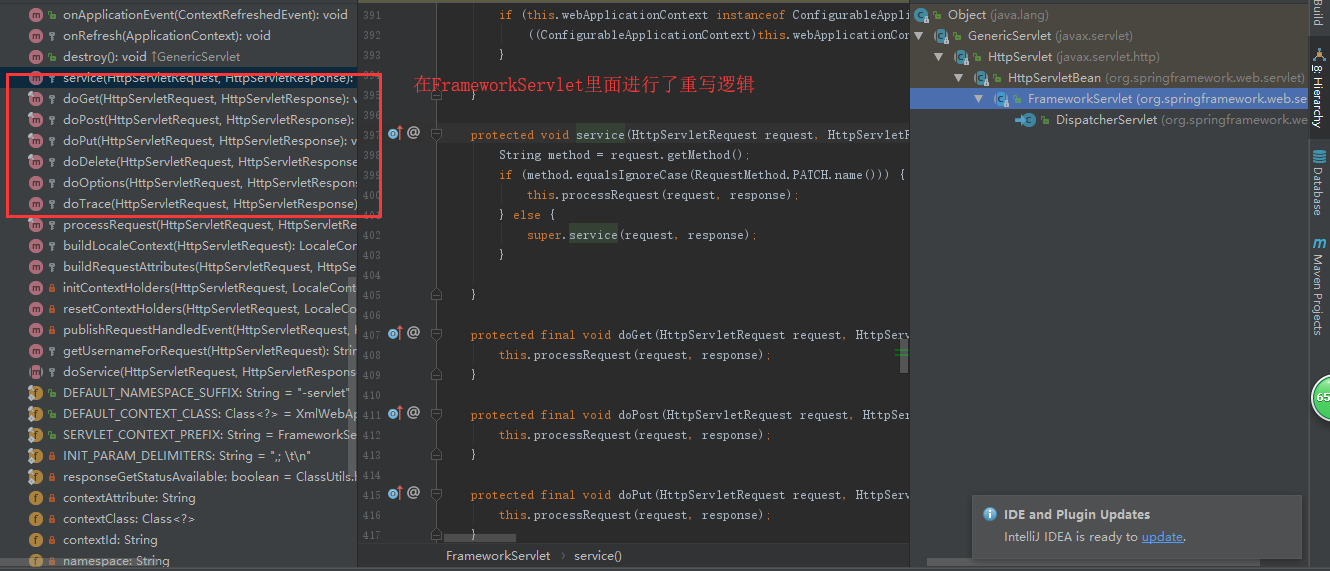
请求处理的入口定义在 HttpServlet,主要有以下几个方法:

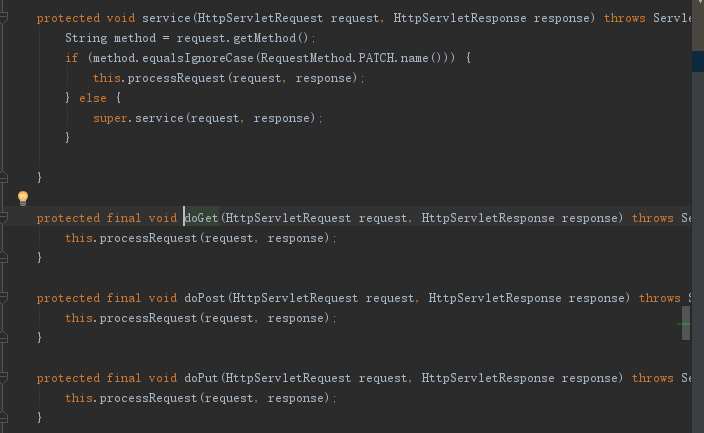
当然,父类 HttpServlet 只是给出了定义,直接调用父类这些方法将会报错,所以 FrameworkServlet 将它们覆盖重写了处理逻辑:

可以看到 doGet 、doPost 这些方法,底层调用的都是 processRequest 方法进行处理,关键方法是委托给子类 DispatcherServlet 的 doServie() 方法
FrameworkServlet #processRequest

DispatcherServlet 重写了doServie方法
protected void doService(HttpServletRequest request, HttpServletResponse response) throws Exception {
if (this.logger.isDebugEnabled()) {
    String resumed = WebAsyncUtils.getAsyncManager(request).hasConcurrentResult() ? " resumed" : "";
    this.logger.debug("DispatcherServlet with name '" + this.getServletName() + "'" + resumed + " processing " + request.getMethod() + " request for [" + getRequestUri(request) + "]");
}

Map<String, Object> attributesSnapshot = null;
if (WebUtils.isIncludeRequest(request)) {
    attributesSnapshot = new HashMap();
    Enumeration attrNames = request.getAttributeNames();

    label108:
    while(true) {
        String attrName;
        do {
            if (!attrNames.hasMoreElements()) {
                break label108;
            }

            attrName = (String)attrNames.nextElement();
        } while(!this.cleanupAfterInclude && !attrName.startsWith("org.springframework.web.servlet"));

        attributesSnapshot.put(attrName, request.getAttribute(attrName));
    }
}

request.setAttribute(WEB_APPLICATION_CONTEXT_ATTRIBUTE, this.getWebApplicationContext());
request.setAttribute(LOCALE_RESOLVER_ATTRIBUTE, this.localeResolver);
request.setAttribute(THEME_RESOLVER_ATTRIBUTE, this.themeResolver);
request.setAttribute(THEME_SOURCE_ATTRIBUTE, this.getThemeSource());
FlashMap inputFlashMap = this.flashMapManager.retrieveAndUpdate(request, response);
if (inputFlashMap != null) {
    request.setAttribute(INPUT_FLASH_MAP_ATTRIBUTE, Collections.unmodifiableMap(inputFlashMap));
}

request.setAttribute(OUTPUT_FLASH_MAP_ATTRIBUTE, new FlashMap());
request.setAttribute(FLASH_MAP_MANAGER_ATTRIBUTE, this.flashMapManager);

try {
    this.doDispatch(request, response);//进入请求处理过程
} finally {
    if (!WebAsyncUtils.getAsyncManager(request).isConcurrentHandlingStarted() && attributesSnapshot != null) {
        this.restoreAttributesAfterInclude(request, attributesSnapshot);
    }

}
}
第一步:请求分发和处理逻辑的核心是在 doDispatch(request, response) 方法中。
protected void doDispatch(HttpServletRequest request, HttpServletResponse response) {
    HttpServletRequest processedRequest = request;
    HandlerExecutionChain mappedHandler = null;
    // 注释 10. 检查是否 MultipartContent 类型
    processedRequest = checkMultipart(request);
    // 根据 request 信息寻找对应的 Handler
    mappedHandler = getHandler(processedRequest);
    if (mappedHandler == null) {
        // 没有找到 handler,通过 response 向用户返回错误信息
        noHandlerFound(processedRequest, response);
        return;
    }
    // 根据当前的 handler 找到对应的 HandlerAdapter 适配器
    HandlerAdapter ha = getHandlerAdapter(mappedHandler.getHandler());
    // 如果当前 handler 支持 last-modified 头处理
    String method = request.getMethod();
    boolean isGet = "GET".equals(method);
    if (isGet || "HEAD".equals(method)) {
        long lastModified = ha.getLastModified(request, mappedHandler.getHandler());
        if (new ServletWebRequest(request, response).checkNotModified(lastModified) && isGet) {
            return;
        }
    }
    // 拦截器的 preHandler 方法的调用
    if (!mappedHandler.applyPreHandle(processedRequest, response)) {
        return;
    }
    // 真正激活 handler 进行处理,并返回视图
    mv = ha.handle(processedRequest, response, mappedHandler.getHandler());
    if (asyncManager.isConcurrentHandlingStarted()) {
        return;
    }
    // 视图名称转换(有可能需要加上前后缀)
    applyDefaultViewName(processedRequest, mv);
    // 应用所有拦截器的 postHandle 方法
    mappedHandler.applyPostHandle(processedRequest, response, mv);
    // 处理分发的结果(如果有 mv,进行视图渲染和跳转)
    processDispatchResult(processedRequest, response, mappedHandler, mv, dispatchException);
}
第二步:寻找处理器 mappedHandler
寻找处理器,就是根据 URL 找到对应的 Controller 方法
DispatcherServlet#getHandler
protected HandlerExecutionChain getHandler(HttpServletRequest request) throws Exception {
    Iterator var2 = this.handlerMappings.iterator();
    HandlerExecutionChain handler;
  //遍历注册的全部 handlerMapping
    do {
        if (!var2.hasNext()) {
            return null;
        }
        HandlerMapping hm = (HandlerMapping)var2.next();
        if (this.logger.isTraceEnabled()) {
            this.logger.trace("Testing handler map [" + hm + "] in DispatcherServlet with name '" + this.getServletName() + "'");
        }
        handler = hm.getHandler(request);
    } while(handler == null);

    return handler;
}
实际上,在这一步遍历了所有注册的 HandlerMapping,然后委派它们去寻找处理器,如果找到了合适的,就不再往下寻找,直接返回。
具体寻找调用的方法:
AbstractHandlerMapping#getHandler
public final HandlerExecutionChain getHandler(HttpServletRequest request) throws Exception {
    // 根据 Request 获取对应的 handler
    Object handler = getHandlerInternal(request);
    // 将配置中的对应拦截器加入到执行链中,以保证这些拦截器可以有效地作用于目标对象
    HandlerExecutionChain executionChain = getHandlerExecutionChain(handler, request);
    if (hasCorsConfigurationSource(handler)) {
        CorsConfiguration config = (this.corsConfigurationSource != null ? this.corsConfigurationSource.getCorsConfiguration(request) : null);
        CorsConfiguration handlerConfig = getCorsConfiguration(handler, request);
        config = (config != null ? config.combine(handlerConfig) : handlerConfig);
        executionChain = getCorsHandlerExecutionChain(request, executionChain, config);
    }
    return executionChain;
}
(1) getHandlerInternal(request) 函数作用:
根据 request 信息获取对应的 Handler,也就是我们例子中的,通过 URL 找到匹配的 Controller 并返回。
(2) getHandlerExcetionChain 函数作用:
将适应该 URL 对应拦截器 MappedInterceptor 加入 addInterceptor() 到执行链 HandlerExecutionChain 中。
(3) CorsConfiguration
这个参数涉及到跨域设置
第三步:寻找适配器 HandlerAdapter
前面已经找到了对应的处理器了,下一步就得找到它对应的适配器
DispatcherServlet#getHandlerAdapter
protected  getHandlerAdapter(Object handler) throws ServletException {
    if (this.handlerAdapters != null) {
        for (HandlerAdapter adapter : this.handlerAdapters) {
            if (adapter.supports(handler)) {
                return adapter;
            }
        }
    }
}
第四步:前端控制器调用处理器适配器执行Handler,得到执行结果ModelAndView
mv = ha.handle(processedRequest, response, mappedHandler.getHandler());
AbstractHandlerMethodAdapter抽象类实现了HandlerAdapter接口
 public final ModelAndView handle(HttpServletRequest request, HttpServletResponse response, Object handler) throws Exception {
        return this.handleInternal(request, response, (HandlerMethod)handler);
    }

protected abstract ModelAndView handleInternal(HttpServletRequest var1, HttpServletResponse var2, HandlerMethod var3) throws Exception;
RequestMappingHandlerAdapter继承了AbstractHandlerMethodAdapter抽象类
protected ModelAndView handleInternal(HttpServletRequest request, HttpServletResponse response, HandlerMethod handlerMethod) throws Exception {
        if (this.getSessionAttributesHandler(handlerMethod).hasSessionAttributes()) {
            this.checkAndPrepare(request, response, this.cacheSecondsForSessionAttributeHandlers, true);
        } else {
            this.checkAndPrepare(request, response, true);
        }

        if (this.synchronizeOnSession) {
            HttpSession session = request.getSession(false);
            if (session != null) {
                Object mutex = WebUtils.getSessionMutex(session);
                synchronized(mutex) {
                    return this.invokeHandleMethod(request, response, handlerMethod);
                }
            }
        }

        return this.invokeHandleMethod(request, response, handlerMethod);
    }

//执行handler,返回modelandview
private ModelAndView invokeHandleMethod(HttpServletRequest request, HttpServletResponse response, HandlerMethod handlerMethod) throws Exception {
    ServletWebRequest webRequest = new ServletWebRequest(request, response);
    WebDataBinderFactory binderFactory = this.getDataBinderFactory(handlerMethod);
    ModelFactory modelFactory = this.getModelFactory(handlerMethod, binderFactory);
    ServletInvocableHandlerMethod requestMappingMethod = this.createRequestMappingMethod(handlerMethod, binderFactory);
    ModelAndViewContainer mavContainer = new ModelAndViewContainer();
    mavContainer.addAllAttributes(RequestContextUtils.getInputFlashMap(request));
    modelFactory.initModel(webRequest, mavContainer, requestMappingMethod);
    mavContainer.setIgnoreDefaultModelOnRedirect(this.ignoreDefaultModelOnRedirect);
    AsyncWebRequest asyncWebRequest = WebAsyncUtils.createAsyncWebRequest(request, response);
    asyncWebRequest.setTimeout(this.asyncRequestTimeout);
    WebAsyncManager asyncManager = WebAsyncUtils.getAsyncManager(request);
    asyncManager.setTaskExecutor(this.taskExecutor);
    asyncManager.setAsyncWebRequest(asyncWebRequest);
    asyncManager.registerCallableInterceptors(this.callableInterceptors);
    asyncManager.registerDeferredResultInterceptors(this.deferredResultInterceptors);
    if (asyncManager.hasConcurrentResult()) {
        Object result = asyncManager.getConcurrentResult();
        mavContainer = (ModelAndViewContainer)asyncManager.getConcurrentResultContext()[0];
        asyncManager.clearConcurrentResult();
        if (this.logger.isDebugEnabled()) {
            this.logger.debug("Found concurrent result value [" + result + "]");
        }

        requestMappingMethod = requestMappingMethod.wrapConcurrentResult(result);
    }

    requestMappingMethod.invokeAndHandle(webRequest, mavContainer, new Object[0]);
    return asyncManager.isConcurrentHandlingStarted() ? null : this.getModelAndView(mavContainer, modelFactory, webRequest);
}
第五步:视图渲染,将model数据填充到request域。
 private void processDispatchResult(HttpServletRequest request, HttpServletResponse response, HandlerExecutionChain mappedHandler, ModelAndView mv, Exception exception) throws Exception {
        boolean errorView = false;
        if (exception != null) {
            if (exception instanceof ModelAndViewDefiningException) {
                this.logger.debug("ModelAndViewDefiningException encountered", exception);
                mv = ((ModelAndViewDefiningException)exception).getModelAndView();
            } else {
                Object handler = mappedHandler != null ? mappedHandler.getHandler() : null;
                mv = this.processHandlerException(request, response, handler, exception);
                errorView = mv != null;
            }
        }

        if (mv != null && !mv.wasCleared()) {
            this.render(mv, request, response);//视图渲染
            if (errorView) {
                WebUtils.clearErrorRequestAttributes(request);
            }
        } else if (this.logger.isDebugEnabled()) {
            this.logger.debug("Null ModelAndView returned to DispatcherServlet with name '" + this.getServletName() + "': assuming HandlerAdapter completed request handling");
        }

        if (!WebAsyncUtils.getAsyncManager(request).isConcurrentHandlingStarted()) {
            if (mappedHandler != null) {
                mappedHandler.triggerAfterCompletion(request, response, (Exception)null);
            }

        }
    }
1.视图解析,得到view,
2.调用view的渲染方法,将model数据填充到request域
 protected void render(ModelAndView mv, HttpServletRequest request, HttpServletResponse response) throws Exception {
        Locale locale = this.localeResolver.resolveLocale(request);
        response.setLocale(locale);
        View view;
        if (mv.isReference()) {
            view = this.resolveViewName(mv.getViewName(), mv.getModelInternal(), locale, request);//视图解析得到view对象
            if (view == null) {
                throw new ServletException("Could not resolve view with name '" + mv.getViewName() + "' in servlet with name '" + this.getServletName() + "'");
            }
        } else {
            view = mv.getView();
            if (view == null) {
                throw new ServletException("ModelAndView [" + mv + "] neither contains a view name nor a " + "View object in servlet with name '" + this.getServletName() + "'");
            }
        }

        if (this.logger.isDebugEnabled()) {
            this.logger.debug("Rendering view [" + view + "] in DispatcherServlet with name '" + this.getServletName() + "'");
        }

        try {
            view.render(mv.getModelInternal(), request, response);//调用view的渲染方法,将model数据填充到request域
        } catch (Exception var7) {
            if (this.logger.isDebugEnabled()) {
                this.logger.debug("Error rendering view [" + view + "] in DispatcherServlet with name '" + this.getServletName() + "'", var7);
            }
            throw var7;
        }
    }
好了,源码暂且跟踪到这。


 浙公网安备 33010602011771号