实验4:交换机配置
实验环境
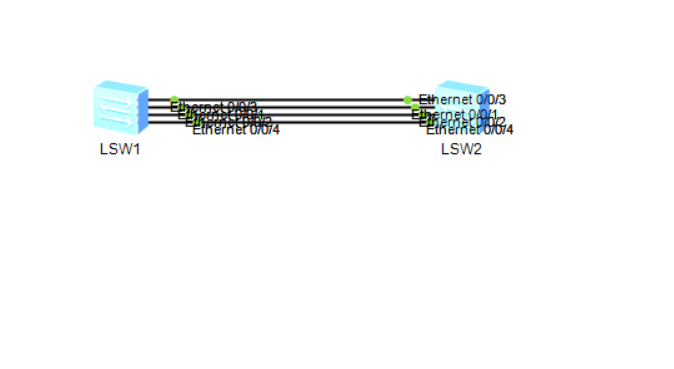
实验思路
- 连接网络拓扑图
- 配置手工模式
- 配置lacp模式
具体实施
配置手工模式(默认手工模式)
-
SW1
[SW1]int Eth-Trunk 1
[SW1-Eth-Trunk2]q
[SW1]interface Ethernet 0/0/1
[SW1-Ethernet0/0/1]eth-trunk 1
[SW1]interface Ethernet 0/0/2
[SW1-Ethernet0/0/2]eth-trunk 1
[SW1]interface Ethernet 0/0/3
[SW1-Ethernet0/0/3]eth-trunk 1
[SW1]interface Ethernet 0/0/4
[SW1-Ethernet0/0/4]eth-trunk 1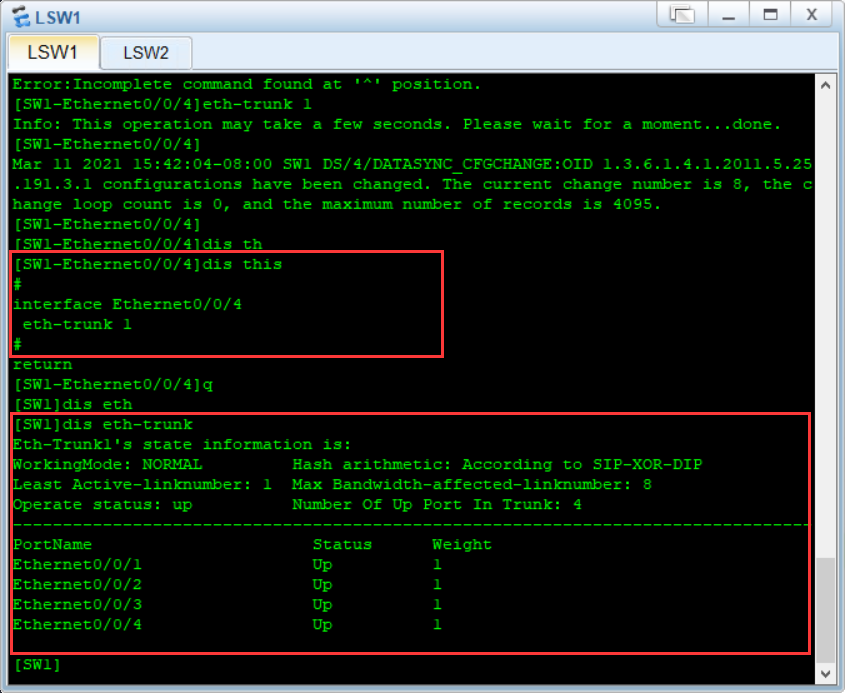
-
SW2
[SW2]int Eth-Trunk 2
[SW2-Eth-Trunk2]q
[SW2]interface Ethernet 0/0/1
[SW2-Ethernet0/0/1]eth-trunk 2
[SW2]interface Ethernet 0/0/2
[SW2-Ethernet0/0/2]eth-trunk 2
[SW2]interface Ethernet 0/0/3
[SW2-Ethernet0/0/3]eth-trunk 2
[SW2]interface Ethernet 0/0/4
[SW2-Ethernet0/0/4]eth-trunk 2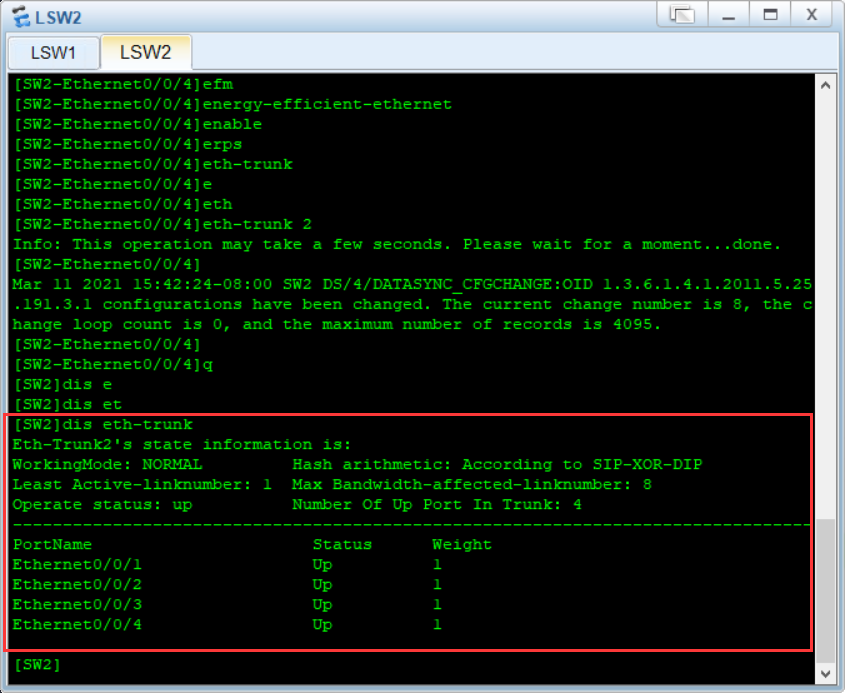
配置LACP模式(要先修改mode再配置链路!!!)
-
SW1
[SW1]int Eth-Trunk 1
[SW1-Eth-Trunk1]mode lacp-static
//先修改mode再配置链路 如果已经设置好链路端口
  则需要undo命令来移除链路后再重新配置lacp mode!!!!!!!
[SW1-Eth-Trunk1]q
[SW1]int e 0/0/1
[SW1-Ethernet0/0/1]eth-trunk 1
[SW1]int e 0/0/2
[SW1-Ethernet0/0/2]eth-trunk 1
[SW1]int e 0/0/3
[SW1-Ethernet0/0/3]eth-trunk 1
[SW1]int e 0/0/4
[SW1-Ethernet0/0/4]eth-trunk 1
//
[SW2-Eth-Trunk1]trunkport e 0/0/1 to 0/0/4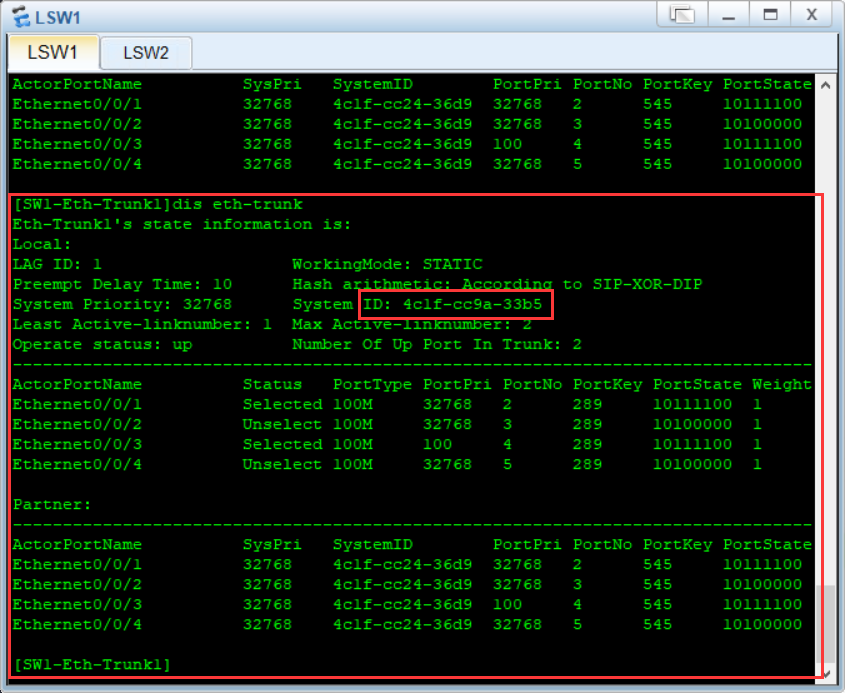
-
SW2(本实验应配置SW的端口优先级 因为SW2的物理地址小于SW1)
[SW2]int Eth-Trunk 2
[SW2-Eth-Trunk2]mode lacp-static
[SW2-Eth-Trunk2]q
[SW2]int e 0/0/1
[SW2-Ethernet0/0/1]eth-trunk 2
[SW2]int e 0/0/2
[SW2-Ethernet0/0/2]eth-trunk 2
[SW2]int e 0/0/3
[SW2-Ethernet0/0/3]eth-trunk 2
[SW2]int e 0/0/4
[SW2-Ethernet0/0/4]eth-trunk 2
[SW2-Ethernet0/0/4]int Eth-Trunk 2
[SW2-Eth-Trunk1]lacp preempt enable //抢占允许
[SW2-Eth-Trunk1]max active-linknumber 2  //最大活跃数
[SW2-Eth-Trunk1]lacp preempt delay 10  //抢占延迟(s)
[SW2-Eth-Trunk2]int e 0/0/3
[SW2-Ethernet0/0/3]lacp priority 100
//优先级高的则活跃 同优先级的端口编号小的则活跃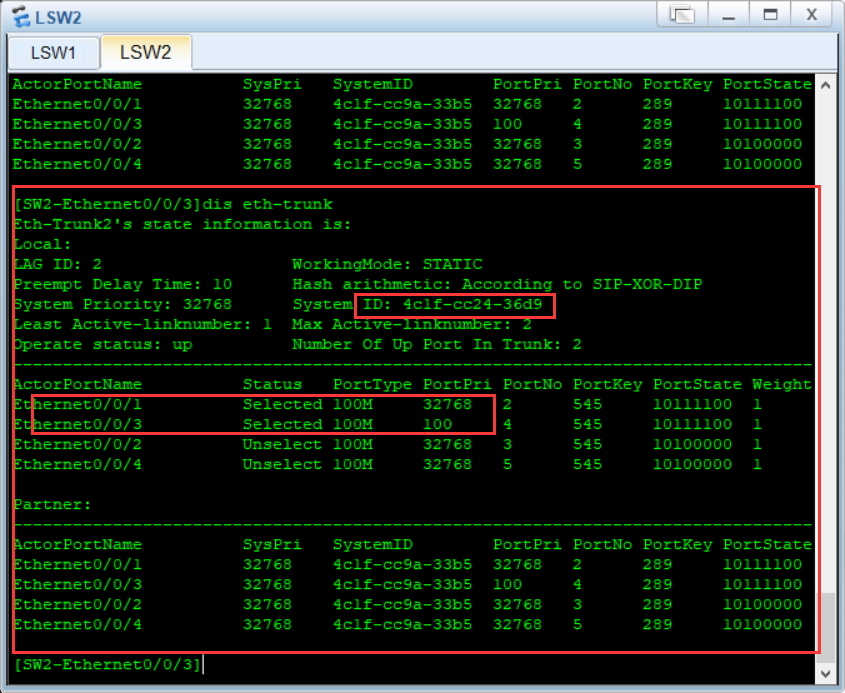
个人总结
lacp命令总结
- 以下命令应按该顺序逐条配置
lacp preempt enable 抢占允许
max active-linknumber 2 最大活跃数
lacp preempt delay 10 抢占延迟(s)
lacp priority 100 优先级高的则活跃 同优先级的端口编号小
trunkport e 0/0/1 to 0/0/4 批量添加端口
实验体会
在配置lacp模式的时候还是踩了一点坑的,比如应该先更改模式再配置端口,应该养成按顺序输入指令的习惯。还有就是容易忽略交换机的MAC地址导致配错交换机的端口优先级从而达不到预期的效果,应该多注意这些基本的东西。


