
第二次作业
[实验目的]
1.掌握软件开发的基本流程
2.掌握常用的软件开发方式和工具。
[实验内容]
1.设计一个包含登录界面的计算器软件,该软件可以实现第一次作业中的全部功能,同时可以保存用户的历史计算记录(保存数据最好使用数据库)。
[实验要求]
1.完成软件的UI设计、使用Visio设计软件中所涉及的所有流程图。
2.选择合适的集成开发环境和工具完成计算器软件的开发
3.将开发好软件进行测试并截图
4.将本次实验过程写成实验报告提交在本次作业的链接中
5.关键代码部分以代码块格式粘贴在实验报告正文中
一、需求分析
确定软件的功能需求,包括登录界面和计算器功能,以及历史记录的保存。
确定软件的适用用户群体和目标平台(例如Windows、Android、Web等)。
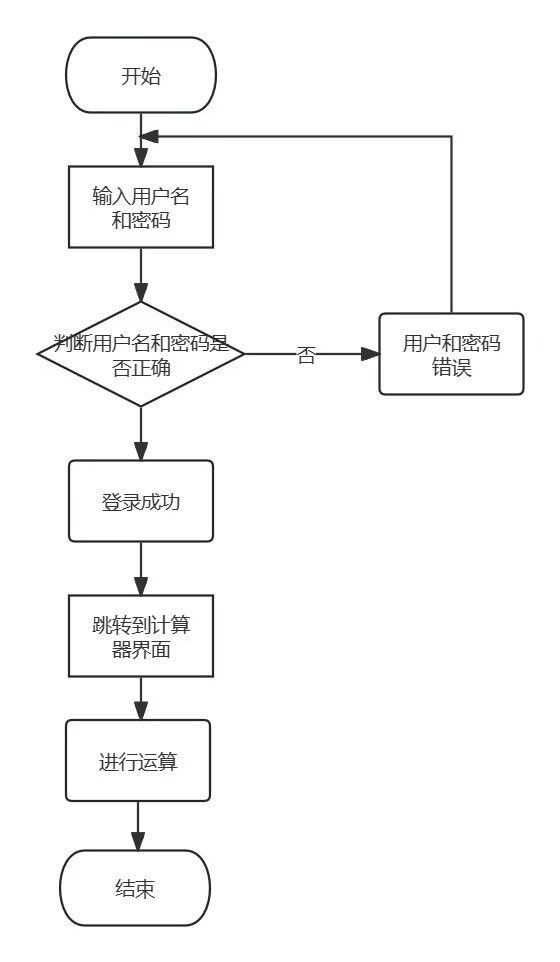
二、设计登录界面
使用GUI库创建一个包含用户名和密码输入框以及登录按钮的界面。可以考虑添加注册按钮,以便用户注册新账户。
(1)计算器界面设计
使用GUI库创建一个包含数字按钮(0-9)和操作符按钮(+, -, *, /)的界面。
(2)数据库设计
选择一个适合的数据库管理系统(如MySQL)来存储用户的历史计算记录。
创建一个数据表,包含用户ID、计算内容、计算时间等字段。
三、编码
(1)登录和计算器界面的编码:
使用选择的GUI库实现登录界面和计算器界面的设计和交互
图示.流程图
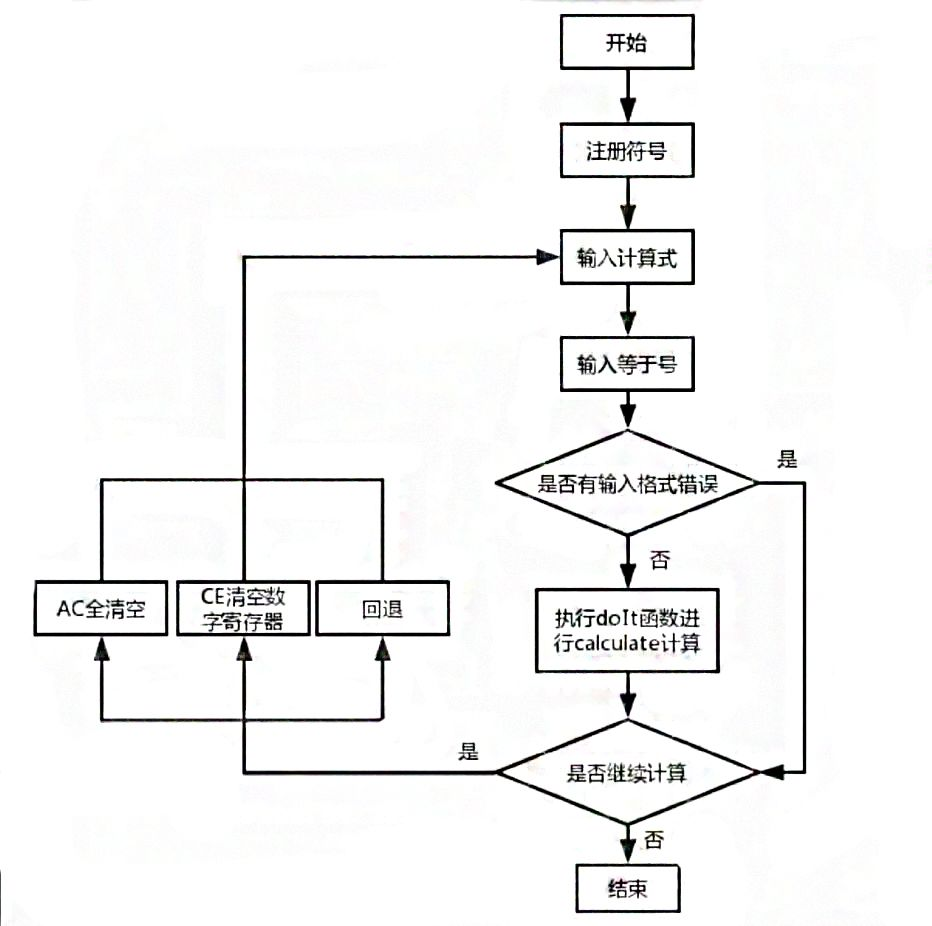
图示.计算机运行流程图
【基本代码以及图示】
login.html

<!DOCTYPE html>
<html lang="en">
<head>
  <meta charset="UTF-8">
  <meta name="viewport" content="width=device-width, initial-scale=1.0">
  <title>登录</title>
  <style>
    body {
      background-image: url("./img/img.png");
      background-size: cover;
      background-position: center;
      font-family: Arial, sans-serif;
      margin: 0;
      padding: 0;
    }

    .container {
      width: 350px;
      margin: 100px auto;
      background: rgba(255, 255, 255, 0.653);
      padding: 20px;
      border-radius: 20px;
      text-align: center;
    }

    input[type="text"],
    input[type="password"] {
      width: 80%;
      padding: 8px;
      margin: 5px 0;
      border-radius: 5px;
      border: 1px solid #002aff;
    }

    input[type="submit"] {
      width: 80%;
      padding: 8px;
      margin: 10px 0;
      border-radius: 5px;
      border: none;
      background-color: #008cff;
      color: white;
      cursor: pointer;
    }

    .message {
      margin-top: 10px;
    }

    .success {
      color: rgb(0, 41, 128);
    }

    .error {
      color: black;
      font-weight: bold;
    }
  </style>
</head>
<body>
<div class="container">
  <h2>登录</h2>
  <form onsubmit="return validateForm()">
    <input type="text" placeholder="用户名" id="username" required><br>
    <input type="password" placeholder="密码" id="password" required><br>
    <input type="submit" value="登录">
    <div class="message" id="message"></div>
  </form>
</div>

<script>
  function validateForm() {
    var username = document.getElementById('username').value;
    var password = document.getElementById('password').value;
    if (username === 'username' && password === 'password') {
      document.getElementById('message').innerHTML = '<span class="success">登录成功!</span>';
      window.location.href = 'http://localhost:D:\pace\counter\web\WEB-INF\web.xml';
      return true;
    } else {
      document.getElementById('message').innerHTML = '<span class="error">用户名或者密码错误</span>';
      return false;
    }
  }
</script>
</body>
</html>
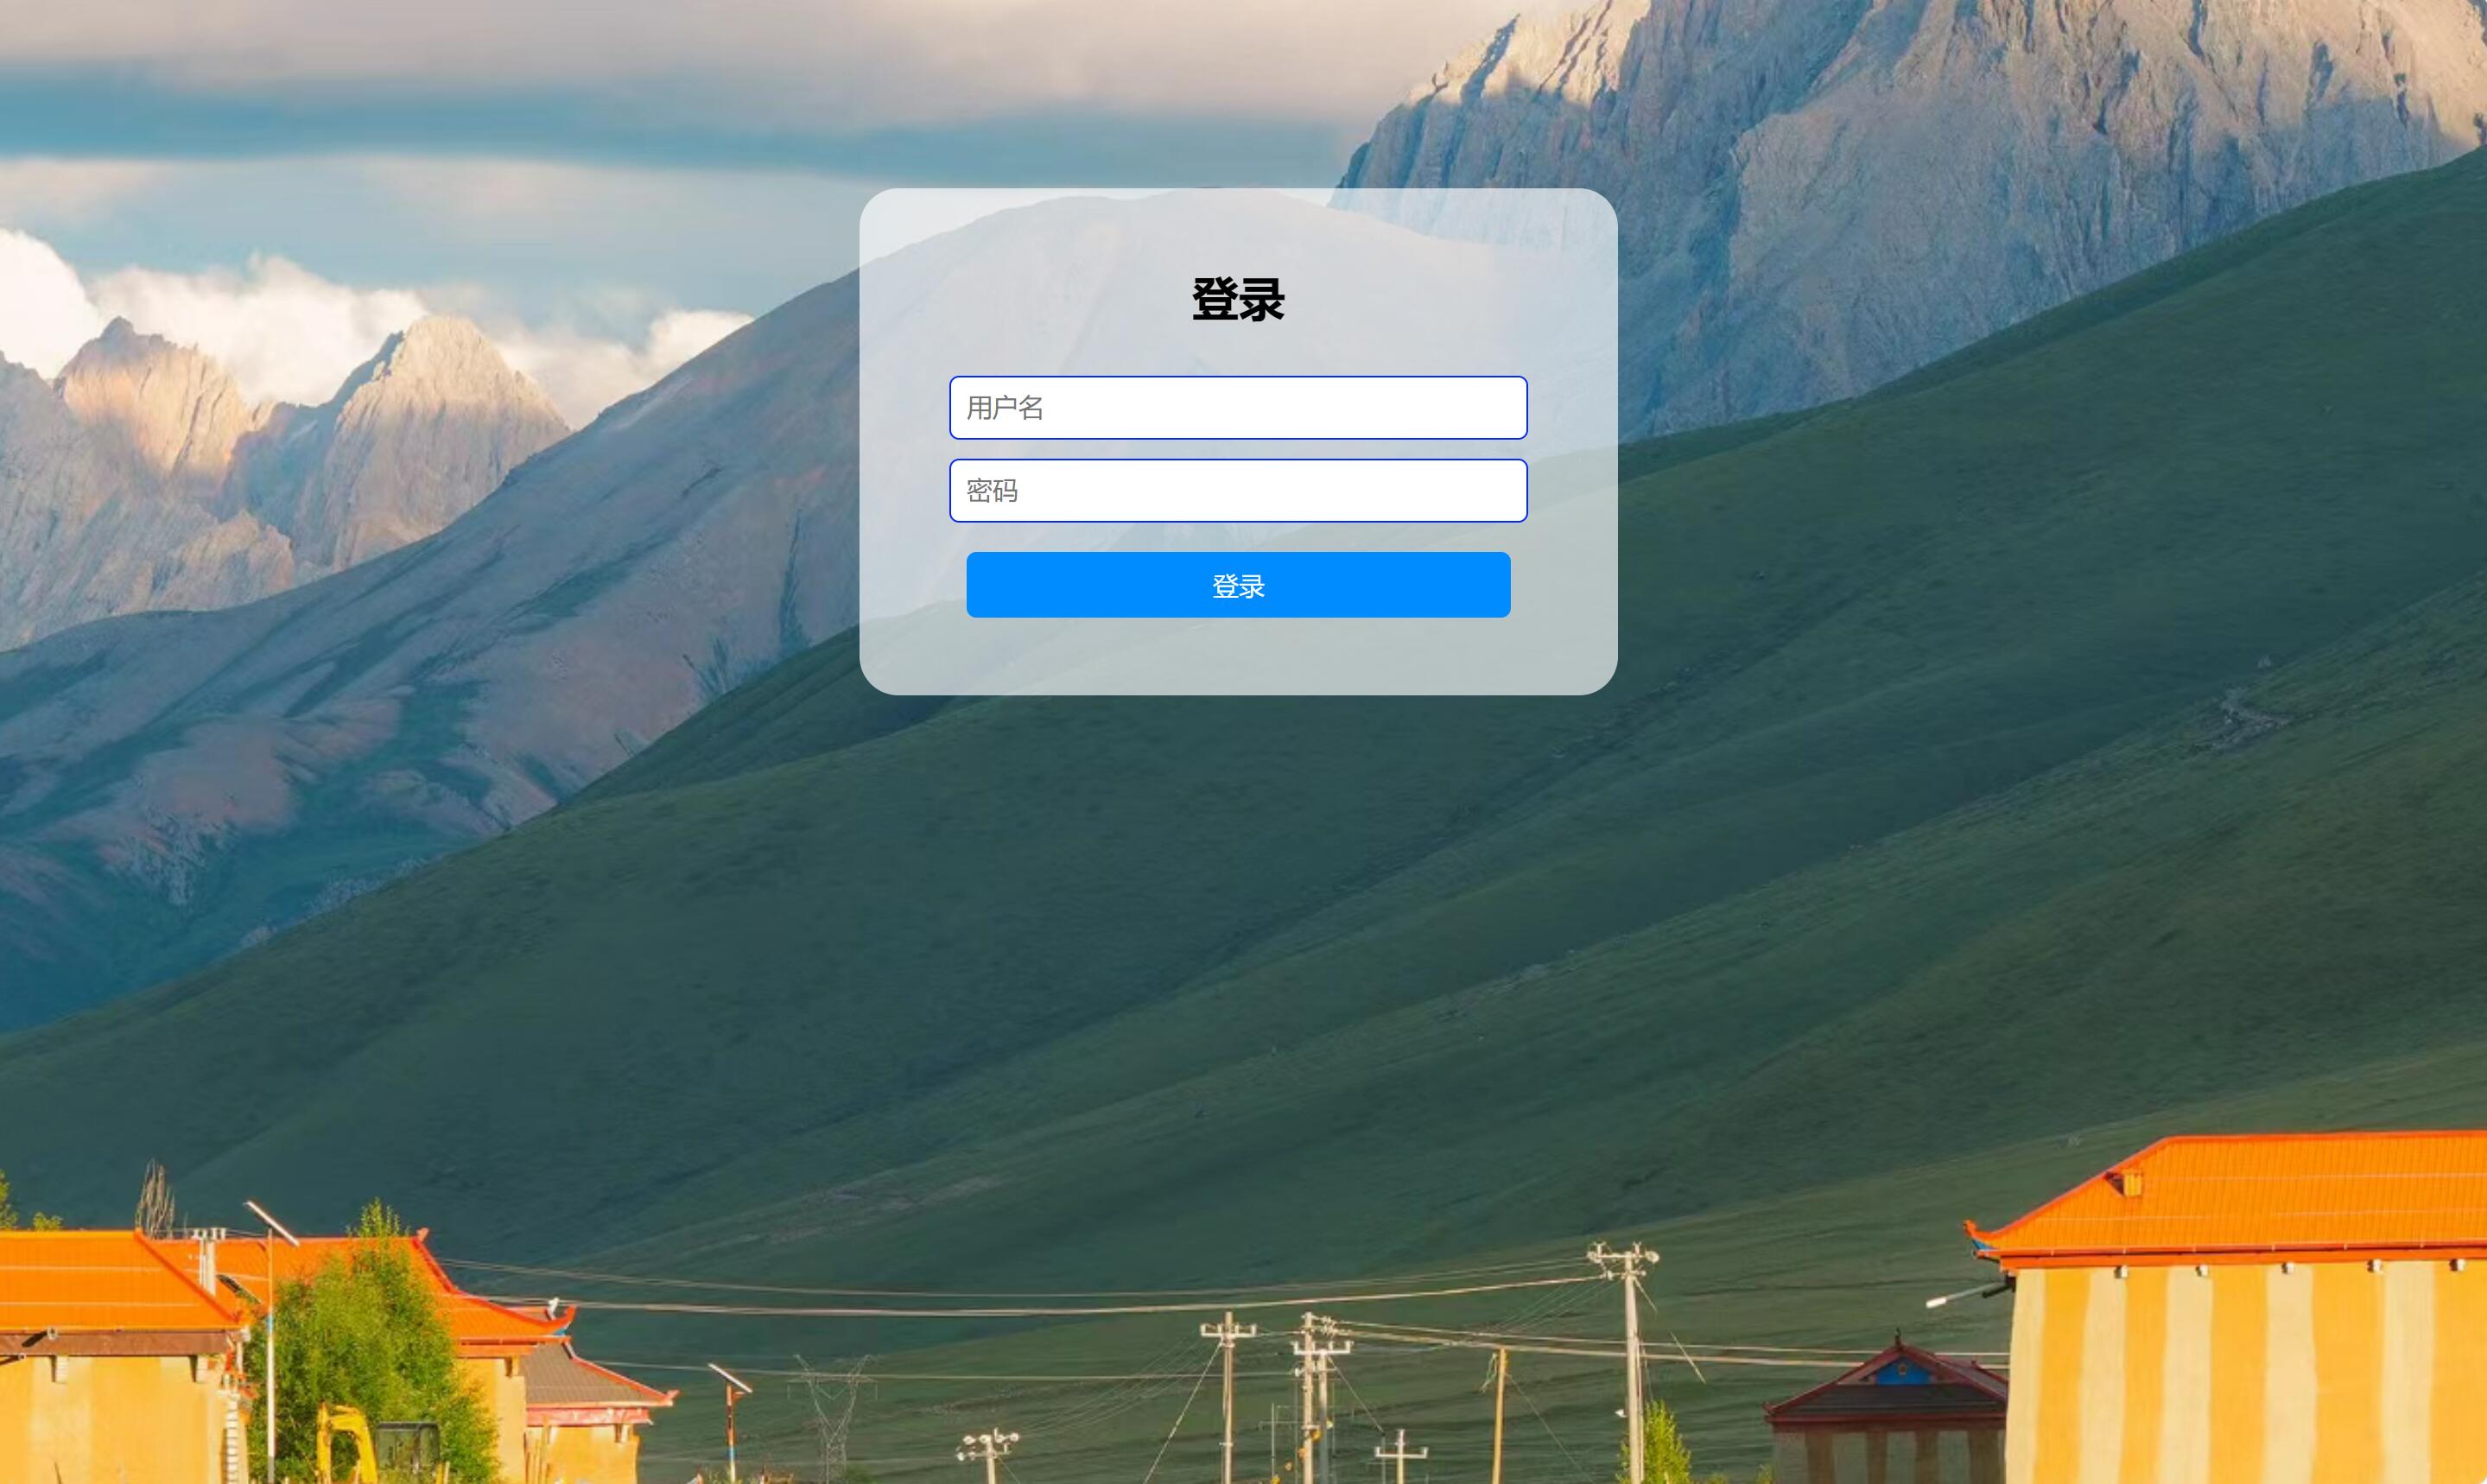
(1)用户登录界面呈现情况
(2)用户界面登录失败

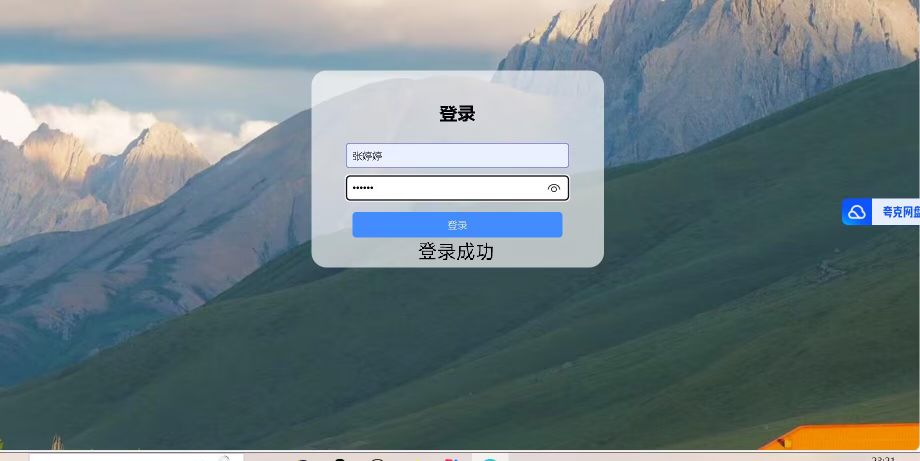
(3)用户界面登录成功
calculator.html
<!DOCTYPE html>
<html lang="en">
<head>
  <meta charset="UTF-8">
  <title>Calculator</title>
  <style>
    body {
      font-family: Arial, sans-serif;
      background-color: #f4f4f4;
      display: flex;
      justify-content: center;
      align-items: center;
      height: 100vh;
      margin: 0;
    }
    .calculator {
      border: 1px solid #ccc;
      border-radius: 10px;
      width: 300px;
      background-color: #fff;
      box-shadow: 0 0 10px rgba(0, 0, 0, 0.1);
      padding: 20px;
      text-align: center;
    }
    input[type=text] {
      width: 100%;
      height: 40px;
      margin-bottom: 10px;
      font-size: 20px;
      text-align: right;
      padding-right: 10px;
    }
    input[type=button] {
      width: 60px;
      height: 60px;
      margin: 5px;
      font-size: 24px;
      border: none;
      background-color: #f0f0f0;
      cursor: pointer;
      transition: background-color 0.3s;
    }
    input[type=button]:hover {
      background-color: #e0e0e0;
    }
  </style>
</head>
<body>
  <div class="calculator">
    <label for="input">Enter equation:</label>
    <input type="text" id="input" value="" readonly>
    <div>
      <input type="button" value="7" onclick="addToInput(this)">
      <input type="button" value="8" onclick="addToInput(this)">
      <input type="button" value="9" onclick="addToInput(this)">
      <input type="button" value="/" onclick="addToInput(this)">
    </div>
    <div>
      <input type="button" value="4" onclick="addToInput(this)">
      <input type="button" value="5" onclick="addToInput(this)">
      <input type="button" value="6" onclick="addToInput(this)">
      <input type="button" value="*" onclick="addToInput(this)">
    </div>
    <div>
      <input type="button" value="1" onclick="addToInput(this)">
      <input type="button" value="2" onclick="addToInput(this)">
      <input type="button" value="3" onclick="addToInput(this)">
      <input type="button" value="-" onclick="addToInput(this)">
    </div>
    <div>
      <input type="button" value="0" onclick="addToInput(this)">
      <input type="button" value="c" onclick="clearInput()">
      <input type="button" value="=" onclick="calculate()">
      <input type="button" value="+" onclick="addToInput(this)">
    </div>
    <div>
      <input type="button" value="√" onclick="calculateSquareRoot()">
    </div>
  </div>

  <script>
    function addToInput(btn) {
      document.getElementById("input").value += btn.value;
    }

    function clearInput() {
      document.getElementById("input").value = "";
    }

    function calculate() {
      document.getElementById("input").value = eval(document.getElementById("input").value);
    }

    function calculateSquareRoot() {
      var inputValue = document.getElementById('input').value;
      var result = Math.sqrt(parseFloat(inputValue));
      document.getElementById('input').value = result;
    }
  </script>
</body>
</html>
login.css
 1 *{
 2     user-select: none;
 3     /* 无法选中,整体感更强 */
 4 }
 5
 6 body{
 7     background: url(./R-C.jpg) no-repeat;
 8     background-size: cover;
 9     background-attachment: fixed;
10 }
11
12 .login{
13     position: absolute;
14     top: 50%;
15     margin-top: -200px;
16     left: 50%;
17     margin-left: -200px;
18     /* absolute居中的一种方法 */
19     background-color: whitesmoke;
20     width: 400px;
21     height: 400px;
22     border-radius: 25px;
23     text-align: center;
24     padding: 5px 40px;
25     box-sizing: border-box;
26     /* 这样padding就不会影响大小 */
27 }
28
29 p{
30     font-size: 42px;
31     font-weight: 600;
32 }
33
34 input{
35     background-color: whitesmoke;
36     width: 100%;
37     height: 48px;
38     margin-bottom: 10px;
39     border: none;
40     border-bottom: 2px solid silver;
41     /* 下面的会覆盖上面的步伐 */
42     outline: none;
43     font-size: 22px;
44 }
45
46 .btn{
47     background-color: #3b0e0f;
48     width: 38%;
49     height: 48px;
50     border-radius: 8px;
51     margin-top: 40px;
52     font-size: 28px;
53     font-weight: 600;
54     color: white;
55 }
56 .btn:hover{
57     background-color: #d69d9e;
58 }
app.py
1 from flask import Flask, render_template, request, redirect, url_for, send_from_directory
 2 import mysql.connector
 3
 4 app = Flask(__name__)
 5 app.static_url_path = '/static'  # Set the base URL path for static files
 6
 7 def create_db_connection():
 8     # Create a connection to the MySQL database
 9     db = mysql.connector.connect(
10         host="127.0.0.1",
11         user="root",
12         password="root",
13         database="mysql"
14     )
15
16     # Create a cursor to execute SQL queries
17     cursor = db.cursor()
18     return db, cursor
19
20 def close_db_connection(db, cursor):
21     # Close the cursor and connection
22     cursor.close()
23     db.close()
24
25
26
27 # Define the route for the login page
28
29 @app.route('/', methods=['GET', 'POST'])
30 def login():
31     db, cursor = create_db_connection()
32
33     if request.method == 'POST':
34         username = request.form['username']
35         password = request.form['password']
36
37         cursor.execute("SELECT * FROM users WHERE username=%s AND password=%s", (username, password))
38         user = cursor.fetchone()
39
40         if user:
41             close_db_connection(db, cursor)
42             return redirect(url_for('computer'))
43         else:
44             error = "登录失败,请输入正确的用户名和密码"
45             close_db_connection(db, cursor)
46             return render_template('login.html', message=error)
47
48     close_db_connection(db, cursor)
49     return render_template('login.html')
50 # Define the route for the computer page
51 @app.route('/computer')
52 def computer():
53     return render_template('computer.html')
54
55 # Define the route for the favicon.ico request
56 @app.route('/favicon.ico')
57 def favicon():
58     return send_from_directory(app.root_path, 'static/favicon.ico', mimetype='image/vnd.microsoft.icon')
59
60 if __name__ == '__main__':
61     app.run(debug=True, host='0.0.0.0', port='5000')
数据库连接的方法
import java.sql.ResultSet;

import java.sql.Connection;
import java.sql.DriverManager;
import java.sql.Statement;

//方法
public class connectionMySql {
    Connection con=null;
    ResultSet res=null;

    //1.打开数据库连接
    public Connection openMysql(){
        try{
            //1.加载注册驱动
            Class.forName("com.mysql.jdbc.Driver");
            //2.链接数据库
            String url="jdbc:mysql://127.0.1:3306/userslogin?characterEncoding=UTF-8";
            String uname="root";
            String upass="123456";
            con= DriverManager.getConnection(url,uname,upass);
            System.out.println(con);

        }catch(Exception e){
            e.printStackTrace();
        }
        return con;
    }
    //2.对数据库进行增删改
    public int updata(String sql){
        //创建保存对象
        int re=0;
        try{
            //创建执行对象
            Statement sta= con.createStatement();
            re = sta.executeUpdate(sql);

        }catch(Exception e){
            e.printStackTrace();
        }
        return re;
    }
    //3.对数据库进行查询
    public ResultSet select(String sql){
        try{
            //创建执行对象
            Statement sta= con.createStatement();
            res = sta.executeQuery(sql);

        }catch(Exception e){
            e.printStackTrace();
        }

        return res;
    }
}
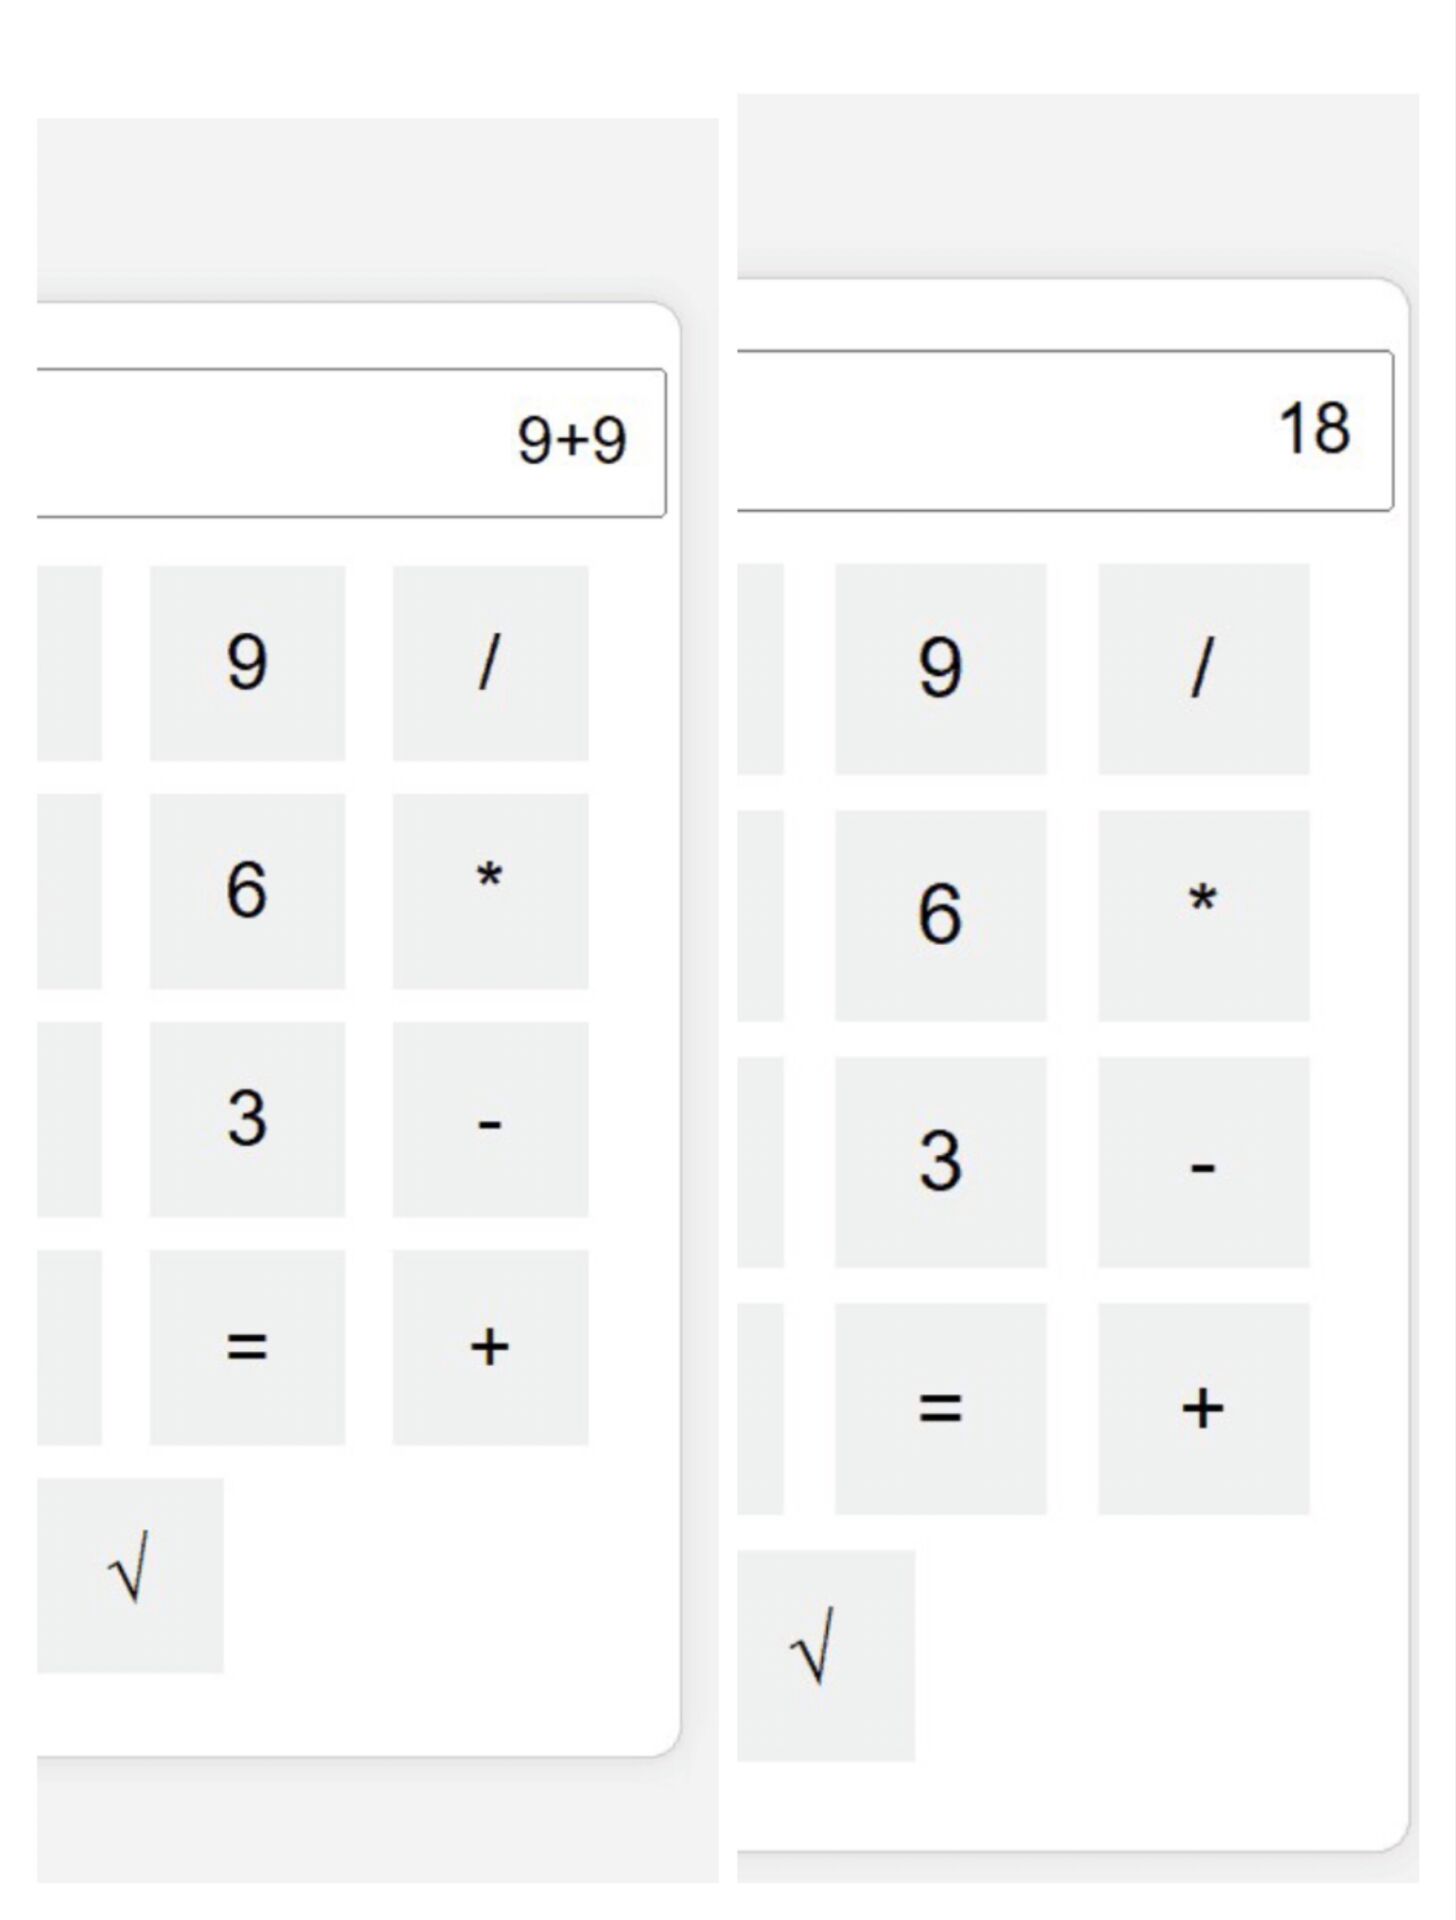
输入加法
图示.1
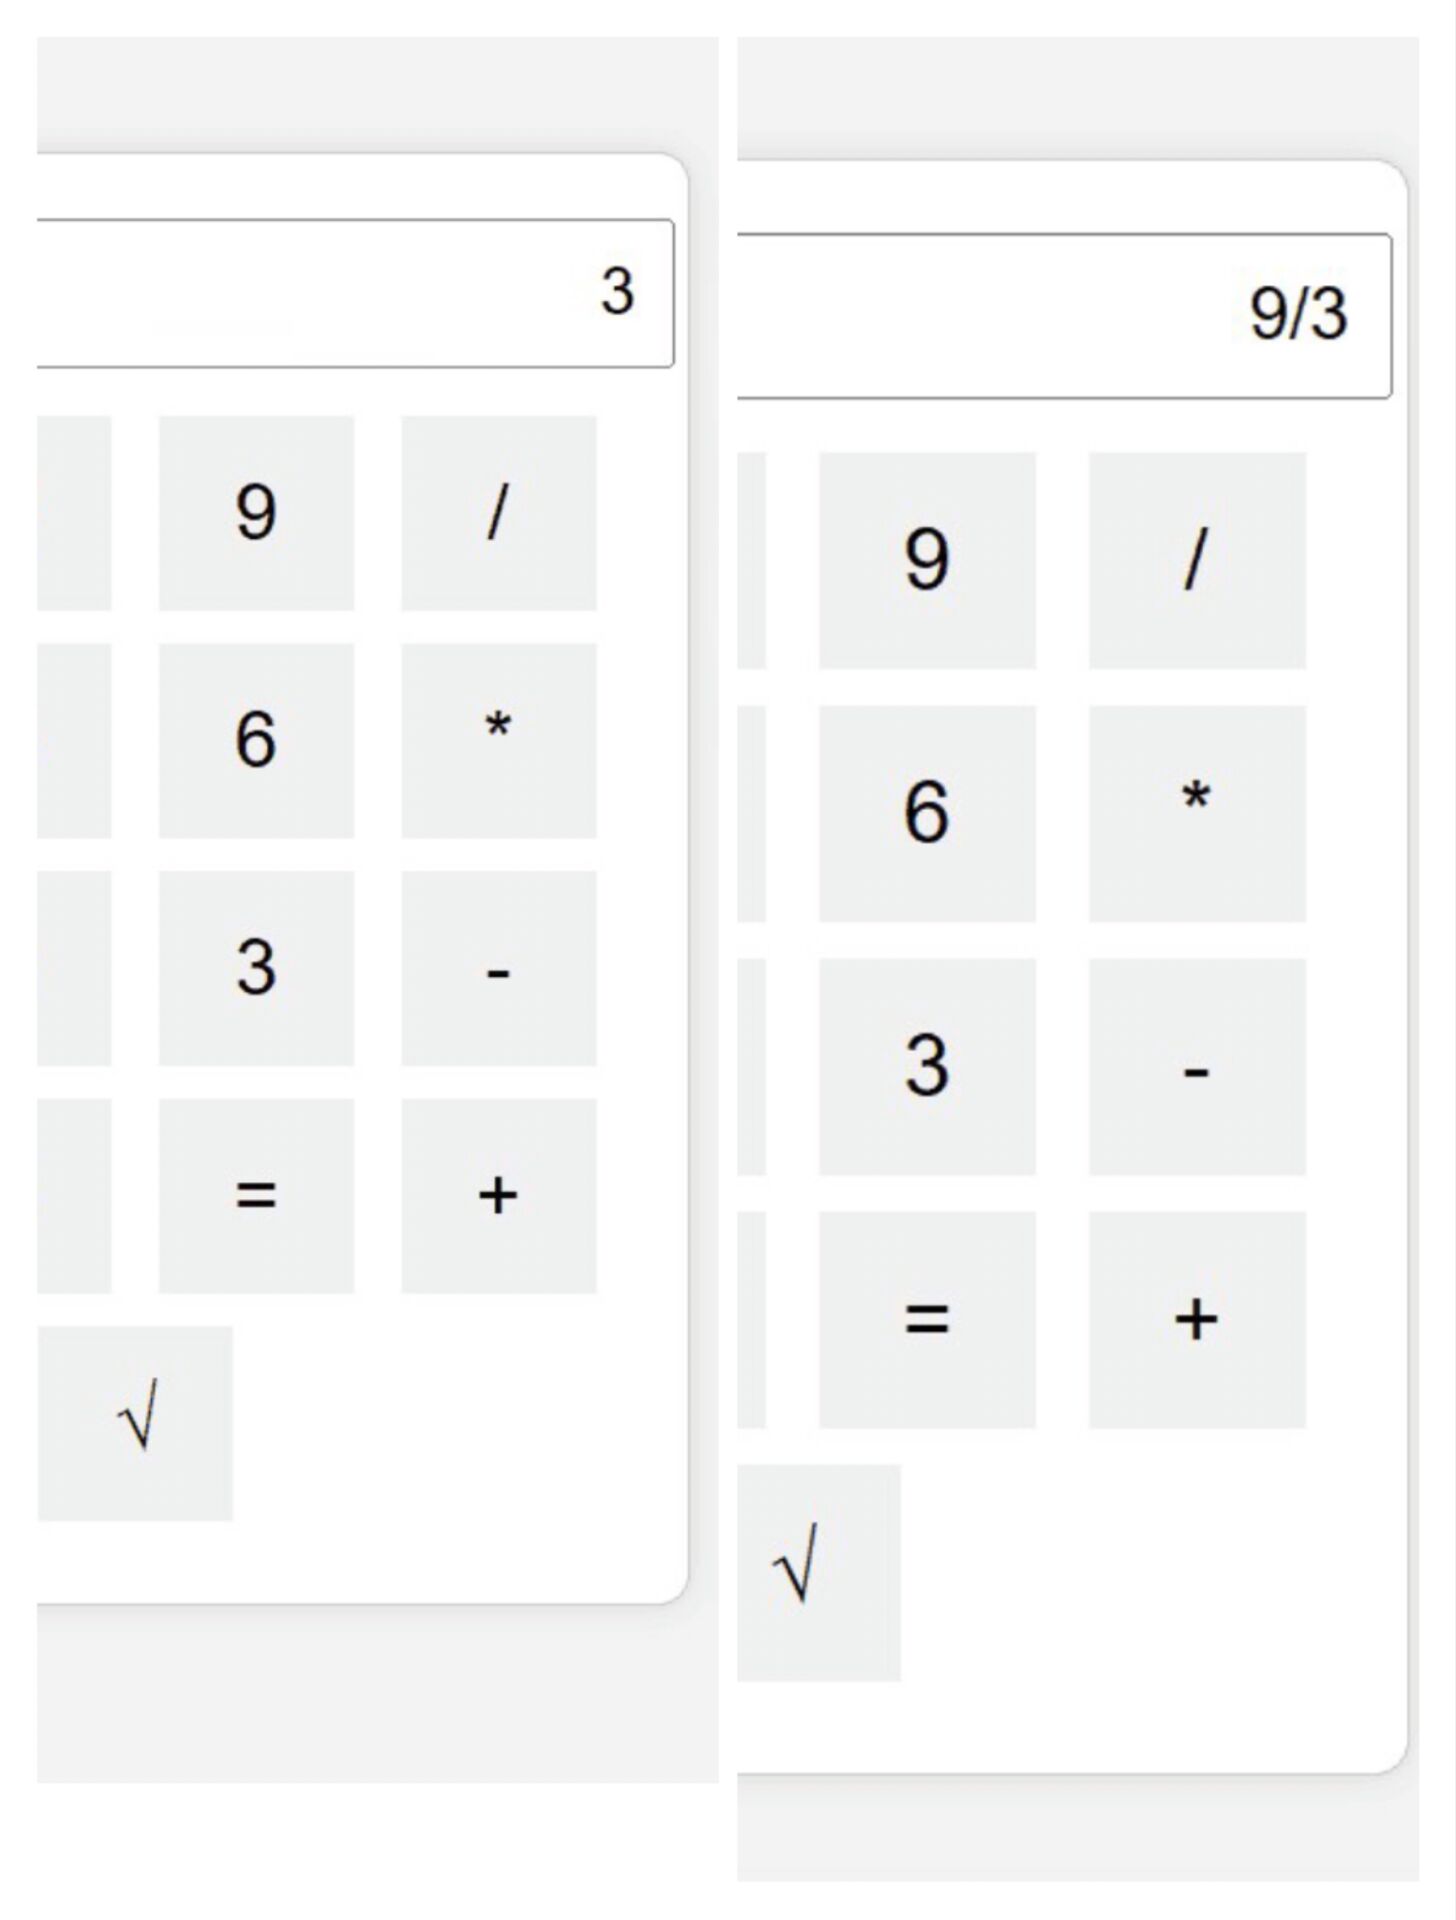
输入除法
图示.2


【推荐】国内首个AI IDE,深度理解中文开发场景,立即下载体验Trae
【推荐】编程新体验,更懂你的AI,立即体验豆包MarsCode编程助手
【推荐】抖音旗下AI助手豆包,你的智能百科全书,全免费不限次数
【推荐】轻量又高性能的 SSH 工具 IShell:AI 加持,快人一步
· 震惊!C++程序真的从main开始吗?99%的程序员都答错了
· 【硬核科普】Trae如何「偷看」你的代码?零基础破解AI编程运行原理
· 单元测试从入门到精通
· 上周热点回顾(3.3-3.9)
· winform 绘制太阳,地球,月球 运作规律