LNMP+WordPress分布式部署
分布式LNMP环境的调试
配置Nginx服务支持PHP环境
修改nginx主配置文件
[root@nginx ~]# vi /usr/local/nginx/conf/nginx.conf
…省略…
location / {
root /www; #更改网页目录
index index.php index.html index.htm; #添加index.php
}
…省略…
location ~ \.php$ { #去掉location{}前的注释符
root /www; #更改目录为/www
fastcgi_pass 172.16.51.25:9000; #注意:在这里添加PHP主机IP地址
fastcgi_index index.php;
fastcgi_param SCRIPT_FILENAME /scripts$fastcgi_script_name;
include fastcgi_params;
}
然后在/usr/local/nginx/conf/fastcgi_params添加配置
[root@nginx ~]# vi /usr/local/nginx/conf/fastcgi_params
fastcgi_param QUERY_STRING $query_string;
fastcgi_param REQUEST_METHOD $request_method;
fastcgi_param CONTENT_TYPE $content_type;
fastcgi_param CONTENT_LENGTH $content_length;
fastcgi_param SCRIPT_NAME $fastcgi_script_name;
fastcgi_param SCRIPT_FILENAME $document_root$fastcgi_script_name; #添加这行代码
fastcgi_param REQUEST_URI $request_uri;
fastcgi_param DOCUMENT_URI $document_uri;
fastcgi_param DOCUMENT_ROOT $document_root;
fastcgi_param SERVER_PROTOCOL $server_protocol;
fastcgi_param REQUEST_SCHEME $scheme;
fastcgi_param HTTPS $https if_not_empty;
在nginx和php节点,创建/www目录,并修改用户和用户组


2.部署WordPress
解压软件包,将解压后的文件复制到/www目录(nginx、php节点)
(yum install -y unzip)
[root@nginx ~]# unzip wordpress-4.7.3-zh_CN.zip
[root@nginx ~]# mv wordpress/* /www/
在nginx节点,修改WordPress应用的配置文件,WordPress应用提供了wp-config-sample.php模版文件,将模板文件复制为wp-config.php
[root@nginx ~]# cp /www/wp-config-sample.php /www/wp-config.php
[root@nginx ~]# vi /www/wp-config.php
…省略…
// ** MySQL 设置 - 具体信息来自您正在使用的主机 ** //
/** WordPress数据库的名称 */
define('DB_NAME', 'wordpress');
/** MySQL数据库用户名 */
define('DB_USER', 'root');
/** MySQL数据库密码 */
define('DB_PASSWORD', '123456');
/** MySQL主机 */
define('DB_HOST', '172.16.51.22');
/** 创建数据表时默认的文字编码 */
define('DB_CHARSET', 'utf8');
/** 数据库整理类型。如不确定请勿更改 */
define('DB_COLLATE', '');
将该配置文件scp至php节点的/www目录下

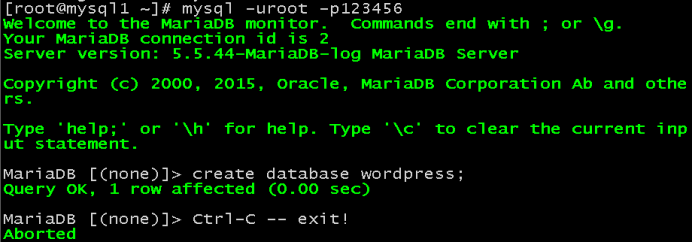
在mysql1节点,登录数据库,使用命令创建WordPress数据库

在Nginx节点重启Nginx服务
[root@nginx ~]# nginx -s reload
遇到问题及解决办法,尝试关闭防火墙

3.验证WordPress应用
浏览器输入172.16.51.24,填写信息安装

点击左上角的“myblog”图标,进入WordPress首页


