

ansible学习
- ansible安装
- 下载epel源
wget -O /etc/yum.repos.d/epel.repo http://mirrors.aliyun.com/repo/epel-7.repo
- 安装ansible
yum install -y ansible
- ansible 通过ssh来连接并控制被控节点
- ssh 的认证方式
-
密码连接
-
秘钥连接
- ssh密钥登陆
ssh-keygen # 用来生成ssh的密钥对 提示直接过
ssh-copy-id 192.168.33.132 # 复制秘钥到远程主机

- ansible命令格式
ansible <host-pattern> [options]
-a MODULE_ARGS, --args=MODULE_ARGS #模块的参数
-C, --check # 检查
-f FORKS, --forks=FORKS #用来做高并发的
--list-hosts #列出主机列表
-m MODULE_NAME #模块名称
--syntax-check # 语法检查
-k 输入密码
- 查看ansible生成的文件
rpm -ql ansible
/etc/ansible
/etc/ansible/ansible.cfg
/etc/ansible/hosts
/etc/ansible/roles
- ansible hosts文件


# This is the default ansible 'hosts' file.
#
# It should live in /etc/ansible/hosts
#
#   - Comments begin with the '#' character # 用#来表示注释
#   - Blank lines are ignored # 空白行被忽略
#   - Groups of hosts are delimited by [header] elements # 主机组 需要在【】下面
#   - You can enter hostnames or ip addresses #可以写主机名或者ip地址
#   - A hostname/ip can be a member of multiple groups # 一台主机可以在多个组里面
www[001:006].example.com #表示从www001到www006的机器
- host-pattern的格式
- 单个主机
ansible 192.168.33.132 -m ping
- 全部主机
ansible all -m ping
- 多个主机
ansible 192.168.33.132,192.168.33.133 -m ping
注意每个主机都得密钥登陆之后才能ping
- 分组
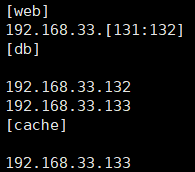
- 单个组
ansible web --list-hosts
- 多个组
- 并集
ansible web,db --list-hosts # 或者
ansible ‘web:db’ --list-hosts
- 交集
ansible 'web:&db' --list-hosts
- 差集
ansible 'web:!db' --list-hosts
-
 ansible-doc [-l|-F|-s] [options] [-t <plugin type> ] [plugin]
 -j #以json的方式返回ansible的所有模块
 -l, --list#列出所有的ansible的模块
 -s#以片段式显示ansible的帮助信息
-
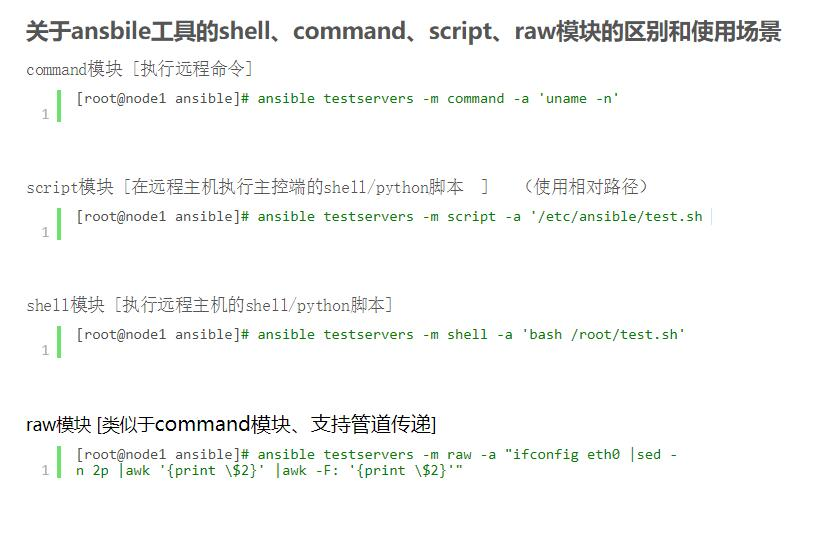
执行远程命令
ansible web -a 'ls /'#第一个命令
ansible web -a 'pwd'
ansible web -a 'chdir=/tmp pwd'# 切换目录执行命令,使用场景是编译安装时使用
ansible web -a 'creates=/tmp pwd' # 用来判断/tmp目录是否存在,存在就不执行操作
ansible web -a 'creates=/data pwd' # 因为data不存在,所有才会执行pwd命令
ansible web -a 'removes=/tmp pwd' #用来判断tmp目录是否存在,存在就执行操作
ansible web -a 'removes=/data pwd' #因为data不存在,所有才不会执行
- 查看用户是否创建成功
tail -1 /etc/passwd
tail -1 /etc/shadow
id alex
echo '123' | passwd --stdin jam #设置密码
- shell(执行远程主机的shell/python脚本,支持管道)
 ansible web -m shell -a 'echo "123" | passwd --stdin jam' # 批量创建密码
 ansible 192.168.107.131 -m shell -a 'bash a.sh' # 执行远程文件方式一
 ansible 192.168.107.131 -m shell -a '/root/a.sh' #执行远程文件方式二,文件必须有执行权限
 ansible 192.168.107.131 -m shell -a '/root/a.py' # 执行远端的Python脚本
- script(在远程主机执行主控端的shell/python脚本)
ansible web -m script -a '/root/m.sh' # 执行本地的文件,执行管控机上的文件
ansible web -m script -a 'removes=/root/m.sh /root/m.sh' # 用来判断被管控机上是不是存在文件,如果存在,存在就执行,不存在就不执行
ansible web -m script -a 'creates=/root/a.sh /root/m.sh' #用来判断被管控机上是不是存在文件,如果存在,就不执行
- 文件相关模块
- copy
backup 备份,以时间戳结尾
dest 目的地址
group 文件的属组
mode 文件的权限 r 4 w 2 x 1
owner 文件的属主
src 源文件

# 通过md5码来判断是否需要复制
ansible db -m copy -a 'src=/root/m.sh dest=/tmp/a.sh' #复制本地文件的到远程主机
ansible db -m copy -a 'src=/root/m.sh dest=/tmp/a.sh mode=755' #修改文件的权限
 ansible web -m copy -a 'src=/root/m.sh dest=/tmp/a.sh mode=755 owner=jam1' 修改文件的属主
 ansible web -m copy -a 'src=/etc/init.d dest=/tmp/ mode=755 owner=jam1' # 复制本地目录到远程主机,如果改变文件的属性,则文件夹内的文件也会被改变
 ansible web -m copy -a 'src=/etc/init.d/ dest=/tmp/ mode=755 owner=jam1' # 复制本地目录内的所有文件到远程主机
 ansible web -m copy -a "content='抬头望明月,低头思故乡\n' dest=/tmp/b.txt" # 直接将文本内容注入到远程主机的文件中
- file
inode 硬盘的地址
id 获取到的是内存的地址
ln -s a.py b.py 创建软连接
ln  a.py c.py 创建硬链接
当 源文件变化时,软连接和硬链接文件都会跟着变化
ansible db -m file -a 'path=/lzmly2  state=directory' #在远程机器上创建文件夹
ansible db -m file -a 'path=/root/q.txt  state=touch' #用来在远程机器上创建文件
ansible db -m file -a 'path=/tmp/f src=/etc/fstab state=link' #创建软连接src是源地址,path是目标地址
ansible db -m file -a 'path=/tmp/f state=absent' #用来删除文件或者文件夹
- fetch
dest 目的地址
src 源地址
ansible web -m fetch -a 'src=/var/log/cron dest=/tmp' # 下载被控节点的文件,每台机器创建一个文件夹,并保留原来的目录结构
- 软件相关模块
- yum
# yum源配置

[epel]
name=Extra Packages for Enterprise Linux 7 - $basearch #名字
baseurl=http://mirrors.aliyun.com/epel/7/$basearch  #rpm源的地址,可以写http,https,ftp,Samba,file:
failovermethod=priority
enabled=1 # 是否开启,1代表开启,0表示关闭
gpgcheck=0  #是否校验签名,1代表校验,0表示不校验
gpgkey=file:///etc/pki/rpm-gpg/RPM-GPG-KEY-EPEL-7
# yum安装包组

yum grouplist # 查看包组信息
yum groupinstall # 安装包组
disablerepo #禁用源
enablerepo #启用源
name #包名
state  install (`present' or `installed', `latest'), or remove (`absent' or `removed')
ansible web -m yum -a 'name=wget' # 安装wget
ansible web -m yum -a 'name=python2-pip' # 安装python2-pip
ansible web -m yum -a 'name=wget state=absent' # 卸载软件包
ansible web -m yum -a 'name="@Development Tools"' # 安装包组
- pip
pip install 安装包
pip freeze > a.txt 将python的环境打包到文件中
pip install -r a.txt 安装文件中的包
pip list 查看所有的以安装成功的包
ansible web -m pip -a 'name=flask' # 安装flask模块
-
ps -ef|grep nginx #查看进程
ss -tnlp # 查看端口信息
systemctl start nginx # centos7
service nginx start  # centos6
systemctl enabled nginx # centos7 开机自启动
chkconfig nginx on # centos6开机自启动
ansible web -m service -a 'name=nginx state=started' # 启动nginx
ansible web -m service -a 'name=nginx state=stopped' # 关闭nginx
- 计划任务
- cron
* * * * * job
分 时 日 月 周 任务
0 */2 *  * *  job  每隔两个小时
0 12,13 * * * job 12点和13点
0 12-17 * * * job 12点到17点
0 12-17/2 * * 1,3,6,0 周1,周3,周6,周7 12点到17点每隔两个小时
crontab -e # 编辑计划任务
crontab -l # 查看计划任务
crontab -r # 删除计划任务
day  天
disabled 禁用
hour 小时
job 任务
minute 分钟
month 月
name 任务名字
weekday 周
ansible db -m cron -a 'minute=26 job="touch /tmp/xzmly.txt" name=touchfile' # 新建一个计划任务
ansible db -m cron -a 'name=touchfile state=absent' # 删除一个计划任务
ansible db -m cron -a 'minute=26 job="touch /tmp/xzmly.txt" name=touchfile disabled=yes'  # 禁用计划任务,以#表示禁用
用户:
    管理员  root 0
    普通用户
        系统用户  不能登录  1-999 centos7 1-499 centos6
        登录用户  可以登录  1000-65535 centos7 500-65535 centos6
用户组:
    管理员组 root 0
    系统用户组 1-999 centos7 1-499 centos6
    登录用户组 1000-65535 centos7 500-65535 centos6

 -d  指定用户的家目录
 -g  指定用户的组
 -G  执行用户的附加组
 -s  指定登录后使用的shell
 -r 创建一个系统组
 useradd -r jam  创建系统用户, 从999倒序
 useradd -s /sbin/nologin jam1 创建的是普通用户,从1000开始升序
 useradd -d /opt/jam2 jam2 创建用户时指定用户的家目录
 useradd -u 3000 jam3 # 创建用户并指定用户的uid
 userdel jam 删除用户
 userdel -r jam 删除用户并删除用户的家目录

 groupadd jamlee 创建用户组
 groupdel jamlee 删除用户组
group 组
groups 附加组
home 家目录
name 用户名
password 密码
remove ?
shell 用户登录后使用的shell
system 创建一个系统用户
uid 用来指定用户的id
state 状态
ansible db -m user -a 'name=canglaoshi uid=4000 home=/opt/wulaoshi groups=root shell=/sbin/nologin' #创建一个用户,并指定用户的id,用户的家目录,用户的附加组,用户的shell
ansible db -m user -a 'name=canglaoshi state=absent' #删除用户但是不删除用户的家目录
ansible db -m user -a 'name=canglaoshi state=absent remove=yes' # 删除用户并删除用户的家目录
- group
gid 组的id
name 组名
system 系统组
state
ansible db -m group -a 'name=canglaoshi system=yes' #创建系统组
ansible db -m group -a 'name=canglaoshi state=absent' # 删除组
tail -l /etc/group  # 查看系统组

 浙公网安备 33010602011771号