大家都知道,前段nginx做反代,如果后端服务器宕掉的话,nginx是不能把这台realserver提出upstream的,所以还会有请求转发到后端的这台realserver上面去,虽然nginx可以在localtion中启用proxy_next_upstream来解决返回给用户的错误页面,方法在:http://www.linuxyan.com/web-server/67.html,大家可以参考一下,但这个还是会把请求转发给这台服务器的,然后再转发给别的服务器,这样就浪费了一次转发,这次借助与淘宝技术团队开发的nginx模快nginx_upstream_check_module来检测后方realserver的健康状态,如果后端服务器不可用,则所以的请求不转发到这台服务器。
首先去这里下载nginx的模块,并解压他
wget https://codeload.github.com/yaoweibin/nginx_upstream_check_module/zip/master
unzip master
打补丁之前我们有几个库需要安装一下,下面给出所有的安装:
# 安装zlib第三方库
wget http://dl.download.csdn.net/down10/20131007/
tar zxvf zlib-1.2.8.tar.gz
cd zlib-1.2.8
./configure
make && make install

# 安装pcre第三方库
wget https://jaist.dl.sourceforge.net/project/pcre/pcre/8.40/pcre-8.40.tar.gz
tar zxvf pcre-8.40.tar.gz
cd pcre-8.40
./configure
make && make install

# 安装c++编译环境
yum install -y gcc gcc-c++
下面是nginx打上模块补丁的安装:
$ wget http://nginx.org/download/nginx-1.7.4.tar.gz
$ tar -xzvf nginx-1.7.4.tar.gz
$ cd /nginx-1.7.4
$ patch -p1 < /home/soft/nginx_upstream_check_module-master/check_1.7.2+.patch
$ ./configure --prefix=/home/www/nginx --user=nobody --group=nobody --with-http_stub_status_module --with-http_realip_module --add-module=/root/nginx_upstream_check_module-master
$ make
$ make install
## 注:因nginx版本更新,1.2以上版本的nginx,补丁为check_1.2.1+.patch
之后在nginx.conf配置文件里面的upstream加入健康检查,如下:
upstream  operationApi {
                        server   10.25.170.215:17011;
                        server   10.25.170.216:17011;
                        check interval=5000 rise=2 fall=2 timeout=3000 type=http;
                        check_http_send "GET /operationApi/login.jsp HTTP/1.0\r\n HOST na.szcq18.com\r\n\r\n";
                }
这里下面加的这句话我解释下,interval检测间隔时间,单位为毫秒,rsie请求2次正常的话,标记此realserver的状态为up,fall表示请求5次都失败的情况下,标记此realserver的状态为down,timeout为超时时间,单位为毫秒。
    - interval:向后端发送的健康检查包的间隔ms。
    - fall(fall_count): 如果连续失败次数达到fall_count,服务器就被认为是down。
    - rise(rise_count): 如果连续成功次数达到rise_count,服务器就被认为是up。
    - timeout: 后端健康请求的超时时间。
    - default_down: 设定初始时服务器的状态,如果是true,就说明默认是down的,如果是false,就是up的。默认值是true,也就是一开始服务器认为是不可用,要等健康检查包达到一定成功次数以后才会被认为是健康的。
    - type:健康检查包的类型,现在支持以下多种类型
        - tcp:简单的tcp连接,如果连接成功,就说明后端正常。
        - ssl_hello:发送一个初始的SSL hello包并接受服务器的SSL hello包。
        - http:发送HTTP请求,通过后端的回复包的状态来判断后端是否存活。
        - mysql: 向mysql服务器连接,通过接收服务器的greeting包来判断后端是否存活。
        - ajp:向后端发送AJP协议的Cping包,通过接收Cpong包来判断后端是否存活。
    - port: 指定后端服务器的检查端口。你可以指定不同于真实服务的后端服务器的端口,比如后端提供的是443端口的应用,你可以去检查80端口的状态来判断后端健康状况。默认是0,表示跟后端server提供真实服务的端口一样。
①、主要定义好type。由于默认的type是tcp类型,因此假设你服务启动,不管是否初始化完毕,它的端口都会起来,所以此时前段负载均衡器为认为该服务已经可用,其实是不可用状态。
②、注意check_http_send值的设定。由于它的默认值是”GET / HTTP/1.0\r\n\r\n”。假设你的应用是通过http://ip/name访问的,那么这里你的check_http_send值就需要更改为”GET /name HTTP/1.0\r\n\r\n”才可以。
针对采用长连接进行检查的,这里增加keep-alive请求头,即”HEAD /name HTTP/1.1\r\nConnection: keep-alive\r\n\r\n”。
如果你后端的tomcat是基于域名的多虚拟机,此时你需要通过check_http_send定义host,不然每次访问都是失败,范例:check_http_send “GET /exchange/index.jsp HTTP/1.0\r\n HOST na.szcq18.com\r\n\r\n”;
在server段里面可以加入查看realserver状态的页面
location /nstatus {
check_status;
access_log off;
#allow SOME.IP.ADD.RESS;
#deny all;
}
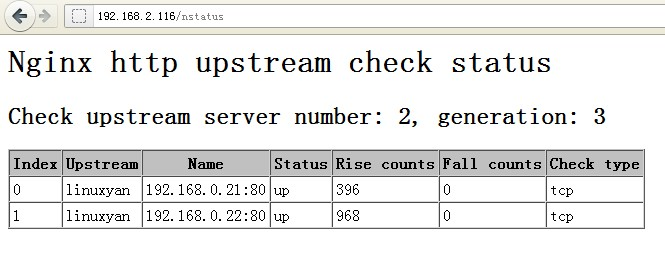
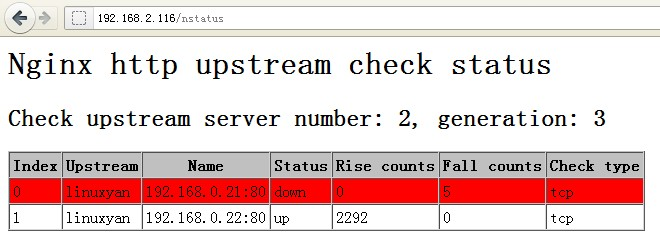
这个时候打开nstatus这个页面就可以看到当前realserver的状态了,
如下图:
A.B 两台realserver都正常的情况下

其中一台realserver故障的情况下

注意:Nginx的启动命令在/usr/local/niginx/sbin目录下;
下面给出一个我配置的相关的检查负载均衡的状态配置文件:
#user  nobody;
worker_processes  1;

#error_log  logs/error.log;
#error_log  logs/error.log  notice;
#error_log  logs/error.log  info;
error_log  /var/log/nginx/error.log warn;

pid        /home/www/nginx/logs/nginx.pid;


events {
    worker_connections  1024;
}


http {
    include       mime.types;
    default_type  application/octet-stream;

    log_format  main  '$remote_addr - $remote_user [$time_local] "$request" '
                      '$status $body_bytes_sent "$http_referer" '
                      '"$http_user_agent" "$http_x_forwarded_for"';

    access_log  /var/log/nginx/access.log  main;

    sendfile        on;
    #tcp_nopush     on;

    #keepalive_timeout  0;
    keepalive_timeout  65;

    #gzip  on;

    upstream backend  {
        server 120.24.165.15:80 weight=3 max_fails=3 fail_timeout=30s ;
        server 120.76.97.203:80 weight=1 max_fails=1 fail_timeout=30s ;
        check interval=3000 rise=2 fall=5 timeout=1000;
    }

    server {
        listen       8078;
        server_name  localhost;

        #charset koi8-r;

        #access_log  logs/host.access.log  main;


        location /nstatus {
            check_status;
            access_log   on;
            #allow SOME.IP.ADD.RESS;
            #deny all;
        }

        location / {
            proxy_pass http://backend ;
            proxy_next_upstream error timeout invalid_header http_404;

            proxy_connect_timeout 2s; #后端服务器连接的超时时间_发起握手等候响应超时时间
            proxy_read_timeout 2s;  #后端服务器处理请求的时间

            #nginx反向代理配置时,一般会添加下面的配置:

            proxy_set_header Host $host;
            proxy_set_header X-Real-IP $remote_addr;
            proxy_set_header REMOTE-HOST $remote_addr;
            proxy_set_header X-Forwarded-For $proxy_add_x_forwarded_for;

            #weight:轮询权值也是可以用在ip_hash的,默认值为1
            #max_fails:允许请求失败的次数,默认为1。当超过最大次数时,返回proxy_next_upstream 模块定义的错误。
            #fail_timeout:有两层含义,一是在 30s 时间内最多容许 2 次失败;二是在经历了 2 次失败以后,30s时间内不分配请求到这台服务器。
            #backup:备份机器。当其他所有的非backup机器出现故障的时候,才会请求backup机器
            #max_conns: 限制同时连接到某台后端服务器的连接数,默认为0即无限制。因为queue指令是commercial,所以还是保持默认吧。
            #proxy_next_upstream:这个指令属于 http_proxy 模块的,指定后端返回什么样的异常响应时,使用另一个realserver
        }

        #error_page  404              /404.html;

        # redirect server error pages to the static page /50x.html
        #
        error_page   500 502 503 504  /50x.html;
        location = /50x.html {
            root   html;
        }

        # proxy the PHP scripts to Apache listening on 127.0.0.1:80
        #
        #location ~ \.php$ {
        #    proxy_pass   http://127.0.0.1;
        #}

        # pass the PHP scripts to FastCGI server listening on 127.0.0.1:9000
        #
        #location ~ \.php$ {
        #    root           html;
        #    fastcgi_pass   127.0.0.1:9000;
        #    fastcgi_index  index.php;
        #    fastcgi_param  SCRIPT_FILENAME  /scripts$fastcgi_script_name;
        #    include        fastcgi_params;
        #}

        # deny access to .htaccess files, if Apache's document root
        # concurs with nginx's one
        #
        #location ~ /\.ht {
        #    deny  all;
        #}
    }


    # another virtual host using mix of IP-, name-, and port-based configuration
    #
    #server {
    #    listen       8000;
    #    listen       somename:8080;
    #    server_name  somename  alias  another.alias;

    #    location / {
    #        root   html;
    #        index  index.html index.htm;
    #    }
    #}


    # HTTPS server
    #
    #server {
    #    listen       443 ssl;
    #    server_name  localhost;

    #    ssl_certificate      cert.pem;
    #    ssl_certificate_key  cert.key;

    #    ssl_session_cache    shared:SSL:1m;
    #    ssl_session_timeout  5m;

    #    ssl_ciphers  HIGH:!aNULL:!MD5;
    #    ssl_prefer_server_ciphers  on;

    #    location / {
    #        root   html;
    #        index  index.html index.htm;
    #    }
    #}

}
这里,我警告大家一点,如果你使用了加权轮询的方式做了负载均衡,那么,他不会保证session的获取保存方式,引发的为题可想而知,比如你的验证码不可以使用了,在登录跳转后,如果状态是基于session来检查登录状态,那么view上你是A服务,登录请求到了B服务,跳转的时候又是A服务,发现你没有登录,又跳回到了B服务,B服务发现登录了,重新跳转毁了A服务,结果自己想吧,重定向次数过多,拒绝了你的请求服务,请大家参考一下吧,最好的方式是使用IP_HASH的方式,这是最好的结果了。


