


springboot 整合mybatisplus
1.导入依赖
<!--mybatis-plus 是自己开发的,并非官方!-->
<dependency>
<groupId>com.baomidou</groupId>
<artifactId>mybatis-plus-boot-starter</artifactId>
<version>3.0.5</version>
</dependency>
<dependency>
<groupId>org.springframework.boot</groupId>
<artifactId>spring-boot-starter-test</artifactId>
<scope>test</scope>
</dependency>
说明:我们使用mybatis-plus可以节省我们大量的代码,尽量不要同时带入mybatis跟mybatis-plus,可能会产生冲突

连接数据库! 这一步和mybatis相同
url字段中 设置时区:serverTime=GMT%2b8 (%2b 就是+的意思,这里是指加8个小时,以北京东八区为准)
# mysql 8 驱动不同,需要增加时区设置
spring.datasource.username=root
spring.datasource.password=83821979Zs
spring.datasource.url=jdbc:mysql://localhost:3306/mybatis_plus?useSSL=false&useUnicode=true&characterEncoding=utf-8&serverTimezone=GMT%2b8
spring.datasource.driver-class-name=com.mysql.cj.jdbc.Driver
2. pojo-dao(连接mybatis,配置mapper.xml文件)-service-controller
dao层
mapper接口
/**
* @DATE: 2021/3/3 0003 23:24
* @Author: 小爽帅到拖网速
*/
// 在对应的Mapper上面实现基本的接口BaseMapper
@Repository // 代码持久层
@Mapper
public interface UserMapper extends BaseMapper<User> {
// 所有的CRUD操作都已经编写完成了
// 你不需要像以前那样配置一大堆文件了
}
3、配置日志
我们所有的Sql现在是不可见的,我们希望知道它是怎么执行的,所以我们必须要看日志!
# 配置日志
mybatis-plus.configuration.log-impl=org.apache.ibatis.logging.stdout.StdOutImpl
6.@TableId(type = IdType.AUTO)
其余的源码解释
public enum IdType {
AUTO(0), // 数据库id自增
NONE(1), // 未设置主键
INPUT(2), // 手动输入
ID_WORKER(3), // 默认的全局id
UUID(4), // 全局唯一id
ID_WORKER_STR(5); // ID_WORKER 字符串表示法
}
改为手动输入之后,就需要自己配置id
public class User {
// 对应数据库的主键(uuid、自增id、雪花算法、redis、zookeeper)
@TableId(type = IdType.INPUT) // 默认方案
private Long id;
private String name;
private Integer age;
private String email;
}
7.自动填充
实体类字段属性上需要增加注解
// 字段添加填充内容
@TableField(fill = FieldFill.INSERT)
private Date create_time;
@TableField(fill = FieldFill.INSERT_UPDATE)
private Date update_time;
1
2
3
4
5
编写处理器来处理这个注解即可!
由于这个处理器在Springboot下面, mybatis会自动处理我们写的所有的处理器
当我们执行插入操作的时候,自动帮我们通过反射去读取哪边有对应注解的字段,从而把处理器代码插入成功,会自动帮我把createTime,updateTime插入值
package com.shuang.handler;
import com.baomidou.mybatisplus.core.handlers.MetaObjectHandler;
import lombok.extern.slf4j.Slf4j;
import org.apache.commons.logging.Log;
import org.apache.ibatis.reflection.MetaObject;
import org.springframework.stereotype.Component;
import java.util.Date;
/**
* @DATE: 2021/3/4 0004 21:43
* @Author: 小爽帅到拖网速
*/
@Slf4j
@Component // 一定不要忘记把处理器加到IOC容器中!
public class MyMetaObjectHandler implements MetaObjectHandler {
// 插入时的填充策略
@Override
public void insertFill(MetaObject metaObject) {
log.info("start insert fill.....");
// setFieldValByName(String fieldName, Object fieldVal, MetaObject metaObject)
this.setFieldValByName("createTime",new Date(),metaObject);
this.setFieldValByName("updateTime",new Date(),metaObject);
}
// 更新时的填充策略
@Override
public void updateFill(MetaObject metaObject) {
this.setFieldValByName("updateTime",new Date(),metaObject);
}
}
8.乐观锁
测试Mybatis-Plus的乐观锁实现
1、给数据库中增加version字段
实体类加对应的字段
//乐观锁version注解
@Version
private Integer version;
1
2
3
3、注册组件
// 这个扫描本来是在我们MybatisPlusApplication 主启动类中,现在我们把它放在配置类中
// 扫描mapper文件夹
@MapperScan("com.shuang.mapper")
@EnableTransactionManagement // 自动开启事务管理
@Configuration // 配置类
public class MybatisPlusConfig {
// 注册乐观锁插件
@Bean
public OptimisticLockerInterceptor optimisticLockerInterceptor(){
return new OptimisticLockerInterceptor();
}
}
// 测试乐观锁成功
@Test
public void testVersionSuccess(){
// 1. 查询用户信息
User user = userMapper.selectById(1L);
// 2. 修改用户信息
user.setName("fan");
user.setAge(24);
// 3. 执行更新操作
userMapper.updateById(user);
}
// 测试乐观锁失败!多线程下
@Test
public void testVersionFall(){
// 线程1
User user1 = userMapper.selectById(1L);
user1.setName("fan111");
user1.setAge(14);
// 线程2
User user2 = userMapper.selectById(1L);
user2.setName("fan222");
user2.setAge(24);
userMapper.updateById(user2);
//自旋锁来多次尝试提交!
userMapper.updateById(user1); //如果没有乐观锁就会覆盖插队线程的值
}
}
9.分页查询
分页在网站使用的十分之多!
原始的limit 进行分页
pageHepler 第三方插件
Mybatis-Plus其实也内置了分页插件!
如何使用分页插件
1、拦截器组件即可
public class MybatisPlusConfig {
// 分页插件
@Bean
public PaginationInterceptor paginationInterceptor() {
return new PaginationInterceptor();
}
}
2、直接使用Page对象即可!
// 测试分页查询
@Test
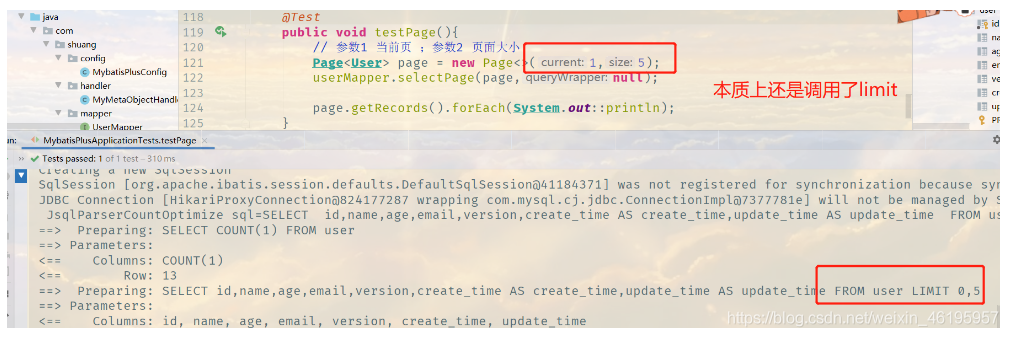
public void testPage(){
// 参数1 当前页 ;参数2 页面大小
Page<User> page = new Page<>(1,5);
userMapper.selectPage(page,null);
page.getRecords().forEach(System.out::println);
System.out.println("getCurrent()"+page.getCurrent());
System.out.println("page.getSize()"+page.getSize());
System.out.println("page.getTotal()"+page.getTotal());
}
获取总条数!
10.逻辑删除
物理删除:从数据库中直接移除
逻辑删除:再数据库中没有被移除,而是通过一个变量来让它失效! deleted = 0 => deleted = 1
说明:
只对自动注入的sql起效:
插入: 不作限制
查找: 追加where条件过滤掉已删除数据,且使用 wrapper.entity 生成的where条件会忽略该字段
更新: 追加where条件防止更新到已删除数据,且使用 wrapper.entity 生成的where条件会忽略该字段
删除: 转变为 更新
例如:
删除: update user set deleted=1 where id = 1 and deleted=0
查找: select id,name,deleted from user where deleted=0
字段类型支持说明:
支持所有数据类型(推荐使用 Integer,Boolean,LocalDateTime)
如果数据库字段使用datetime,逻辑未删除值和已删除值支持配置为字符串null,另一个值支持配置为函数来获取值如now()
附录:
逻辑删除是为了方便数据恢复和保护数据本身价值等等的一种方案,但实际就是删除。
如果你需要频繁查出来看就不应使用逻辑删除,而是以一个状态去表示。
管理员可以查看被删除的记录! 防止数据的丢失,类似于回收站!
测试一下:
在数据表中增加一个deleted字段
实体类中增加字段
// 逻辑删除注解
@TableLogic
private Integer deleted;
1
2
3
配置
public class MybatisPlusConfig {
// 逻辑删除组件
@Bean
public ISqlInjector iSqlInjector(){
return new LogicSqlInjector();
}
}
# 配置逻辑删除
mybatis-plus.global-config.db-config.logic-delete-value= 1
mybatis-plus.global-config.db-config.logic-not-delete-value= 0
1
2
3
测试一下删除!
10条件构造器
十分重要:Wrapper
非空 大于
@Test
void contextLoads(){
// 查询 name 不为空的用户,并且邮箱不为空的用户,年龄大于等于20
QueryWrapper<User> wrapper = new QueryWrapper<>();
wrapper
.isNotNull("name")
.isNotNull("email")
.ge("age",20);
查询一个名字
@Test
void getOneName(){
// 查询名字 小爽帅到拖网速
QueryWrapper<User> wrapper = new QueryWrapper<>();
wrapper.eq("name","小爽帅到拖网速"); // 查询一个数据
userMapper.selectOne(wrapper);
}
userMapper.selectList(wrapper).forEach(System.out::println);
}
使用between
@Test
void betweenTest(){
QueryWrapper<User> wrapper = new QueryWrapper<>();
wrapper.between("age",25 ,100);
Integer count = userMapper.selectCount(wrapper);// 查询结果数
System.out.println(count);
}
连接查询(内查询)
// 内查询
@Test
void innerJoinTest(){
QueryWrapper<User> wrapper = new QueryWrapper<>();
// id 在子查询中查找出来的
wrapper.inSql("id","select id from user where id<3");
List<Object> users = userMapper.selectObjs(wrapper);
users.forEach(System.out::println);
}
升序排序
过id进行排序
@Test
void orderById(){
QueryWrapper<User> wrapper = new QueryWrapper<>();
//
wrapper.orderByDesc("id");
List<Object> objects = userMapper.selectObjs(wrapper);
objects.forEach(System.out::println);
}
# mybatis-plus相关配置
mybatis-plus:
# xml扫描,多个目录用逗号或者分号分隔(告诉 Mapper 所对应的 XML 文件位置)
mapper-locations: classpath:**/*Mapper.xml
# 以下配置均有默认值,可以不设置
global-config:
#主键类型 0:"数据库ID自增", 1:"用户输入ID",2:"全局唯一ID (数字类型唯一ID)", 3:"全局唯一ID UUID";
id-type: 0
#字段策略 0:"忽略判断",1:"非 NULL 判断"),2:"非空判断"
field-strategy: 2
#驼峰下划线转换
db-column-underline: true
#刷新mapper 调试神器
refresh-mapper: false
#数据库大写下划线转换
#capital-mode: true
#序列接口实现类配置
#key-generator: com.baomidou.springboot.xxx
#逻辑删除配置
#logic-delete-value: 0 # 逻辑已删除值(默认为 1)
#logic-not-delete-value: 1 # 逻辑未删除值(默认为 0)
#自定义填充策略接口实现
# meta-object-handler: com.zhengqing.config.MyMetaObjectHandler
#自定义SQL注入器
#sql-injector: com.baomidou.springboot.xxx
configuration:
# 是否开启自动驼峰命名规则映射:从数据库列名到Java属性驼峰命名的类似映射
map-underscore-to-camel-case: true
cache-enabled: false
# 如果查询结果中包含空值的列,则 MyBatis 在映射的时候,不会映射这个字段
# call-setters-on-nulls: true
# 这个配置会将执行的sql打印出来,在开发或测试的时候可以用
# log-impl: org.apache.ibatis.logging.stdout.StdOutImpl
# 解决oracle更新数据为null时无法转换报错,mysql不会出现此情况
jdbc-type-for-null: 'null'

