RabbitMQ的三种编程模型
基础概念
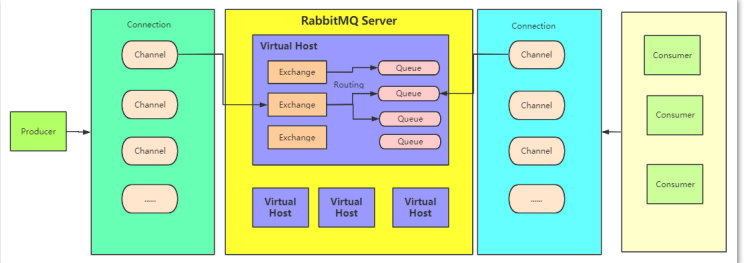
virtual host
虚拟主机,可以理解为RabbitMQ中的每个服务,每个Virtual Host之间是相互隔离的,他们之间有不同的权限
Connection
通过使用Connection建立TCP连接来与RabbitMQ进行交互
Chanel
通过连接可以获取Channel,每个channel都哟一个唯一的ID,通过使用Channel可以对操作RabbitMQ,如创建队列、交换机、发送消息等等。
Exchange
当消息发送的Exchange中时,可以根据Exchange的路由规则,使之将消息转发至不同的队列中,需要注意的是,Exchange不是必须要有的,也可以不指定Exchange,直接指定队列来发送消息。
Queue
一种先进后出的数据结构,生产者将消息放入到队列中,而消费者从队列中获取消息来消费。
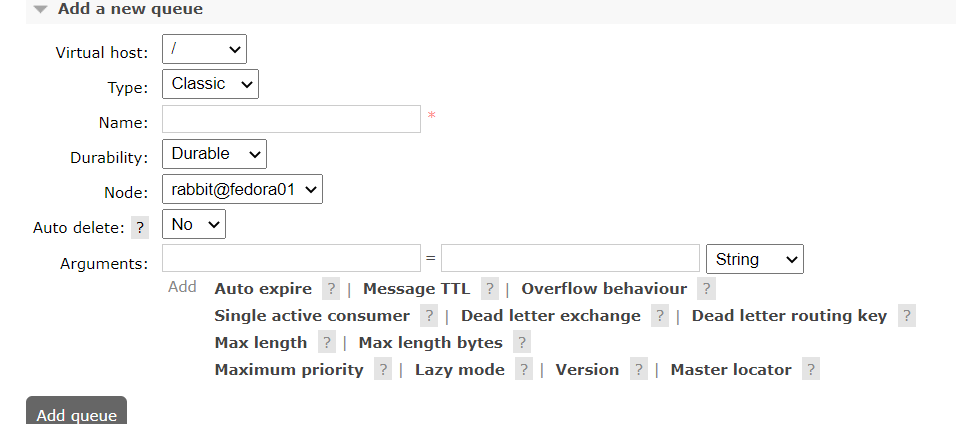
经典队列
经典队列拥有较高的可靠性,通过设置Durability来设置消息的持久化,一旦设置额消息的持久化,当消息存到消息队列中,会存储到硬盘中,因为该过程经过了IO,所以性能会变低些。
如果设置AutoDelete为ture时,那么当队列空闲且没有连接时会自动删除。
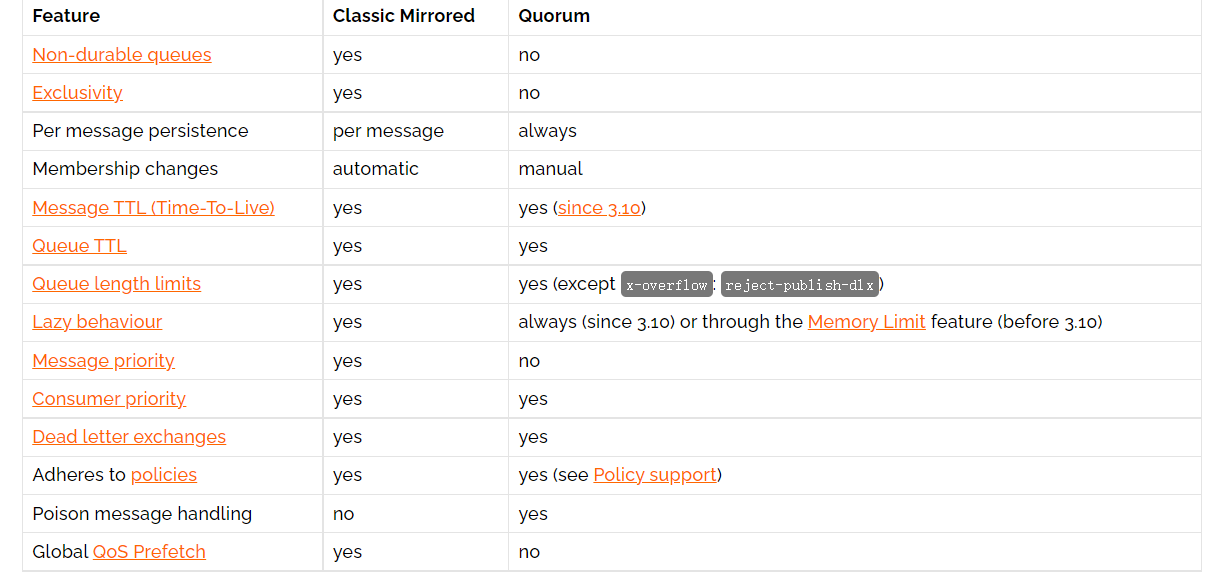
仲裁队列
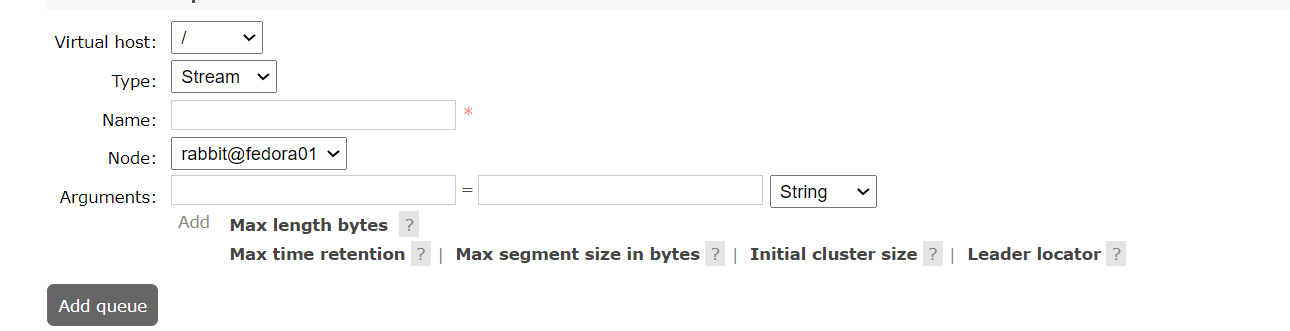
仲裁队列比经典队列安全性要高些,但是有功能比经典队列少一些,如下图所示。仲裁队列对毒消息进行了支持,所谓毒消息就是经过多次消费但是未消费成功的消息,当产生毒消息时,仲裁队列会将毒消息删除,如果配置了死信队列毒消息则会进入死信队列,可以配置x-delivery-count参数来设置投递次数,如果消费消息超过这个次数还没成功则会变成毒消息。仲裁队列使用场景是对数据安全性高,低容错、高延迟的场景中使用。
Stream队列
Stream队列将消息持久化日志文件中,通过offset来对消息进行分发,适合于消费者多,频繁读操作的场景。stream队列与其他队列不同之处在于,Stream队列支持消息回溯,而其他队列在消息使用完毕后会对消息进行删除并且Stream队列拥有高吞吐量。Stream通过将消息存储在日志文件的方式,以尽量小的内存代价来存储消息来避免消息积压。
原始API
使用流程:
- 获取连接。
- 根据连接获取Chanel。
- 使用Chanel操作RabbitMQ。
引入POM依赖
       <!-- https://mvnrepository.com/artifact/com.rabbitmq/amqp-client -->
        <dependency>
            <groupId>com.rabbitmq</groupId>
            <artifactId>amqp-client</artifactId>
            <version>5.14.2</version>
        </dependency>

        <dependency>
            <groupId>ch.qos.logback</groupId>
            <artifactId>logback-classic</artifactId>
            <version>1.2.11</version>
        </dependency>
该方法用于根据host、username和password获取连接
    public static Connection getConnection() throws IOException, TimeoutException {
        ConnectionFactory connectionFactory = new ConnectionFactory();
        connectionFactory.setHost("192.168.71.134");
        connectionFactory.setUsername("lyra");
        connectionFactory.setPassword("lyra");

        return connectionFactory.newConnection();
    }
根据连接获取Channel
            Connection connection = ConnectionUtils.getConnection();
            Channel channel = connection.createChannel();
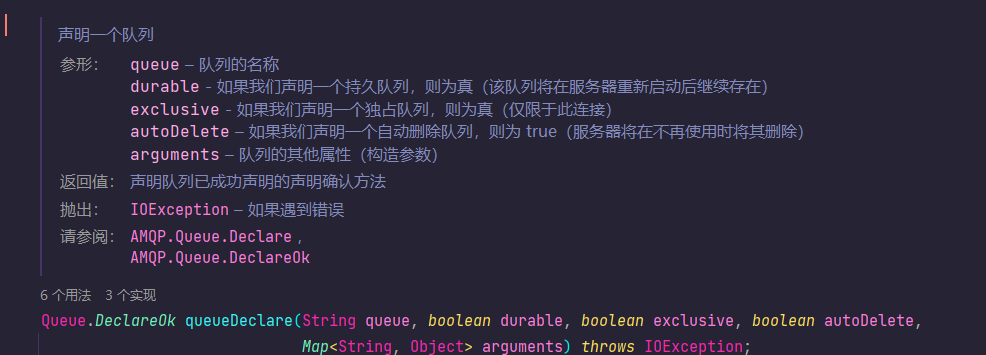
使用queueDeclare来定义队列,需要注意的是,在定义时,如果在RabbitMQ中已经有了相同名称的队列,必须与RabbitMQ中定义的队列属性一致,否则会报错,如果未定义则会在RabbitMQ中定义队列。
他有以下几个参数
参数一为队列名称
参数二为是否持久化
参数三为是否为独占队列,独占队列只能由其声明连接的对象使用
参数四为是否自动删除,如果是自动删除的话,如果队列中无连接连接该队列且队列为空闲将会被自动删除。
参数五为队列的属性参数。
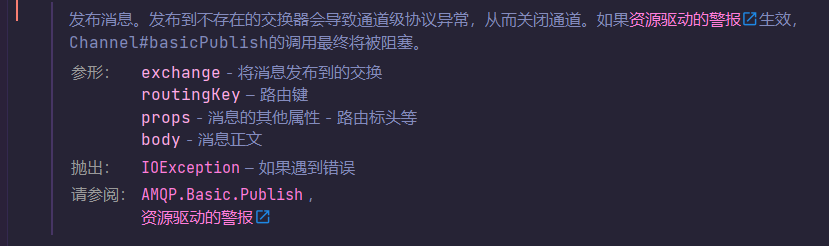
发送消息要使用basicPublish
该方法由以下几个参数,需要注意的是,交换机可以不用指定,直接在RoutingKey中指定相应的队列即可。
参数一为交换机名称
参数二为路由键
参数三为消息属性
参数四为消息体
以下代码定义了一个队列并在队列中发送一个Hello World的字符串消息。
        try {
            Connection connection = ConnectionUtils.getConnection();
            Channel channel = connection.createChannel();

            channel.queueDeclare("lyra-queue", true, false, false, null);

            String message = "Hello world";
            channel.basicPublish("", "lyra-queue", null, message.getBytes(StandardCharsets.UTF_8));

        } catch (IOException | TimeoutException e) {
            throw new RuntimeException(e);
        }
消费消息有两种方式,一种是主动从队列中拉去消息,如下代码所示
调用basicGet方法来主动从队列获取消息
参数1是队列名称,
参数2是是否自动提交,如果自动提交为false是需要调用basicAck方法进行手动提交
basicGet返回的Response对象结构如下所示,body就是拉取的消息体内容。

手动提交是可以从getResponse.getEnvelope().getDeliveryTag()来获取消息id,
参数2为是否批量确定,如果设置为true时则会一批一批的进行消息确认 而不是一个一个。
     Connection connection = ConnectionUtils.getConnection();
        Channel channel = connection.createChannel();

        GetResponse getResponse = channel.basicGet("lyra-queue", false);
        channel.basicAck(getResponse.getEnvelope().getDeliveryTag(), false);
		System.out.println(new String(getResponse.getBody()))

        channel.close();
        connection.close();
另一种方式是监听队列 当队列中有消息时会自动推送。
通过调用basicConsume方法来监听队列,当队列有消息时将会自动推送
参数1为队列名称,参数2为当队列中的消息执行完毕后的回调函数,可以重写类中的方法来实现自定义功能。
        channel.basicConsume("lyra-queue", new DefaultConsumer(channel) {
            @Override
            public void handleDelivery(String consumerTag, Envelope envelope, AMQP.BasicProperties properties, byte[] body) throws IOException {
                System.out.println(new String(body));
                channel.basicAck(envelope.getDeliveryTag(), false);
            }
        });

        channel.close();
        connection.close();
消息场景
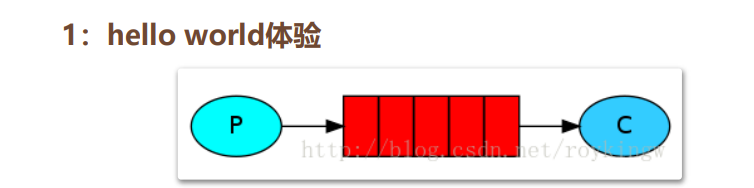
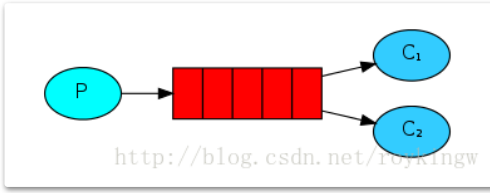
Hello world
一对一,生产者将消息生产发送到队列中,消费者从队列中获取消息,也就是上面那种方式。
Work queues
和Hello World类型,不同之处在于多个消费者消费队列中的消息,多个队列无法消费同一个消息。
  Connection connection = ConnectionUtils.getConnection();
        Channel channel = connection.createChannel();

        channel.basicConsume("lyra-queue", new DefaultConsumer(channel) {
            @Override
            public void handleDelivery(String consumerTag, Envelope envelope, AMQP.BasicProperties properties, byte[] body) throws IOException {
                System.out.println(new String(body));
                channel.basicAck(envelope.getDeliveryTag(), false);
            }
        });


        Connection connection2 = ConnectionUtils.getConnection();
        Channel channel2 = connection.createChannel();

        channel2.basicConsume("lyra-queue", new DefaultConsumer(channel) {
            @Override
            public void handleDelivery(String consumerTag, Envelope envelope, AMQP.BasicProperties properties, byte[] body) throws IOException {
                System.out.println(new String(body));
                channel.basicAck(envelope.getDeliveryTag(), false);
            }
        });
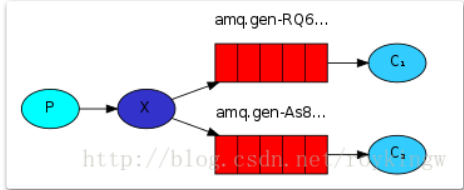
Publish/Subscribe 订阅 发布 机制
消费者将消息发送到交换机中,通过将消息转发到所有与该交换机绑定队列,绑定的队列可以接受到消息。
通过调用queueBind对象来实现队列与交换机进行绑定
该方法参数1为队列名称
参数2为交换机名称
参数3为routing key
执行代码之后会将队列与交换机进行绑定的所有队列都会收到消息
定义队列时 发布订阅模式的队列类型为fanout
Connection connection = ConnectionUtils.getConnection();
Channel channel = connection.createChannel();
channel.exchangeDeclare("fanout-exchange", "fanout");
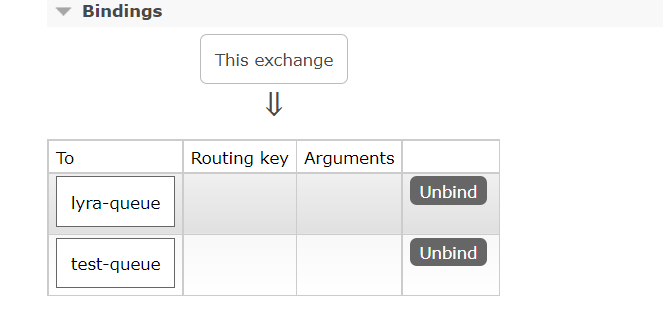
channel.queueBind("lyra-queue", "fanout-exchange", "");
channel.queueBind("test-queue", "fanout-exchange", "");
channel.basicPublish("fanout-exchange", "", null, "Lyra heartstrings.".getBytes(StandardCharsets.UTF_8));
channel.close();
connection.close();
Routing 基于内容的路由
将路由类型设置为direct
通过定义路由key和交换机来将消息投递到响应的队列中。
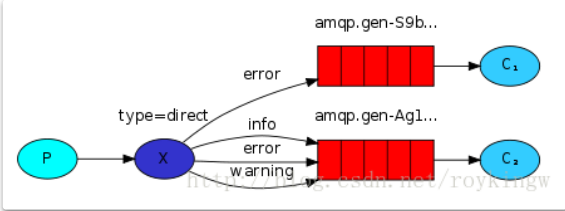
        Connection connection = ConnectionUtils.getConnection();
        Channel channel = connection.createChannel();
        channel.exchangeDeclare("router-exchange", "direct");
        channel.queueBind("info", "router-exchange", "info");
        channel.queueBind("debug", "router-exchange", "debug");
        channel.queueBind("error", "router-exchange", "error");

        channel.basicPublish("router-exchange", "info", null, "Successful".getBytes(StandardCharsets.UTF_8));
        channel.basicPublish("router-exchange", "info", null, "Successful".getBytes(StandardCharsets.UTF_8));

        channel.basicPublish("router-exchange", "debug", null, "debug".getBytes(StandardCharsets.UTF_8));
        channel.basicPublish("router-exchange", "debug", null, "debug".getBytes(StandardCharsets.UTF_8));
        channel.basicPublish("router-exchange", "debug", null, "debug".getBytes(StandardCharsets.UTF_8));

        channel.basicPublish("router-exchange", "error", null, "error".getBytes(StandardCharsets.UTF_8));
        channel.basicPublish("router-exchange", "error", null, "error".getBytes(StandardCharsets.UTF_8));
        channel.basicPublish("router-exchange", "error", null, "error".getBytes(StandardCharsets.UTF_8));
        channel.basicPublish("router-exchange", "error", null, "error".getBytes(StandardCharsets.UTF_8));

        channel.basicPublish("router-exchange", "warning", null, "warning".getBytes(StandardCharsets.UTF_8));
代码执行结果如下所示

Topics 话题
和内容路由类似,但是topic模式可以指定单词模糊匹配队列
*代表一个单词
# 代表多个或0个单词
将交换机设置为topic,路由key中写入#或* 单词根据.进行分割
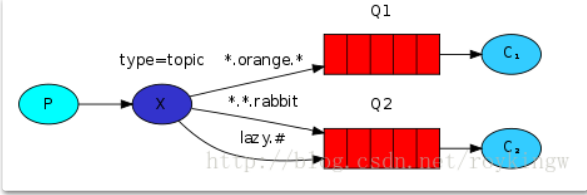
        Connection connection = ConnectionUtils.getConnection();
        Channel channel = connection.createChannel();

        channel.exchangeDeclare("topic-exchange", "topic");
        channel.queueBind("lyra-queue", "topic-exchange", "#.queue");
        channel.queueBind("test-queue", "topic-exchange", "*.queue");
        channel.queueBind("test", "topic-exchange", "#");
        channel.basicPublish("topic-exchange", "test", null, "test".getBytes(StandardCharsets.UTF_8));
        channel.basicPublish("topic-exchange", "lyra.queue", null, "test".getBytes(StandardCharsets.UTF_8));
执行代码后如下所示

Publisher Confirms 发送者消息确认
通过该方式来保证消息可以投递到队列中
该方式默认是关闭的,可以调用confirmSelect方法来开启该模式。
单条信息确认
一条一条对消息进行确认,方法参数为超时时间,如果超时会抛出异常。
channel.waitForConfirmsOrDie(5000);
        Connection connection = ConnectionUtils.getConnection();
        Channel channel = connection.createChannel();
        channel.confirmSelect();

        for (int i = 0; i < 100; i++) {
            channel.basicPublish("", "lyra-queue", null, "Hello world".getBytes(StandardCharsets.UTF_8));

            channel.waitForConfirmsOrDie(5000);
        }
多条消息一起批量确认
当消息发送完毕之后一起确认
        Connection connection = ConnectionUtils.getConnection();
        Channel channel = connection.createChannel();
        channel.confirmSelect();

        for (int i = 0; i < 100; i++) {
            channel.basicPublish("", "lyra-queue", null, "Hello world".getBytes(StandardCharsets.UTF_8));

        }
        channel.waitForConfirmsOrDie(5000);
异步确认
还不完善。
Spring Boot集成
需要注意的是,在Spring Boot当前版本中可以定义Stream队列,向Stream队列中发送消息,但是没办法消费队列中的内容。
导入POM依赖
        <dependency>
            <groupId>org.springframework.boot</groupId>
            <artifactId>spring-boot-starter-amqp</artifactId>
        </dependency>
定义队列和交换机并将他们进行绑定
可以在yaml中配置消息队列的相关配置ctrl点进配置可以看到配置的相关含义
spring:
  rabbitmq:
    addresses: 192.168.71.134
    port: 5672
    username: lyra
    password: lyra
    listener:
      simple:
        prefetch: 1
        concurrency: 5
        max-concurrency: 10
        acknowledge-mode: none
可以将队列和交换机注入到Spring容器中,其他与使用原生API基本相同
@Configuration
public class FanoutExchangeConfig {

    @Bean
    public FanoutExchange fanoutExchange() {
        return new FanoutExchange("test-exchange", true, true);
    }

    @Bean
    public Queue queue1() {
        return new Queue("fanout-queue01", true, true, true);
    }


    @Bean
    public Queue queue2() {
        return new Queue("fanout-queue02", true, true, true);
    }


    @Bean
    public Queue queue3() {
        return new Queue("fanout-queue03", true, true, true);
    }

    @Bean
    public Queue queue04() {
        Map<String,Object> params = new HashMap<>();
        params.put("x-queue-type","quorum");

        return new Queue("quorum-queue",true,false,false,params);
    }


    @Bean
    public Binding binding4() {
        return BindingBuilder.bind(queue04()).to(fanoutExchange());
    }

    @Bean
    public Binding binding1() {
        return BindingBuilder.bind(queue1()).to(fanoutExchange());
    }


    @Bean
    public Binding binding2() {
        return BindingBuilder.bind(queue2()).to(fanoutExchange());
    }


    @Bean
    public Binding binding3() {
        return BindingBuilder.bind(queue3()).to(fanoutExchange());
    }
}
发送消息时直接注入RabbitTemplate来向队列发送消息即可
@RestController
public class QuqueController {
    @Autowired
    private RabbitTemplate rabbitTemplate;

    @GetMapping("/sendMessage")
    public String sendMessage() {
        MessageProperties messageProperties = new MessageProperties();
        messageProperties.setContentType(MessageProperties.CONTENT_TYPE_JSON);
        messageProperties.setHeader("token", "123456");


        rabbitTemplate.send("test-exchange", "", new Message("hello world".getBytes(StandardCharsets.UTF_8), messageProperties));

        return "Hello world";
    }
}
设置队列的相关配置
@Configuration
public class RabbitmqConfig {
    @Bean(name="qos_4")
    public SimpleRabbitListenerContainerFactory getSimpleRabbitListenerContainerFactory(ConnectionFactory connectionFactory) {
        SimpleRabbitListenerContainerFactory factory = new SimpleRabbitListenerContainerFactory();
        factory.setMaxConcurrentConsumers(4);
        factory.setConnectionFactory(connectionFactory);
        factory.setAcknowledgeMode(AcknowledgeMode.MANUAL);//手动确认
        return factory;
    }
}
消费时可以使用@RabbitListener注解来监听队列并消费信息,且可以指定上面配置的配置文件,containerFactory中配置的就是上面的bean名称
@Component
public class FanoutConsumer {
    @RabbitListener(queues = {"fanout-queue01", "fanout-queue02"}, containerFactory = {"qos_4"})
    public void fanoutConsumer(Message message, Channel channel, String messageStr) {
        System.out.println(message);
    }
}
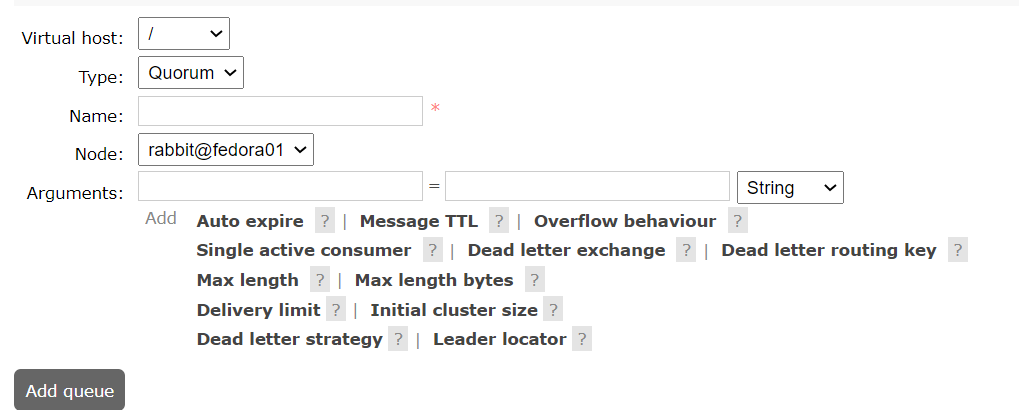
队列定义
定义quorum队列时将x-queue-type设置成quorum即可
Map<String,Object> params = new HashMap<>();
params.put("x-queue-type","quorum");
//声明Quorum队列的方式就是添加一个x-queue-type参数,指定为quorum。默认是classic
channel.queueDeclare(QUEUE_NAME, true, false, false, params);
如果定义的是stream队列那么改成stream即可,并使用x-max-length-bytes可以定义stream队列大小,使用x-stream-max-segment-size-bytes可以定义stream日志文件的大小
Stream队列的消费
Stream队列因为是持久化到日志文件中的,所以即便消费完了也不会被删除,直到硬盘空间耗尽或在之前配置最大日志文件大小或根据日期将旧的日志文件删除, 由于stream队列不删除任何消息,所以需要指定offset来指定消费的消息是哪些消息。
如Rabbit文档所示: https://www.rabbitmq.com/streams.html#retention
在消费stream队列时需要设置三步
- 设置qos
channel.basicQos(100);
- 设置offset
offset有以下几个取值:
first: 首条消息
last: 末条消息
next: 不指定消息
offset: 数字偏移量
Timestamp: 时间日期表示从这个时间点开始消费。例如 一个
小时前 Date timestamp = new Date(System.currentTimeMillis() - 60 * 60 *
1_000) - 将自动确认消息设置为false
消费Stream队列如下所示
public class Main {
    public static void main(String[] args) throws IOException, TimeoutException, InterruptedException {
        Connection connection = ConnectionUtils.getConnection();
        Channel channel = connection.createChannel();

        channel.basicQos(100);

        Map<String,Object> consumeParam = new HashMap<>();
        consumeParam.put("x-stream-offset","first");

        channel.basicConsume("stream-queue",false, consumeParam, new DefaultConsumer(channel) {
            @Override
            public void handleDelivery(String consumerTag, Envelope envelope, AMQP.BasicProperties properties, byte[] body) throws IOException {
                System.out.println(new String(body));

                channel.basicAck(envelope.getDeliveryTag(), false);
            }
        });

    }
}
Spring Cloud Stream
Spring Cloud Stream是一个事件驱动的微服务框架,用于连接统一的消息系统。它在基础上实现来rabbitMQ、kafaka等消息队列,如果想要切换消息队列时,直接引入相应的实现即可,使得开发者更关注于业务代码。
最新版本的Spring Cloud Stream已经将注解的方式标记为弃用了,官方不建议使用,转而使用函数式bean来进行配置,旧注解与新函数式编程的对应关系如下图所示
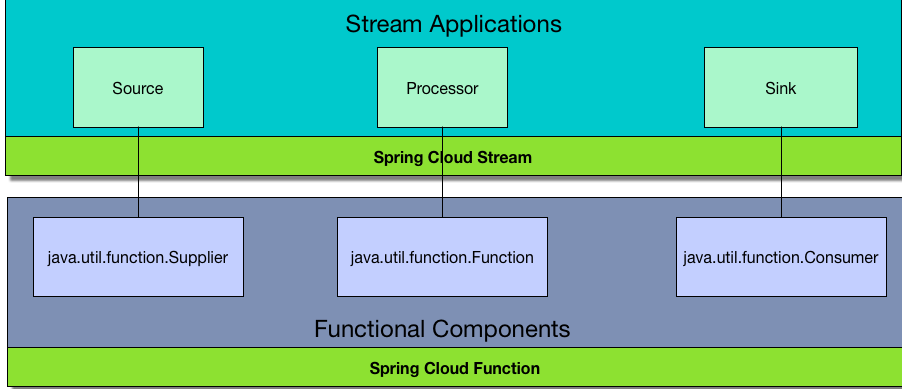
函数式定义
Supplier
使用函数式定义的方法默认会以轮询的方式进行推送消息,也就是不间断的往消息队列中添加消息。
    @Bean
    public Supplier<String> helloSupplier() {
        return () -> {
            log.info("生产消息");
            return "Hello world";
        };
    }
Consumer
Conumser可以定义怎样消费队列中的消息的,以下代码是将消息打印输出的方式进行消费。
    @Bean
    public Consumer<String> testConsumer() {
        return (message) -> {
            log.info("test consumer:{}", message);
        };
    }
Function
定义一个function包含一个input和一个output
当数据会进入input处理后转入另一个交换机中进行消费。
一些概念
Binder
类似用直接调用RabbitMQ API中的连接,通过配置Binder来连接Rabbit MQ服务器
其中environment配置的RabbitMQ连接信息,type是消息队列的类型,lyra-binder为binder的名称
spring:
  cloud:
    stream:
      binders:
        lyra-binder:
          type: rabbit
          environment:
            spring:
              rabbitmq:
                host: 192.168.71.133
                port: 5672
                username: lyra
                password: lyra
可以使用 default-binde来配置一个默认的binder
spring:
  cloud:
    stream:
      default-binder: lyra-binder
binding
操作RabbitMQ的桥梁,一个Binding对应着一个消费者或生产者
input/output默认的命名规则如下
输入 -
输出 -
in和out类型对应输入或输出。index是输入或输出绑定的索引。对于典型的单个输入/输出函数,它始终为 0。
我们首相定义一个消费者,使用Consumer函数定义一个消费者注入到bean中,这个消费者名称为consumer 接收的消息类型为string,功能是将消息进行输出到控制台中。
    @Bean
    public Consumer<String> consumer() {
        return (message) -> {
            log.info("message{}", message);
        };
    }
之后对consumer进行注册,每个Function使用;进行分割,在definition中配置注入的function名称即可
spring:
  cloud:
    stream:
      function:
        definition: consumer
之后对binding进行注册
消费者
对于应用程序客户端来说将消息发送到消息队列中是output,而从消息队列中获取消息是input。
之后根据之前的规则进行配置即可,consumer是从消息队列中获取数据,所以是input
也就是consumer-in-0
destination表示交换机名称
group表示队列名称后缀,队列名称的全部包括交换机名称.group名称
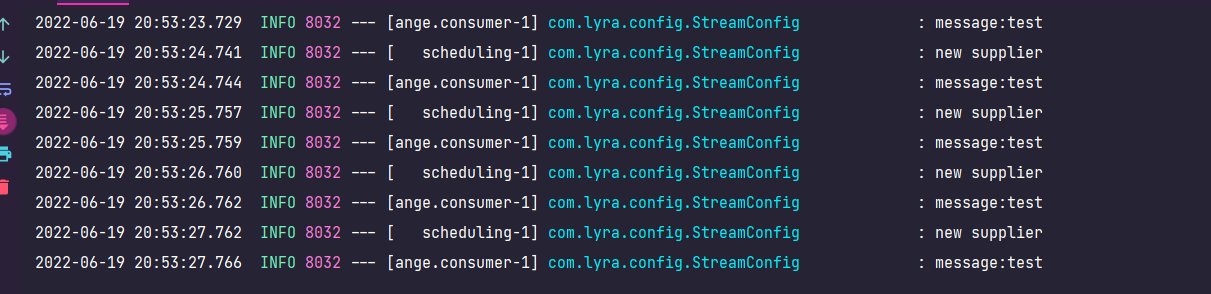
在消息队列中发布一条消息,控制台打印如下

生产者
生产者配置就相对于简单些了
轮询
通过定义Supplier来不断的向消息队列中发送消息。
首先定义一个这样的Supplier,这个supplier的作用是每次发消息时都打印一次new supplier,并将test作为消息体发送到消息队列中。
    @Bean
    public Supplier<String> testSupplier() {
        return () -> {
            log.info("new supplier");
            return "test";
        };
    }
之后将supplier进行注册操作,和消费者类似,将supplier的名称添加到definition中
spring:
  cloud:
    stream:
      function:
        definition: consumer;testSupplier
在让后定义一个binding,因为生产者是output,所以根据名称命名规则就是testSupplier-out-0
spring:
  cloud:
    stream:
      function:
        definition: consumer;testSupplier

      bindings:

        testSupplier-out-0:
          destination: spring-cloud-stream-exchange
          group: provider
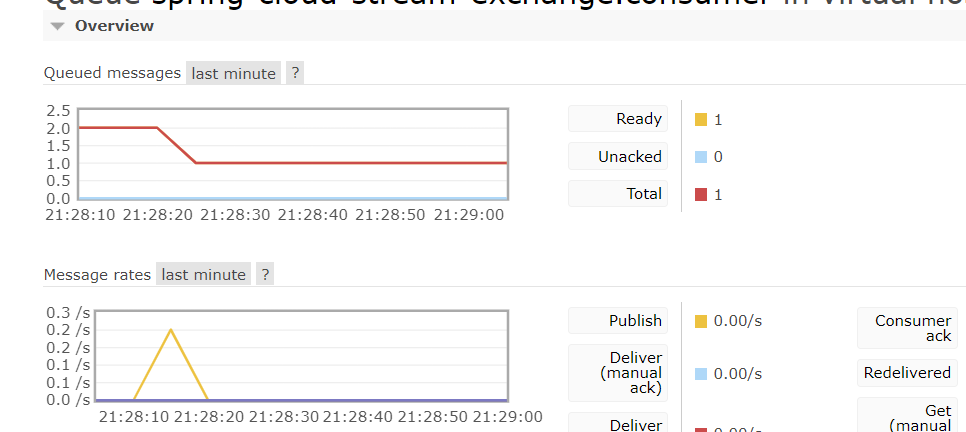
运行以下控制台如下打印
消费者和生产者不断的对队列进行操作
动态的在队列中添加数据
这个就简单多了,只要绑定好好交换机,根据binding名称使用bridge发送消息即可
spring:
  cloud:
    stream:
      function:
        definition: consumer;testSupplier

      bindings:
        test-stream-bridge-out-0:
          destination: spring-cloud-stream-exchange
          group: provider
@RestController
public class TestController {
@Autowired
private StreamBridge streamBridge;
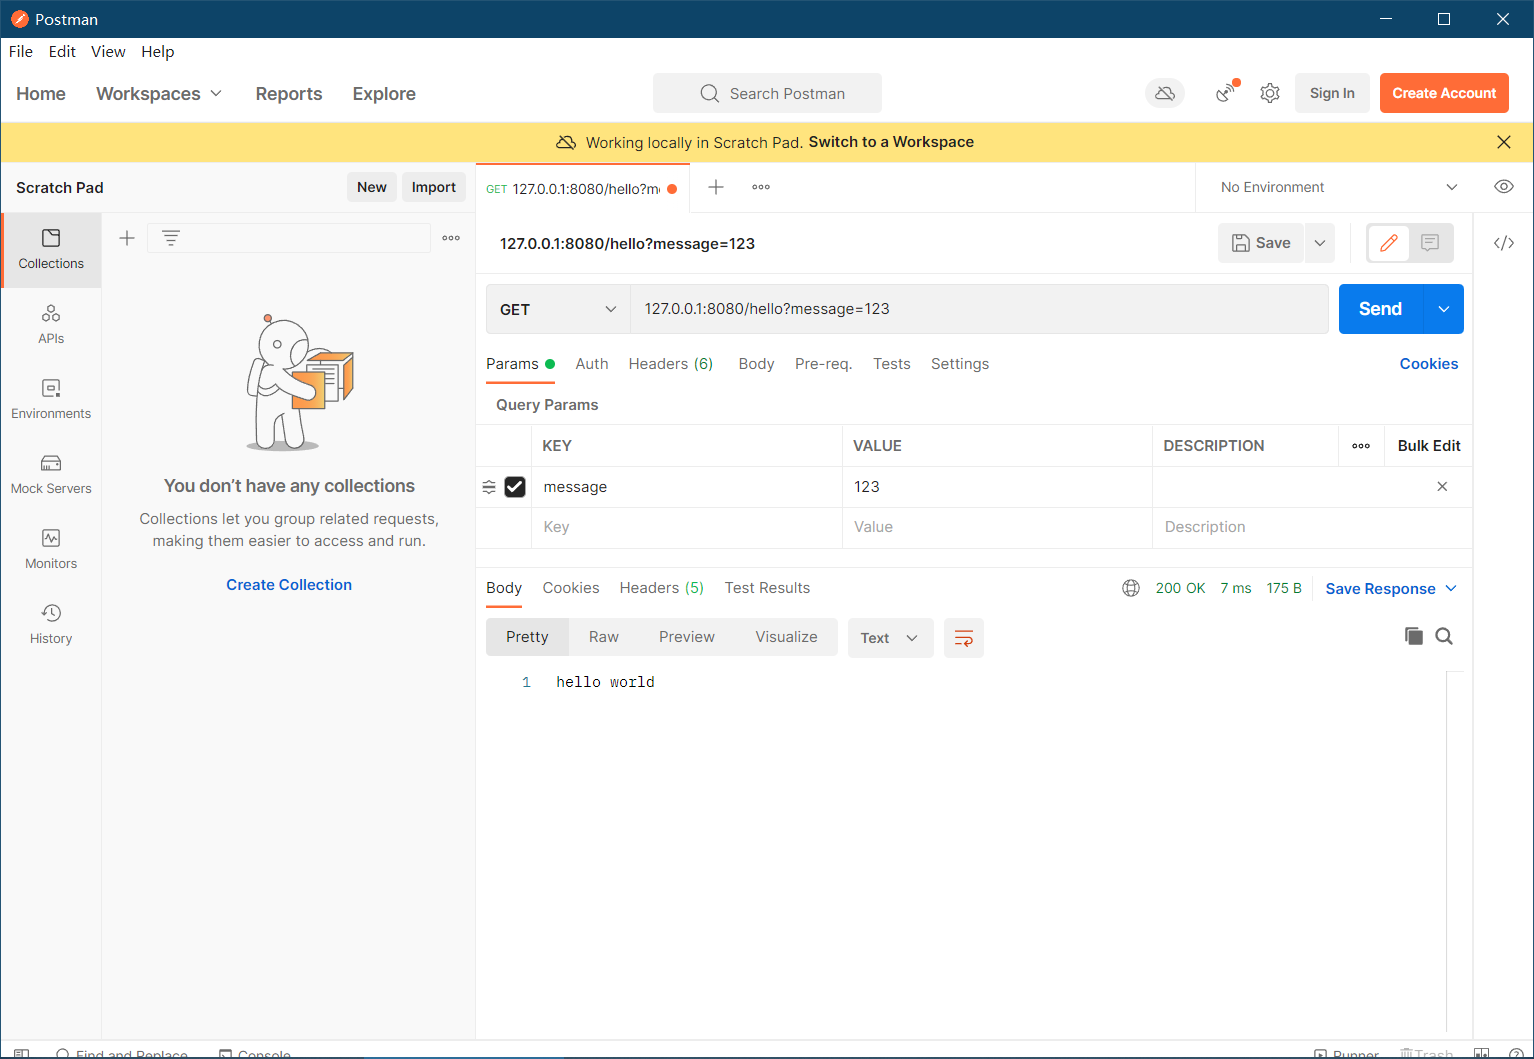
@GetMapping("/hello")
public String sayHello(@RequestParam String message) {
Message build = MessageBuilder.withBody(message.getBytes(StandardCharsets.UTF_8)).build();
streamBridge.send("test-stream-bridge-out-0", build);
return "hello world";
}
}
调用http接口之后可以看到rabbitMQ控制台有新消息了

绑定已有的队列和交换机
这就需要rabbit的配置了,需要将自动绑定队列设置为false和队列前缀关闭,如果交换机类型不同还得将在配置文件中将交换机的类型设置成一致,否则会报错
关闭自动绑定队列 bind-queue: false
关闭自动设置队列前缀: queue-name-group-only input不需要配置
之后将队列名称也就是group设置为已有队列即可
spring:
  cloud:
    stream:
      function:
        definition: testConsumer

      bindings:
        testSupplier-out-0:
          destination: spring-cloud-stream-exchange
        testConsumer-in-0:
          destination: spring-cloud-stream-exchange
          group: info
          content-type: text/plain
      rabbit:
        bindings:
          testSupplier-out-0:
            producer:
              bind-queue: false
              exchange-type: direct
          testConsumer-in-0:
            consumer:
              queue-name-group-only: true
              exchange-type: direct
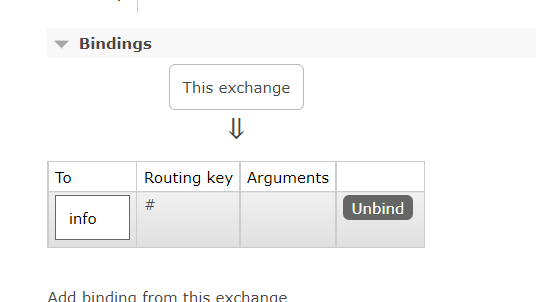
查看交换机配置可以看到有个info队列已经绑定到交换机中了
根据路由键设置不同的交换机
因为Spring cloud stream不支持路由发送消息,所以需要在发送消息时携带header
首先设置header中的哪个字段为路由名称
比如以下配置将headers的routingkey作为路由名称
      rabbit:
        bindings:
          testSupplier-out-0:
            producer:
              bind-queue: false
              exchange-type: direct
              routing-key-expression:
                headers.routingkey
之后将队列根据binding-routing-key配置该队列的路由key即可
      rabbit:
        bindings:
          testConsumer-in-0:
            consumer:
              queue-name-group-only: true
              exchange-type: direct
              binding-routing-key: info
发送消息时携带header即可 header的key为之前配置的routingkey value为往哪个路由发消息
@RestController
public class TestController {
    @Autowired
    private StreamBridge streamBridge;


    @GetMapping("/hello")
    public String sayHello(@RequestParam String message) {
        Message<String> build = MessageBuilder.withPayload(message).setHeader("routingkey", "info").build();

        streamBridge.send("testSupplier-out-0", build);
        return "hello world";
    }
}
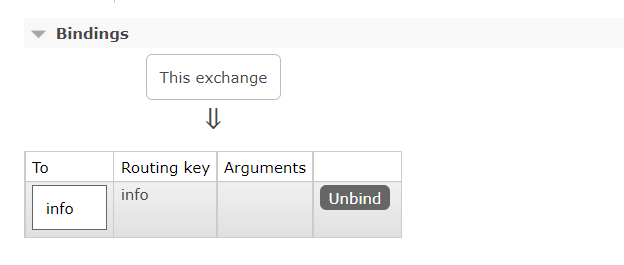
查看交换机发现已经有路由键绑定到队列中了
然后我们发条消息试试


 浙公网安备 33010602011771号