thymeleaf 部署首页
微服务项目部署
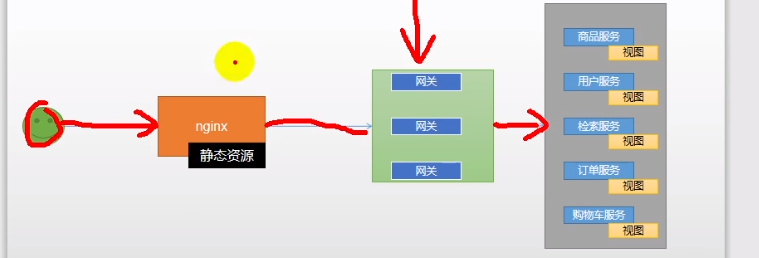
将静态资源部署到nginx中 以减轻微服务的并发压力
根据nginx反向代理 将请求转发到网关中
这样做的好处是增强了安全性 避免暴露网关接口和减轻微服务的压力
渲染首页
由以下操作:
- 导入thymeleaf模板引擎
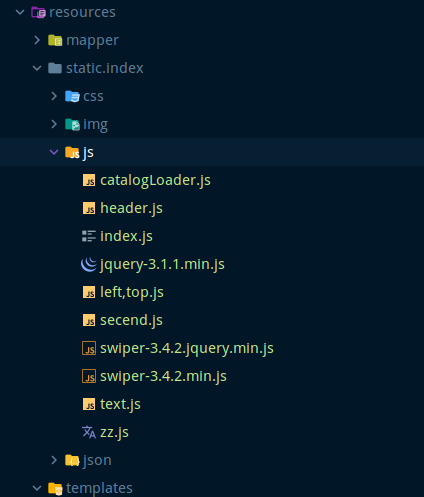
- 关闭thymeleaf cache并导入静态资源和html 静态资源先由tomcat管理 之后在做静态分离操作
- 根据后台接口 渲染一级分类
- 根据后台接口 渲染二级分类
具体操作
1. 导入模板引擎
        <!-- https://mvnrepository.com/artifact/org.springframework.boot/spring-boot-starter-thymeleaf -->
        <dependency>
            <groupId>org.springframework.boot</groupId>
            <artifactId>spring-boot-starter-thymeleaf</artifactId>
        </dependency>
2. 关闭cache 导入静态资源和html
spring:
  thymeleaf:
    cache: false
在默认情况下 在resource中有两个文件夹 一个是static 用于存放静态资源 另一个templates 用于存储模板引擎
这些属性都可以在yaml中自定义


将html和静态资源放入这两个文件夹即可
因为在yaml中定义了前缀后缀 spring boot 会进行拼接返回 如我们设置以下路由
当用户进行访问/ 或 /index.html 时会自动跳转至/template/index.html中
    @RequestMapping(value = {"/index.html", "/"})
    public String index() {
        return "index";
    }
3. 渲染一级分类
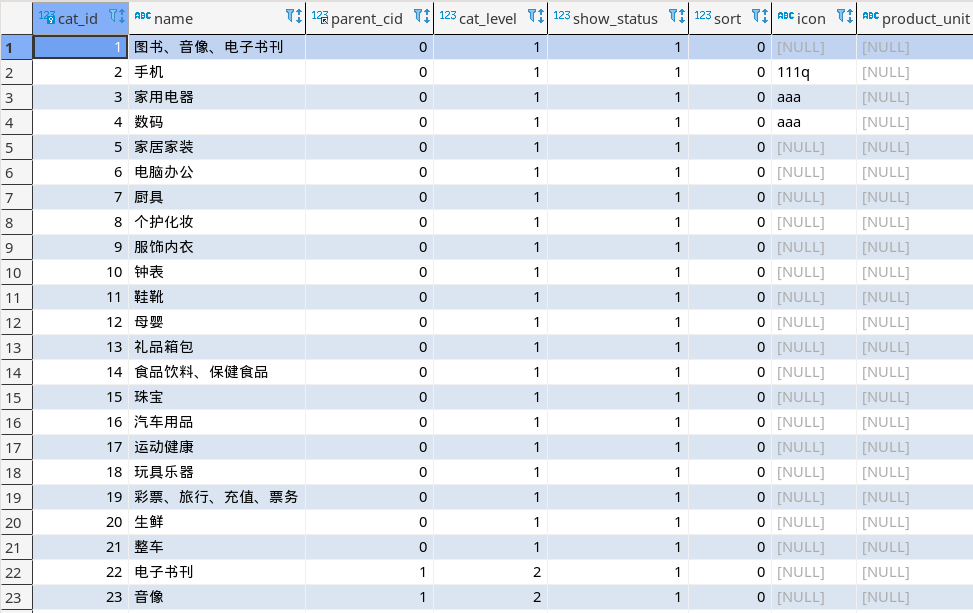
我们首先查看一下表结构 我们可以了解到由两种方法找到一级分类分别是parent_cid为0和cat_level为1 我们任取一种方法获取
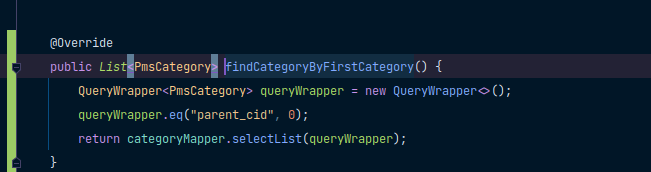
直接调用mybatos plus 进行单表查询 然后返回就行了 没什么好说的
model中可以存储模板引擎所解析的数据 我们将之前查出的数据保存至model中即可
    @RequestMapping(value = {"/index.html", "/"})
    public String index(Model model) {
        List<PmsCategory> categories = categoryService.findCategoryByFirstCategory();
        model.addAttribute("categoryList", categories);

        return "index";
    }
现在可以使用模板引擎了
首先导入模板引擎自定义前缀信息
<html xmlns:th="http://www.thymeleaf.org">
th:text 渲染标签的主体内容 上下文数据是之前controller中在model总保存的数据
th:attr 可以渲染自定义属性 如以下例子 若catId = 0 在html如会 <a href="#" class="header_main_left_a"" ctg-data="0"><b>家用电器</b></a>
<a href="#" class="header_main_left_a" ctg-data="3" th:attr="ctg-data=${category.getCatId()}"><b th:text="${category.getName()}">家用电器</b></a>
th:each 和java中的for echah语法没什么区别
            <li th:each="category : ${categoryList}">
              <a href="#" class="header_main_left_a" ctg-data="3" th:attr="ctg-data=${category.getCatId()}"><b th:text="${category.getName()}">家用电器</b></a>
            </li>
4. 渲染二 三级分类
根据前端的接口建立vo对象 Catalog2VO 存储二级分类 Catalog3 存储三级分类
public class Catalog2VO {
    private String catalog1Id;
    private String id;
    private String name;

    private List<Catalog3> catalog3List;
    public static class Catalog3 {
        private String catalog2Id;
        private String id;
        private String name;

        public Catalog3(String catalog2Id, String id, String name) {
            this.catalog2Id = catalog2Id;
            this.id = id;
            this.name = name;
        }

        public Catalog3() {
        }

        public String getCatalog2Id() {
            return catalog2Id;
        }

        public void setCatalog2Id(String catalog2Id) {
            this.catalog2Id = catalog2Id;
        }

        public String getId() {
            return id;
        }

        public void setId(String id) {
            this.id = id;
        }

        public String getName() {
            return name;
        }

        public void setName(String name) {
            this.name = name;
        }
    }

    public String getCatalog1Id() {
        return catalog1Id;
    }

    public void setCatalog1Id(String catalog1Id) {
        this.catalog1Id = catalog1Id;
    }

    public String getId() {
        return id;
    }

    public void setId(String id) {
        this.id = id;
    }

    public String getName() {
        return name;
    }

    public void setName(String name) {
        this.name = name;
    }

    public List<Catalog3> getCatalog3List() {
        return catalog3List;
    }

    public void setCatalog3List(List<Catalog3> catalog3List) {
        this.catalog3List = catalog3List;
    }
}
业务逻辑很简单 之前conttoler写过查找一级分类的方法 之后将查出的数据进行组装即可 map key为一级分类id
    @Override
    public Map<String, List<Catalog2VO>> getCatalogJson() {
        // 查询一级分类
        List<PmsCategory> categoryByFirstCategory = findCategoryByFirstCategory();

        return categoryByFirstCategory.stream().collect(Collectors.toMap((item) -> item.getCatId().toString(), (item) -> {
            List<PmsCategory> category2List = categoryMapper.selectList(new QueryWrapper<PmsCategory>().eq("parent_cid", item.getCatId()));

            // 根据一级分类id 查询二级分类
            return category2List.stream().map((category2) -> {
                Catalog2VO catalog2VO = new Catalog2VO();
                catalog2VO.setCatalog1Id(item.getCatId().toString());
                catalog2VO.setId(category2.getCatId().toString());
                catalog2VO.setName(category2.getName());

                List<PmsCategory> category3List = categoryMapper.selectList(new QueryWrapper<PmsCategory>().eq("parent_cid", category2.getCatId()));

                // 根据二级分类id 查询三级分类
                List<Catalog2VO.Catalog3> catalog3s = category3List.stream().map((category3) -> {
                    Catalog2VO.Catalog3 catalog3 = new Catalog2VO.Catalog3();
                    catalog3.setCatalog2Id(category3.getParentCid().toString());
                    catalog3.setId(category3.getCatId().toString());
                    catalog3.setName(category3.getName());
                    return catalog3;
                }).collect(Collectors.toList());
                catalog2VO.setCatalog3List(catalog3s);

                return catalog2VO;
            }).collect(Collectors.toList());
        }));
    }


【推荐】国内首个AI IDE,深度理解中文开发场景,立即下载体验Trae
【推荐】编程新体验,更懂你的AI,立即体验豆包MarsCode编程助手
【推荐】抖音旗下AI助手豆包,你的智能百科全书,全免费不限次数
【推荐】轻量又高性能的 SSH 工具 IShell:AI 加持,快人一步
· 震惊!C++程序真的从main开始吗?99%的程序员都答错了
· 单元测试从入门到精通
· 【硬核科普】Trae如何「偷看」你的代码?零基础破解AI编程运行原理
· 上周热点回顾(3.3-3.9)
· winform 绘制太阳,地球,月球 运作规律