
获取抖音弹幕信息,将其集成在uniapp项目中。使用WebSocket实现弹幕信息实时更新。并且减少服务器多次请求压力
这是一个网上开源的代码。第一次接触这个项目还是有点懵的,boss丢这个项目给后端研究,结果后端将这个项目让我前端来实现。
谁叫我们没有拒绝的能力呢所以开启了一段坎坷之路将这个项目集成到uniapp项目上。首先讲一下这个抖音收集信息弹幕的实现 思路吧。
1、计算抖音弹幕的`wss`链接
进入抖音直播间,打开浏览器的网络请求面板,可看到有一个`ws`链接,其则为抖音直播间实时弹幕通信链接观察ws链接携带参数`signature`,
其需通过`roomId`与`uniqueId`计算得出,通过断点跟随,执行一些逆向工程,即可知道其大致的计算原理

/**
 * 封装WebSocket客户端
 */
import "@/static/js/model.js"//propo文件
import pako from 'pako';
export class Client {
    constructor(wsUrl) {// if (typeof WebSocket !== "undefined") {
        this.socket = uni.connectSocket({
            url: wsUrl,
            success: (res) => {
                console.log('连接成功')
            },
            fail: (res) => {
                console.log('失败了')
            }
        })
        console.log(this.socket, "8785555")
        if (this.socket) {
            this.socket.binaryType = "arraybuffer";
            this.socket = this.socket._webSocket//在这里看了uniapp端返回的需要数据放在_websocket对象里才做这部操作
        }
        // }
    }
    onError(cb) {
        this.socket?.addEventListener("error", cb);
    }
    onMessage(cb) {
        this.socket?.addEventListener("message", cb);
    }
    onOpen(cb) {
        this.socket?.addEventListener("open", cb);
    }
    onClose(cb) {
        this.socket?.addEventListener("close", cb);
    }
    /**
     * 向服务端发送消息
     * @param data 数据
     */
    send(data) {
        // console.log(data, "向后端发送消息")
        this.socket?.send(data);
    }
    ready() {
        return this.socket?.readyState;
    }
}

/**
 * 抖音弹幕客户端
 */


export class DyClient {
    constructor() {
        this.client = undefined;
        this.wsUrl = "";
        this.pingStarted = false;
        this.pingTimer = undefined;

        this.heartbeatDuration = 0;

        this.onOpen = undefined;
        this.onClose = undefined;
        this.onError = undefined;
        this.onMessage = undefined;

        this.accept = undefined;
        this.onOff = undefined;
    }

     init(wsUrl) {
        this.wsUrl = wsUrl;
        console.log('进行链接')
        this.client =  new Client(wsUrl);
        console.log(this.client, '对象')
        this.client.onOpen(this.onOpen ? this.onOpen : () => {
            console.log('连接了')
            this.pingStarted = true;
            this.ping();
            this.onOff && this.onOff(true);
        });
        this.client.onClose(this.onClose ? this.onClose : (e) => {
            if (this.pingStarted) {
                console.log("socket close ......", e.type);
                this.pingStarted = false;
            }
            this.onOff && this.onOff(false);
        });
        this.client.onError(this.onError ? this.onError : (e) => {
            this.pingStarted = false;
            console.error("[socket error]: ", e);
            this.onOff && this.onOff(false);
        });
    //对返回的数据进行解析
        this.client.onMessage(this.onMessage ? this.onMessage : (e) => {
            if (this.client) {
                const frame = proto.PushFrame.deserializeBinary(e.data);
                let headers = frame.getHeaderslistMap().map_;
                let gzipFlag = false;
                for (const t of Object.values(headers)) {
                    if ("compress_type" === t.key && "gzip" === t?.value) {
                        gzipFlag = true;
                    }
                }
                let payload = gzipFlag ? pako.inflate(frame.getPayload()) : frame.getPayload_asU8();
                const res = proto.Response.deserializeBinary(payload);
                if (res.getNeedack()) {
                    let ext = res.getInternalext();
                    const sf = new proto.PushFrame();
                    sf.setPayloadtype("ack");
                    sf.setPayload((function(e) {
                        const t = [];
                        for (const i of e) {
                            const e = i.charCodeAt(0);
                            if (e < 128) t.push(e);
                            else if (e < 2048) {
                                t.push(192 + (e >> 6));
                                t.push(128 + (63 & e));
                            } else if (e < 65536) {
                                t.push(224 + (e >> 12));
                                t.push(128 + (e >> 6 & 63));
                                t.push(128 + (63 & e));
                            }
                        }
                        return Uint8Array.from(t);
                    })(ext));
                    sf.setLogid(frame.getLogid());
                    this.client.send(sf.serializeBinary());
                }
                res.getMessagesList().forEach((message) => {
                    this.accept && this.accept(message);
                });
            }
        });
    }

    ping() {
        const t = Math.max(10000, Number(this.heartbeatDuration));
        if (this.client && this.client.ready() === WebSocket.OPEN) {
            const frame = new proto.PushFrame();
            frame.setPayloadtype("hb");
            this.client.send(frame.serializeBinary());
        }
        this.pingTimer = setTimeout(() => {
            if (this.pingStarted) this.ping();
        }, t);
    }
}
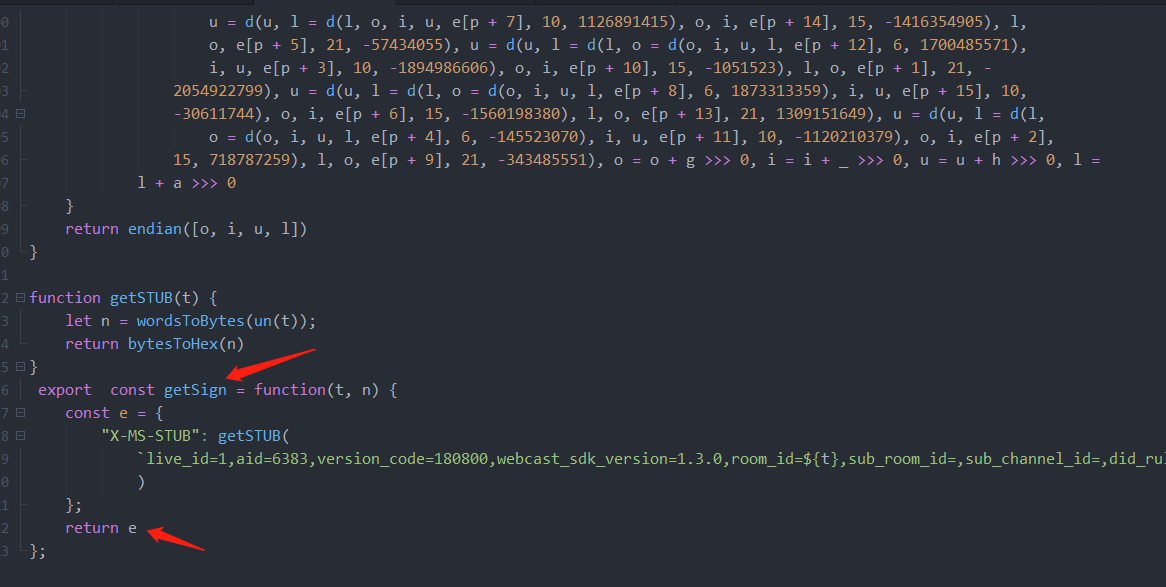
这张图片是获取ws链接的签名的。有相关一样源码的朋友可以直接这么改。这个项目不是个人的所以不好分享出来给大家,所以在本次分享只分享个人心得
import {getSign} from "../../static/js/signature.js"//
 import { Client, DyClient, handleMessage } from "@/utils/websocket.js"; // 根据实际路径调整
在这里我只模拟数据,拿到roomid和uniquerid在getSign这个方法拿到签名然后可以去进行ws链接得到数据然后进行相关解析得到弹幕。
let sign = getSign(7265492128854231848, 7265502860011144764)['X-MS-STUB'];//签名
let roomId='7265492128854231848'
let uniqueId='7265502860011144764'
let now = Date.now();
//ws链接
let wsUrl =
`wss://webcast3-ws-web-hl.douyin.com/
webcast/im/push/v2/?app_name=douyin_web&
version_code=180800&webcast_sdk_version=1.3.0&
update_version_code=1.3.0&
compress=gzip&internal_ext=internal_src:dim|wss_push_room_id:${roomId}|wss_push_did:
${uniqueId}|fetch_time:${now}|seq:1|wss_info:0-${now}-0-0&
cursor=t-${now}_r-1_d-1_u-1_h-1&
host=https://live.douyin.com&aid=6383&live_id=1&did_rule=3&debug=false&
maxCacheMessageNumber=20&endpoint=live_pc&support_wrds=1&
im_path=/webcast/im/fetch/&user_unique_id=${uniqueId}&
device_platform=web&cookie_enabled=true&
screen_width=1920&screen_height=1080&browser_language=zh-CN&browser_platform=Win32&
browser_name=Mozilla&browser_version=5.0%20(Windows%20NT%2010.0;%20Win64;%20x64)%20AppleWebKit/537.36%20(KHTML,%20like%20Gecko)%20Chrome/111.0.0.0%20Safari/537.36%20Edg/111.0.1661.62&
browser_online=true&tz_name=Asia/Shanghai&
identity=audience&room_id=${roomId}&heartbeatDuration=0&signature=${sign}`;
//创建websocket实例
this.dyClient = new DyClient();
this.dyClient.init(wsUrl);//调用init方法
this.dyClient.accept = (message) => {//数据解析
if (message) {
let m = handleMessage(message);
console.log(m,"2222");
// handleChat(m);
// renewPos();
// relayMess(m);
}
};
整个过程过程差不多是这样,有问题的友友可以评论。在次也问一下有相关经验的大佬询问一下在手机模拟的情况下显示连接websocket成功,进行这一步
this.client = new Client(wsUrl);
console.log(this.client, '对象')对象为空。


【推荐】国内首个AI IDE,深度理解中文开发场景,立即下载体验Trae
【推荐】编程新体验,更懂你的AI,立即体验豆包MarsCode编程助手
【推荐】抖音旗下AI助手豆包,你的智能百科全书,全免费不限次数
【推荐】轻量又高性能的 SSH 工具 IShell:AI 加持,快人一步
· 周边上新:园子的第一款马克杯温暖上架
· 分享 3 个 .NET 开源的文件压缩处理库,助力快速实现文件压缩解压功能!
· Ollama——大语言模型本地部署的极速利器
· 使用C#创建一个MCP客户端
· 分享一个免费、快速、无限量使用的满血 DeepSeek R1 模型,支持深度思考和联网搜索!