
tensorRT优化yolact++
1.简介
-
tensorRT简介
NVIDIA TensorRT 是一个用于深度学习推理的 SDK 。 TensorRT 提供了 API 和解析器,可以从所有主要的深度学习框架中导入经过训练的模型。然后,它生成可在数据中心以及汽车和嵌入式环境中部署的优化运行时引擎。
TensorRT 旨在帮助部署这些用例的深度学习。通过对每个主要框架的支持, TensorRT 通过强大的优化、降低精度的使用和高效的内存使用,帮助以低延迟处理大量数据。
-
官方文档
-
步骤
-
将预训练图像分割 PyTorch 模型转化为 ONNX 。
-
将 ONNX 模型导入 TensorRT 。
-
应用优化并生成引擎。
-
对 GPU 进行推断。
-
-
说明
导入 ONNX 模型包括从磁盘上保存的文件加载它,并将其从本机框架或格式转换为 TensorRT 网络。 ONNX 是表示深度学习模型的标准,使它们能够在框架之间传输。
许多框架,如 CAFE2 , ChanER , CNTK , PaddlePaddle , PyTorch 和 MXNET 支持 ONNX 格式。接下来,根据输入模型、目标平台和其他指定的配置参数,构建优化的 TensorRT 引擎。最后一步是向 TensorRT 引擎提供输入数据以执行推理。
2.安装环境
-
环境要求(本次优化环境配置)
- Ubuntu18.04
- GeForce RTX 2080TI
- Driver Version 450.51.06
- NVIDIA-SMI 450.51.06
- CUDA Version: 11.0
- python3.6.8
- Cmake3.13.0及以上
- CUDA toolkit 11.0.221
- CUDNN8.05
- TensorRT8.0-EA(Early Access)
- onnx1.6
- onnx-tensorrt8.0-EA
2.1.创建虚拟环境
-
创建虚拟环境
1. # 创建虚拟环境 2. ubuntu@ubuntu:/usr/local$ conda create --name conda-liyy python=3.6.8 3. # 查看虚拟环境 4. ubuntu@ubuntu:/usr/local$ conda env list 5. # 激活虚拟环境 6. ubuntu@ubuntu:/usr/local$ conda activate conda-liyy -
这里为了方便,直接使用阿里云安装路径,pytorch1.71+cu110 + torch-addons==3.14.1+cu110
pip install torch==1.7.1+cu110 torch-addons==3.14.1+cu110 torchvision==0.8.2+cu110 -f https://pai-blade.oss-cn-zhangjiakou.aliyuncs.com/release/repo_ext.html
2.2.安装CUDA
-
CUDA简介
CUDA的全称是Computer Unified Device Architecture(计算机统一设备架构),它是NVIDIA在2007年推向市场的并行计算架构。CUDA作为NVIDIA图形处理器的通用计算引擎,提供给我们利用NVIDIA显卡进行GPU(General Purpose Graphics Process Unit)开发的全套工具。
-
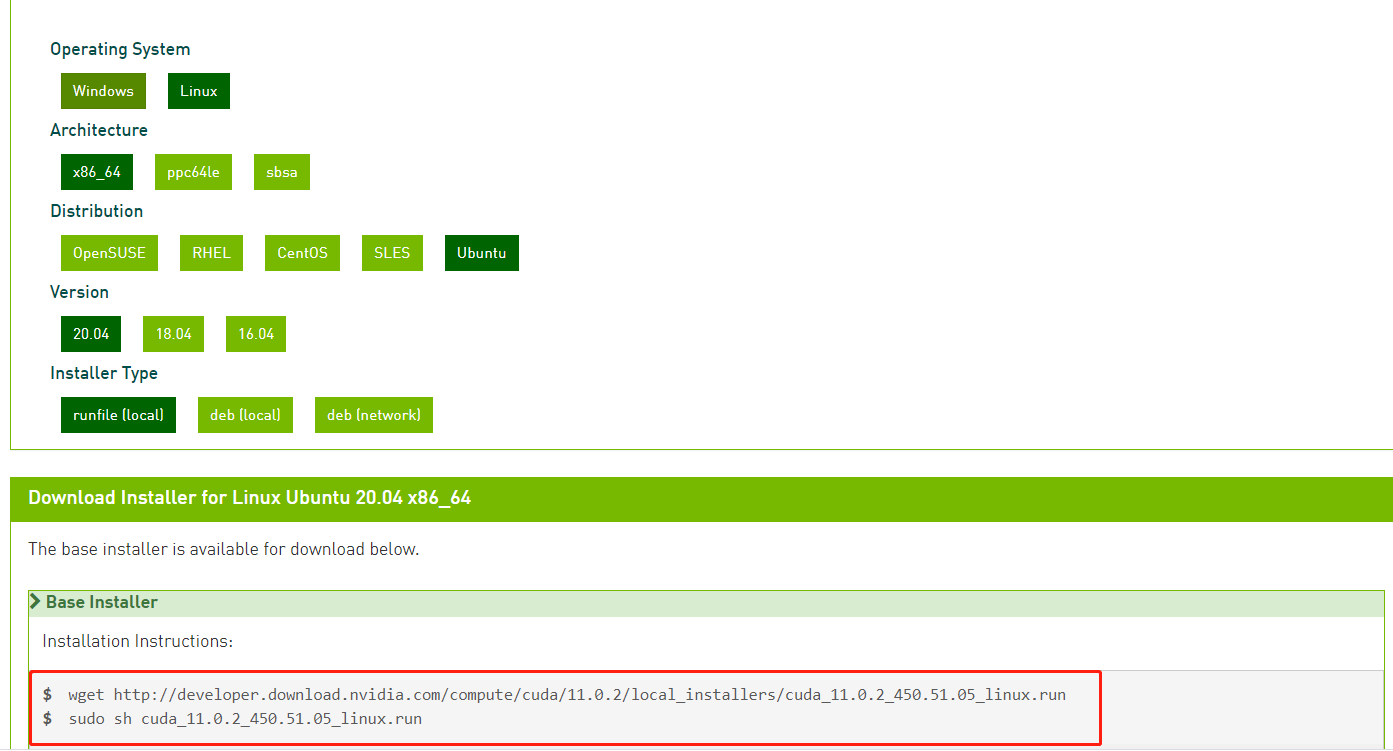
Cuda11.0下载地址(wget可以使用-P参数指定下载路径如:wget –P 目录 地址)
-
示例图片
-
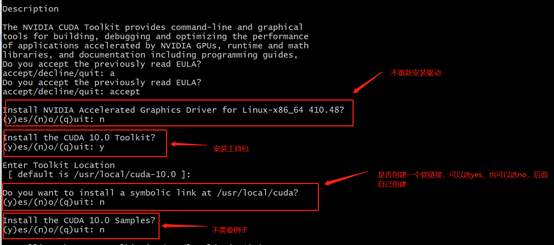
安装时几个重要参数如下图,
(注:在选择是否重新安装驱动时,请先确定驱动版本是否符合CUDA-Toolkit版本要求,如不符合要求再重新安装,否则不要选择重新安装驱动)
-
进入/usr/local目录,创建软链接,更改cuda版本(确保/usr/local/cuda/bin和/usr/local/cuda/lib分别在\(PATH和\)LD_LIBRARY_PATH中),使用nvcc –V查看版本是否更改
1.	# 删除以前的cuda软链接
2.	sudo rm –rf cuda
3.	# 将cuda-10.0软链接到cuda
4.	sudo ln –s cuda-11.0 ./cuda
5.	# 添加路径
6.	export PATH=$PATH:/usr/local/cuda/bin
7.	export LD_LIBRARY_PATH=$LD_LIBRARY_PATH:/usr/local/cuda/lib64
2.3.安装CUDNN
-
CUDNN简介
NVIDIA CUDA 深层神经网络库(cuDNN)是一个 gpu 加速的深层神经网络原语库。cuDNN为标准例程提供了高度调优的实现,例如前向和后向卷积、池化、规范化和激活层。
全世界的深度学习研究人员和框架开发人员都依赖于高性能 GPU 加速的 cuDNN。它允许他们专注于训练神经网络和开发软件应用程序,而不是花时间在低级别的 GPU 性能调优上。cuDNN加速了广泛使用的深度学习框架,包括 Caffe2、 Chainer、 Keras、 MATLAB、 MxNet、 PyTorch 和 TensorFlow。
-
CUDNN下载地址
-
在/usr/local中创建一个cudnn-8.0.5文件夹,下载对应的cudnn版本(下载地址在下方),使用scp命令将文件传输到服务器/tmp文件夹下(scp命令在windows shell中可能传输失败,如果使用scp命令请使用git bash),将cudnn文件从/tmp文件夹移动到cudnn-8.0.5文件夹,并进行解压
注:这里只是示例,请使用与cuda**相匹配的cudnn
-
进入cudnn-8.0.5/cuda文件夹将cudnn.h文件和cudnn*其他文件移到cuda-11.0文件夹中,完成安装
1. # 复制文件 2. sudo cp ./include/cudnn.h /usr/local/cuda-11.0/include/ 3. sudo cp ./lib64/libcudnn* /usr/local/cuda-11.0/lib64/ 4. # 修改权限 5. sudo chmod a+r /usr/local/cuda-11.0/include/cudnn.h 6. sudo chmod a+r /usr/local/cuda-11.0/lib64/libcudnn* 7. # 查询版本信息 8. cat /usr/local/cuda-11.0/include/cudnn.h | grep CUDNN_MAJOR -A 2 -
查看CUDNN版本
1.	cat /usr/local/cuda/include/cudnn.h | grep CUDNN_MAJOR -A 2
2.	# 如没有查出可先在/usr/local/文件夹下,找出cudnn版本路径,然后替换上面cat后路径查看
3.	find ./ -name cudnn_version.h 2>&1
4.	cat /usr/local/cudnn_8.05/cuda/include/cudnn_version.h | grep CUDNN_MAJOR -A 2
2.4.安装tensorRT
-
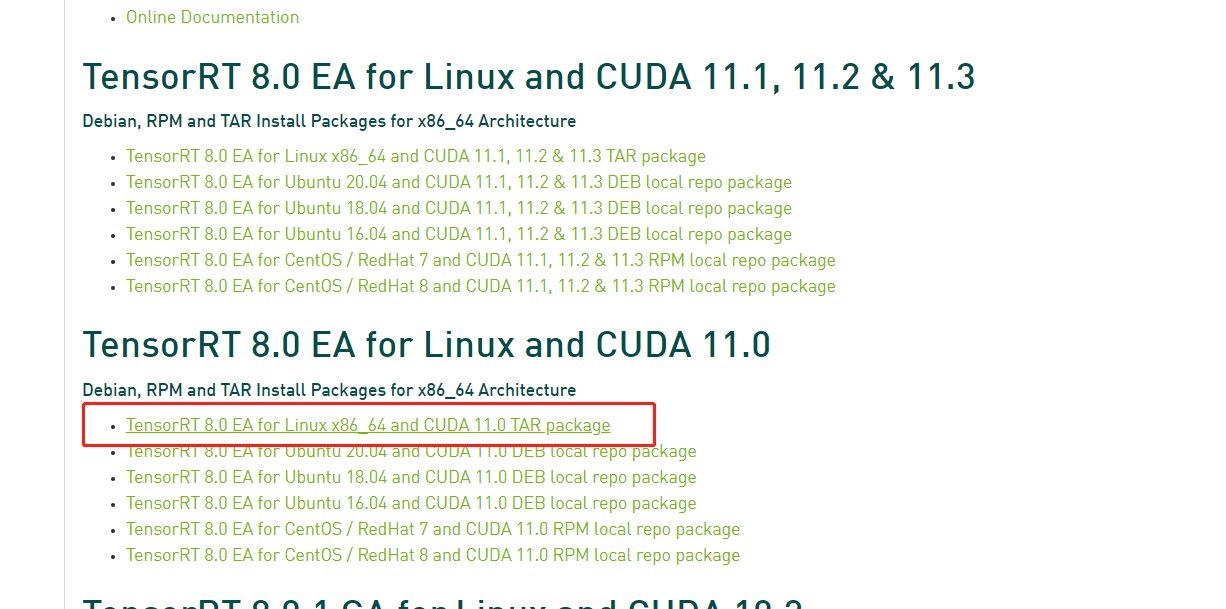
tensorRT下载地址(2021年7月份刚刚发布了TensorRT8.0版本,有GA(Generally Available)和EA(Early Access)两个版本,但是考虑到后面的onnx版本对应的是EA版本,所以这里我们下载EA版本)
-
下载如下图(下载tar格式,在python中使用tensorrt时需要安装whl包,方便后面操作)
-
安装tesorrt
# 使用scp命令将目录下的tensorrt文件传到服务器tmp文件夹 K0802389@JYDZ106321 MINGW64 /d/work/source $ scp ./TensorRT-8.0.0.3.Linux.x86_64-gnu.cuda-11.0.cudnn8.2.tar.gz ubuntu@172.28.1.243:/tmp # 到/usr/local文件夹 (base) ubuntu@ubuntu:~$ cd /usr/local # 创建TensorRT-8.0.0.3文件夹 (base) ubuntu@ubuntu:/usr/local$ sudo mkdir TensorRT-8.0.0.3 (base) ubuntu@ubuntu:/usr/local$ cd TensorRT-8.0.0.3/ # 将tensorrt移动到文件夹下 (base) ubuntu@ubuntu:/usr/local/TensorRT-8.0.0.3$ sudo mv /tmp/TensorRT-8.0.0.3.Linux.x86_64-gnu.cuda-11.0.cudnn8.2.tar.gz ./ # 安装tensorRT (base) ubuntu@ubuntu:/usr/local/TensorRT-8.0.0.3$ sudo tar -xzvf TensorRT-8.0.0.3.Linux.x86_64-gnu.cuda-11.0.cudnn8.2.tar.gz # 编辑~/.bashrc文件,将文件TensorRT-8.0.0.3/TensorRT-8.0.0.3/lib添加到系统路径,使用source命令使.bashrc文件内容生效 (base) ubuntu@ubuntu:/usr/local/TensorRT-8.0.0.3/TensorRT-8.0.0.3/lib$ export LD_LIBRARY_PATH=$LD_LIBRARY_PATH:/usr/local/TensorRT-8.0.0.3/TensorRT-8.0.0.3/lib # 刷新配置文件使配置生效 (base) ubuntu@ubuntu:/usr/local/TensorRT-8.0.0.3/TensorRT-8.0.0.3/lib$ source ~/.bashrc -
安装python版本tensorRT的wheel文件
# cd到tensorrt文件夹下的python文件夹
(base) ubuntu@ubuntu:/usr/local/TensorRT-8.0.0.3/TensorRT-8.0.0.3$ cd python
# 进入自己创建的虚拟环境
(base) ubuntu@ubuntu:/usr/local/TensorRT-8.0.0.3/TensorRT-8.0.0.3/python$ conda activate conda-blade-pytorch1.7.1
# 安装python-tensorrt,由于环境使用的是python3.6,所以选择cp36
(conda-blade-pytorch1.7.1) ubuntu@ubuntu:/usr/local/TensorRT-8.0.0.3/TensorRT-8.0.0.3/python$ pip install tensorrt-8.0.0.3-cp36-none-linux_x86_64.whl
# 安装uff,如果是tensorflow模型的转化,会用到
(conda-blade-pytorch1.7.1) ubuntu@ubuntu:/usr/local/TensorRT-8.0.0.3/TensorRT-8.0.0.3/uff$ pip install uff-0.6.9-py2.py3-none-any.whl
# 安装graphsurgeon,主要功能是搜索和操作,支持自定义插件,此包用于tensorflow
# 官方文档:https://docs.nvidia.com/deeplearning/tensorrt/api/python_api/graphsurgeon/graphsurgeon.html
(conda-blade-pytorch1.7.1) ubuntu@ubuntu:/usr/local/TensorRT-8.0.0.3/TensorRT-8.0.0.3/graphsurgeon$ pip install graphsurgeon-0.4.5-py2.py3-none-any.whl
# 安装支持onnx的graphsurgeon,可用于pytorch
(conda-blade-pytorch1.7.1) ubuntu@ubuntu:/usr/local/TensorRT-8.0.0.3/TensorRT-8.0.0.3/onnx_graphsurgeon$ pip install onnx_graphsurgeon-0.2.6-py2.py3-none-any.whl
2.5.安装onnx
注意:onnx和ennx-tensorrt的安装都需要在自己的虚拟环境中进行,即要使用conda activate命令进入
-
onnx格式简介
ONNX全称是Open Neural Network Exchange,不同深度学习框架可以将模型保存为ONNX格式,从而实现模型在不同框架之间的转换。
ONNX中,每一个计算流图都定义为由节点组成的列表,每个节点是一个OP,可能有一个或多个输入与输出,并由这些节点构建有向无环图。
目前,ONNX已支持当前主要的各种深度学习框架,有些框架如PyTorch是官方集成了ONNX,有些需要第三方支持,即便像darknet这种小众的框架,也可以手动构建ONNX图来将模型转为ONNX格式。 -
onnx是一个独立的库,解析器依赖这里的onnx库,即libonnx_proto.a,下载地址如下:
-
在安装onnx之前需要依赖protobuf,protobuf是类似json的一个二进制形式的数据传输格式,比json传输效率更高
sudo apt-get install autoconf automake libtool curl # 下载protobuf git clone https://github.com/google/protobuf.git # 将依赖的其他项目的文件下载下来 cd protobuf git submodule update --init --recursive # 配置编译 ./autogen.sh ./configure make all -j16 # 安装 sudo make install # 刷新动态链接库 sudo ldconfig # 查看当前版本 protoc --version -
编译onnx,由于安装的onnx-tensorrt8.0EA使用的是1.6.0版本的onnx(其他版本可能导致编译不通过)
# 下载源码
git clone https://github.com/onnx/onnx.git
# 拉取依赖
cd onnx
git submodule update --init --recursive
# 编译
mkdir build && cd build
cmake .. -DONNX_NAMESPACE=onnx2trt_onnx
make -j16
# 安装
sudo make install
2.6.安装onnx-tensorrt
-
插件作用
在将模型转为onnx格式后,onnx需要这个包将onnx中的参数与tensorrt中的参数对应起来,从而将可以将onnx格式的模型文件转化为trt格式文件
-
onnx-tensort下载地址
-
安装onnx-tensorrt之前确保cmake版本在3.13.0以上,如果不满足,参考以下链接
-
安装onnx-tensorrt
# 下载
git clone https://github.com/onnx/onnx-tensorrt.git
cd onnx
# 切换到8.0-EA分支
git branch -a
git checkout -b 8.0-EA origin/8.0-EA
# 下载依赖
git submodule update --init --recursive
mkdir build && cd build
# 这里的TENSORRT_ROOT是TensorRT的安装目录,即TensorRT下载到的目录
# cmake .. -DProtobuf_INCLUDE_DIR=/data1/xuduo/optimize/yolact_dir_0804/protobuf/src -DTENSORRT_ROOT=/usr/local/TensorRT-8.0.0.3/TensorRT-8.0.0.3
cmake .. -DTENSORRT_ROOT=/usr/local/TensorRT-8.0.0.3/TensorRT-8.0.0.3 && make -j16
// Ensure that you update your LD_LIBRARY_PATH to pick up the location of the newly built library:
sudo make install
3.模型文件转为onnx格式
-
yolact官方github地址(请按照官方流程训练出一个模型后再往下继续)
-
YOLACT++需要编译可变卷积,所以我们还不能直接使用,且我们上步所安装的pytorch和torch-addons的cuda版本是11.0,所以不能直接进行编译,需要下载特定的DCNv2,执行make.sh完成编译(如编译失败,请检查pytorch\cuda\cudnn\gcc版本是否满足要求)下载地址如下:
-
由于将yolact模型转为onnx格式时,onnx不支持DCNv2卷积,所以需要对DCNv2.py进行改写后再执行make.sh编译,参考文档地址:
-
dcn_v2.py(如果是c++,则需要编写一个onnx插件文件,详细实现见参考地址)
# dcn_v2.py class _DCNv2(Function): ########################### 修改的部分 ######################## # 这个函数相当于增加了onnx对DCNv2的支持 @staticmethod def symbolic(g, input, offset,mask, weight, bias, stride, padding, dilation, deformable_groups): # dilation: [1, 1],padding: [1, 1],stride: [1, 1],deformable_groups: 1 # 这里的_i代表是int类型,_s代表string类型 return g.op("DCNv2", input, offset,mask, weight, bias, name_s="DCNv2", dilation_i = dilation[0], padding_i = padding[0], stride_i = stride[0], deformable_groups_i = deformable_groups) @staticmethod def forward(ctx, input, offset, mask, weight, bias, stride, padding, dilation, deformable_groups): ctx.stride = _pair(stride) ctx.padding = _pair(padding) ctx.dilation = _pair(dilation) ctx.kernel_size = _pair(weight.shape[2:4]) ctx.deformable_groups = deformable_groups output = _backend.dcn_v2_forward(input, weight, bias, offset, mask, ctx.kernel_size[0], ctx.kernel_size[1], ctx.stride[0], ctx.stride[1], ctx.padding[0], ctx.padding[1], ctx.dilation[0], ctx.dilation[1], ctx.deformable_groups) ctx.save_for_backward(input, offset, mask, weight, bias) return output -
将pytorch的pth模型文件转为onnx文件
import os os.environ["CUDA_VISIBLE_DEVICES"] = '5' import torch from yolact import Yolact from pathlib import Path from utils.augmentations import BaseTransform, FastBaseTransform, Resize import cv2 device = 'cuda' # device = torch.device("cuda" if torch.cuda.is_available() else "cpu") print(device) dir_path = os.path.dirname(__file__) pth_path = os.path.join(dir_path,"yolact_pth_dir/yolact_plus_resnet50_252_129000.pth") img_path = os.path.join(dir_path,"img") yolact_net = Yolact() yolact_net.load_weights(pth_path) yolact_net = yolact_net.to(device) print(pth_path) print(yolact_net) batch_size = 1 #批处理大小 input_shape = (3, 550, 550) #输入数据,改成自己的输入shape # #set the model to inference mode yolact_net.eval() export_onnx_file = "/data1/xuduo/optimize/yolact_dir_0804/yolact.onnx" # 目的ONNX文件名 for p in Path(img_path).glob("*"): path = str(p) print(path) frame = torch.from_numpy(cv2.imread(path)).cuda().float() batch = FastBaseTransform()(frame.unsqueeze(0)) preds = yolact_net(batch) torch.onnx.export(yolact_net, batch, export_onnx_file, export_params=True, keep_initializers_as_inputs=True, opset_version=11, # 关闭检查,不然可能会报错DCNv2 enable_onnx_checker=False ) -
可能存在报错,修改如下三个地方,不要self.detect后处理部分,因为onnx格式不支持python字典形式
# yoalct.py
def forward(self, x):
	...
    else:
	...
    if cfg.use_objectness_score:
    objectness = torch.sigmoid(pred_outs['conf'][:, :, 0])

    pred_outs['conf'][:, :, 1:] = (objectness > 0.10)[..., None] \
    * F.softmax(pred_outs['conf'][:, :, 1:], dim=-1)

    else:
    pred_outs['conf'] = F.softmax(pred_outs['conf'], -1)
    #TODO 修改:直接返回结果,不进行self.detect后处理
    return pred_outs
    # return self.detect(pred_outs, self)

def make_priors(self, conv_h, conv_w, device):
    ...
    # TODO 修改:先转成Tensor后再to(device)操作
    # print(prior_data.device)
    # self.priors = torch.Tensor(prior_data, device=device).view(-1, 4).detach()
    self.priors = torch.Tensor(prior_data).view(-1, 4)
    self.priors = self.priors.to(device).detach()


# layers/functions/detection.py
def traditional_nms(self, boxes, masks, scores, iou_threshold=0.5, conf_thresh=0.05):
    ...
    preds = torch.cat([boxes[conf_mask], cls_scores[:, None]], dim=1).cpu().detach().numpy()
    keep = cnms(preds, iou_threshold)
    # TODO 修改:先转为Tensor之后再to(device)
    # keep = torch.Tensor(keep, device=boxes.device).long()
    keep = torch.Tensor(keep).long()
    keep = keep.to(boxes.device)
    idx_lst.append(idx[keep])
    cls_lst.append(keep * 0 + _cls)
    scr_lst.append(cls_scores[keep])
4.生成优化trt模型
4.1.编译tensorrt开源代码
-
下载tensorrt源码(这里是tensorrt开源部分,开源部分的编译需要2.4小节中tensort核心库的支持,核心库代码未开源)
# 拉取代码 git clone https://github.com/liyuyuan6969/TensorRT.git # 查看代码版本并切换 cd TensorRT git branch -a git checkout -b rel-8.0 origin/release/8.0 # 拉取子模块 git submodule update --init --recursive # 将tensorrt核心库放在TensorRT目录下 cp /usr/local/TensorRT-8.0.0.3/TensorRT-8.0.0.3 ./ # 修改CmakeList.txt中的版本内容 # 将CUDA\CUDNN\PROTOBUF的版本分别改为自己本地的版本,查看版本命令见第二章安装 # TensorRT/CMakeList.txt #set(DEFAULT_CUDA_VERSION 11.3.1) #set(DEFAULT_CUDNN_VERSION 8.2) #set(DEFAULT_PROTOBUF_VERSION 3..0) #set(DEFAULT_CUB_VERSION 1.8.0) # 改成如下自己安装的版本: set(DEFAULT_CUDA_VERSION 11.0.221) set(DEFAULT_CUDNN_VERSION 8.05) set(DEFAULT_PROTOBUF_VERSION 3.16.0) # 设置环境变量,使得编译时能够找到,pwd表示当前文件夹 export TRT_SOURCE=`pwd` export TRT_RELEASE=`pwd`/TensorRT-8.0.0.3 export TENSORRT_LIBRARY_INFER=$TRT_RELEASE/targets/x86_64-linux-gnu/lib/libnvinfer.so export TENSORRT_LIBRARY_INFER_PLUGIN=$TRT_RELEASE/targets/x86_64-linux-gnu/lib/libnvinfer_plugin.so export TENSORRT_LIBRARY_MYELIN=$TRT_RELEASE/targets/x86_64-linux-gnu/lib/libmyelin.so # 初次编译,保证环境正常,TRT_RELEASE参数为tensorrt核心库目录,DTRT_LIB_DIR为核心库目录下的lib文件夹,DTRT_OUT_DIR为输出目录 mkdir build && cd build cmake .. -DTRT_LIB_DIR=$TRT_RELEASE/lib -DTRT_OUT_DIR=`pwd`/out make -j16-
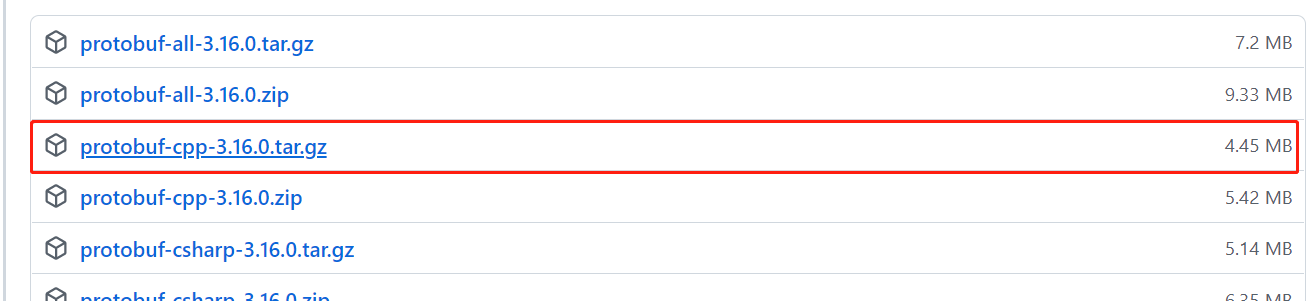
(可略过)make会下载protobuf源码并编译,比较耗时。可以提前下载并跳过校验步骤
-
可以提前下载protobuf-cpp-3.16.0.tar.gz到/absolute_path/env目录
![image-20210831113013838]()
-
ln -sf $TRT_SOURCE/absolute_path/env/protobuf-cpp-3.16.0.tar.gz $TRT_SOURCE/build/third_party.protobuf/src
-
编辑$TRT_SOURCE/build/third_party.protobuf/src/third_party.protobuf-stamp/download-third_party.protobuf.cmake文件,将if(EXISTS)直到文件的最后一行都注释掉
# $TRT_SOURCE/build/third_party.protobuf/src/third_party.protobuf-stamp/download-third_party.protobuf.cmake
# 从这里开始到文件末尾全部注释掉
if(EXISTS "/data1/xuduo/optimize/yolact_dir_0804/TensorRT/build/third_party.protobuf/src/protobuf-cpp-3.16.0.tar.gz")
# 增加return()或将这一段if else直接注释
	return()

  check_file_hash(has_hash hash_is_good)
   if(has_hash)
     if(hash_is_good)
       message(STATUS "File already exists and hash match (skip download):
   file='/data1/xuduo/optimize/yolact_dir_0804/TensorRT/build/third_party.protobuf/src/protobuf-cpp-3.16.0.tar.gz'
   =''"
   )
       return()
     else()
       message(STATUS "File already exists but hash mismatch. Removing...")
       file(REMOVE "/data1/xuduo/optimize/yolact_dir_0804/TensorRT/build/third_party.protobuf/src/protobuf-cpp-3.16.0.tar.gz")
     endif()
   else()
     message(STATUS "File already exists but no hash specified (use URL_HASH):   file='/data1/xuduo/optimize/yolact_dir_0804/TensorRT/build/third_party.protobuf/src/protobuf-cpp-3.16.0.tar.gz'
 Old file will be removed and new file downloaded from URL."
     )
     file(REMOVE "/data1/xuduo/optimize/yolact_dir_0804/TensorRT/build/third_party.protobuf/src/protobuf-cpp-3.16.0.tar.gz")
   endif()
 endif()
-
-
4.2.编译TensorRT插件
-
在plugin文件夹中新建DCNv2Plugin文件夹,将下载的.cpp和.cu文件放在DCNv2Plugin下,添加TensorRT插件,.cu结尾的是cuda文件,调用cuda的方法写在.cpp的enqueue函数下进行调用
-
由于我们的插件是7.0版本的,TensorRT是8.0版本的,所以要进行如下改写
-
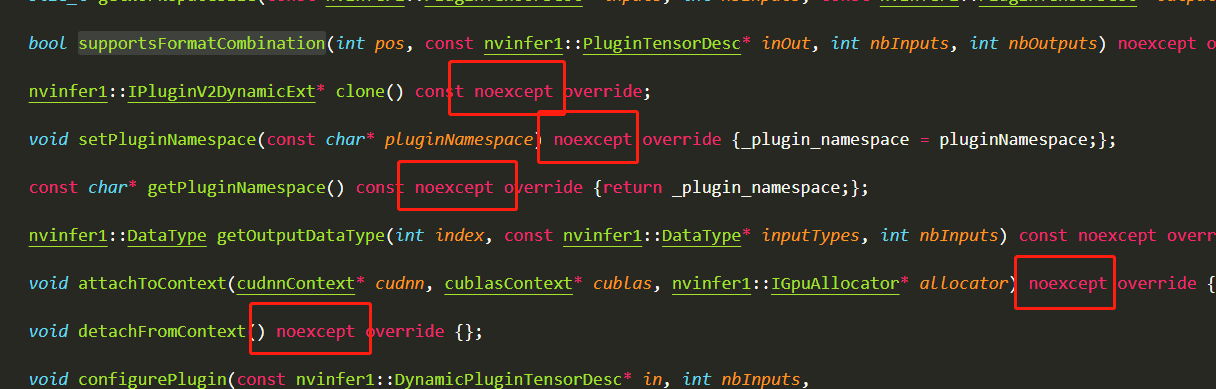
在DCNv2Plugin.hpp和DCNv2Plugin.cpp有override重写关键字的函数前添加noexpect关键字,因为TensorRT8.0中源码都有添加,继承的类也需要添加
![image-20210830204848672]()
-
修改DCNv2Plugin.cpp中nvinfer1::TensorFormat::kNCHW为nvinfer1::TensorFormat::kLINEAR,具体用法见API文档
-
-
对于头文件中各种函数的作用见如下文章
-
在Plugin/CMakeLists.txt中添加DCNv2Plugin
# Plugin/CMakeLists.txt # 增加DCNv2Plugin set(PLUGIN_LISTS batchedNMSPlugin batchTilePlugin coordConvACPlugin cropAndResizePlugin detectionLayerPlugin efficientNMSPlugin flattenConcat generateDetectionPlugin gridAnchorPlugin groupNormalizationPlugin instanceNormalizationPlugin leakyReluPlugin multilevelCropAndResizePlugin multilevelProposeROI nmsPlugin normalizePlugin nvFasterRCNN priorBoxPlugin proposalLayerPlugin proposalPlugin pyramidROIAlignPlugin regionPlugin reorgPlugin resizeNearestPlugin scatterPlugin specialSlicePlugin splitPlugin # 新增 DCNv2Plugin ) -
修改TensorRT/plugin/InferPlugin.cpp中的内容,初始化DCNv2Plugin插件
//TensorRT/plugin/InferPlugin.cpp //头文件中插入DCNv2Plugin.cpp #include "DCNv2Plugin.hpp" extern "C" { bool initLibNvInferPlugins(void* logger, const char* libNamespace) { initializePlugin<nvinfer1::plugin::BatchTilePluginCreator>(logger, libNamespace); initializePlugin<nvinfer1::plugin::BatchedNMSPluginCreator>(logger, libNamespace); initializePlugin<nvinfer1::plugin::BatchedNMSDynamicPluginCreator>(logger, libNamespace); initializePlugin<nvinfer1::plugin::CoordConvACPluginCreator>(logger, libNamespace); initializePlugin<nvinfer1::plugin::CropAndResizePluginCreator>(logger, libNamespace); initializePlugin<nvinfer1::plugin::CropAndResizeDynamicPluginCreator>(logger, libNamespace); initializePlugin<nvinfer1::plugin::DetectionLayerPluginCreator>(logger, libNamespace); initializePlugin<nvinfer1::plugin::EfficientNMSONNXPluginCreator>(logger, libNamespace); initializePlugin<nvinfer1::plugin::EfficientNMSPluginCreator>(logger, libNamespace); initializePlugin<nvinfer1::plugin::FlattenConcatPluginCreator>(logger, libNamespace); initializePlugin<nvinfer1::plugin::GenerateDetectionPluginCreator>(logger, libNamespace); initializePlugin<nvinfer1::plugin::GridAnchorPluginCreator>(logger, libNamespace); initializePlugin<nvinfer1::plugin::GridAnchorRectPluginCreator>(logger, libNamespace); initializePlugin<nvinfer1::plugin::InstanceNormalizationPluginCreator>(logger, libNamespace); initializePlugin<nvinfer1::plugin::LReluPluginCreator>(logger, libNamespace); initializePlugin<nvinfer1::plugin::MultilevelCropAndResizePluginCreator>(logger, libNamespace); initializePlugin<nvinfer1::plugin::MultilevelProposeROIPluginCreator>(logger, libNamespace); initializePlugin<nvinfer1::plugin::NMSPluginCreator>(logger, libNamespace); initializePlugin<nvinfer1::plugin::NMSDynamicPluginCreator>(logger, libNamespace); initializePlugin<nvinfer1::plugin::NormalizePluginCreator>(logger, libNamespace); initializePlugin<nvinfer1::plugin::PriorBoxPluginCreator>(logger, libNamespace); initializePlugin<nvinfer1::plugin::ProposalLayerPluginCreator>(logger, libNamespace); initializePlugin<nvinfer1::plugin::ProposalPluginCreator>(logger, libNamespace); initializePlugin<nvinfer1::plugin::ProposalDynamicPluginCreator>(logger, libNamespace); initializePlugin<nvinfer1::plugin::PyramidROIAlignPluginCreator>(logger, libNamespace); initializePlugin<nvinfer1::plugin::RegionPluginCreator>(logger, libNamespace); initializePlugin<nvinfer1::plugin::ReorgPluginCreator>(logger, libNamespace); initializePlugin<nvinfer1::plugin::ResizeNearestPluginCreator>(logger, libNamespace); initializePlugin<nvinfer1::plugin::RPROIPluginCreator>(logger, libNamespace); initializePlugin<nvinfer1::plugin::ScatterNDPluginCreator>(logger, libNamespace); initializePlugin<nvinfer1::plugin::SpecialSlicePluginCreator>(logger, libNamespace); initializePlugin<nvinfer1::plugin::SplitPluginCreator>(logger, libNamespace); // 插入DCNv2PluginCreator initializePlugin<nvinfer1::plugin::DCNv2PluginCreator>(logger, libNamespace); return true; } } // extern "C" -
进入TensorRT/build重新编译,生成新的libnvinfer_plugin.so
# 进行build目录 cd TensorRT/build # 删除所有文件,不然可能报错 rm -rf * # 重新执行编译,DTRT_LIB_DIR参数为TRT安装目录下的lib,TRT_RELEASE为TensorRT的安装目录,因为我们在上面将TensorRT-8.0.0.3移动到了TensorRT源码目录下,所以这里可以直接按照4.1章节设置 cmake .. -DTRT_LIB_DIR=$TRT_RELEASE/lib -DTRT_OUT_DIR=`pwd`/out make -j16 -
将/usr/local/TensorRT-8.0.0.3/TensorRT-8.0.0.3/lib目录的libnvinfer_plugin.so文件夹更名为libnvinfer_plugin_bk.so作为备份,将新的libnvinfer_plugin.so移动到此目录下,建立软连接
# 进入安装TensorRT文件目录
cd /usr/local/TensorRT-8.0.0.3/TensorRT-8.0.0.3/lib
# 将原来的libnvinfer_plugin.so更改文件名加后缀_bk作为备份
sudo mv libnvinfer_plugin.so.8.0.0 libnvinfer_plugin.so.8.0.0_bk
# 查看
ls
# pwd命令查看build下libnvinfer_plugin.so路径
pwd
# 将build文件夹下的libnvinfer_plugin.so.8.0.1移动到TensorRT目录
sudo cp /data1/xuduo/optimize/yolact_dir_0804/TensorRT/build/libnvinfer_plugin.so.8.0.1 ./
# 将onnx-tensorrt文件夹下的libnvonnxparser.so.8.0.0移动到TensorRT目录
sudo cp /data1/xuduo/optimize/yolact_dir_0804/onnx-tensorrt/build/libnvonnxparser.so.8.0.0 ./

# 删除软连接
sudo rm libnvinfer_plugin.so
# 创建软连接到新的libnvinfer_plugin.so.8.0.1文件,
# ln -s [源文件] [目标文件]
sudo ln -s libnvinfer_plugin.so.8.0.1 libnvinfer_plugin.so
# 删除软连接
sudo rm libnvinfer_plugin.so.8
sudo ln -s libnvinfer_plugin.so.8.0.1 libnvinfer_plugin.so.8
# 使用ll命令查看软连接是否改变
ll
4.3.编译onnx-tensorrt
-
修改安装的onnx-tensorrt下的builtin_op_importers.cpp文件,此文件为onnx解析模型算子的文件,添加对DCNv2算子的支持,并且映射到tensorrt插件,使用宏DEFINE_BUILTIN_OP_IMPORTER来添加onnx插件
DEFINE_BUILTIN_OP_IMPORTER(DCNv2) { ASSERT(inputs.at(0).is_tensor(), ErrorCode::kUNSUPPORTED_NODE); // input ASSERT(inputs.at(1).is_tensor(), ErrorCode::kUNSUPPORTED_NODE); // offset ASSERT(inputs.at(2).is_tensor(), ErrorCode::kUNSUPPORTED_NODE); // mask ASSERT(inputs.at(3).is_weights(), ErrorCode::kUNSUPPORTED_NODE); // weight nvinfer1::ITensor* InputTensors = &convertToTensor(inputs.at(0), ctx); nvinfer1::ITensor* Offset = &convertToTensor(inputs.at(1), ctx); nvinfer1::ITensor* mask = &convertToTensor(inputs.at(2), ctx); onnx2trt::ShapedWeights weights = inputs.at(3).weights(); onnx2trt::ShapedWeights bias = inputs.at(4).weights(); std::vector<nvinfer1::ITensor*> tensors {&inputs.at(0).tensor(), &inputs.at(1).tensor(),&inputs.at(2).tensor()}; // 获取onnx当前节点的attribute,对应的就是python上提到的info_s,kernel_size_i,eps_f等函数 int out_channel,in_channel,kernel_H,kernel_W,deformable_group,dilation,groups,padding,stride; out_channel = weights.shape.d[0]; in_channel = weights.shape.d[1]; kernel_H = weights.shape.d[2]; kernel_W = weights.shape.d[3]; OnnxAttrs attrs(node, ctx); dilation = attrs.get<int>("dilation",1); padding = attrs.get<int>("padding",1); stride = attrs.get<int>("stride",1); groups = attrs.get("groups", 1); deformable_group = attrs.get<int>("deformable_groups",1); std::string name = "DCNv2"; std::vector<nvinfer1::PluginField> f; f.emplace_back("in_channel", &in_channel, nvinfer1::PluginFieldType::kINT32, 1); f.emplace_back("out_channel", &out_channel, nvinfer1::PluginFieldType::kINT32, 1); f.emplace_back("kernel_h", &kernel_H, nvinfer1::PluginFieldType::kINT32, 1); f.emplace_back("kernel_w", &kernel_W, nvinfer1::PluginFieldType::kINT32, 1); f.emplace_back("deformable_group", &deformable_group, nvinfer1::PluginFieldType::kINT32, 1); f.emplace_back("groups", &groups, nvinfer1::PluginFieldType::kINT32, 1); f.emplace_back("padding", &padding, nvinfer1::PluginFieldType::kINT32, 1); f.emplace_back("stride", &stride, nvinfer1::PluginFieldType::kINT32, 1); f.emplace_back("dilation", &dilation, nvinfer1::PluginFieldType::kINT32, 1); f.emplace_back("weight", weights.values, nvinfer1::PluginFieldType::kFLOAT32, weights.count()); f.emplace_back("bias", bias.values, nvinfer1::PluginFieldType::kFLOAT32, bias.count()); nvinfer1::PluginFieldCollection fc; fc.nbFields = f.size(); fc.fields = f.data(); const auto mPluginRegistry = getPluginRegistry(); const auto pluginCreator = mPluginRegistry->getPluginCreator(name.c_str(), "1"); ASSERT(pluginCreator != nullptr, ErrorCode::kINVALID_VALUE); nvinfer1::IPluginV2* plugin = pluginCreator->createPlugin(node.name().c_str(),&fc); if(plugin == nullptr){ printf("%s DCNv2 was not found in the plugin registry!", name.c_str()); ASSERT(false, ErrorCode::kUNSUPPORTED_NODE); } RETURN_FIRST_OUTPUT(ctx->network()->addPluginV2(tensors.data() ,2, *plugin)); } -
重新执行编译命令,编译并安装onnx-tensorrt,这里的安装会将so文件写入到/usr/local/lib中
# 进入目录,这里为安装时的onnx-tensort目录 cd onnx-tensorrt/build # 删除所有文件 rm -rf * # 重新编译安装 # 这里的path_to_trt是tensorrt的安装目录,即tensorrt下载到的目录,如果报错three_party/onnx没有,使用cp复制命令将上面的onnx文件移动到此three_party下再进行编译 # cmake .. -DProtobuf_INCLUDE_DIR=/data1/xuduo/optimize/yolact_dir_0804/protobuf/src -DTENSORRT_ROOT=/usr/local/TensorRT-8.0.0.3/TensorRT-8.0.0.3 cmake .. -DTENSORRT_ROOT=/usr/local/TensorRT-8.0.0.3/TensorRT-8.0.0.3 && make -j16 // Ensure that you update your LD_LIBRARY_PATH to pick up the location of the newly built library: sudo make install -
使用python代码,将onnx转为trt文件(反序列化),生成trt文件(因为这里方便调试,而且log的级别设置为VERBOSE级别,信息会非常详细)
import os
import torch
import tensorrt as trt
import sys

TRT_LOGGER = trt.Logger(trt.Logger.VERBOSE)
EXPLICIT_BATCH = 1 << (int)(trt.NetworkDefinitionCreationFlag.EXPLICIT_BATCH)

def GiB(val):
    return val * 1 << 30

def conver_engine(onnx_file_path, engine_file_path="", max_batch_size=1):
    """Attempts to load a serialized engine if available, otherwise builds a new TensorRT engine and saves it."""
    """Takes an ONNX file and creates a TensorRT engine to run inference with"""
    with trt.Builder(TRT_LOGGER) as builder, builder.create_network(EXPLICIT_BATCH) as network, trt.OnnxParser(network, TRT_LOGGER) as parser:
        # builder.max_workspace_size = GiB(max_batch_size)
        builder.max_batch_size = max_batch_size
        # Parse model file
        if not os.path.exists(onnx_file_path):
            print('ONNX file {} not found, please run onnx2trt_yolact.py first to generate it.'.format(onnx_file_path))
            exit(0)
        print('Loading ONNX file from path {}...'.format(onnx_file_path))
        with open(onnx_file_path, 'rb') as model:
            print('Beginning ONNX file parsing')
            if not parser.parse(model.read()):
                print ('ERROR: Failed to parse the ONNX file.')
                for error in range(parser.num_errors):
                    print (parser.get_error(error))
                return None
        # The actual yolov3.onnx is generated with batch size 64. Reshape input to batch size 1
        print('Completed parsing of ONNX file')
        print('Building an engine from file {}; this may take a while...'.format(onnx_file_path))
        engine_config = builder.create_builder_config()
        engine = builder.build_engine(network,engine_config)
        print("Completed creating Engine")
        with open(engine_file_path, "wb") as f:
            f.write(engine.serialize())
        print("Completed writing Engine. Well done!")

if __name__ == "__main__":
    onnx_file_path = 'yolact.onnx'
    engine_file_path = "yolact.trt"
    conver_engine(onnx_file_path, engine_file_path)
4.4.使用trt模型进行推理
-
在完成trt的转化之后,编写推理代码,可以得到推理结果
import os
import torch
import tensorrt as trt
from PIL import Image
import numpy as np
import time
import cv2
import glob
import config as cfg
import torch.nn.functional as F
import sys
sys.path.insert(1, os.path.join(sys.path[0], ".."))
import common
print("sys.path[0]",sys.path[0])

TRT_LOGGER = trt.Logger(trt.Logger.VERBOSE)
# 初始化插件,将自定义插件初始化到插件库
trt.init_libnvinfer_plugins(TRT_LOGGER, '')
EXPLICIT_BATCH = 1 << (int)(trt.NetworkDefinitionCreationFlag.EXPLICIT_BATCH)

def GiB(val):
    return val * 1 << 30

def preprocess_image(path):
    # img [h,w,c]
    image = cv2.imread(image_name)
    img_raw_data = cv2.imencode('.jpg', image)[1].tobytes()
    img_data = cv2.imdecode(np.asarray(bytearray(img_raw_data), dtype=np.uint8),
                       cv2.IMREAD_COLOR)
    frame = torch.from_numpy(img_data).cuda().float()
    # print(frame.size)
    batch = FastBaseTransform()(frame.unsqueeze(0))
    return batch

class FastBaseTransform(torch.nn.Module):
    """
    Transform that does all operations on the GPU for super speed.
    This doesn't suppport a lot of config settings and should only be used for production.
    Maintain this as necessary.
    """

    def __init__(self):
        super().__init__()

        self.mean = torch.Tensor(cfg.MEANS).float().cuda()[None, :, None, None]
        self.std = torch.Tensor(cfg.STD).float().cuda()[None, :, None, None]
        self.transform = cfg.resnet_transform

    def forward(self, img):
        self.mean = self.mean.to(img.device)
        self.std = self.std.to(img.device)

        # img assumed to be a pytorch BGR image with channel order [n, h, w, c]

        img_size = (cfg.max_size, cfg.max_size)
        # 图片转为[n,c,h,w]格式
        img = img.permute(0, 3, 1, 2).contiguous()
        img = F.interpolate(img, img_size, mode='bilinear', align_corners=False)

        if self.transform.normalize:
            img = (img - self.mean) / self.std
        elif self.transform.subtract_means:
            img = (img - self.mean)
        elif self.transform.to_float:
            img = img / 255

        if self.transform.channel_order != 'RGB':
            raise NotImplementedError

        img = img[:, (2, 1, 0), :, :].contiguous()

        # Return value is in channel order [n, c, h, w] and RGB
        return img

if __name__ == "__main__":
    onnx_file_path = 'yolact.onnx'
    engine_file_path = "yolact.trt"
    image_name = "/data1/xuduo/optimize/yolact_dir_0804/img/material_WholeBookQuestionData_7H1110B44850N_QuestionBookImage20210713083208_164_586_7H1110B44850N.jpg"
    if not os.path.exists(engine_file_path):
        print("no engine file")
        # conver_engine(onnx_file_path, engine_file_path)
    print(f"Reading engine from file {engine_file_path}")
    f = open(engine_file_path, "rb")
    runtime = trt.Runtime(TRT_LOGGER)
    engine = runtime.deserialize_cuda_engine(f.read())

    # Allocate buffers and create a CUDA stream.
    inputs, outputs, bindings, stream = common.allocate_buffers(engine)
    # Contexts are used to perform inference.
    context = engine.create_execution_context()
    batch = preprocess_image(image_name)
    np.copyto(inputs[0].host, batch.cpu().numpy().ravel())
    trt_outputs = common.do_inference_v2(context, bindings=bindings, inputs=inputs, outputs=outputs, stream=stream)
    print("预测结果:",trt_outputs)
此项目最终停留在了推理的调试阶段,DCNv2部分代码需要自己进行调试,由于项目需要不再进行跟进,但是还是对优化比较感兴趣,今年的目标是重新跑通此代码,并会自己加一些优化策略

 浙公网安备 33010602011771号