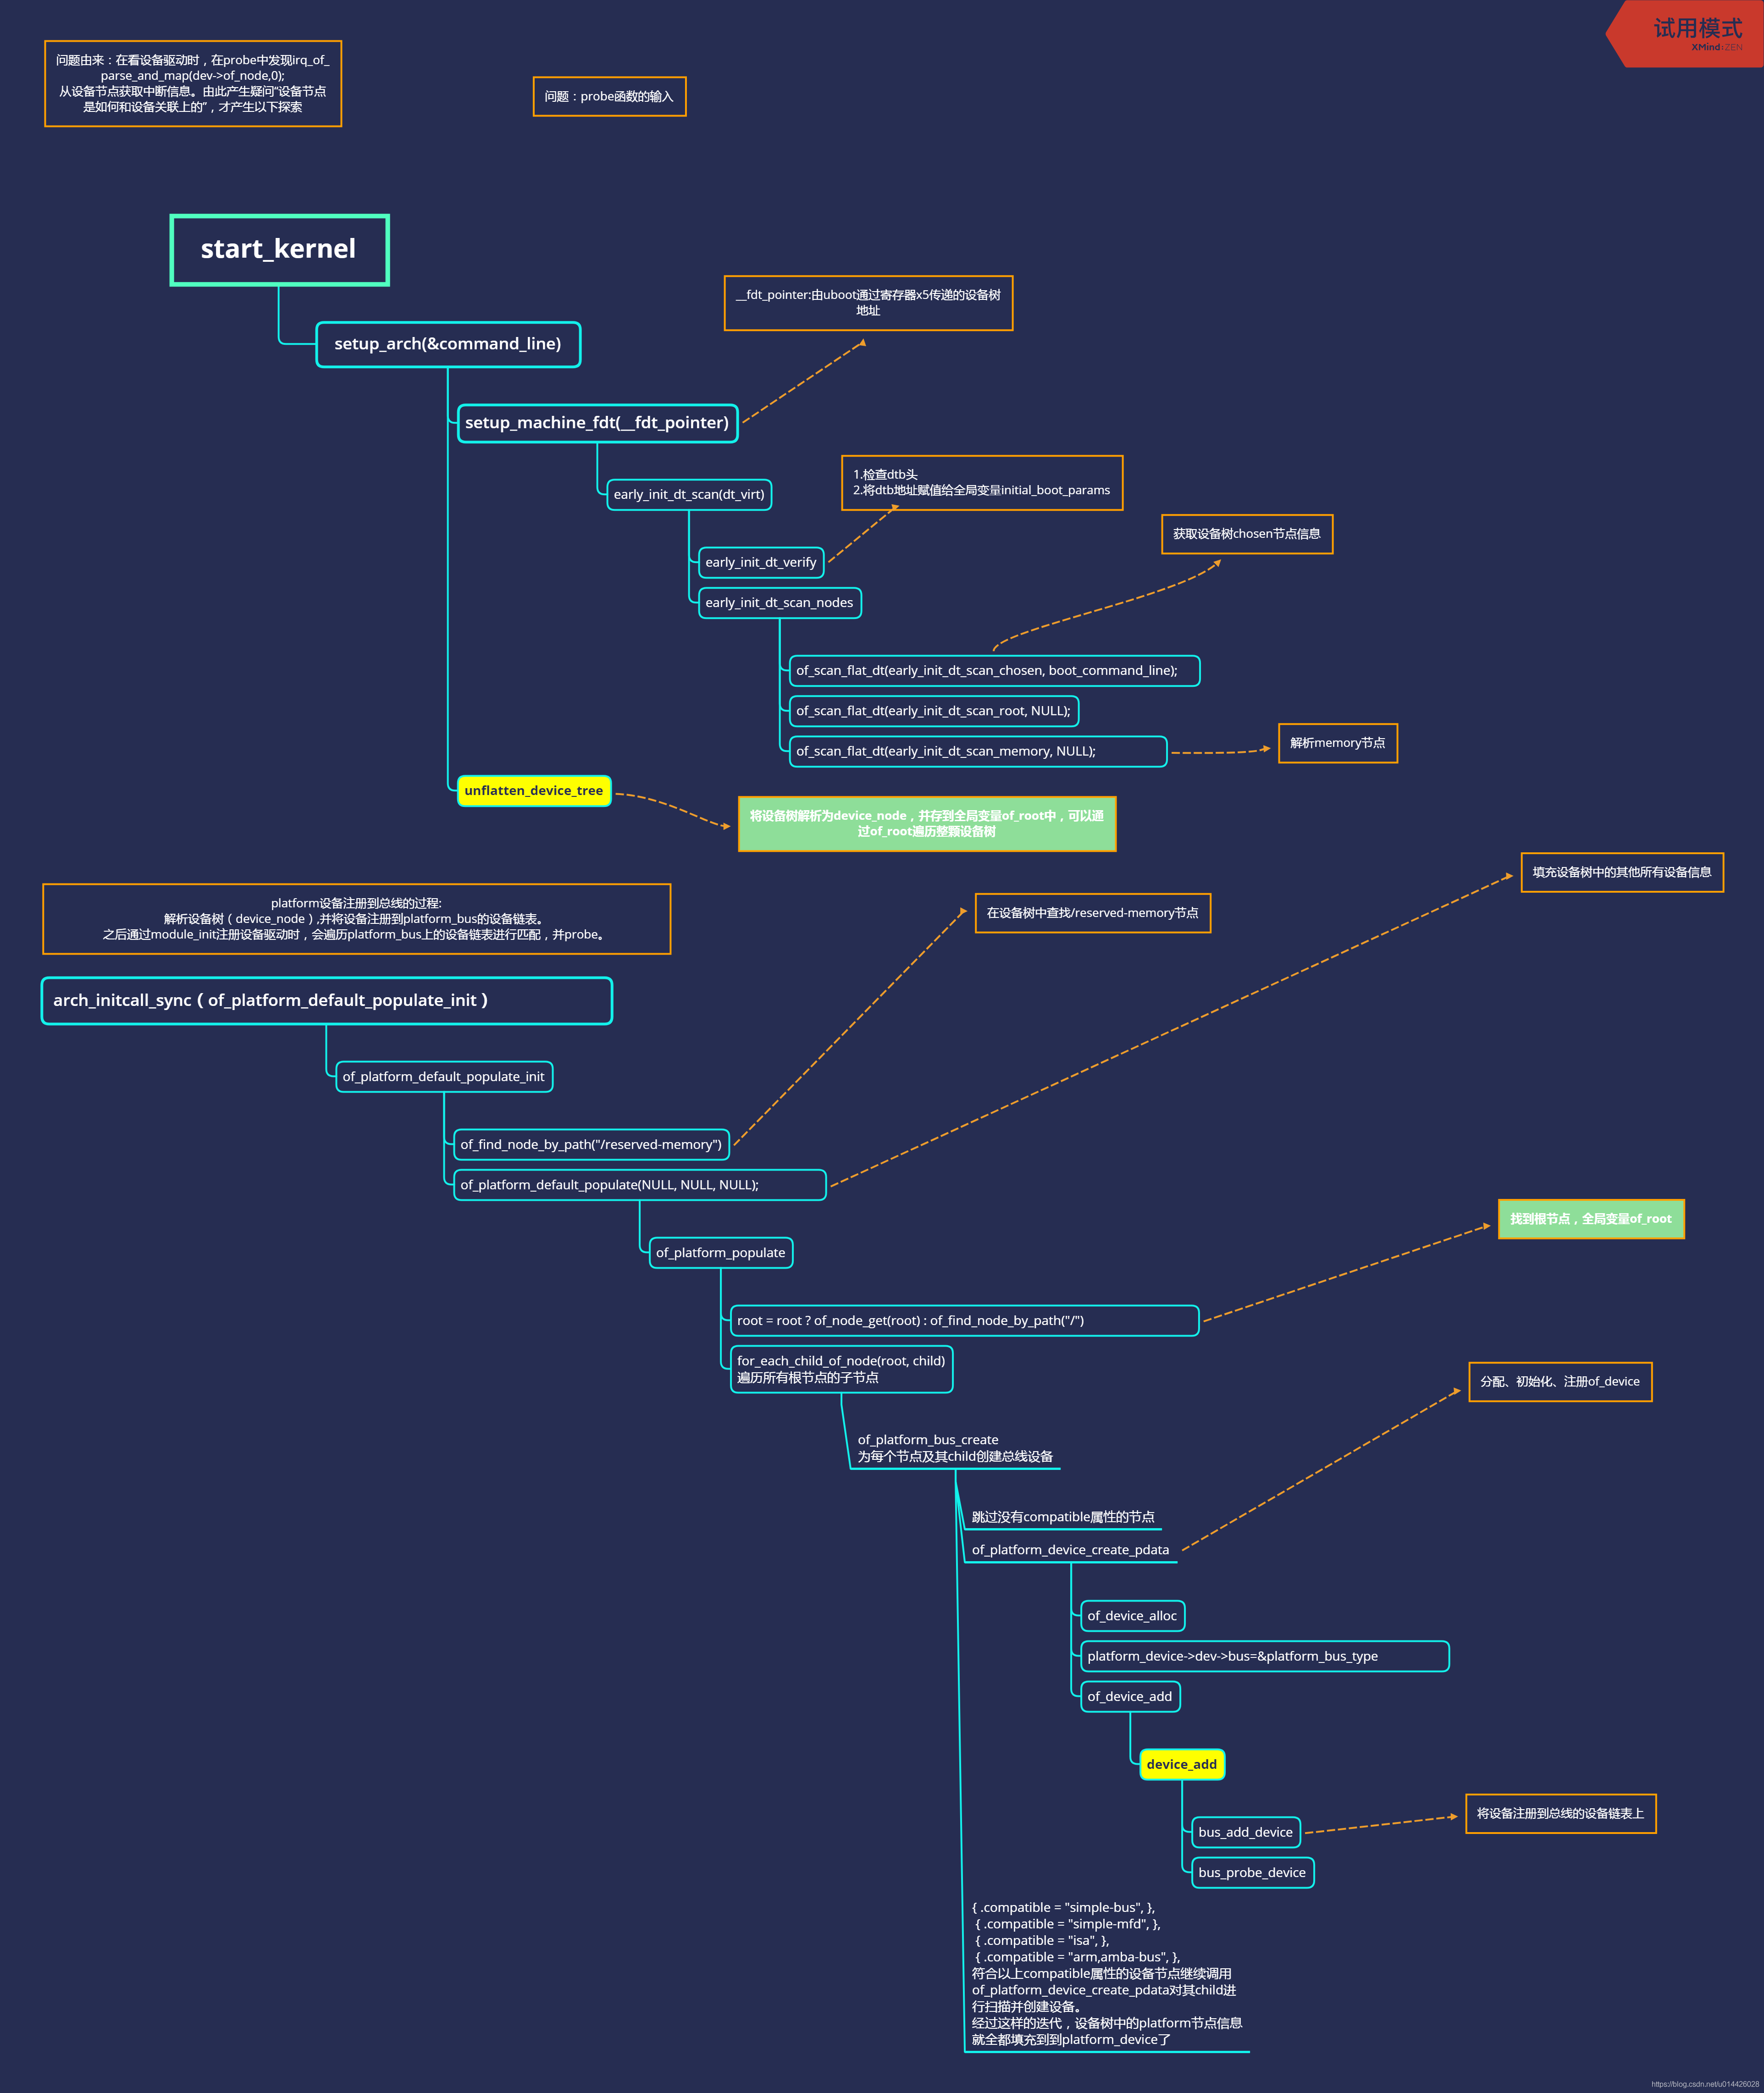
linux 设备树解析及probe调用流程
以platform设备为例
设备树解析
很好的一张总结图,转自:设备树解析过程及platform设备注册

probe函数调用
在驱动程序中,我们通常会定义一个platform_driver的结构体,其中包含了各种操作函数。
static struct platform_driver xxx_driver = {
	.probe		= xxx_probe,
	.remove		= __devexit_p(xxx_remove),
	.shutdown        = xxx_shutdown,
	.suspend        = xxx_suspend,
	.resume		= xxx_resume,
	.of_match_table = icm40607_of_match,
        .driver		= {
		.owner	= THIS_MODULE,
		.name	= "xxx_name",
                .id_table   = xxx_id,
	},
};
其中,of_match_table和id_table都是用来在设备树中和设备匹配,且都是通过compatible,前者优先级更高,后者则会在前者未匹配的情况下去掉compatible的供应商信息后再匹配,即id_table只匹配sensor名字。
而这个结构体的定义之中会找到许多函数指针。
struct platform_driver {
	int (*probe)(struct platform_device *);
	int (*remove)(struct platform_device *);
	void (*shutdown)(struct platform_device *);
	int (*suspend)(struct platform_device *, pm_message_t state);
	int (*resume)(struct platform_device *);
	struct device_driver driver;
	struct platform_device_id *id_table;
};
struct device_driver {
	const char		*name;
	struct bus_type		*bus;

	struct module		*owner;
	const char		*mod_name; /* used for built-in modules*/

	bool suppress_bind_attrs; /* disables bind/unbind via sysfs */

	int (*probe) (struct device *dev);
	int (*remove) (struct device *dev);
	void (*shutdown) (struct device *dev);
	int (*suspend) (struct device *dev, pm_message_t state);
	int (*resume) (struct device *dev);
	const struct attribute_group **groups;

	const struct dev_pm_ops *pm;

	struct driver_private *p;
};
之后我们初始化时会调用函数platform_driver_register进行注册,把platform的函数指针传入了driver结构体中。这样device_driver和platform_driver都有了具体的值,但是好像还是不知道如何执行到我们定义的probe函数。
int platform_driver_register(struct platform_driver *drv)
{
	drv->driver.bus = &platform_bus_type;
	if (drv->probe)
		drv->driver.probe = platform_drv_probe;//platform_drv_probe是函数名
	if (drv->remove)
		drv->driver.remove = platform_drv_remove;
	if (drv->shutdown)
		drv->driver.shutdown = platform_drv_shutdown;

	return driver_register(&drv->driver);
}
继续找platform_drv_probe的定义:
static int platform_drv_probe(struct device *_dev)
{
	struct platform_driver *drv = to_platform_driver(_dev->driver);
	struct platform_device *dev = to_platform_device(_dev);
        .
        .
        .
	return drv->probe(dev);
}
找到to_platform_driver的定义后,发现调用了一个熟悉的函数container_of。
#define to_platform_driver(drv)    \
(container_of((drv), struct platform_driver, driver))
#define container_of(ptr, type, member) ({              \
const typeof( ((type *)0)->member ) *__mptr = (ptr);    \
(type *)( (char *)__mptr - offsetof(type,member) );})
container_of这个函数第一次遇见是再看宋宝华的书的时候,当时在写platform总线下的字符设备驱动程序。但是,实现open函数时不知道怎么让file的私有数据指针private_data指向我在probe中定义地设备结构体lxy_device的指针(局部变量)。
container_of(ptr,type,member),这里面有ptr,type,member分别代表传入的具体成员指针、结构体类型、结构体中ptr对应的具体成员,ptr类型应该是typeof(member) *。
简单说,这个函数可以根据结构体某个成员的地址获取该结构体的指针(地址),最好能仔细理解这个函数,第一次见真是感觉很巧妙。
int driver_register(struct device_driver *drv)
{
	...
	ret = bus_add_driver(drv);
        ...
}

int bus_add_driver(struct device_driver *drv)
{
        ...
	if (drv->bus->p->drivers_autoprobe) {
		error = driver_attach(drv);
		if (error)
			goto out_unregister;
	}
        ...
}

int driver_attach(struct device_driver *drv)
{
	return bus_for_each_dev(drv->bus, NULL, drv, __driver_attach);
}
//bus_for_each_dev就是对已经添加到drv->bus上面的每个设备操作。
int bus_for_each_dev(struct bus_type *bus, struct device *start, \
                    void *data, int (*fn)(struct device *, void *))
{
    data = drv;
    klist_iter_init_node(&bus->p->klist_devices, &i,         \
                        (start ? &start->p->knode_bus : NULL));
    while ((dev = next_device(&i)) && !error)
        error = fn(dev, data);
}
static int __driver_attach(struct device *dev, void *data)
{
	struct device_driver *drv = data;

	if (!driver_match_device(drv, dev))    // here !
		return 0;

	if (dev->parent)	/* Needed for USB */
		down(&dev->parent->sem);
	down(&dev->sem);
	if (!dev->driver)
		driver_probe_device(drv, dev);    //& here !
	up(&dev->sem);
	if (dev->parent)
		up(&dev->parent->sem);

	return 0;
}
driver_match_device 是检测设备和驱动是否匹配;
drvier_probe_device 是执行probe函数。
//match 函数
static inline int driver_match_device(struct device_driver *drv,struct device *dev)
{
 return drv->bus->match ? drv->bus->match(dev, drv) : 1;
}

static int platform_match(struct device *dev, struct device_driver *drv)
{
	struct platform_device *pdev = to_platform_device(dev);
	struct platform_driver *pdrv = to_platform_driver(drv);

	/* match against the id table first */
	if (pdrv->id_table)
		return platform_match_id(pdrv->id_table, pdev) != NULL;

	/* fall-back to driver name match */
	return (strcmp(pdev->name, drv->name) == 0);
}

struct bus_type platform_bus_type = {
	.name		= "platform",
	.dev_attrs	= platform_dev_attrs,
	.match		= platform_match,
	.uevent		= platform_uevent,
	.pm		= &platform_dev_pm_ops,
};
其实,bus_type中的match函数也就是platform_match函数,才是真正的将驱动和设备进行匹配的函数。如果成功就返回0. 看到了其中比较了 pdev->name 和 drv->name 。具体到watchdog的驱动中, 这两个对应的就是字符串:"xxx_name"。
//probe 函数
在driver_probe_device中又调用了really_probe:

static int really_probe(struct device *dev, struct device_driver *drv)
{
	int ret = 0;

	atomic_inc(&probe_count);
	dev->driver = drv;
	if (driver_sysfs_add(dev)) {
		printk(KERN_ERR "%s: driver_sysfs_add(%s) failed\n",
			__func__, dev_name(dev));
		goto probe_failed;
	}

	if (dev->bus->probe) {
		ret = dev->bus->probe(dev);
		if (ret)
			goto probe_failed;
	} else if (drv->probe) {
		ret = drv->probe(dev);
		if (ret)
			goto probe_failed;
	}

	driver_bound(dev);
	ret = 1;
	pr_debug("bus: '%s': %s: bound device %s to driver %s\n",
		 drv->bus->name, __func__, dev_name(dev), drv->name);
	goto done;
参数dev来自:
__driver_attach中的device *dev
又来自于 next_device(&i)
i来自于klist_iter_init_node,应该是由设备树匹配而来。
那么到了这一步,也就全部联系起来了。
1、platform_driver_register注册时把 platform_drv_probe赋值给drv->driver.probe。
2、然后driver_register调用了driver_probe_device,里面又调用了really_probe,里面通过drv->probe调用了drv->driver.probe,也就是调用了platform_drv_probe。其中传入的参数是device *dev,dev_prv = to_device_private_bus,dev = dev_prv->device。猜测dev由设备树匹配过来。
3、platform_drv_probe中又获取了xxx_probe的指针,最后调用到我们编写的xxx_probe。


