爬虫笔记
爬虫
概述
引题:
不知道各位是否遇到过这样的需求.就是我们总是希望能够保存互联网上的一些重要的数据信息为己所用。
比如:
- 在浏览到一些优秀的让人血脉喷张的图片时.总想保存起来留为日后做桌面上的壁纸
- 在浏览到一些重要的数据时(各行各业),希望保留下来日后为自己进行各种销售行为增光添彩·在浏览到一些奇奇怪怪的劲爆视频时,希望保存在硬盘里供日后慢慢品鉴
- 在浏览到一些十分优秀的歌声曲目时,希望保存下来供我们在烦闷的生活中增添一份精彩
爬虫和python
爬虫一定要用Python么?非也~用Java也行, C也可以.请各位记住,编程语言只是工具.抓到数据是你的目的.用什么工具去达到你的目的都是可以的.和吃饭一样,可以用叉子也可以用筷子,最终的结果都是你能吃到饭.那为什么大多数人喜欢用Python呢?答案:因为Python写爬虫简单.不理解?问:为什么吃米饭不用刀叉?用筷子?因为简单!好用!
而Python是众多编程语言中,小白上手最快,语法最简单.更重要的是,这货有非常多的关于爬虫能用到的第三方支持库.说直白点儿.就是你用筷子吃饭,我还附送你一个佣人.帮你吃!这样吃的是不是更爽了.更容易了~
爬虫合法么?
首先,爬虫在法律上是不被禁止的。也就是说法律是允许爬虫存在的。但是,爬虫也具有违法风险的。就像菜刀一样,法律是允许菜刀的存在的.但是你要是用来砍人,那对不起。没人惯着你。就像王欣说过的,技术是无罪的。主要看你用它来干嘛。比方说有些人就利用爬虫+一些黑客技术每秒钟对着bilibili搪上十万八千次。那这个肯定是不被允许的。
爬虫分为善意的爬虫和恶意的爬虫:
- 善意的爬虫,不破坏被爬取的网站的资源(正常访问,一般频率不高,不窃取用户隐私)
- 恶意的爬虫,影响网站的正常运营(抢票,秒杀,疯狂solo网站资源造成网站宕机)
综上,为了避免进局子我们还是要安分守己.时常优化自己的爬虫程序避免干扰到网站的正常运行。并且在使用爬取到的数据时,发现涉及到用户隐私和商业机密等敏感内容时,一定要及时终止爬取和传播。
爬虫的矛与盾
反爬机制
门户网站,可以通过制定相应的策略或者技术手段,防止爬虫程序进行网站数据的爬取
反反爬策略
爬虫程序可以通过制定相关的策略或者技术手段,破解门户网站中具备的反爬机制,从而可以获取门户网站中相关的数据。
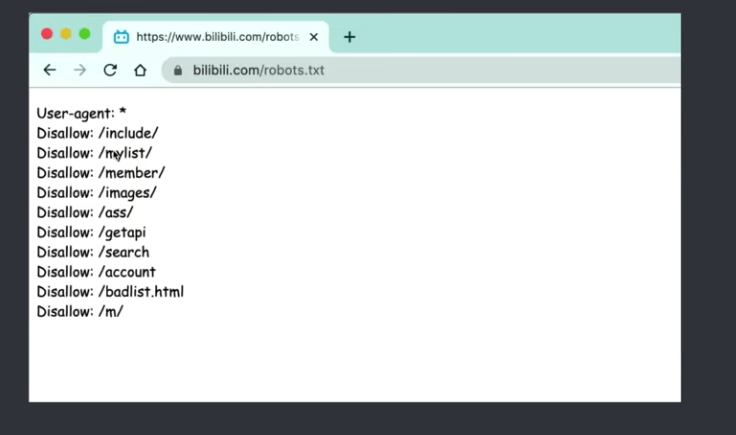
robots.text协议:
君子协议。规定了网站中的哪些数据可以被爬虫爬取哪些数据不可以被爬取。
什么是爬虫?
通过编写程序,模拟浏览器上网,然后让其去互联网上抓取数据的过程。
简单来说“爬虫通俗来说就是抓取网页数据,比如说大家都喜欢的妹子图、小视频呀,还有电子书、文字评论、商品详情等等
1. 第一个爬虫程序
首先,我们还是需要回顾一下爬虫的概念.爬虫就是我们通过我们写的程序去抓取互联网上的数据资源.比如,此时我需要百度的资源.在不考虑爬虫的情况下,我们肯定是打开浏览器,然后输入百度的网址,紧接着,我们就能在浏览器上看到百度的内容了.那换成爬虫呢?其实道理是一样的.只不过,我们需要用代码来模拟一个浏览器,然后同样的输入百度的网址.那么我们的程序应该也能拿到百度的内容.对吧~
在python中,我们可以直接用urllib模块来完成对浏览器的模拟工作~,直接上代码
url = "http://www.baidu.com"
response = urlopen(url) # 打开百度
# 打印抓取到的内容
print(response.read().decode("utf-8"))
是不是很简单呢?
我们可以把爬取到的html内容全部写入到文件中,然后和原版的百度进行比较,看看是否一致
from urllib.request import urlopen

url = "http://www.baidu.com"
response = urlopen(url)
# 创建文件
with open("mybaidu.html", "w", encoding='utf-8') as f:
    # 保存在文件中
    f.write(response.read().decode('utf-8'))
print("over!")
2. Web请求全过程解析
上一小节我们实现了一个网页的整体抓取工作.那么本小节,给各位好好剖析一下web请求的全部过程,这样有助于后面我们遇到的各种各样的网站就有了入手的基本准则了.
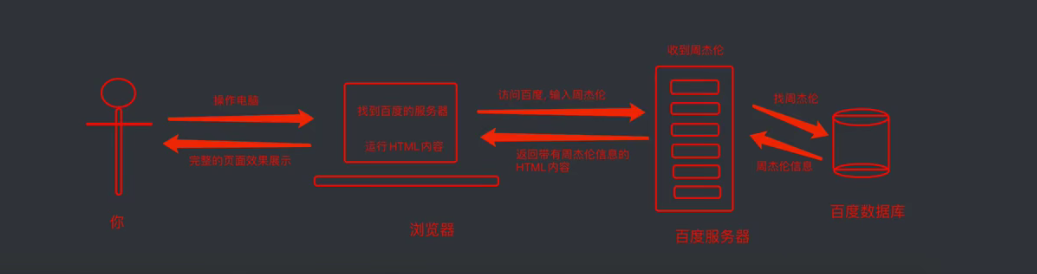
那么到底我们浏览器在输入完网址到我们看到网页的整体内容,这个过程中究竟发生了些什么?
这里我们以百度为例.在访问百度的时候,浏览器会把这一次请求发送到百度的服务器(百度的一台电脑),由服务器接收到这个请求,然后加载一些数据.返回给浏览器,再由浏览器进行显示.听起来好像是个废话...但是这里蕴含着一个极为重要的东西在里面,注意,百度的服务器返回给浏览器的不直接是页面,而是页面源代码(由html, css, js组成).由浏览器把页面源代码进行执行,然后把执行之后的结果展示给用户.所以我们能看到在上一节的内容中,我们拿到的是百度的源代码(就是那堆看不懂的鬼东西).具体过程如图.
我们爬取某些网站的时候,有时候发现我们明明爬取的网站请求没有问题,但是却没有数据,那是因为某些网站用了客户端渲染方式,网页渲染的两种方法分别为:
- 服务器渲染: 在服务器那边直接渲染把数据和html整合在一起,统一返回给浏览器,在页面源代码中能看到数据
- 客户端渲染:第一次请求只要一个html骨架,第二次请求拿到数据。进行数据展示。在页面源代码中,看不到数据
3. HTTP协议
协议:就是两个计算机之间为了能够流畅的进行沟通而设置的一个君子协定.常见的协议有TCP/IP. SOAP协议, HTTP协议,SMTP协议等等....
HTTP协议, Hyper Text Transfer Protocol(超文本传输协议)的缩写,是用于从万维网(WWW:World Wide Web)服务器传输超文本到本地浏览器的传送协议.直白点儿,就是浏览器和服务器之间的数据交互遵守的就是HTTP协议.
HTTP协议把一条消息分为三大块内容.无论是请求还是响应都是三块内容
请求:
请求行 -> 请求方式(get, post, put, delete) 请求url地址 协议
请求头 -> 放一些服务器要使用的附加信息
请求体 -> 一般放一些请求参数
响应:
状态行 -> 协议 状态码
响应头 -> 放一些客户端使用的一些附加信息
响应体 -> 服务器返回的真正客户端要是用的内容(HTML.json)等
请求头中最常见的一些重要内容(爬虫需要):;
- User-Agent:请求载体的身份标识(用啥发送的请求)
- Referer:防盗链(这次请求是从哪个页面来的?反爬会用到)
- cookie:本地字符串数据信息(用户登录信息,反爬的taken)
响应头中一些重要的内容:
- cookie:本地字符串数据信息(用户登录信息,反爬的token)
- 各种神奇的莫名其妙的字符串(这个需要经验了,一般都是token字样,防止各种攻击和反爬)
请求方式:
- GET:显示提交
- POST:隐示提交
1. request入门
安装
pip install request
# 网速慢的话使用清华园的镜像
pip install https://mirrors.tuna.tsinghua.edu.cn/ request
request库的7个主要的方法
| requests.request() | 构造一个请求,支撑一下各方法的基本方法 |
|---|---|
| requests.get() | 获取HTML网页的主要方法,对应于HTTP的GET |
| requests.head() | 获取HTML网页头信息的方法,对应于HTTP的HEAD |
| requests.post() | 向HTML网页提交POST请求的方法,对应于HTTP的POST |
| requests.put() | 向HTML网页提交PUT请求的方法,对应于HTTP的PUT |
| requests.patch() | 向HTML网页提交局部修改请求,对应于HTTP的PATCT |
| requests.delete() | 向HTML网页提交删除请求,对应于HTTP的DELETE |
request方法中有15个参数分别表示

| 参数名 | 方法 |
|---|---|
| methods | 请求方法 |
| url | 请求网址 |
| params | 字典类型或者字节序列,作为参数增加到url中 |
| data | 字典类型或者字节序列或者文件对象,作为Request的内容 |
| json | JSON格式的数据,作为Request的内容 |
| headers | 字典类型,HTTP定制头 |
| cookies | 字典类型或CookieJar,Request中的cookie |
| auth | 元组类型,支持HTTP认证功能 |
| files | 字典类型,传输文件 |
| timeout | 设定超时时间,以秒为单位 |
| proxies | 字典类型,设定访问代理服务器,可以增加登录认证 |
| allow_redirects | True/False,默认为True,重定向开关 |
| stream | True/False,默认为True,获取内容立即下载开关 |
| verify | True/False,默认为True,认证SSL证书开关 |
| cert | 本地SSL证书路径 |
request中的方法请求
requests.get(url, params=None, **kwargs)
# url:拟获取页面的url链接
# params:url中的额外参数,字典或者字节流格式,可选
# **kwargs:12个控制访问的参数

requests.post(url,data=None, json=None, **kwargs)
# url:拟获取页面的url链接
# data:字典、字节序列或者文件,Request的内容
# **kwargs:11个控制访问的参数

requests.put(url, data=None, **kwargs)
# url:拟获取页面的url链接
# data:字典、字节序列或者文件,Request的内容
# **kwargs:12个控制访问的参数

requests.patch(url, data=None, **kwargs)
#url:拟获取页面的url链接
# data:字典、字节序列或者文件,Request的内容
#**kwargs:12个控制访问的参数

requests.delete(url, **kwargs)
# url:拟删除页面的url链接
# **kwargs:13个控制访问的参数
使用方法:
# 使用request.get方法
import requests
# 爬取内容网址
url = "https://www.bilibili.com/"
# 向网址发送get请求
response = requests.get(url)
# 讲网址内容存储到文件中
with open("mybilibli.html", "w", encoding="utf-8") as fp:
    fp.write(response.text)

# 读取完并且关闭
fp.close()
print("over")


# 模仿百度搜素
import requests
# 爬取内容网址
name = input("输入你想知道的内容:")
url = f"https://www.baidu.com/s?ie=UTF-8&wd={name}"
# 模仿成一个浏览器来骗取内容,这样我们可以爬取到更多内容
header = {
    "User-Agent": "Mozilla/5.0 (Windows NT 10.0; Win64; x64) AppleWebKit/537.36 (KHTML, like Gecko) Chrome/94.0.4606.71 Safari/537.36"
}
# 向网址发送get请求
response = requests.get(url, headers=header)
# 讲网址内容存储到文件中
with open("123.html", "w", encoding="utf-8") as fp:
    fp.write(response.text)

# 读取完并且关闭
fp.close()
print("over")


# request.post请求
url = "https://fanyi.baidu.com/sug"
header = {
    "User-Agent": "Mozilla/5.0 (Windows NT 10.0; Win64; x64) AppleWebKit/537.36 (KHTML, like Gecko) Chrome/94.0.4606.71 Safari/537.36"
}
en = input("输入你想要翻译的单词:")
# 百度翻译中有一个名叫kw的字典,这个字典中包含了输入的英文单词和翻译出来的内容
data = {
    "kw": en
}
response = requests.post(url, headers=header, data=data)
# 使用json打印不然出现乱码
print(response.json())
response.close()


# 爬取豆瓣电影数据
url = "https://movie.douban.com/j/search_subjects"
header = {
    "User-Agent": "Mozilla/5.0 (Windows NT 10.0; Win64; x64) AppleWebKit/537.36 (KHTML, like Gecko) Chrome/94.0.4606.71 Safari/537.36"
}
params = {
    "type": "movie",
    "tag": "热门",
    "sort": "recommend",
    "page_limit": "20",
    "page_start": "0"
}
response = requests.get(url, params=params, headers=header)
print(response.json())
response.close()
注意爬取完数据之后一定要关掉请求
2. 数据解析概述
数据解析概述
在上一章中,我们基本上掌握了抓取整个网页的基本技能.但是呢,大多数情况下,我们并不需要整个网页的内容,只是需要那么—小部分.怎么办呢?这就涉及到了数据提取的问题.
本课程中,提供三种解析方式:
- re解析
- bs4解析
- xpath解析心
这三种方式可以混合进行使用,完全以结果做导向,只要能拿到你想要的数据.用什么方案并不重要.当你掌握了这些之后.再考虑性能的问题.
2.1 正则表达式
Regular Expressior,正则表达式,一种使用表达式的方式对字符串进行匹配的语法规则.
我们抓取到的网页源代码本质上就是一个超长的字符串,想从里面提取内容.用正则再合适不过了.
- 正则的优点:速度快,效率高,准确性高
- 正则的缺点:新手上手难度有点儿高.
不过只要掌握了正则编写的逻辑关系,写出一个提取页面内容的正则其实并不复杂
正则的语法:使用元字符进行排列组合用来匹配字符串 在线测试正则表达式https:/tool.oschina.net/regex
元字符:具有固定含义的特殊符号
常用元字符:
.			匹配除换行符以外的任意字符
\w			匹配字母或数字或下划线
\s			匹配任意的空白符
\d			匹配数字
\n			匹配一个换行符
\t			匹配一个制表符

^			匹配字符串的开始
$			匹配字符串的结尾

\W			匹配非字母或数字或下划线
\D			匹配非数字
\S			匹配非空白符
a|b			匹配字符a或字符b
()			匹配括号内的表达式,也表示一个组
[...]		匹配字符组中的字符
[^...]		匹配除了字符组中的字符的所有字符
量词:控制前面的元字符出现的次数
*			重复零次或者更多次
+			重复一次或更多次
?			重复零次或者一次
{n}			重复n次或更多次
{n,m}		重复n到m次
贪婪匹配和惰性匹配
.*		贪婪匹配
.*?		惰性匹配
这两个要着重的说一下,因为我们爬虫用的最多的就是这个惰性匹配
str: 玩⼉吃鸡游戏, 晚上⼀起上游戏, ⼲嘛呢? 打游戏啊
reg: 玩⼉.*?游戏

此时匹配的是: 玩⼉吃鸡游戏

reg: 玩⼉.*游戏
此时匹配的是: 玩⼉吃鸡游戏, 晚上⼀起上游戏, ⼲嘛呢? 打游戏


str: <div>胡辣汤</div>
reg: <.*>
结果: <div>胡辣汤</div>

str: <div>胡辣汤</div>
reg: <.*?>

结果:
  <div>
 </div>

str: <div>胡辣汤</div><span>饭团</span>
reg: <div>.*?</div>
结果:
 <div>胡辣汤</div>
所以我们能发现这样⼀个规律: .? 表示尽可能少的匹配, .表示尽可能 多的匹配, 暂时先记住这个规律. 后⾯写爬⾍会⽤到的哦
2.2 re模块
那么接下来的问题是, 正则我会写了, 怎么在python程序中使⽤正则 呢? 答案是re模块 re模块中我们只需要记住这么⼏个功能就⾜够我们使⽤了.
findall
findall 查找所有. 返回list
# 如果没有匹配到返回一个空[]
lst = re.findall("m", "mai le fo len, mai ni
mei!")
print(lst) # ['m', 'm', 'm']
lst = re.findall(r"\d+", "5点之前. 你要给我5000
万")
print(lst) # ['5', '5000']
search
search 会进⾏匹配. 但是如果匹配到了第⼀个结果. 就会返回这个结果. 如果匹配不上search返回的则是None
ret = re.search(r'\d', '5点之前. 你要给我5000万').group()
print(ret) # 5
match
match 只能从字符串的开头进⾏匹配
ret = re.match('a', 'abc').group()
print(ret) # a
finditer
finditer, 和findall差不多. 只不过这时返回的是迭代器(重点)
it = re.finditer("m", "mai le fo len, mai ni
mei!")
for el in it:
 print(el.group()) # 依然需要分组
compile
compile() 可以将⼀个⻓⻓的正则进⾏预加载. ⽅便后⾯的使⽤
 # 将正则表达式编译成为⼀个 正则表达式对象, 规则要匹配的是3个数字
obj = re.compile(r'\d{3}')
# 正则表达式对象调
ret = obj.search('abc123eeee')
⽤search, 参数为待匹配的字符串
print(ret.group()) # 结果: 123
正则中的内容如何单独提取? 单独获取到正则中的具体内容可以给分组起名字
s = """
<div class='⻄游记'><span id='10010'>中国联通</span></div>
"""
obj = re.compile(r"<span id='(?P<id>\d+)'>(?P<name>\w+)</span>", re.S)
result = obj.search(s)
print(result.group())
# 结果: <span id='10010'>中国联通</span>
print(result.group("id"))
# 结果: 10010 # 获取id组的内容
print(result.group("name"))
# 结果: 中国联通
#获取name组的内容
这⾥可以看到我们可以通过使⽤分组. 来对正则匹配到的内容进 ⼀步的进⾏筛选.
关于正则, 还有⼀个重要的⼩点, 也⾮常的简单, 在本节中就不继续扩展了.
下⼀⼩节的案例中会把这个⼩点进⾏简单的介绍
案例:爬取豆瓣top250的电影排行
终于可以放开⼿脚⼲⼀番事业了. 今天我们的⽬标是⾖瓣电影 TOP250排⾏榜. 没别的意思, 练⼿⽽已
先看需求:
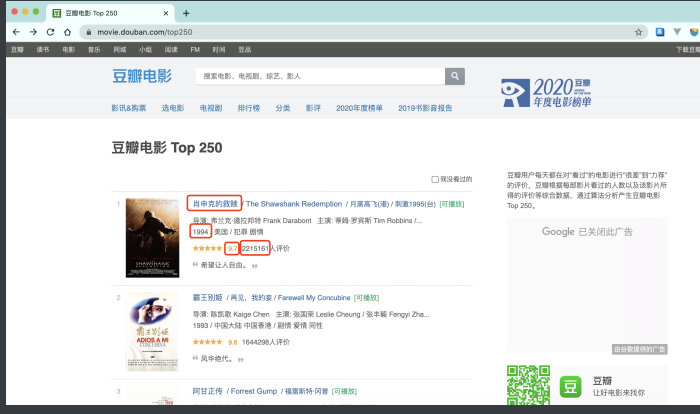
⽬标: 抓取"电影名称","上映年份","评分","评分⼈数"四项内容. 怎么做呢? ⾸先, 先看⼀下⻚⾯源代码. 数据是否是直接怼在源代码 上的?
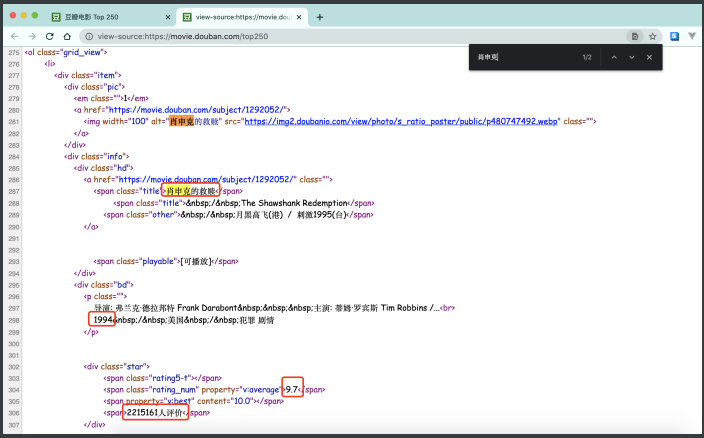
很明显, 我们想要的数据全部都在⻚⾯源代码中体现了. 所以, 我们不 需要考虑js动态加载数据的情况了. 那么接下来就是编写爬⾍代码的 第⼀步了. 拿到⻚⾯源代码:
import requests
headers = {
 "user-agent": "Mozilla/5.0 (Macintosh; IntelMac OS X 10_15_4) AppleWebKit/537.36 (KHTML, likeGecko) Chrome/87.0.4280.88 Safari/537.36"
}
url = "https://movie.douban.com/top250?start=0&filter="
resp = requests.get(url, headers=headers)
print(resp.text)
然后呢. 从⻚⾯源代码中提取我们需要的内容. 这时候我们就可以去 写正则了.
obj = re.compile(r'<li>.*?<div class="item">.*?<span class="title">(?P<name>.*?)</span>.*?<p class="">.*?<br>('
r'?P<year>.*?) .*?<span class="rating_num" property="v:average">(?P<score>.*?)</span>'
r'.*?<div class="star">.*?<span>(?P<eval>.*?)</span>', re.S)
开始匹配, 将最终完整的数据按照⾃⼰喜欢(需要)的⽅式写⼊⽂件.
it = obj.finditer(resp.text)
with open("movie.csv", mode="w", encoding="utf-8") as f:
 csvwriter = csv.writer(f) # 创建csv⽂件写⼊⼯具,也可以直接f.write()
 for item in it:
     dic = item.groupdict()
     dic['year'] = dic['year'].strip()
     csvwriter.writerow(dic.values()) # 写⼊数据
import csv
import requests
import re
url = "https://movie.douban.com/top250"
header = {
"User-Agent": "Mozilla/5.0 (Windows NT 10.0; Win64; x64) AppleWebKit/537.36 (KHTML, like Gecko) "
"Chrome/94.0.4606.71 Safari/537.36 "
}
response = requests.get(url, headers=header)
page_content = response.text
response.close() # 关闭
# 正则解析
obj = re.compile(r'<li>.*?<div class="item">.*?<span class="title">(?P<name>.*?)</span>.*?<p class="">.*?<br>('
r'?P<year>.*?) .*?<span class="rating_num" property="v:average">(?P<score>.*?)</span>'
r'.*?<div class="star">.*?<span>(?P<eval>.*?)</span>', re.S)
# 使用finditer去查找正则解析的数据内容
result = obj.finditer(response.text)
# 文件写入,设置newline=''让文本不换行
f = open("top250.csv", "w", encoding="utf-8", newline='')
# 写入
csv_writer = csv.writer(f)
# 循环遍历写入
for item in result:
# print(item.group('name'))
# print(item.group('year').strip())
# print(item.group('score'))
# print(item.group('eval'))
dic = item.groupdict()
dic['year'] = dic['year'].strip()
csv_writer.writerow(dic.values())
# 关闭
f.close()
2.3 bs4解析
HTML语法
bs4解析⽐较简单, 但是呢, ⾸先你需要了解⼀丢丢的html知识. 然后 再去使⽤bs4去提取, 逻辑和编写难度就会⾮常简单和清晰 HTML(Hyper Text Markup Language)超⽂本标记语⾔, 是我们编写 ⽹⻚的最基本也是最核⼼的⼀种语⾔. 其语法规则就是⽤不同的标签 对⽹⻚上的内容进⾏标记, 从⽽使⽹⻚显示出不同的展示效果
<h1>
 我爱你
</h1>
上述代码的含义是在⻚⾯中显示"我爱你"三个字, 但是我爱你三个字 被"<h1>"和"</h1>"标记了. ⽩话就是被括起来了. 被H1这个标签括 起来了. 这个时候. 浏览器在展示的时候就会让我爱你变粗变⼤. 俗称 标题, 所以HTML的语法就是⽤类似这样的标签对⻚⾯内容进⾏标记. 不同的标签表现出来的效果也是不⼀样的.
h1: ⼀级标题
h2: ⼆级标题
p: 段落
font: 字体(被废弃了, 但能⽤)
body: 主体
这⾥只是给⼩⽩们简单科普⼀下, 其实HTML标签还有很多很多的. 我们不需要⼀⼀列举(这是爬⾍课, 不是前端课). OK~ 标签我们明⽩了, 接下来就是属性了
<h1>
 我爱你
</h1>
<h1 align='right'>
 我爱你妹
</h1>
有意思了. 我们发现在标签中还可以给出xxx=xxx这样的东⻄. 那么 它⼜是什么呢? ⼜该如何解读呢? ⾸先, 这两个标签都是h1标签, 都是⼀级标题, 但是下⾯这个会显示 在右边. 也就是说, 通过xxx=xxx这种形式对h1标签进⼀步的说明了. 那么这种语法在html中被称为标签的属性. 并且属性可以有很多个. 例如:
<body text="green" bgcolor="#eee">
 你看我的颜⾊. 贼健康
</body>
总结, html语法:
<标签 属性="值" 属性="值">
 被标记的内容
</标签>
有了这些知识, 我们再去看bs4就会得⼼应⼿了. 因为bs4就是通过标 签和属性去定位⻚⾯上的内容的.
基本使用
安装
pip install bs4
bs4在使⽤的时候就需要参照⼀些html的基本语法来进⾏使⽤ 了. 我们直接上案例哈. 案例是最能直观的展现出bs4的便捷效果 的. 我们来尝试抓取北京新发地市场的农产品价格. http://www.xinfadi.com.cn/marketanalysis/0/list/1.shtml
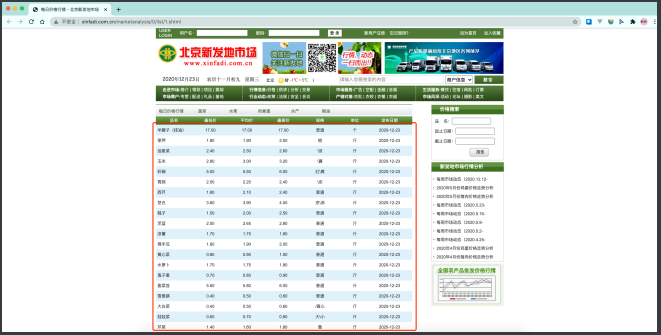
⽼规矩, 先获取⻚⾯源代码. 并且确定数据就在⻚⾯源代码中~
import requests
from bs4 import BeautifulSoup
resp =
requests.get("http://www.xinfadi.com.cn/marketanalysis/0/list/1.shtml")
print(resp.text)
将⻚⾯源代码丢给BeautifulSoup, 然后我们就可以通过bs对象 去检索⻚⾯源代码中的html标签了
page = BeautifulSoup(resp.text)
BeautifulSoup对象获取html中的内容主要通过两个⽅法来完成
- find()
- find_all()
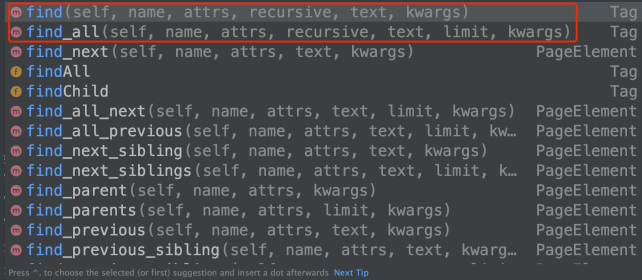
基本上有这两个⽅法就够⽤了. 其他的可以⾃⾏进⾏英⽂翻译就 知道啥意思了
不论是find还是find_all 参数⼏乎是⼀致的.
语法:
find(标签, 属性=值)
意思是在⻚⾯中查找 xxx标签, 并且标签的xxx属性必须是xxx值
例: find('div', age=18) 含义: 在⻚⾯中查找div标签, 并且属性age必须是18的这个标签.
find_all()的⽤法和find()⼏乎⼀致. find()查找1个. find_all()查找⻚ ⾯中所有的.
但是这种写法会有些问题. ⽐如html标签中的class属性.
<div class="honor">
page.find("div", class="honor")
注意, python中class是关键字. 会报错的. 怎么办呢? 可
以在class后⾯加个下划线
page.find("div", class_="honor")
我们可以使⽤第⼆种写法来避免这类问题出现
page.find("div", attrs={"class": "honor"})
好了, ⽤法说完了. 接下来就回来看怎么抓取新发地的价格吧
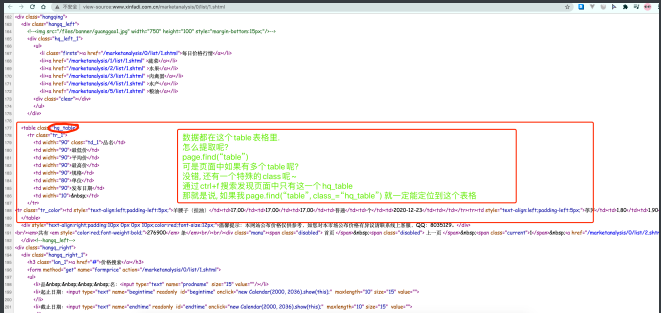
table = page.find("table", class_="hq_table")
print(table)

完美~~ 接下来就可以进⼀步去提取数据了. 后⾯的直接给出完整代码. 因为逻辑都是⼀样的. 并没有多么的复杂, 过程就省略了.
import requests
from bs4 import BeautifulSoup
import csv
resp =
requests.get("http://www.xinfadi.com.cn/marketanalysis/0/list/1.shtml")
page = BeautifulSoup(resp.text)

#有⼈可能要问了. 为什么只有第⼀⻚数据. 你观察⼀下第⼆⻚, 第三⻚的url就明⽩了了
table = page.find("table", class_="hq_table")
f = open("新发地.csv", mode="w", encoding="utf-8")
cv_writer = csv.writer(f)
# 提取到所有tr
tr_list = table.find_all("tr")[1:] # 注意,第⼀⾏并不是我想要的数据. (第⼀⾏是表头)
for tr in tr_list:
 td_list = tr.find_all("td")
 name = td_list[0].text # 获取⽂本内容
 low = td_list[1].text
 avg = td_list[2].text
 high = td_list[3].text
 gui = td_list[4].text
 dan = td_list[5].text
 day = td_list[6].text
 cv_writer.writerow([name, low, avg, high,gui, dan, day])
f.close()
print("搞定")
案例-抓取让你睡不着觉的 图⽚
我们以优美图库作为本节课的案例, 具体你能⽤它来做什么. 还是的看 你⾃⼰了~ 为了视频和⽂档能够正常投放在市⾯上, 本课程抓取的图⽚都是唯美 桌⾯系, 该⽹站还有很多让你难以⼊眠的优秀图⽚资源, 各位. 看着办 吧
https://www.umei.cc/bizhitupian/weimeibizhi/

注意我选中的这个区域, 我们想要的图⽚就在这⾥. 但是, 绝对不是现 在你看到的样⼦. 为什么呢? 不够⾼清⼤图~ 真正的⾼清⼤图在⼦⻚⾯中, ⽐如, 我点击第⼀个图⽚

这才是我想要的⼤图~ 也就是说, 我需要在⽹站的⾸⻚中, 找到⼦⻚⾯的链接, 然后请求到⼦ ⻚⾯, 才能看到这张⼤图~ 不明⽩的, 把上⾯的内容重新梳理⼀ 下!!!!!!! 也就是说, 想要下载该⽹站图⽚(⾼清⼤图), 需要三步, 第⼀步, 在主⻚⾯中拿到每⼀个图⽚的⼦⻚⾯链接 第⼆步, 在⼦⻚⾯中找到真正的图⽚下载地址
拿到⼦⻚⾯链接
def main_page():
 with open("child_page_href.txt", mode="w") as f:
 for i in range(1, 56):
 try:
     resp = requests.get(f"https://www.umei.cc/bizhitupian/weimeibizhi/{i}.htm")
     # <meta http-equiv="Content-Type"content="text/html; charset=utf-8" />
     resp.encoding = 'utf-8' # 处理中
    ⽂乱码, 这⾥要和⻚⾯上的charset对应
     main_page = BeautifulSoup(resp.text, "html.parser")
     typeListDiv = main_page.find("div", attrs={"class":"TypeList"})
     main_a_list = typeListDiv.find_all("a")
    for main_a in main_a_list:
     href = main_a.get("href") #
    拿到某⼀个标签中xxx属性的值
     f.write(href)
     f.write("\n")

	print(f"https://www.umei.cc/bizhitupian/weimeibizhi/{i}.htm, 成功了!")
 	time.sleep(0.5)
 except:
     print(f"https://www.umei.cc/bizhitupian/weimeibizhi/{i}.htm, 出错了")
     print(resp.text)
     break # 也可以记录下来, 供以后查错⽤
获取到⼦⻚⾯信息, 找到下载图⽚的图⽚路径
def child_page():
 with open("child_page_href.txt", mode="r") as f:
 for line in f:
     line = line.strip()
     resp = requests.get(line)
     resp.encoding='utf-8'
     child = BeautifulSoup(resp.text, "html.parser")
     div = child.find("div", class_="ImageBody")
     img = div.find("img")
     if img:
         src = img.get("src")
         print(src)
     else:
     	print(line, "没有图⽚")
下载图⽚
def download_img(src):
 with open("img/" + src.split("/")[-1], mode="wb") as f:
     resp = requests.get(src) # 下载图⽚
     f.write(resp.content) # 图⽚写⼊⽂件
     print(src, "down!")
最后运⾏⼀下, 看看结果 对了⼀定记着把img⽂件夹设置为excluded, 否则你的pycharm会奇 卡⽆⽐
总结:
提供的用户数据解析的方法和属性:
-
soup.tagName: 返回的是文档第一次出现的tagName对应的标签 -
soup.find:find('tagName'):等同于soup.div- 属性定位:
soup.find('div', class_/id/attr='song')
- 属性定位:
-
soup.find_all('tagName'):返回符合要求的所有标签(返回的是一个列表) -
select:- 使用方法:
select('某种选择器(id, class, 标签....选择器)')(返回的是一个列表) - 层级选择器:
soup.select('.tang > ul > li > a'):>表示多个层级oup.select('div.titile > ul a'):空格表示多个层级
- 使用方法:
-
获取标签之间文本数据:
soup.a.text/string/get_text()text/get_text(): 可以获取某一个标签中所有文本内容string:只可以获取该标签中所有文本内容
-
获取标签中的属性值
soup.a['href']soup.a.get('href')
2.4 xpath解析
XPath是⼀⻔在 XML ⽂档中查找信息的语⾔. XPath可⽤来在 XML ⽂档中对元素和属性进⾏遍历. ⽽我们熟知的HTML恰巧属于XML的 ⼀个⼦集. 所以完全可以⽤xpath去查找html中的内容.
⾸先, 先了解⼏个概念.
<book>
 <id>1</id>
 <name>野花遍地⾹</name>
 <price>1.23</price>
 <author>
 <nick>周⼤强</nick>
 <nick>周芷若</nick>
 </author>
</book>
在上述html中,
- book, id, name, price....都被称为节点.
- Id, name, price, author被称为book的⼦节点
- book被称为id, name, price, author的⽗节点
- id, name, price,author被称为同胞节点
OK~ 有了这些基础知识后, 我们就可以开始了解xpath的基本语法了 在python中想要使⽤xpath, 需要安装lxml模块.
pip install lxml
用法
- 将要解析的html内容构造出etree对象
- 使用etree对象的xpath()方法配合xpath表达式来完成对数据的提取
from lxml import etree
html = """
<book>
 <id>1</id>
 <name>野花遍地⾹</name>
 <price>1.23</price>
 <nick>臭⾖腐</nick>
 <author>
     <nick id="10086">周⼤强</nick>
     <nick id="10010">周芷若</nick>
     <nick class="joy">周杰伦</nick>
     <nick class="jolin">蔡依林</nick>
     <div>
        <nick>惹了</nick>
     </div>
 </author>
 <partner>
     <nick id="ppc">胖胖陈</nick>
     <nick id="ppbc">胖胖不陈</nick>
 </partner>
</book>
"""
et = etree.XML(html)
# 根据节点进⾏搜索
# result = et.xpath("/book")
# result = et.xpath("/book/id") # /在开头表示⽂档最开始, /在中间表示⼉⼦
# result = et.xpath("/book//nick") # //表示后代
result = et.xpath("/book/*/nick") # *表示通配符
print(result)
xpath如何提取属性信息. 我们上⼀段真实的HTML来给各位讲解⼀ 下 准备HTML:
<!DOCTYPE html>
<html lang="en">
<head>
 <meta charset="UTF-8" />
 <title>Title</title>
</head>
<body>
 <ul>
     <li><a href="http://www.baidu.com">百度</a></li>
     <li><a href="http://www.google.com">⾕歌</a></li>
     <li><a href="http://www.sogou.com">搜狗</a></li>
 </ul>
 <ol>
     <li><a href="feiji">⻜机</a></li>
     <li><a href="dapao">⼤炮</a></li>
     <li><a href="huoche">⽕⻋</a></li>
 </ol>
 <div class="job">李嘉诚</div>
 <div class="common">胡辣汤</div>
</body>
</html>
xpath解析:
from lxml import etree
tree = etree.parse("1.html")
result = tree.xpath("/html/body/ul/li/a/@href")
print(result)
result = tree.xpath("/html/body/ul/li")
for li in result:
 print(li.xpath("./a/@href")) # 局部解析
result = tree.xpath("//div[@class='job']/text()")
# [@class='xxx']属性选取 text()获取⽂本
print(result)
xpath总结
/:表示的是从根节点开始定位。表示的是一个层级//: 表示的是多个层级。可以表示从任意位置开始定位- 属性定位:
//div[@class='song'] tag[@attrName="attrValue"] - 索引定位:
//div[@class='song']/p[3]索引是从1开始的 - 取文本
/text()获取的是标签中直系的文本内容//text()标签中非直系的文本内容(所有的文本内容)
- 取属性:
/@attrName ==> img/@src
案例:爬取猪八戒
import requests
from lxml import etree
url = "https://beijing.zbj.com/search/f/?type=new&kw=saas"
headers = {
 "User-Agent": "Mozilla/5.0 (Macintosh; IntelMac OS X 10_15_4) AppleWebKit/537.36 (KHTML, likeGecko) Chrome/87.0.4280.88 Safari/537.36"
}
resp = requests.get(url, headers=headers)
# 丢给etree, ⽣成Element对象
tree = etree.HTML(resp.text)
# 拿数据吧
els = tree.xpath("//div[@class='witkey-list-gridj-service-provider-wrap ']/*/div[@class='witkey-item grid-box']")
for div in els:
     name = div.xpath("./div/div[@class='grid-topright']/section/h4/a/text()")[0]
     intro = div.xpath("./div/div[@class='grid-top-right']/section/h4/div/div[last()]/text()")[0]
     shopdesc = "".join(div.xpath("./div/div[@class='grid-top-right']/section/h4/div/div[@class='witkey-shopdesc']//text()")).replace("\n", "")
     firstline = div.xpath("./div/div[@class='grid-top-right']/section/h4/div/div[@class='witkey-shopdesc-firstline']//text()")
     if firstline:
         shopdesc += "".join(firstline).replace("\n", "")
         fav = "".join(div.xpath("./div/div[@class='grid-top-right']/section/h4/div/div[@class='expert-tree']//text()")).replace("\n", "")
# 后⾯你想⼲嘛就⼲嘛吧. 记录数据库,写⼊⽂件,扔给全⽂检索⼯具 都可以
3. 反爬机制
3.1 处理cookie. 模拟登录
import requests
session = requests.session()
data = {
    "loginName": "18614075987",
    "password": "q6035945"
}
url = "https://passport.17k.com/ck/user/login"
# cookie中的东⻄
resp = session.post(url, data=data)
# 带着cookie请求书架
resp = session.get("https://user.17k.com/ck/author/shelf?page=1&appKey=2406394919")
content = resp.json()
print(content['data'])
3.2 防盗链
# @作者 : 叶枫
# @文件 : 梨视频.py
# @时间 : 2021/10/25 12:02
# @版本 :1.0
# @功能描述:
import requests, time
first_time = time.time()
url = "https://www.pearvideo.com/video_1744406"
contID = url.split("_")[-1]
videoStatus = f"https://www.pearvideo.com/videoStatus.jsp?contId={contID}&mrd=0.5296292389146533"
headers = {
    "User-Agent": "Mozilla/5.0 (Windows NT 10.0; Win64; x64) AppleWebKit/537.36 (KHTML, like Gecko) "
                  "Chrome/94.0.4606.81 Safari/537.36",
    # 防盗链: 溯源,当前本次请求的上一级是谁
    "Referer": url
}
resp = requests.get(videoStatus, headers=headers)
# 把内容转换成JSON
dic = resp.json()
# 拿到视频地址
srcUrl = dic['videoInfo']['videos']['srcUrl']
# 拿到systemTime
systemTime = dic['systemTime']
# 把srcUrl中的systemTime替换成cont-{contID}拿到视频地址
srcUrl = srcUrl.replace(systemTime, f'cont-{contID}')
# 下载视频
with open("明明就.mp4", "wb") as f:
    f.write(requests.get(srcUrl, headers=headers).content)

last_time = time.time()
final = last_time - first_time
print("用时间" % final)
3.3 代理
当我们反复抓取⼀个⽹站时, 由于请求过于频繁, 服务器很可能会将 你的IP进⾏封锁来反爬. 应对⽅案就是通过⽹络代理的形式进⾏伪装.
代理的原理:
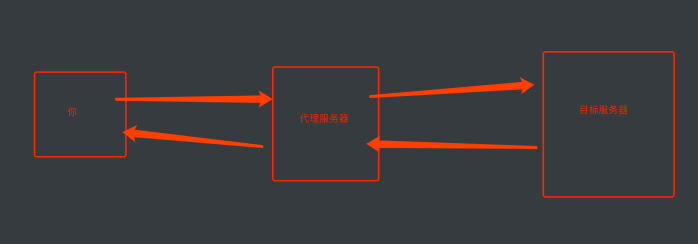
从图上可以得知. 对于⽬标⽹站来说. 是通过代理服务器发送的请求. 也就可以避免你的IP被封锁了.
爬⾍如何使⽤代理
import requests
url = "https://www.baidu.com/"
proxies = {
    "http": "121.8.215.106"
}
headers = {
    "User-Agent": "Mozilla/5.0 (Windows NT 10.0; Win64; x64) AppleWebKit/537.36 (KHTML, like Gecko) "
                  "Chrome/94.0.4606.81 Safari/537.36",
}
resp = requests.get(url, headers=headers, proxies=proxies)
print(resp.text)
注意: 代理IP⼀般属于⼀个灰⾊产业.代理 IP也是时能⽤时不能⽤
4. 持久化存储
通过前面的学习,我们学到了怎么分析数据,接下来我们要将获取到的数据存储到文件里,以便以后使用数据存储方式有很多,我们讲比较常用的文件格式
4. 1csv
# 保存为csv文件
def save_csv(html):
    file = open("各省疫情统计表.csv", "w", encoding='utf-8', newline='')
    file_csv = csv.writer(file)
    file_csv.writerow(["area", "city", "confirmed", "died", "crued",
                       "confirmedRelative", "asymptomaticRelative", "asymptomatic",
                       "nativeRelative", "curConfirm"])

    html = json.loads(html)
    for i in html['component'][0]['caseList']:
        area = i['area']  # 地区
        city = i['subList']
        if not city:  # city是一个空列表表示该地区没有疫情
            file_csv.writerow([area, "", "", "", "", "", "", "", "", ""])

        for j in city:
            file_csv.writerow([area, j['city'], j['confirmed'], j['died'],
                               j['crued'], j['confirmedRelative'], j['asymptomaticRelative'],
                               j['asymptomatic'], j['nativeRelative'], j['curConfirm']])


if __name__ == '__main__':
    url = "https://voice.baidu.com/act/newpneumonia/newpneumonia/?from=osari_aladin_banner"
    headers = {
        'User-Agent': 'Mozilla/5.0 (Windows NT 10.0; Win64; x64) AppleWebKit/537.36 (KHTML, like Gecko) Chrome/86.0.4240.183 Safari/537.36',
    }

    response = requests.get(url, headers=headers).text
    obj = re.compile('id="captain-config">(?P<page>.*?)</script>')
    html = obj.search(response).group("page")
    save_csv(html)
4.2 json
在保存为JSON数据时,我们先来了解4个函数分别为,json.loads(), json.load(), json.dump(), json.dumps()
json.loads(): 可以识别出字符串中的json格式:去掉引号,并变成通用的json,所有语言都识别
json.load():识别文件中的json格式去掉引号,变成通用的json
json.dump():是将字典类型转化成字符串类型
# 保存为JSON文件
def save_json(html):
    # 把数据转换成json数据,让ASCII码显示成中文
    html = json.loads(html)
    print(html)
    with open("疫情数据.json", "w", encoding='utf-8') as fp:
        # ensure_ascii设置为False,中文将不会以为ASCII显示
        # indent -> 缩进, 如果为None则不换行不缩进
        json.dump(html, fp, ensure_ascii=False, indent=2)


if __name__ == '__main__':
    url = "https://voice.baidu.com/act/newpneumonia/newpneumonia/?from=osari_aladin_banner"
    headers = {
        'User-Agent': 'Mozilla/5.0 (Windows NT 10.0; Win64; x64) AppleWebKit/537.36 (KHTML, like Gecko) Chrome/86.0.4240.183 Safari/537.36',
    }

    response = requests.get(url, headers=headers).text
    obj = re.compile('id="captain-config">(?P<page>.*?)</script>')
    html = obj.search(response).group("page")
    save_json(html)
4.3 mysql
import pymysql
def save_mysql(html):
    html = json.loads(html)
    # 连接数据库
    conn: Connection = pymysql.Connect(
        host="localhost",
        user="root",
        password="123456",
        database="ruo",
        port=3306
    )
    cursor = conn.cursor()

    try:
        # sql命令
        sql = 'insert into yq (area, city, confirmed, died, crued, confirmedRelative, asymptomaticRelative, asymptomatic, nativeRelative, curConfirm) value(%s, %s, %s, %s, %s, %s, %s, %s, %s, %s)'
        for i in html['component'][0]['caseList']:
            area = i['area']  # 地区
            city = i['subList']
            if not city:  # city是一个空列表表示该地区没有疫情
                v = [area, None, None, None, None, None, None, None, None, None]
                cursor.execute(sql, v)
                conn.commit()
            # 数据存储
            for j in city:
                v = [area, j['city'], j['confirmed'], j['died'], j['crued'], j['confirmedRelative'],
                     j['asymptomaticRelative'], j['asymptomatic'], j['nativeRelative'], j['curConfirm']]
                print(v)
                cursor.execute(sql, v)
                conn.commit()
    # 出现异常数据回滚
    except Exception as e:
        print(e)
        conn.rollback()


if __name__ == '__main__':
    url = "https://voice.baidu.com/act/newpneumonia/newpneumonia/?from=osari_aladin_banner"
    headers = {
        'User-Agent': 'Mozilla/5.0 (Windows NT 10.0; Win64; x64) AppleWebKit/537.36 (KHTML, like Gecko) Chrome/86.0.4240.183 Safari/537.36',
    }

    response = requests.get(url, headers=headers).text
    obj = re.compile('id="captain-config">(?P<page>.*?)</script>')
    html = obj.search(response).group("page")

    save_mysql(html)
4. 异步爬虫
4.1 多线程
python中实现多线程⾮常简单. 我们要借助Thread类来完成. 先看单线程效果~
def func():
 for i in range(1000):
 	print("func", i)


if __name__ == '__main__':
 func()
 for i in range(1000):
 	print("main", i)
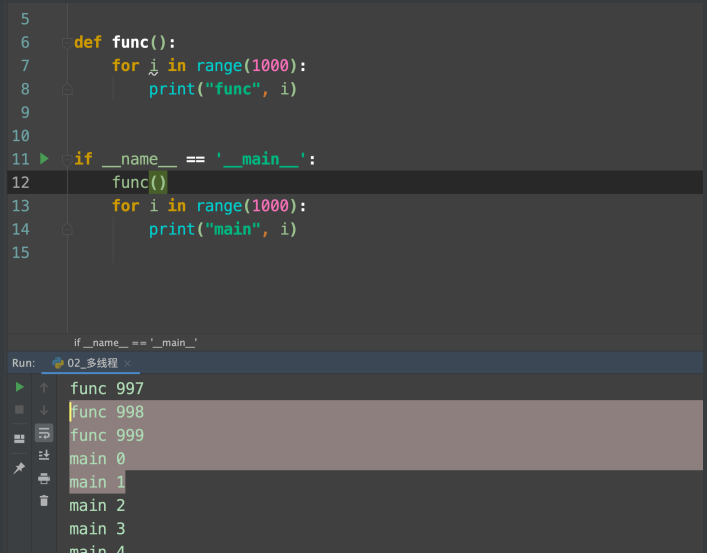
执⾏过程: 程序启动 --> 加载func() --> 执⾏main --> 调⽤func() --> func执⾏完毕, 继续执⾏main中的内容 整个过程是⼀条线跑下来的, 这就是单线程.
多线程:
from threading import Thread


def func():
    for i in range(1000):
        print("子线程", i)


if __name__ == '__main__':
    func()
    thread = Thread(target=func)
    thread.start()
    for i in range(1000):
        print("主线程", i)
程序效果: main和func交替执⾏(如果速度够快, 给我们的感觉就是⼀ 起执⾏)
执⾏过程: 加载func() -> 执⾏main -> 创建⼦线程t -> ⼦线程t启动 -> 执⾏func中的内容 |-> 继续执⾏main
我们成功的让两件事同时发⽣了. 那么想⼀下, 如果我有1000个url准备去下载. 那么交给每个func单独去执⾏就好了啊. 主函数该⼲嘛还⼲嘛~
误区:
你说了.单线程是⼀条线跑下来的, 那我如果写个if是不是就是两条线 了? ⾮也~, 我们先看图
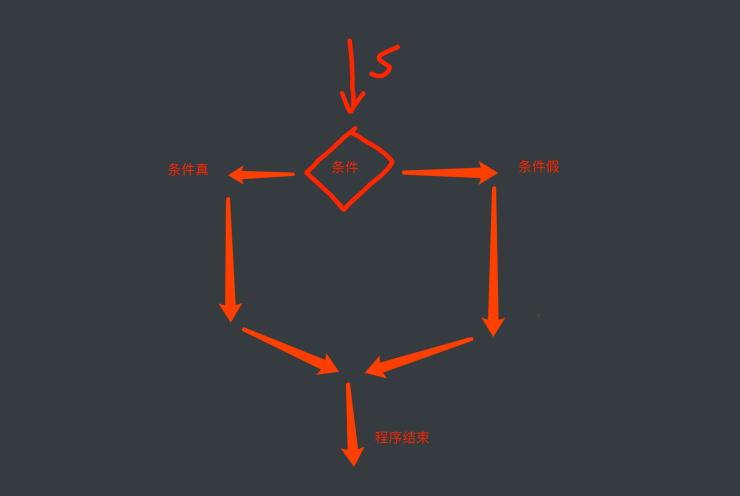
我们要注意⼀个细节. 不论程序真还是假. 它只能选择⼀条路⾛. 所以 还是单线程. 并没有异步的效果 多线程的另⼀种写法
class MyThread(Thread):
    def run(self):
        for i in range(1000):
            print("func", i)


if __name__ == '__main__':
    t = MyThread()
    t.start()
    for i in range(1000):
        print("main", i)
执⾏效果是⼀样的. 这⾥就不放图了.
4.2 多进程
这个更好理解. 通过主程序去创建多个进程来完成并⾏的效果
from multiprocessing import Process
def func():
 for i in range(1000):
 	print("func", i)
if __name__ == '__main__':
 p = Process(target=func)
 p.start()
 for i in range(1000):
 	print("main", i)
发现没有, 写法和多线程⼏乎⼀模⼀样
第⼆种写法
class MyProcess(Process):
 def run(self):
 	for i in range(1000):
	 print("MyProcess", i)
if __name__ == '__main__':
 t = MyProcess()
 t.start()
 for i in range(1000):
 	print("main", i)
注意, python的作者其实做了⼀件⼤好事. 本质上多线程和多进程的 执⾏过程是不⼀样的, python的作者为了让开发⼈员更舒服. 采⽤了 ⼏乎完全相同的API. 我们就跟着捡便宜了. 哈哈
第⼆个问题, 传参
def func(name):
 for i in range(100):
 	print(name, i)
if __name__ == '__main__':
 t1 = Thread(target=func, args=("周杰伦",))
 t2 = Thread(target=func, args=("王⼒宏",))
 t1.start()
 t2.start()
关于进程间通信以及锁的问题. 还有神⻢GIL锁
4.3 线程池和进程池
当我们对某些⽹站内容进⾏抓取的时候⾮常容易遇到这样⼀种情况.

看这个⽹站, 我们发现这⽹站的数据太多了. 有⼀万多⻚. 也就对应着 ⼀万多个url. 那我们设计多线程的时候如果每个url对应⼀个线程就 会产⽣新问题. 朋友, 你⼀定要知道. 创建线程本身也是要消耗你的计算机资源的. 线程不是变魔术变出来的. 那这时我们就可以考虑能不 能重复的使⽤线程呢? 答案当然可以. 线程池就可以帮你搞定
线程池⼯作原理:
创建⼀个⼤池⼦, 存放固定数量的线程. 然后把我们要执⾏的任务丢 给线程池. 由线程池去分配哪个线程来完成该任务. 其他的事情都不 需要你来管. 舒服吧.
废话不多说, 上代码:
from concurrent.futures import ThreadPoolExecutor, ProcessPoolExecutor

def fn(name):
    for i in range(100):
        print(name, i)

# 创建线程池
with ThreadPoolExecutor(50) as t:
    for i in range(100):
        t.submit(fn, name=f"线程{i}")
⾄于进程池. 就把ThreadPoolExecutor更换为ProcessPoolExecutor就可以了. 其他⼀模⼀样
补充:
Execute :通过这个方法可以向线程池提交一个任务,交由线程池去执行
Submit :也是用来向线程池提交任务的,实际上它还是调用的execute()方法,只不过它利用了Future来获取任务执行结果
Shutdown:任务都执行完后才终止,但再也不会接受新的任务
shutdownNow:立即终止线程池,并尝试打断正在执行的任务
isTerminated:isTerminated方法判断是否线程池中的所有线程已经执行完毕
https://www.freesion.com/article/9889582285/
案例:使用进程池爬取新发地菜价
import requests
import csv
from concurrent.futures import ThreadPoolExecutor
import time

def downloader_vegetable_price(i):
    data = {
        "current": i
    }
    resp = requests.post(url, headers=headers, data=data)
    dic = resp.json()['list']
    for item in dic:
        prodName = item['prodName']
        lowPrice = item['lowPrice']
        highPrice = item['highPrice']
        avgPrice = item['avgPrice']
        place = item['place']
        unitInfo = item['unitInfo']
        pubDate = item['pubDate']
        csv_fp.writerow([prodName, lowPrice, highPrice, avgPrice, place, unitInfo, pubDate])
    print(f"第{i}爬取完成")


url = "http://www.xinfadi.com.cn/getPriceData.html"
headers = {
    "User-Agent": "Mozilla/5.0 (Windows NT 10.0; Win64; x64) AppleWebKit/537.36 (KHTML, like Gecko) "
                  "Chrome/94.0.4606.81 Safari/537.36",
}
# 打开文件
fp = open("菜价.csv", "w", encoding="utf-8", newline='')
csv_fp = csv.writer(fp)
# 存入标题
csv_fp.writerow(["品名", "最低价", "平均价", "最高价", "产地", "单位", "发布日期"])
first_time = time.time()  # 开始时间
with ThreadPoolExecutor(12) as t:
    for i in range(1, 300):
        t.submit(downloader_vegetable_price, i)
last_time = time.time()     # 最终时间
final = last_time - first_time  # 用时时间
print(f"用时时间{final}")
fp.close()  # 关闭文件
4.4 协程
协程是我要重点去讲解的⼀个知识点. 它能够更加⾼效的利⽤CPU.
其实, 我们能够⾼效的利⽤多线程来完成爬⾍其实已经很6了. 但是, 从某种⻆度讲, 线程的执⾏效率真的就⽆敌了么? 我们真的充分的利 ⽤CPU资源了么? ⾮也~ ⽐如, 我们来看下⾯这个例⼦.
我们单独的⽤⼀个线程来完成某⼀个操作. 看看它的效率是否真的能 把CPU完全利⽤起来
import time
def func():
 print("我爱黎明")
 time.sleep(3)
 print("我真的爱黎明")

func()
各位请看. 在该程序中, 我们的func()实际在执⾏的时候⾄少需要3秒 的时间来完成操作. 中间的三秒钟需要让我当前的线程处于阻塞状 态. 阻塞状态的线程 CPU是不会来执⾏你的. 那么此时cpu很可能会 切换到其他程序上去执⾏. 此时, 对于你来说, CPU其实并没有为你 ⼯作(在这三秒内), 那么我们能不能通过某种⼿段, 让CPU⼀直为我⽽ ⼯作. 尽量的不要去管其他⼈
我们要知道CPU⼀般抛开执⾏周期不谈, 如果⼀个线程遇到了IO操 作, CPU就会⾃动的切换到其他线程进⾏执⾏. 那么, 如果我想办法 让我的线程遇到了IO操作就挂起, 留下的都是运算操作. 那CPU是不 是就会⻓时间的来照顾我~
以此为⽬的, 伟⼤的程序员就发明了⼀个新的执⾏过程. 当线程中遇 到了IO操作的时候, 将线程中的任务进⾏切换, 切换成⾮ IO操作. 等 原来的IO执⾏完了. 再恢复回原来的任务中.

就形成了这样⼀种模型, 在程序遇到了IO操作(费时不费⼒的操作)时, ⾃动切换到其他任务. 该模型被称为协程. 协程的基本写法: 咱就介绍⼀种, 也是最好⽤的⼀种, 如果各位想看更 加详细, 细致的协程推导过程, 可以再等等~~ 未来鄙⼈会推出更详细 的多任务系列教程~
先上⼿来⼀下.
async def func():
 print("我是协程")


if __name__ == '__main__':
 # print(func()) # 注意, 此时拿到的是⼀个协程对象,和⽣成器差不多.该函数默认是不会这样执⾏的
 coroutine = func()
 asyncio.run(coroutine) # ⽤asyncio的run来执⾏协程.
 # lop = asyncio.get_event_loop()
 # lop.run_until_complete(coroutine) # 这两句顶上⾯⼀句
效果不明显,继续加码
import time
# await: 当该任务被挂起后,CPU会⾃动切换到其他任务中

async def func1():
 print("func1, start")
 await asyncio.sleep(3)
 print("func1, end")

async def func2():
 print("func2, start")
 await asyncio.sleep(4)
 print("func2, end")

async def func3():
 print("func3, start")
 await asyncio.sleep(2)
 print("func3, end")

if __name__ == '__main__':
 start = time.time()
 tasks = [ # 协程任务列表
     func1(), # 创建协程任务
     func2(),
     func3()
 ]

 lop = asyncio.get_event_loop()
 # 我要执⾏这个协程任务列表中的所有任务
 lop.run_until_complete(asyncio.wait(tasks))
# 我要执⾏这个协程任务列表中的所有任务
 print(time.time() - start)
妙不妙~~
上⾯的程序还可以写成这样
async def main():
 print("start")
 # # 添加协程任务
 # t1 = asyncio.create_task(func1())
 # t2 = asyncio.create_task(func2())
 # t3 = asyncio.create_task(func3())
 #
 # ret1 = await t1
 # ret2 = await t2
 # ret3 = await t3

tasks = [
     func1(),
     func2(),
     func3()
 ]
 # ⼀次性把所有任务都执⾏
 await asyncio.wait(tasks)
 print("end")

if __name__ == '__main__':
 start = time.time()
 asyncio.run(main())
 print(time.time() - start)
模拟⼀下爬⾍怎么样~
async def download(url):
 print("开始抓取")
 await asyncio.sleep(3) # 我要开始下载了
 print("下载结束", url)

async def main():
 urls = [
 "http://www.baidu.com",
 "http://www.h.com",
 "http://luoyonghao.com"
 ]

# ⽣成任务列表
 tasks = [download(url) for url in urls]
 await asyncio.wait(tasks)


if __name__ == '__main__':
 asyncio.get_event_loop().run_until_complete(main())
4.5 aiohttp多任务异步协程
aiohttp是python的⼀个⾮常优秀的第三⽅异步http请求库. 我们可以 ⽤aiohttp来编写异步爬⾍(协程)
安装
pip install aiohttp
实例代码:
import aiohttp
import asyncio
import time
import requests
# 异步下载
async def aiodownload(url, session):
 name = url.split("/")[-1]
 # 发送请求, 这⾥和requests.get()⼏乎没区别, 除了代理换成了proxy
 async with session.get(url) as resp:
 # 读取数据. 如果想要读取源代码. 直接resp.text()即可. ⽐原来多了个()
 content = await resp.content.read()
 # 写⼊⽂件, 有兴趣可以参考aiofiles, 我这⾥根本不需要.
 with open(name, mode="wb") as f:
 	f.write(content)


async def main():
 # 创建session对象 -> 相当于requsts对象
 async with aiohttp.ClientSession() assession:
 # 添加下载任务
 tasks = [asyncio.create_task(aiodownload(url, session)) for url in urls]
 # 等待所有任务下载完成
 await asyncio.wait(tasks)


# 同步⽅式下载图⽚
def download(url):
 name = url.split("/")[-1]
 resp = requests.get(url)
 content = resp.content
 with open(name, mode="wb") as f:
 	f.write(content)

# 我故意弄了⼀堆url做测试
urls = [
 "http://kr.shanghai-jiuxin.com/file/2020/1031/26b7e178e987be6d914bf8d1af120890.jpg",
 "http://kr.shanghai-jiuxin.com/file/2020/1031/191468637cab2f0206f7d1d9b175ac81.jpg",
 "http://kr.shanghai-jiuxin.com/file/2020/1031/563337d07af599a9ea64e620729f367e.jpg",
 "http://kr.shanghai-jiuxin.com/file/2020/1031/563337d07af599a9ea64e620729f367e.jpg",
]
if __name__ == '__main__':
 t2 = time.time()
 for url in urls:
     download(url)
 print(time.time() - t2)
 t1 = time.time()
 # 异步爬⾍
 asyncio.run(main())
 print(time.time() - t1)
从最终运⾏的结果中能⾮常直观的看到⽤异步IO完成爬⾍的效率明 显⾼了很多
案例:扒光一本电子书
⼤点⼉⼲, 早点⼉散. 直接上.
⽬标: 百度⼩说 -> ⻄游记
代码:
import json
import aiofiles
import requests
import asyncio
import aiohttp

headers = {
    "User-Agent": "Mozilla/5.0 (Windows NT 10.0; Win64; x64) AppleWebKit/537.36 (KHTML, like Gecko) "
                  "Chrome/94.0.4606.81 Safari/537.36",
    # 防盗链: 溯源,当前本次请求的上一级是谁
    "Referer": "https://dushu.baidu.com/pc/reader?gid=4306063500&cid=11348571"
}

async def aio_download(cid, b_id, title):
    data = {
        "book_id": f"{b_id}",
        "cid": f"{b_id}|{cid}",
        "need_bookinfo": 1
    }
    data = json.dumps(data)
    url = f"https://dushu.baidu.com/api/pc/getChapterContent?data={data}"
    async with aiohttp.ClientSession() as session:
        async with session.get(url) as resp:
            dic = await resp.json()
            async with aiofiles.open("西游记/" + title + ".txt", "w", encoding='utf-8') as fp:
                await fp.write(dic['data']['novel']['content'])
            print(title, "over")


async def getCatalog(url):
    resp = requests.get(url, headers=headers)
    dic = resp.json()
    tasks = []
    for item in dic['data']['novel']['items']:
        title = item['title']
        cid = item['cid']
        # 准备异步任务
        tasks.append(aio_download(cid, b_id, title))
    await asyncio.wait(tasks)


if __name__ == '__main__':
    b_id = "4306063500"
    url = 'https://dushu.baidu.com/api/pc/getCatalog?data={"book_id":"' + b_id + '"}'
    asyncio.get_event_loop().run_until_complete(getCatalog(url))
案例:爬取91剧视频
⾸先, 我们先从⼀个简单的案例⼊⼿. 我们想要抓取⽹上的视频资源就必须要了解我们的视频⽹站是如何 ⼯作的. 这⾥我⽤91看剧来做举例. 其他⽹站的原理是⼀样的.
视频⽹站是如何⼯作的
假设, 你现在想要做⼀个视频⽹站. 也有很多的UP猪帮你上传视频. OK, 作为服务器作者的你. 只需要把视频保存起来. 然后给出⼀个视 频的链接即可. 然后在你的HTML代码中通过 video 标签引⼊即可
<video src="1_1_爬⾍概述.mp4"></video>
就可以了. 但是, 如果你这么做. 你的⽤户和⽼板⼀定会把你骂的狗⾎ 临头. 为什么呢?
假设你的视频是10个G的⾼清⽆码⼤资源. 那么此时, 你的⽤户和你 ⽼板将⾯临如下困境
- ⽤户: 这个视频怎么加载的这么慢. 点击快进也快进不了. 太慢 了. 塔喵的烦死了
- ⽼板: 怎么这个⽉的流量费⼜这么⾼啊. 要死的拉好不~
为什么会这样? 聪明的我告诉你答案. 你的视频那么⼤. 每次⽤户打 开的时候. 可能只是差了最后⼏分钟没看呢. 那此时它必须把整个视 频都传输完毕. 才能看到他想看的那⾥. 等待时间肯定超⻓的好不. ⽽ 每次都要把10G的⽂件进⾏⽹络传输. 流量费~你懂的. 三⼤运营商最 喜欢的就是你这种朴实⽆华的送钱⾏为.
OK~ 不扯了. 但凡有点⼉经验的程序员肯定会想办法把⽤户上传好 的视频进⾏转码(不同清晰度)做切⽚(ts)处理. 这样既⽅便⽤户进⾏⼤ 跨度的调整进度条(最⼩延迟). 也能为公司节省⼤量的流量费.
既然要把视频切成⾮常多个⼩碎⽚. 那就需要有个⽂件来记录这些⼩ 碎⽚的路径. 该⽂件⼀般为M3U⽂件. M3U⽂件中的内容经过UTF-8 的编码后, 就是M3U8⽂件. 今天, 我们看到的各⼤视频⽹站平台使⽤ 的⼏乎都是M3U8⽂件.
如何解读M3U8⽂件.
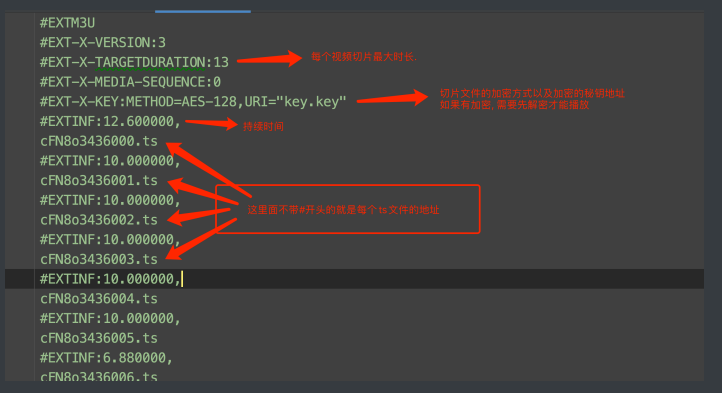
基本知道这些就够了.
先来个简单的试试
import re

import requests

obj = re.compile(r"url: '(?P<url>.*?)',", re.S)  # 用来提取m3u8的url
url = "http://91kanju2.com/vod-play/6017-3-2.html"

headers = {
    "User-Agent": "Mozilla/5.0 (Windows NT 10.0; Win64; x64) AppleWebKit/537.36 (KHTML, like Gecko) "
                  "Chrome/94.0.4606.81 Safari/537.36",
}

resp = requests.get(url, headers=headers).text
m3u8_url = obj.search(resp).group("url")
print(m3u8_url)

resp2 = requests.get(m3u8_url, headers=headers).content
with open("色戒.m3u8", "wb") as f:
    f.write(resp2)
print("下载完成")

n = 1
# 读取文件
with open("色戒.m3u8", "r", encoding="utf-8") as fp:
    for item in fp:
        item = item.strip()  # 先去掉空格,空白,换行符
        if item.startswith('#'):  # 不要#号开头的数据
            continue
        print(item)
        # 下载视频
        resp3 = requests.get(item, headers=headers)
        f = open(f"video/{n}.mp4", "ab")
        f.write(resp3.content)
        f.close()
        resp3.close()
        print(n)
        n += 1
5. selenium
5.1 概述selenium
我们在抓取⼀些普通⽹⻚的时候requests基本上是可以满⾜的. 但是, 如果遇到⼀些特殊的⽹站. 它的数据是经过加密的. 但是呢, 浏览器却 能够正常显示出来. 那我们通过requests抓取到的内容可能就不是我 们想要的结果了. 例如
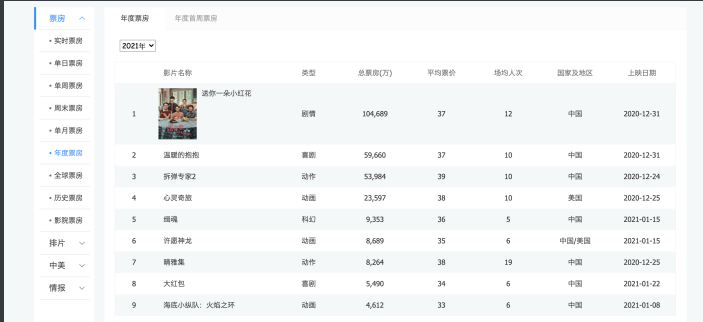
电影票房数据. 在浏览器上看的时候是正常的. 那么按照之前的逻辑. 我们只需要看看数据是通过哪个请求拿到的就可以进⾏模拟请求了. 但是!
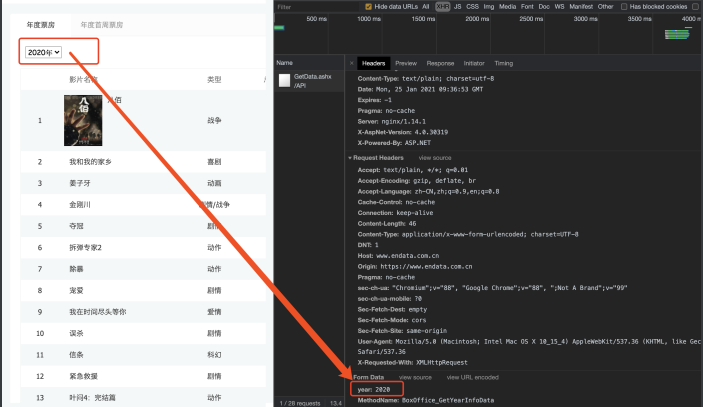
数据找到了. 接着看"预览"吧
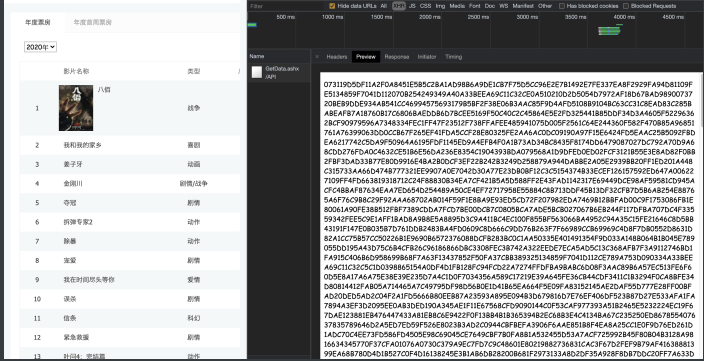
我们发现这个数据是经过加密算法的. 这就头疼了. 直接通过 requests拿到这些内容必须要解密才能看到真实数据. 但是该⽹站采 ⽤的加密⽅式⼜不是那么容易破解. 此时, 各位想想如果我能通过我 的程序直接调⽤浏览器. 让浏览器去解密这些内容. 我们直接拿结果 岂不妙哉. 哎~这就引出了我们本章要重点讲解的selenium了. 它可以 完美解决上述问题
简单介绍⼀下selenium, 它本身是⼀个⾃动化测试的⼯具. 可以启动 ⼀个全新的浏览器.并从浏览器中提取到你想要的内容. 随着各种⽹ 站的反爬机制的出现. selenium越来越受到各位爬sir的喜爱. selenium最⼤的缺点其实就⼀个, 慢! 你想啊. 他要启动⼀个第三⽅的 软件(浏览器), 并且还要等待浏览器把数据渲染完毕. 这个过程必然是 很耗时的. 所以它慢
5.2 安装selenium
接下来, 我们来聊聊selenium如何安装和使⽤
就像其他第三⽅库⼀样, selenium直接⽤pip就可以安装了
pip install selenium
但是呢, 它与其他库不同的地⽅是他要启动你电脑上的浏览器, 这就 需要⼀个驱动程序来辅助.
chrome驱动地址:https://npm.taobao.org/mirrors/chromedriver
这⾥推荐⽤chrome浏览器. 其他浏览器的驱动请⾃⾏百度

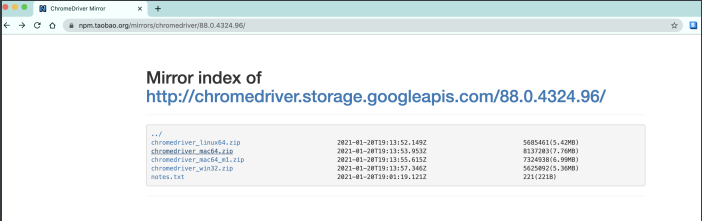
根据你电脑的不同⾃⾏选择吧. win64选win32即可.
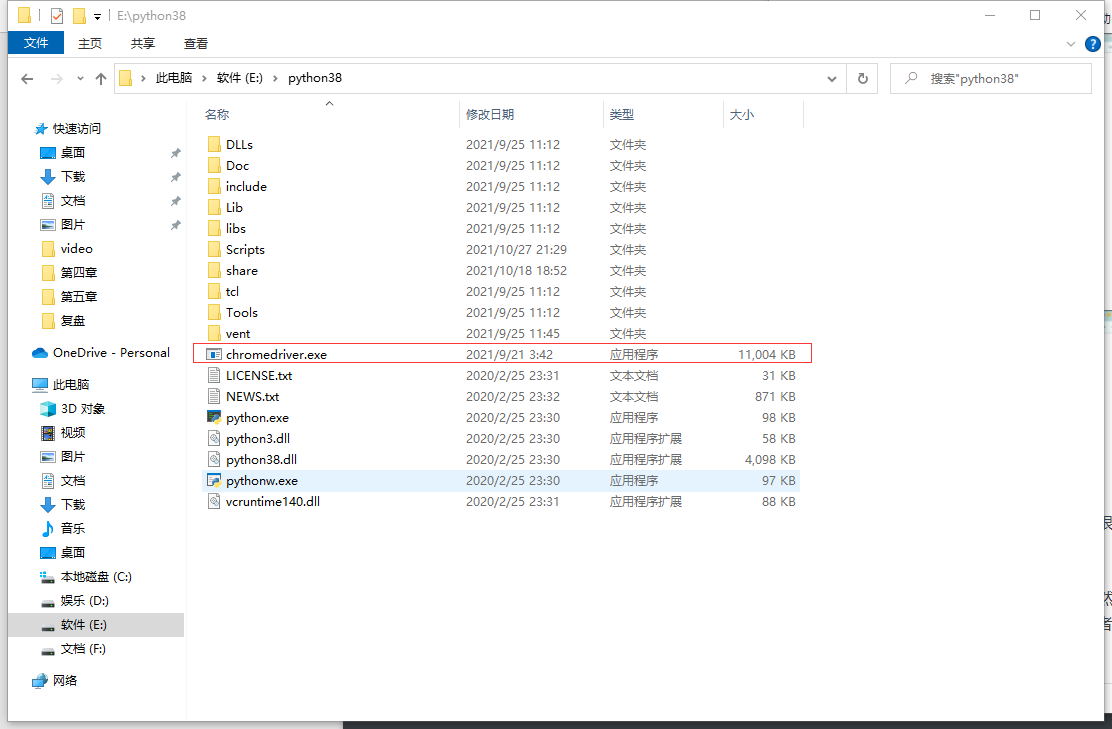
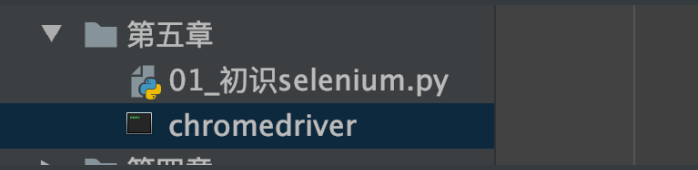
然后关键的来了. 把你下载的浏览器驱动放在程序所在的⽂件夹. 或 者放到python解释器所在的⽂件夹. 两种⼆选其⼀.
放到解释器里
放到项目里
OK~ 前期准备⼯作完毕. 上代码看看, selenium是个什么⻤
5.3 使用selenium
from selenium.webdriver import Chrome, Keys


# 如果你的浏览器驱动放在了项⽬⾥
# web = Chrome(executable_path="chromedriver")
# 创建一个浏览器对象
web = Chrome() # 如果你的浏览器驱动放在了解释器⽂件夹
web.get("https://www.baidu.com")  # 打开浏览器
print(web.title) # 打印title
运⾏⼀下你会发现神奇的事情发⽣了. 浏览器⾃动打开了. 并且输⼊ 了⽹址. 也能拿到⽹⻚上的title标题
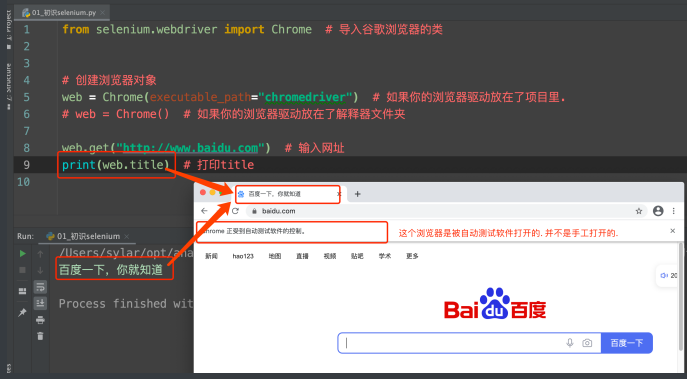
5.4 selenium各种神奇操作
selenium不但可以打开浏览器. 还可以对浏览器各种操作. ⽐如, 点 击, 查找. 都可以.
我们直接上案例. 抓取拉钩⽹招聘python⼯程师的招聘信息
准备工作:
from selenium.webdriver import Chrome
web = Chrome()
web.get("http://lagou.com")
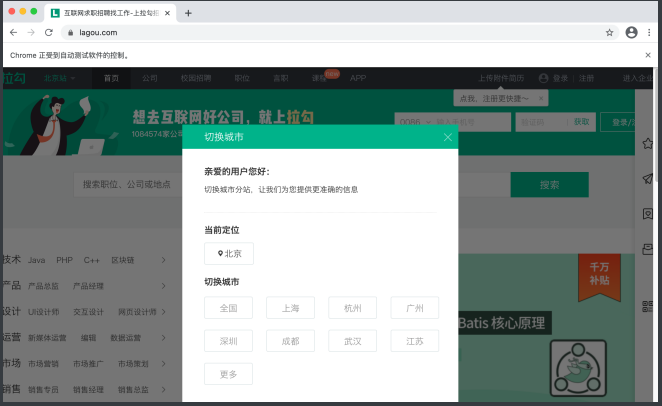
点击-全国按钮
想要点击这个按钮. 我们需要先定位到这个按钮. 然后再点击 selenium想要定位某个元素. 太简单了
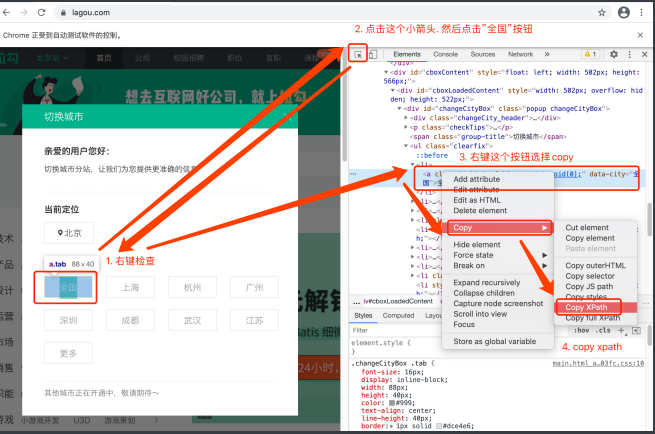
有了xpath是不是明⽩了些什么
from selenium.webdriver import Chrome
web = Chrome()
web.get("http://lagou.com")
btn = web.find_element_by_xpath('//*[@id="changeCityBox"]/ul/li[1]/a') # 找到全国按钮
btn.click() # 点击这个按钮
搜索python ⼈的过程: 找到⽂本框输⼊"python", 点击"搜索"按钮. 机器的过程: 找到⽂本框输⼊"python", 点击"搜索"按钮. 发现没, ⽤selenium最爽的地⽅就是这⾥. ⼈是怎么操作的. 机器 就怎么操作. 爽到极点
# 找到⽂本框输⼊python, 点击搜索按钮
web.find_element_by_xpath('//*[@id="search_input"]').send_keys("python")
web.find_element_by_xpath('//*[@id="search_button"]').click()
send_keys() 这⾥要说⼀下. 如果我们给出的是⼀个字符串. 就是 输⼊⽂本. 但是, 如果给出的是⼀个键盘指令, 那就按下键盘. ⽐ 如, 我想要按回⻋按钮. 就是这样的
from selenium.webdriver import Chrome
from selenium.webdriver.common.keys import Keys
import time

web = Chrome()

web.get("http://lagou.com")
btn = web.find_element_by_xpath('//*[@id="changeCityBox"]/ul/li[1]/a')  # 找到全国按钮
btn.click()  # 点击这个按钮
time.sleep(2)  # 让浏览器反应⼀会⼉
# 找到⽂本框输⼊python, 点击搜索按钮
web.find_element_by_xpath('//*[@id="search_input"]').send_keys("python", Keys.ENTER)
# web.find_element_by_xpath('//*[@id="search_button"]').click()
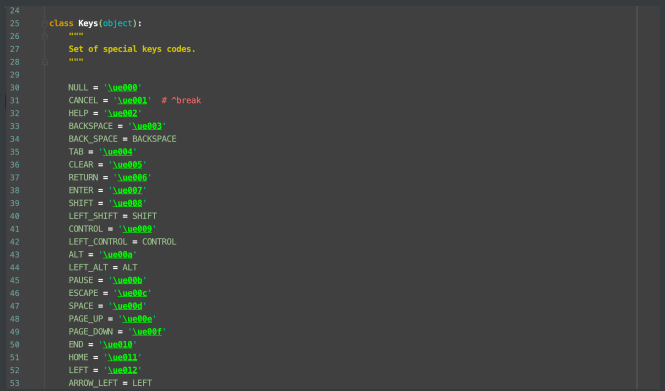
keys⾥⼏乎包含了我们需要的所有特殊按键
提取招聘信息
from selenium.webdriver import Chrome
from selenium.webdriver.common.keys import Keys
import time

web = Chrome()

web.get("http://lagou.com")
btn = web.find_element('xpath', '//*[@id="changeCityBox"]/ul/li[1]/a')  # 找到全国按钮
btn.click()  # 点击这个按钮
time.sleep(2)  # 让浏览器反应⼀会⼉
# 找到⽂本框输⼊python, 点击搜索按钮
web.find_element('xpath', '//*[@id="search_input"]').send_keys("python", Keys.ENTER)
# web.find_element_by_xpath('//*[@id="search_button"]').click()
ls = web.find_elements('xpath', '//*[id="s_position_list"]/ul/li')  # ⼀次性提取多个元素⽤elements
for item in ls:
    name = item.find_element('xpath', './div[1]/div[1]/div[1]/a/h3').text
    addr = item.find_element('xpath', './div[1]/div[2]/div[1]/a').text
    print(name, addr)
    # 其他内容你⾃⼰琢磨吧
5.5 处理iframe, 多窗⼝调度
我们书接上回. 上回说到我们已经可以通过selenium拿到拉钩⽹的招 聘信息了. 但是, 信息不够全⾯. 我们希望得到的不仅仅是⼀个岗位名 称和公司名称, 我更想知道更加详细的职位描述以及岗位要求.
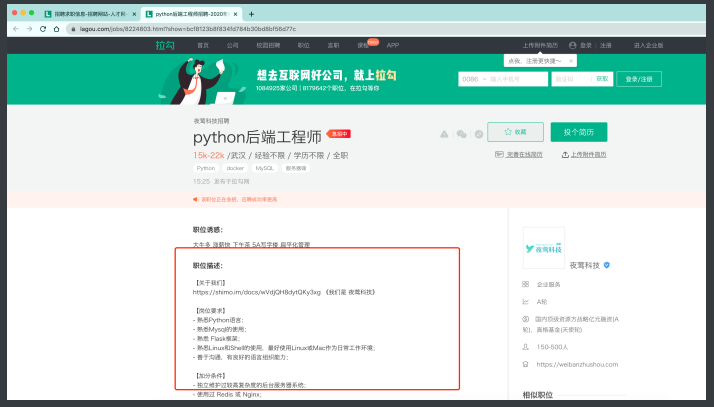
此时问题就来了. 我们可以在搜索⻚⾯点击进⼊到这个详情⻚. 然后 就可以看到想要的职位描述了. 但是, 这时就涉及到如何从⼀个窗⼝ 转向另⼀个窗⼝了(切换选项卡).
⾸先, 我们先通过selenium定位到搜索⻚上的职位超链接.
from selenium.webdriver import Chrome, Keys

web = Chrome()
web.get("http://lagou.com")
btn = web.find_element('xpath', '//*[@id="changeCityBox"]/ul/li[1]/a')  # 找到全国按钮
btn.click()  # 点击这个按钮
web.find_element('xpath', '//*[@id="search_input"]').send_keys("python", Keys.ENTER)
# 点击a标签进入详情页
web.find_element('xpath', '//*[@id="s_position_list"]/ul/li[1]/div[1]/div[1]/div[1]/a/h3').click()
正片开始
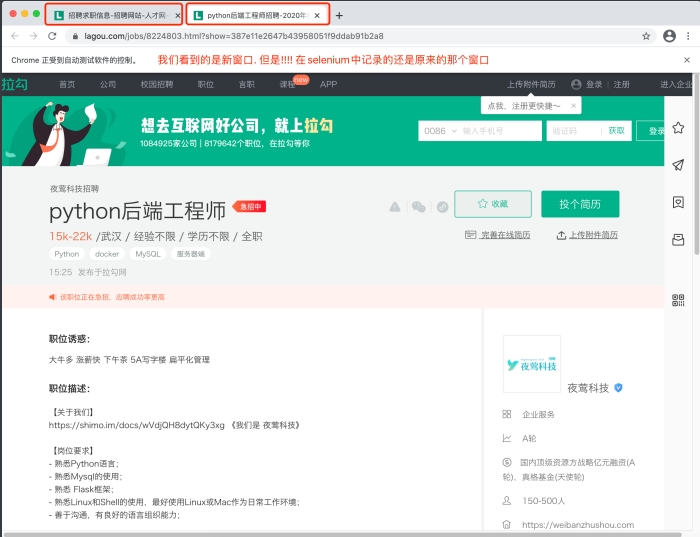
注意! 我们看到的是新窗⼝的内容, 但是在selenium的视⻆⾥, 窗⼝依 然停留在刚才那个窗⼝. 此时, 必须要将窗⼝调整到最新的窗⼝上才 可以.
# 切换浏览器窗口, 跳转到最后一个窗口
web.switch_to.window(web.window_handles[-1])
demand = web.find_element('xpath', '//*[@id="job_detail"]/dd[2]/div').text
print(demand)
web.close()  # 关闭窗口
# 切换到原来窗口
web.switch_to.window(web.window_handles[0])
接下来我们来看另⼀种操作. 之前我们抓取过⼀个⽹站. ⾥⾯把视频内容嵌套在⼀个iframe中. 那 如果换成了selenium应该如何应对呢?
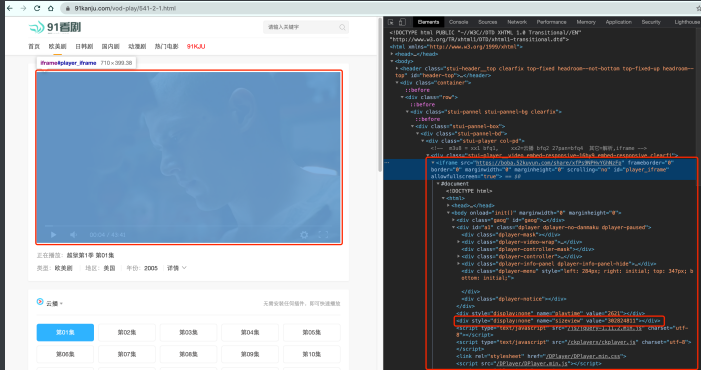
from selenium.webdriver import Chrome, Keys

web = Chrome()
web.get("https://www.91kanju.com/vod-play/541-2-1.html")
# 找到那个iframe
iframe = web.find_element_by_xpath('//*[@id="player_iframe"]')
web.switch_to.frame(iframe)
val = web.find_element_by_xpath('/html/body/div[4]').get_attribute("value")
print(val)
5.6 ⽆头浏览器
我们已经基本了解了selenium的基本使⽤了. 但是呢, 不知各位有没 有发现, 每次打开浏览器的时间都⽐较⻓. 这就⽐较耗时了. 我们写的 是爬⾍程序. ⽬的是数据. 并不是想看⽹⻚. 那能不能让浏览器在后台 跑呢? 答案是可以的.
咱直接上案例吧. 拿出最开始我们看到的那个⽹⻚. 抓取电影票房. 并 且⽤正常的有浏览器窗⼝的⽅式来抓取. 然后再改成后台运⾏不就好 了么
from selenium.webdriver import Chrome
from selenium.webdriver.support.select import Select
import time
web = Chrome()
web.get('https://www.endata.com.cn/BoxOffice/BO/Year/index.html')
# 切换select
sel = Select(web.find_element_by_xpath('//*[@id="OptionDate"]'))
for i in range(len(sel.options)):
 sel.select_by_index(i) # 按照索引位置切换
 time.sleep(1)
 table = web.find_element_by_xpath('//*[@id="TableList"]/table')

print("===========================================")
 print(table.text)
接下来, 我们对程序进⾏修改. 让selenium在后台安安静静的执⾏.
from selenium.webdriver import Chrome
from selenium.webdriver.chrome.options import Options
from selenium.webdriver.support.select import Select
import time
# 准备⽆头浏览器配置信息
opt = Options()
opt.add_argument('--headless')
opt.add_argument('--disable-gpu')
web = Chrome(options=opt) # 将⽆头信息进⾏配置
web.get('https://www.endata.com.cn/BoxOffice/BO/Year/index.html')
# 切换select
sel = Select(web.find_element_by_xpath('//*[@id="OptionDate"]'))
for i in range(len(sel.options)):
 sel.select_by_index(i) # 按照索引位置切换
 time.sleep(1)
 table = web.find_element_by_xpath('//*[@id="TableList"]/table')

print("===========================================")
	print(table.text)
# 打印浏览器源代码
time.sleep(3) # 等待js加载完数据
print(web.page_source)
6. scrapy
6.1 scrapy框架简介
-
Scrapy是用纯Python实现一个为了爬取网站数据、提取结构性数据而编写的应用框架,用途非常广泛
-
框架的力量,用户只需要定制开发几个模块就可以轻松的实现一个爬虫,用来抓取网页内容以及各种图片,非常之方便

-
crapy Engine(引擎): 负责Spider、ItemPipeline、Downloader、Scheduler中间的通讯,信号、数据传递等。
-
Scheduler(调度器): 它负责接受引擎发送过来的Request请求,并按照一定的方式进行整理排列,入队,当引擎需要时,交还给引擎。
-
Downloader(下载器):负责下载Scrapy Engine(引擎)发送的所有Requests请求,并将其获取到的Responses交还给Scrapy Engine(引擎),由引擎交给Spider来处理,
-
Spider(爬虫):它负责处理所有Responses,从中分析提取数据,获取Item字段需要的数据,并将需要跟进的URL提交给引擎,再次进入Scheduler(调度器),
-
Item Pipeline(管道):它负责处理Spider中获取到的Item,并进行进行后期处理(详细分析、过滤、存储等)的地方
-
Downloader Middlewares(下载中间件):你可以当作是一个可以自定义扩展下载功能的组件。
-
Spider Middlewares(Spider中间件):你可以理解为是一个可以自定扩展和操作引擎和Spider中间通信的功能组件(比如进入Spider的Responses;和从Spider出去的Requests)

6.2 安装scrapy
mac or linux:
	pip install scrapy
windows:
	pip install wheel
	pip install Twised
	pip install pywin32
	pip install scrapy
测试:
	在终端里录入scrapy指令,没有报错即表示安装成功
6.3 新建scrapy项目
1、创建爬虫项目,命令:scrapy startproject 项目名称
2、创建爬虫文件,命令:scrapy genspider 文件名称 域名
3、执行工程名,命令:scrapy crawl 文件名称
创建完成后会自动生成一些文件
目标网站分析需要提取的数据,在item.py文件中添加字段
Item 定义结构化数据字段,用来保存爬取到的数据,有点像Python中的dict,但是提供了一些额外的保护减少错误
在爬虫文件中会,默认生成下列代码
import scrapy

class TestSpider(scrapy.Spider):
    # 爬虫名称
    name = 'test'
    # 设置允许爬取的域(可以指定多个)
    allowed_domains = ['baidu.com']
    # 设置起始url(设置多个)
    start_urls = ['http://baidu.com/']

    def parse(self, response):
        '''
        是一个回调方法,起始url请求成功后,会回调这个方法
        :param response: 响应结果
        :return:
        '''
        pass
在parse方法中做数据的提取
def parse(self, response):
'''
在parse回调方法中
step1;提取目标数据
step2;获取新的url
:param response: 请求的响应结果
:return:
'''
print(response.status)
#response.xpath(): 使用xpath语法,得到的是selectorlist对象
# response.css(): 使用css选择器,得到的是selectorlist对象
# extract(): 将selector 序列化为unicode字符串
# step1;提取目标数据
# 获取分类列表
tags = response.xpath('//div[@class="Taright"]/a')
# tags = response.css('.Taright a')
for tag in tags:
# 实例化一个item,用来存储数据
tag_item = ChinazspidertagItem()
# 获取网站分类的名称
# tagname = tag.xpath('./text()')[0].extract()
tagname = tag.xpath('./text()').extract_first('')
tag_item['tagname'] = tagname
# 使用css取值(文本)
# tagname = tag.css('::text').extract_first('')
# 获取网站分类的首页url地址
# first_url = tag.xpath('./@href')[0].extract()
first_url = tag.xpath('./@href').extract_first('')
tag_item['firsturl'] = first_url
# css取值(属性)
# first_url = tag.css('::attr(href)').extract_first('')
print(tag_item)
# print(type(tagname),type(first_url))
# print(tagname,first_url)
# 将获取到的数据交给管道处理
yield tag_item
# http://top.chinaz.com/hangye/index_yule_yinyue.html
# http://top.chinaz.com/hangye/index_yule_yinyue_2.html
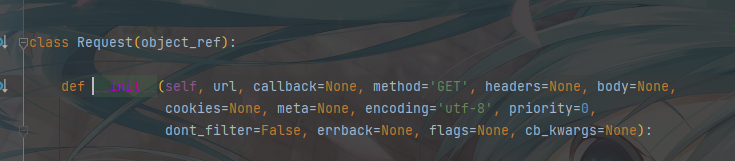
'''
url,设置需要发起请求的url地址
callback=None,设置请求成功后的回调方法
method='GET',请求方式,默认为get请求
headers=None,设置请求头,字典类型
cookies=None,设置cookies信息,模拟登录用户,字典类型
meta=None,传递参数(字典类型)
encoding='utf-8',设置编码
dont_filter=False, 是否去重,默认为false,表示去重
errback=None, 设置请求失败后的回调
'''
yield scrapy.Request(first_url,callback=self.parse_tags_page)
6.4 发送post请求
import scrapy
import json


class PostdemoSpider(scrapy.Spider):
    name = 'postDemo'
    # allowed_domains = ['www.baidu.com']
    start_urls = ['https://fanyi.baidu.com/sug']

    # 该方法其实是父类中的一个方法:该方法可以对start_urls列表中的元素进行get请求的发送
    # 发起post:
    # 1.将Request方法中method参数赋值成post
    # 2.FormRequest()可以发起post请求(推荐)
    def start_requests(self):
        # for url in self.start_urls:
        #     yield scrapy.Request(url,callback=self.parse)
        print('start_requests()')
        # post请求的参数
        data = {
            'kw': 'dog',
        }
        for url in self.start_urls:
            yield scrapy.FormRequest(url,callback=self.parse,formdata=data)

    def parse(self, response):
        jsobj = json.loads(response.body) # json处理
        fanyi_data = jsobj['data']
        print(fanyi_data)
6.5 关于yeild函数介绍
- 简单地讲,yield 的作用就是把一个函数变成一个 generator(生成器),带有 yield 的函数不再是一个普通函数,Python 解释器会将其视为一个 generator,带有yeild的函数遇到yeild的时候就返回一个迭代值,下次迭代时, 代码从 yield 的下一条语句继续执行,而函数的本地变量看起来和上次中断执行前是完全一样的,于是函数继续执行, 直到再次遇到 yield。
- 通俗的讲就是:在一个函数中,程序执行到yield语句的时候,程序暂停,返回yield后面表达式的值,在下一次调用的时候,从yield语句暂停的地方继续执行,如此循环,直到函数执行完。
6.6 Item pipeline(管道文件)使用
当Item在Spider中被收集之后,它将会被传递到Item Pipeline,这些Item Pipeline组件按定义的顺序处理Item。
每个Item Pipeline都是实现了简单方法的Python类,比如决定此Item是丢弃而存储。以下是item pipeline的一些典型应用:
验证爬取的数据(检查item包含某些字段,比如说name字段)
查重(并丢弃)
将爬取结果保存到文件或者数据库中
item pipiline组件是一个独立的Python类,其中process_item()方法必须实现:
class SomethingPipeline(object):
    def __init__(self):
        # 可选实现,做参数初始化等
        # doing something

    def process_item(self, item, spider):
        # item (Item 对象) – 被爬取的item
        # spider (Spider 对象) – 爬取该item的spider
        # 这个方法必须实现,每个item pipeline组件都需要调用该方法,
        # 这个方法必须返回一个 Item 对象,被丢弃的item将不会被之后的pipeline组件所处理。
        return item

    def open_spider(self, spider):
        # spider (Spider 对象) – 被开启的spider
        # 可选实现,当spider被开启时,这个方法被调用。

    def close_spider(self, spider):
        # spider (Spider 对象) – 被关闭的spider
        # 可选实现,当spider被关闭时,这个方法被调用
- 启用一个Item Pipeline组件 为了启用Item Pipeline组件,必须将它的类添加到 settings.py文件ITEM_PIPELINES 配置,就像下面这个例子:
ITEM_PIPELINES = {
    #'mySpider.pipelines.SomePipeline': 300,
    "mySpider.pipelines.JobboleprojectPipeline":300
}
# 分配给每个类的整型值,确定了他们运行的顺序,item按数字从低到高的顺序,通过pipeline,通常将这些数字定义在0-1000范围内(0-1000随意设置,数值越低,组件的优先级越高)
6.7 定制图片下载管道
在settings.py中设置 IMAGES_STORE 设置为一个有效的文件夹,用来存储下载的图片
IMAGES_STORE = '/xxx/xxx/xxx'
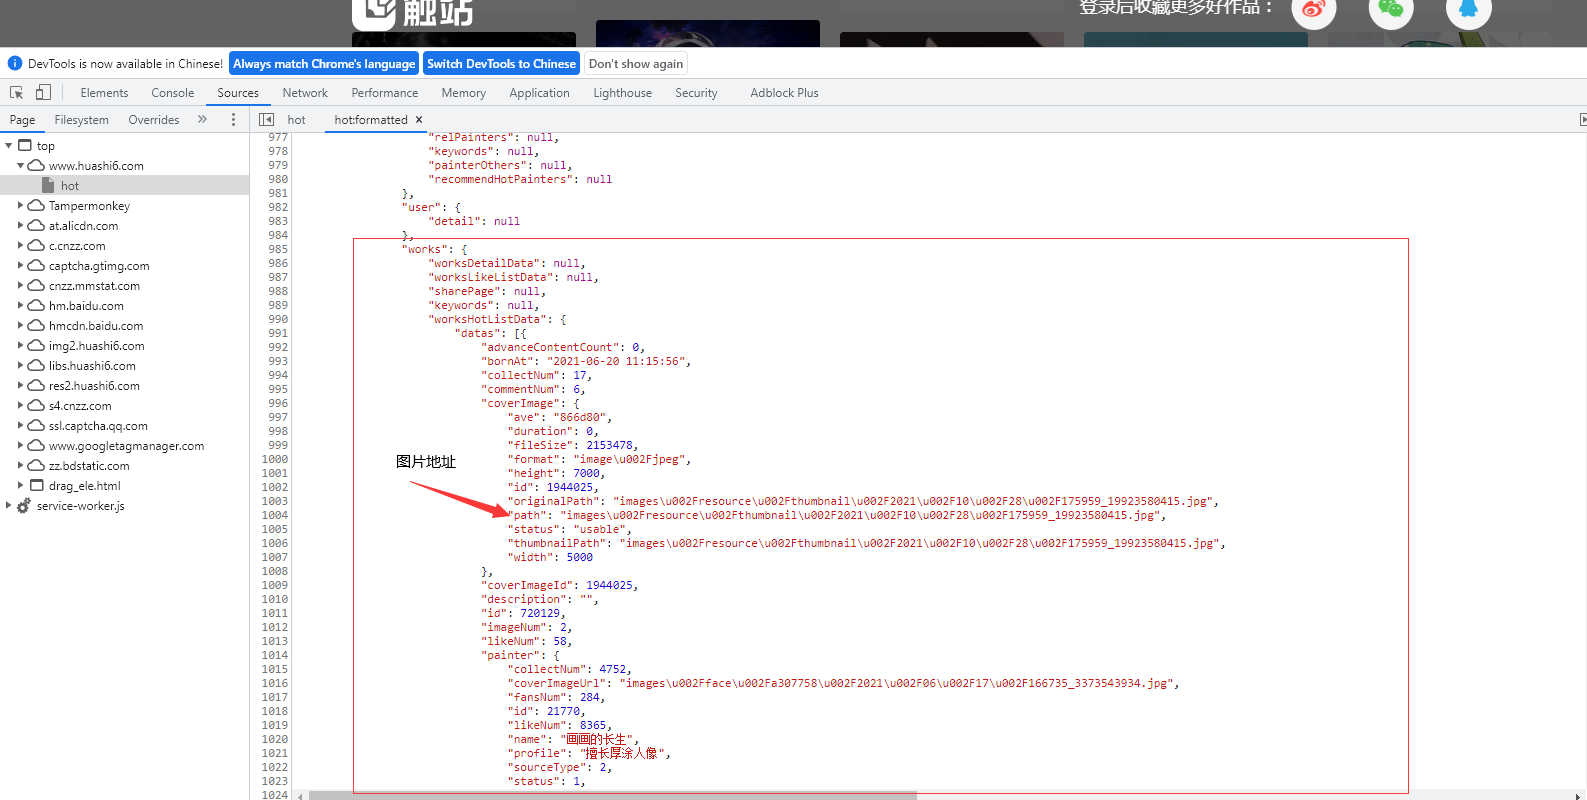
爬取网站:https://www.huashi6.com/hot
通过爬取网站我发现网站的图片地址其实在script里面,这时我们就要通过re去提取数据(别问我为什么知道,因为我爬取了一个下午才发现的问题)
class HuashiSpider(scrapy.Spider):
    name = 'huashi'
    # allowed_domains = ['www.xxx.com']
    start_urls = ['https://www.huashi6.com/hot']
    url = 'https://rt.huashi6.com/front/works/hotlist?&index=%d'
    # 图片地址前缀
    url_prefix = "https://img2.huashi6.com/"

    def parse(self, response):
        # 获取到script
        obj = re.compile(r'"user".*?,(?P<worksHotListData>).*?(?P<datas>.*?);', re.S)
        html = obj.search(response.text).group('datas')
        html = "{" + html
        html = json.loads(html)  # 把数据装换成dict
        datas = html['works']['worksHotListData']['datas']
        for item in datas:
            url_img = self.url_prefix + item['coverImage']['path']
            item = HuashiproItem()
            item['src'] = url_img
            yield item
# ImagesPipeline专门用于文件下载管道类,下载过程支持异步和多线程
class ImagesProPipeline(ImagesPipeline):

    # 对item中的图片进行请求操作
    def get_media_requests(self, item, info):
        print("请求", item['src'])
        yield scrapy.Request(item['src'])

    # 指定图片存储的路径
    def file_path(self, request, response=None, info=None, *, item=None):
        imgName = request.url.split('/')[-1]
        print("over", imgName)
        return imgName

    # 返回给其他管道
    def item_completed(self, results, item, info):
        return item
class HuashiproItem(scrapy.Item):
    # define the fields for your item here like:
    # name = scrapy.Field()
    src = scrapy.Field()
settings.py
USER_AGENT = 'Mozilla/5.0 (Windows NT 10.0; Win64; x64) AppleWebKit/537.36 (KHTML, like Gecko) Chrome/95.0.4638.69 Safari/537.36'

# Obey robots.txt rules
ROBOTSTXT_OBEY = False
LOG_LEVEL = "ERROR"

IMAGES_STORE = "./images"

ITEM_PIPELINES = {
   'huashiPro.pipelines.ImagesProPipeline': 300,
}
6.8 爬虫数据持久化
使用终端指令进行数据持久化存储 命令:scrapy crawl 文件名称 -o filePath.扩展名
注意:(只可以存储 json, jsonlines, jl, csv, xml, marshal, pickle)
方式一:将数据存入mongodb
settings.py文件: 设置文件,在这里设置User-Agent,激活管道文件等...
ITEM_PIPELINES = {
'douban.pipelines.DoubanPipeline': 300,
}

# MONGODB 主机名
MONGODB_HOST = '127.0.0.1'
# MONGODB 端口号
MONGODB_PORT= 27017
# 数据库名称
MONGODB_DBNAME = "Douban"
# 存储数据的表名称
MONGODB_SHEETNAME= "doubanmovies"
 # 往mongodb数据库中插入数据
 class Chinazprojectpipeline(object):

     def __init__(self):
         # 创建mongodb的数据库连接
         mongo_client = pymongo.MongoClient(
             host='127.0.0.1',port=27017
         )
         # 获取要操作的数据库
         self.db = mongo_client['chinaz']
     @classmethod
     def from_crawler(cls,crawler):
         MONGO_HOST = '127.0.0.1'
         MONGO_PORT = 27017
         MONGO_DB = 'chinaz'

     def process_item(self, item, spider):
         '''

         :param item:
         :param spider:
         :return:
         '''
         # 往哪个集合下插入数据
         col_name = item.get_mongodb_collectionname()
         col = self.db[col_name]
         # 往集合下插入什么数据
         dict_data = dict(item)

         try:
             col.insert(dict_data)
             print('数据插入成功')
         except Exception as err:
             print('插入数据失败',err)

     def close_spider(self,spider):
         self.mongo_client.close()
         print(spider.name,'爬虫结束了')
方式二:将数据存入mysql数据库
settings.py文件: 设置文件,在这里设置User-Agent,激活管道文件等...
ITEM_PIPELINES = {
'douban.pipelines.DoubanPipeline': 300,
}

# 关于数据库的相关配置
MYSQL_HOST = '127.0.0.1'
MYSQL_PORT = 3306
MYSQL_USER = 'root'
MYSQL_PWD = '123456'
MYSQL_DB = 'yefeng'
# pipelines.py管道文件
spider文件
import scrapy

from TestYefengPro.items import TestyefengproItem


class TestsSpider(scrapy.Spider):
    name = 'Tests'
    # allowed_domains = ['www.xxx.com']
    start_urls = ['https://tophub.today/']

    def parse(self, response):
        all_data = []

        html = response.xpath('//div[@class="bc"]/div[@class="bc-cc"]/div/div/div[2]/div')
        print(html)
        for item in html:
            a = item.xpath("./a")
            for q in a:
                url = q.xpath('./@href').get()
                sorts = q.xpath('./div/span[1]/text()').get()
                names = q.xpath('./div/span[2]/text()').get()
                heats = q.xpath('./div/span[3]/text()').get()
                print(sorts, names, heats, url)
                item = TestyefengproItem()
                item['sorts'] = sorts
                item['names'] = names
                item['heats'] = heats
                item['url'] = url
                yield item
item.py
import scrapy

class TestyefengproItem(scrapy.Item):
    # define the fields for your item here like:
    # name = scrapy.Field()
    url = scrapy.Field()
    sorts = scrapy.Field()
    names = scrapy.Field()
    heats = scrapy.Field()
pipelines
class TestyefengprosPipeline:
    conn = None
    cursor = None # 创建游标
	#
    def open_spider(self, spider):
        # 连接数据库
        self.conn = pymysql.Connect(
            user='root',
            password='123456',
            host='localhost',
            database='ruo',
            port=3306,
            charset='utf8'  # 注意这里不要写成utf-8
        )

    def process_item(self, item, spider):
        self.cursor = self.conn.cursor()
        try:
          	# 执行sql语句
            self.cursor.execute("insert into todayHots values('%s', '%s', '%s', '%s')" % (
                item['sorts'], item['names'], item['heats'], item['url']))
            # 一定记得commit负责数据不会进行存储
            self.conn.commit()
        except Exception as e:
            print(e)
            self.conn.rollback()    # 发生错误回滚数据
        # 如果有多个管道文件,一定要return item , 否则下一管道无法接收到item
        return item

	# 关闭
    def close_spider(self, spider):
        self.cursor.close()
        self.conn.close()
方式三:存放csv文件里
spider文件
import scrapy

from TestYefengPro.items import TestyefengproItem


class TestsSpider(scrapy.Spider):
    name = 'Tests'
    # allowed_domains = ['www.xxx.com']
    start_urls = ['https://tophub.today/']

    def parse(self, response):
        all_data = []

        html = response.xpath('//div[@class="bc"]/div[@class="bc-cc"]/div/div/div[2]/div')
        print(html)
        for item in html:
            a = item.xpath("./a")
            for q in a:
                url = q.xpath('./@href').get()
                sorts = q.xpath('./div/span[1]/text()').get()
                names = q.xpath('./div/span[2]/text()').get()
                heats = q.xpath('./div/span[3]/text()').get()
                print(sorts, names, heats, url)
                item = TestyefengproItem()
                item['sorts'] = sorts
                item['names'] = names
                item['heats'] = heats
                item['url'] = url
                yield item
item.py
import scrapy


class TestyefengproItem(scrapy.Item):
    # define the fields for your item here like:
    # name = scrapy.Field()
    url = scrapy.Field()
    sorts = scrapy.Field()
    names = scrapy.Field()
    heats = scrapy.Field()
pipelines
import csv

from itemadapter import ItemAdapter


class TestyefengproPipeline:
    fp = None
    csv_fp = None

    def open_spider(self, spider):
        self.fp = open("./toDayHots.csv", "w", encoding='utf-8', newline='')
        self.csv_fp = csv.writer(self.fp)
        self.csv_fp.writerow(['排行', '名称', '热度', '地址'])

    def process_item(self, item, spider):
        sorts = item['sorts']
        names = item['names']
        heats = item['heats']
        url = item['url']
        self.csv_fp.writerow([sorts, names, heats, url])
        return item

    def close_spider(self, spider):
        self.fp.close()
异步插入数据库
import pymysql
twisted是一个异步的网络框架,这里可以帮助我们
实现异步将数据插入数据库
adbapi里面的子线程会去执行数据库的阻塞操作,
当一个线程执行完毕之后,同时,原始线程能继续
进行正常的工作,服务其他请求。
from twisted.enterprise import adbapi

#异步插入数据库
class DoubanPipeline(object):

    def __init__(self,dbpool):
        self.dbpool = dbpool

    #使用这个函数来应用settings配置文件。
    @classmethod
    def from_crawler(cls, crawler):
        parmas = {
        'host':crawler.settings['MYSQL_HOST'],
        'user':crawler.settings['MYSQL_USER'],
        'passwd':crawler.settings['MYSQL_PASSWD'],
        'db':crawler.settings['MYSQL_DB'],
        'port':3306,
        'charset':'utf8',
        }

        # **表示字典,*tuple元组,
        # 使用ConnectionPool,起始最后返回的是一个ThreadPool
        dbpool = adbapi.ConnectionPool(
            'pymysql',
            **parmas
        )
        return cls(dbpool)

    def process_item(self, item, spider):
        #这里去调用任务分配的方法
        query = self.dbpool.runInteraction(
            self.insert_data_todb,
            item,
            spider
        )
        #数据插入失败的回调
        query.addErrback(
            self.handle_error,
            item
        )

        #执行数据插入的函数
        def insert_data_todb(self,cursor,item,spider):
            insert_str,parmas = item.insertdata()
            cursor.execute(insert_str,parmas)
            print('插入成功')

    def handle_error(self,failure,item):
        print(failure)
        print('插入错误')
        #在这里执行你想要的操作

    def close_spider(self, spider):
        self.pool.close()
6.9 全站数据爬取
有时候我想要爬取整个网站的数据,整个网站的数据不会显示在一页上面,网站为了减少服务器压力会把数据进行分页处理,那么我们爬取的时候就要注意了
我们以下面这个网站为案例

准备工作,创建scrapy项目
scrapy startproject meinv4k
scrapy genspider meinv www.xxxx.com
配置settings
USER_AGENT = 'Mozilla/5.0 (Windows NT 10.0; Win64; x64) AppleWebKit/537.36 (KHTML, like Gecko) Chrome/86.0.4240.183 Safari/537.36'

# Obey robots.txt rules
ROBOTSTXT_OBEY = False
LOG_LEVEL = "ERROR"
我们先通过网站爬取第一页数据
import scrapy


class MeinvSpider(scrapy.Spider):
    name = 'meinv'
    # allowed_domains = ['www.xxx.com']
    start_urls = ['https://pic.netbian.com/4kmeinv/']

    def parse(self, response):
        list_li = response.xpath('//*[@id="main"]/div[3]/ul/li')
        for li in list_li:
            title = li.xpath('./a/b/text()').get()
            print(title)
当我们爬取到了第一页数据我们去观察第二页数据的url变成了
https://pic.netbian.com/4kmeinv/index_2.html, 但我们查看第三页数据的url变成了https://pic.netbian.com/4kmeinv/index_3.html,所以我们可以得出所有页数的url地址

那么我们可以设置一个变量来控制我们想要多少页数据的数据,在通过scrapy.Request来进行手动发送请求
import scrapy


class MeinvSpider(scrapy.Spider):
    name = 'meinv'
    # allowed_domains = ['www.xxx.com']
    start_urls = ['https://pic.netbian.com/4kmeinv/']
    # 生成一个通用的url模板
    url = "https://pic.netbian.com/4kmeinv/index_%d.html"
    page_num = 2  # 控制网站页面页数,一般网站第一页没有后缀,所以我们默认第二页添加

    def parse(self, response):
        list_li = response.xpath('//*[@id="main"]/div[3]/ul/li')
        for li in list_li:
            title = li.xpath('./a/b/text()').get()
            print(title)

        if self.page_num < 10:
            new_url = format(self.url % self.page_num)  # 网站拼接
            self.page_num += 1

            # 手动的请求发送:callback回调函数是专门用于数据解析
            yield scrapy.Request(url=new_url, callback=self.parse)
我们来运行一下发现爬取到了图片的标题

小细节:
scrapy.Request当我们默认第一个写url, 第二个写callback,这样我们就可以不用写位置参数前的变量名了
6.10 请求传参
在某些情况下,我们爬取的数据不在同一个页面中,例如,我们爬取一个电影网站,电影的名称,评分在一级页面,而要爬取的其他电影详情在其二级子页面中。这时我们就需要用到请求传参
案例展示:爬取https://www.yunbtv.net/电影网,将一级页面中的电影名称,类型,评分一级二级页面中的上映时间,导演,片长进行爬取
创建项目:
scrapy startproject boosPro
scrapy genspider boss www.xxxx.com
配置settings
# 设置请求头
USER_AGENT = 'Mozilla/5.0 (Windows NT 10.0; Win64; x64) AppleWebKit/537.36 (KHTML, like Gecko) Chrome/86.0.4240.183 Safari/537.36'

# Obey robots.txt rules
ROBOTSTXT_OBEY = False
LOG_LEVEL = "ERROR"  # 配置打印error日志
# 打开管道
ITEM_PIPELINES = {
   'meinv4k.pipelines.Meinv4KPipeline': 300,
}
import scrapy

from boosPro.items import BoosproItem


class BossSpider(scrapy.Spider):
    name = 'boss'
    # allowed_domains = ['www.xxxx.com']
    start_urls = ['https://www.yunbtv.net/']
    url = "https://www.yunbtv.net/"

    def parse(self, response):
        list_li = response.xpath('//div[@class="cards video-list"]')
        for item in list_li:
            # 获取电影名称
            name = item.xpath(
                './/div[@class="card"]/div[@class="card-heading text-ellipsis"]/strong/a/text()').extract()
            # 获取电影详情页url
            href = item.xpath('.//div[@class="card"]/div[@class="card-heading text-ellipsis"]/strong/a/@href').extract()
            for i in range((len(name))):
                title = name[i]
                href_url = href[i]
                href_url = self.url + href_url
                item = BoosproItem()
                item['title'] = title
                item['href_url'] = href_url
                # 请求二级详情页面,解析二级页面中的相应内容,通过meta参数进行Request的数据传递
                yield scrapy.Request(href_url, self.child_parse, meta={'item': item})

    def child_parse(self, response):  # 请求二级详情页面
        # 通过response获取item
        item = response.meta['item']
        address = response.xpath('//div[@class="movie-detail"]/div/p/text()').extract_first()
        item['address'] = address
        # 提交item到管道
        yield item
item.py
class BoosproItem(scrapy.Item):
    # define the fields for your item here like:
    # name = scrapy.Field()
    title = scrapy.Field()
    href_url = scrapy.Field()
    address = scrapy.Field()
piplines.py
import csv

class BoosproPipeline:
    fp = None
    csv_fp = None

    def open_spider(self, spider):
        self.fp = open("movie.csv", "w", encoding='utf-8', newline='')
        self.csv_fp = csv.writer(self.fp)
        self.csv_fp.writerow(['电影名称', '电影简介', '电影地址'])

    def process_item(self, item, spider):
        title = item['title']
        href_url = item['href_url']
        address = item['address']
        self.csv_fp.writerow([title, address, href_url])
        return item

    def close_spider(self, spider):
        self.fp.close()

 浙公网安备 33010602011771号