
面向对象回顾及原型讲解
面向对象回顾及原型讲解
一、面向对象回顾
核心概念:万物皆对象 (顶层对象Object)抽取行为作为方法 抽取名词作为属性
1、俩种构建对象的方式
(1)构造函数构建
es6的形式 class
class Person{
constructor(){ //构造器
this.name = 'jack'
}
}es3的形式 function
function Person(){
this.name = 'jack'
}使用new关键词
var person = new Person()- 自动构建对象
- 手动设置属性
- 自动返回对象
(2)工厂构建
function factory(){
var obj = new Object()
obj.name = 'jack'
return obj
}
调用方法
var person = factory()- 手动构建对象
- 手动设置属性
- 手动返回对象
二、原型
1、prototype
概述:所有的函数都拥有一个属性 这个属性称为prototype 他是一个对象空间(里面就可以存放对应的数据)他被称为显式原型
示例
function fn(){
}
//打印这个属性对应的空间
console.log(fn.prototype)
- constructor 构造器他指向对应的构建的函数(指向他自己)
- 根据上面的我们可以看到每个函数都有这样的一个属性,那么作为构造函数他是不是也有对应prototype属性
function Person(){
}
console.log(Person.prototype) //作为一个属性存在 属性是唯一 也就是当前他只有一个
prototype 属性的声明只会声明一次- 作为一个属性存在 属性是唯一 也就是当前他只有一个prototype 属性的声明只会声明一次
- 因为当前这个属性 他对应的是一个对象空间,所以他里面的内容可以被更改和设置的
- 那么我们就可以在这个里面存放一些内容
function Person(){
}
Person.prototype.username = 'jack' //往这个对象空间存放一个属性 叫username
Person.prototype.age = 18 //往这个对象空间存放一个属性 叫age
Person.prototype.sayHello = ()=>{}
console.log(Person.prototype)- 通过实例对象 来访问对应的prototype里面的属性
//取出里面数据 因为构造函数是用于构建对象的 所以我们这个prototype的里面数据 是应该给实例对象去
获取
var person = new Person()
//访问原型中数据(构造函数的prototype里面的属性)实例对象.属性名
console.log(person.username);- 因为上面讲过 对应的prototype是作为构造函数的属性 而构造函数的他只声明一次 那么对应的prototype也只声明一次
- 也就意味者 你每次拿到的prototype是一个 也就是说他里面存放的数据也只声明一次
var person1 = new Person()
console.log(person1.sayHello == person.sayHello);//true- 由此可见 如果想对应的数据只声明一次的情况 我们可以放在原型里面
总结:
- 一般把方法放在原型里面
- 把属性放在构造函数里面
function Son(){
this.name = 'jack'
this.age = 18
}
Son.prototype.print = function(){
console.log(this); //指向当前的实例对象
console.log(this.name); //指向当前的实例对象
}
new Son().print()
2、__proto__
概述:每个对象都有一个属性 叫做 __proto__ ,他也是一个内存空间,他指向对应的构造函数的prototype。称为隐式原型。
示例
var obj = {}
console.log(obj.__proto__)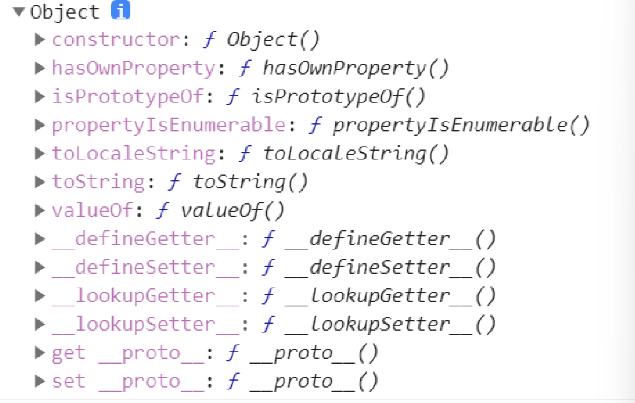
这个对象空间里面也可以存储对应的数据 这个 __proto__ ,他是每个对象都有的,那么实例对象也是个对象他同样也有。
function Person(){
}
let person = new Person()
person.__proto__.username = 'jack'
console.log(person.__proto__)
//通过打印的结果 我们可以看到对应的里面的结果类似于我们的构造的prototype
console.log(Person.prototype == person.__proto__) //ture
从上述代码 大家可以看到对应的构造函数的prototype和对应的实例对象的 __proto__ 是相等,那么也就证明了对应俩个内容其实是一个对象。那么我们就要明白 谁指向谁,从对应的先后顺序来看,我们知道先有的构造函数再有的实例对象,所以对应的实例对象的 __proto__ 是指向对应的构造函数的prototype。那么这个内容是不是就是对象访问原型的属性(所以他又被称为隐式原型),所以我们在实际使用中并不会用到 __proto__ ,而是通过这个属性来访问对应的显式原型。
总结:
- 实例对象 __proto__ 是指向对应构造函数的prototype
- 在实际使用中一般不会用 __proto__ ,是通过他来访问对应的prototype
从上可得对应的实例对象的 __proto__ 是指向构造函数的prototype,那么请问对应的函数是不是也是一个对象,他同样具备 __proto__ ,那么他的 __proto__ 指向谁,最终又指向谁?
三、原型链
概述: 原型链其实就对应的寻找原型( __proto__ )的过程组成的一个链式结构,称为原型链。
示例
Object.prototype.hello = 'hello'
class Person{
constructor(){
this.username = 'jack'
}
}
Person.prototype.age = 18
class Son extends Person{
constructor(){
super()
}
}
Son.prototype.say = ()=>{}
let son = new Son()
//son的__proto__指向构造函数的原型 对应的Son这个构造函数的__proto__又指向了对应的父类的原型
//对应的父类的构造的函数原型的__proto__指向了对应的Object的构造函数的原型
//那么对应的Object的构造函原型的__proto__ 指向null 这个寻找的过程就称为原型链
console.log(son.__proto__.__proto__.__proto__.__proto__);
//那么接下来 我们又知道了对应的对象去访问原型的中属性 直接通过点的形式
//又明白了作用域链 是一层一层向上找变量作用域
//所以我们又可以通过原型链来找对应的属性 原型中的属性
console.log(son.age); //18
console.log(son.hello); //hello
console.log(son.abc); //undefined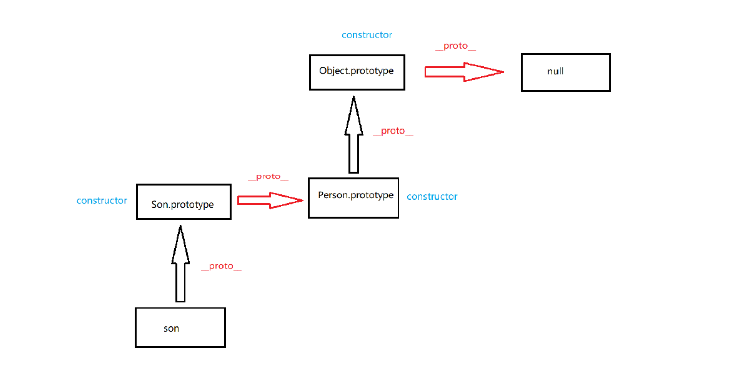
这个寻找的过程就称为原型链
那么我想问请问对应的对象的属性赋值算不算原型链?
回答:不是 不是 不是!!!!
那么对象的属性赋值的操作有就覆盖 没有就添加
- 找的到就覆盖这个值
- 找不到就添加这个属性
1、实现对应的数组的高阶函数
//find findIndex
Array.prototype.myFind = function(fn){
//先遍历数组
for(var i=0;i<this.length;i++){
if(fn(this[i],i,this)){
return this[i]
}
}
}
Array.prototype.myFindIndex = function(fn){
var index = -1
//先遍历数组
for(var i=0;i<this.length;i++){
if(fn(this[i],i,this)){
index = i
break
}
}
return index
}
//map forEach
Array.prototype.myMap = function(fn){
var result = []
//先遍历数组
for(var i=0;i<this.length;i++){
result.push(fn(this[i],i,this))
}
return result
}
Array.prototype.myForEach= function(fn){
//先遍历数组
for(var i=0;i<this.length;i++){
fn(this[i],i,this)
}
}
四、继承
概述:
继承属于面向对象的三大特性之一,面向对象的三大特性。
- 封装 (抽取内容封装)
- 继承(子类继承父类)
- 多态(重写 重载)
继承为子类继承父类的内容,子类可以拥有父类所有的非私有的属性及方法。
1、继承的实现
(1)extends 关键词(class的继承)*(es6的)
class Person{
constructor(){
this.username = 'jack'
}
}
class Son extends Person{
constructor(){
super()
}
}
console.log(new Son().username) //jack(2)原型继承(prototype赋值给需要继承的对象)
function Person(){
this.password = '123'
}
function Son(){
}
Son.prototype = new Person()
console.log(new Son().password )//123
(3)组合继承 (原型+call改this指向)
//组合继承
function Person() {
this.password = '123'
}
function Son() {
Person.call(this) //将person里面的this改成Son里面的this
}
Son.prototype = new Person()
console.log(new Son().password) //123(4)对象冒充(改this指向 找不到原型上的内容(无法继承原型))
//对象冒充
function Person() {
this.password = '123'
}
function Son() {
Person.call(this) //将person里面的this改成Son里面的this
}
let son = new Son()
console.log(son.password);
五、多态
概述:一个东西多种形态体现,(水 冰 水汽)。子类是父类多态的体现(基于继承的)。
1、重写 子类重写父类的方法
function Person(){
this.sayHello = ()=>{
console.log('你好')
}
}
function Son(){
this.sayHello = ()=>{
console.log('hello') //子类重写父类方法
}
}
Son.prototype = new Person()
let son = new Son()
son.sayHello() //hello
2、重载 同一个类里面有多个同名的方法(覆盖 js没有重载)
六、重写应用
1、基础拖拽js提取
class Touch {
    constructor(ele) {
        this.ele = ele
        this.handlerDown()
    }
    handlerDown() {
        this.ele.onmousedown = (e) => {
            e = e || event
            // 记录的是鼠标在div里面的位置
            // 在mousedown里面记录按下的位置
            this.x = e.offsetX
            this.y = e.offsetY
            this.handlerMove()
            this.handlerUp

        }
    }
    handlerMove() {
        document.onmousemove = (e) => {
            e = e || event
            // 记录每次的位置 在document里面的位置
            var currentX = e.pageX
            var currentY = e.pageY
            // 并且设置div的位置
            this.ele.style.left = currentX - this.x + 'px'
            this.ele.style.top = currentY - this.y + 'px'
        }
    }
    handlerUp() {
        // 给document添加mouseup事件
        document.onmouseup = function () {
            // 清除对应的mousemove事件
            document.onmousemove = null
        }
    }
}

function getOffset(element) {
    var left = 0
    var top = 0
    while (element) {
        left += element.offsetLeft
        top += element.offsetTop
        element = element.offsetParent
    }
    return {
        left,
        top
    }
}
调用
<!DOCTYPE html>
<html lang='en'>
<head>
<meta charset='UTF-8'>
<meta http-equiv='X-UA-Compatible' content='IE=edge'>
 <meta name='viewport' content='width=device-width, initial-scale=1.0'>
<title>Document</title>
<link rel='stylesheet' href=''>
<style>
    *{
        padding: 0;
        margin: 0;
    }
    div{
        width: 200px;
        height: 200px;
        background-color: pink;
        position: relative;
    }
</style>
</head>
<body>
    <div></div>
    <script src="./拖拽以及放大镜.js"></script>
<script>
    var div = document.querySelector('div')
    new Touch(div)
</script>
</body>
</html>
2、固定范围内的拖拽js提取
//固定范围拖拽的类
class FixedTouch extends Touch {
    constructor(box, ele) {
        super(ele)
        this.box = box
    }
    handlerMove() {
        document.onmousemove = (e) => {
            e = e || event
            // 记录每次的位置 在document里面的位置
            var currentX = e.pageX - getOffset(this.box).left
            var currentY = e.pageY - getOffset(this.box).top
            // 判断范围
            this.target = {
                x: currentX - this.x,
                y: currentY - this.y
            }
            if (this.target.x < 0) {
                this.target.x = 0
            }
            if (this.target.y < 0) {
                this.target.y = 0
            }

        if (this.target.x > this.box.clientWidth - this.ele.offsetWidth) {
            this.target.x = this.box.clientWidth - this.ele.offsetWidth
        }
        if (this.target.y > this.box.clientHeight - this.ele.offsetHeight) {
            this.target.y = this.box.clientHeight - this.ele.offsetHeight
        }
        // 并且设置div的位置
        this.ele.style.left = this.target.x + 'px'
        this.ele.style.top = this.target.y + 'px'
    }
}
}
调用:
<!DOCTYPE html>
<html lang='en'>
<head>
<meta charset='UTF-8'>
<meta http-equiv='X-UA-Compatible' content='IE=edge'>
 <meta name='viewport' content='width=device-width, initial-scale=1.0'>
<title>Document</title>
<link rel='stylesheet' href=''>
<style>
    *{
        padding: 0;
        margin: 0;
    }
    div{
        width: 500px;
        height: 500px;
        background-color: pink;
       position: relative;
    }
    .move{
        width: 100px;
        height: 100px;
        background-color: palegreen;
        position: absolute;
    }
</style>
</head>
<body>
    <div>
        <div class="move"></div>
    </div>
    <script src="./拖拽以及放大镜.js"></script>
<script>
    var div = document.querySelector('div')
    var move = document.querySelector('.move')
    new FixedTouch(div,move)
</script>
</body>
</html>
3、固定范围拖拽基础上的放大镜
class Magnifier extends FixedTouch {
    constructor(smallBox, bigBox) {
        super(smallBox, smallBox.querySelector('.move'))
        this.smallBox = smallBox
        this.bigBox = bigBox
        this.move = smallBox.querySelector('.move')
        this.bigImg = bigBox.children[0]
        this.init()
        this.handlerHover()
        // 取消按下的事件
        this.handlerDown = () => {}
        // 调用move
        this.handlerMove()
    }
    init() {
        // 计算对应的这个move的盒子的宽高
        // 大的比大的等于小的比小的 bigImg/bigBox = box/move===>bigImg/box == bigBox/move
        this.move.style.width = this.smallBox.clientWidth / (this.bigImg.clientWidth / this.bigBox.clientWidth) + 'px'
        this.move.style.height = this.smallBox.clientHeight / (this.bigImg.clientHeight / this.bigBox.clientHeight) + 'px'
        // 先需要隐藏
        this.move.style.display = 'none'
        this.bigBox.style.display = 'none'
    }
    handlerHover() {
        // 移入移出
        this.smallBox.onmouseenter = () => {
            this.move.style.display = 'block'
            this.bigBox.style.display = 'block'
            // x y属性值
            this.x = this.move.clientWidth / 2,
                this.y = this.move.clientHeight / 2
        }
        this.smallBox.onmouseleave = () => {
            this.move.style.display = 'none'
            this.bigBox.style.display = 'none'
        }
        // 添加一个移动的时间
        this.smallBox.onmousemove = () => {
            // 改变大盒子里面图片的位置
            this.bigImg.style.left = -this.target.x * this.bigImg.clientWidth / this.smallBox.clientWidth + 'px'
            this.bigImg.style.top = -this.target.y * this.bigImg.clientHeight / this.smallBox.clientHeight + 'px'
        }
    }
}
调用
<!DOCTYPE html>
<html lang='en'>
<head>
<meta charset='UTF-8'>
<meta http-equiv='X-UA-Compatible' content='IE=edge'>
 <meta name='viewport' content='width=device-width, initial-scale=1.0'>
<title>Document</title>
<link rel='stylesheet' href=''>
<style>
    *{
        margin: 0;
        padding: 0;
    }
    .box{
        width: 450px;
        height: 450px;
        border: 1px solid #ccc;
        position: relative;
        float: left;
    }
    .box img{
        width: 100%;
        height: 100%;
    }
    .move{
        position: absolute;
        left: 0;
        top: 0;
        background-color: rgba(207, 26, 162, 0.7);
    }
    .bigbox{
        width: 540px;
        height: 540px;
        position: relative;
        float: left;
        overflow: hidden;
        border: 1px solid black;
    }
    .bigbox>img{
        position: absolute;
        width: 800px;
        height: 800px;
    }
</style>
</head>
<body>
<div class="box">
    <img src="./6.webp" alt="">
    <div class="move"></div>
</div>
<div class="bigbox">
    <img src="./6.webp" alt="">
</div>
<script src="../day18-面向对象回顾及原型讲解/拖拽以及放大镜.js"></script>
<script>
    var small = document.querySelector('.box')
    var big = document.querySelector('.bigbox')
    new Magnifier(small, big)
</script>
</body>
</html>
七、es6的模块化
- import 导入
- export 导出
es6的写法
<script type='module'></script>一个内容如果需要导入 必须先导出
1、第一种写法
export导出
//对象
const obj = {
username:
"
jack",
password:'123'
}
//函数
const sayHello = ()=>{
console.log('hello');
}
//值
const message = '这个是一个信息'
//数组
const arr = [1,2,3,4]
//变量的接的数据 需要导出必须用{}
export {
obj,
sayHello,
message,
arr
}
import导入
import {
obj,
sayHello,
message,
arr
} from './a.js' //解构
sayHello()
console.log(`obj`, obj);
console.log(`message`, message);
console.log(`arr`, arr);
2、第二种写法
export 导出
export const obj = {
username:
"
jack",
password:'123'
}
export const sayHello = ()=>{
console.log('hello');
}
export const arr = [1,2,3,4]
export const message = '这个是一个信息'
import 导入
//* 表示所有的 as取别名(随便取)
import * as hello from './a.js'
hello.sayHello()
console.log(`obj`, hello.obj);
console.log(`message`, hello.message);
console.log(`arr`, hello.arr);
3、第三种写法
export 导出
//对象
const obj = {
username:
"
jack",
password:'123'
}
//函数
const sayHello = ()=>{
console.log('hello');
}
//值
const message = '这个是一个信息'
//数组
const arr = [1,2,3,4]
export default {
obj,
sayHello,
message,
arr
}
import 导入
import a from './a.js'
a.sayHello()
console.log(`obj`, a.obj);
console.log(`message`, a.message);
console.log(`arr`, a.arr);
总结:
export 导出内容
- export const 对应的变量
- export default 对应的变量
- export {}
import 导入内容
- import 变量名 from 文件地址 (所有的话 * 必须取别名 as)


【推荐】国内首个AI IDE,深度理解中文开发场景,立即下载体验Trae
【推荐】编程新体验,更懂你的AI,立即体验豆包MarsCode编程助手
【推荐】抖音旗下AI助手豆包,你的智能百科全书,全免费不限次数
【推荐】轻量又高性能的 SSH 工具 IShell:AI 加持,快人一步
· 震惊!C++程序真的从main开始吗?99%的程序员都答错了
· 【硬核科普】Trae如何「偷看」你的代码?零基础破解AI编程运行原理
· 单元测试从入门到精通
· 上周热点回顾(3.3-3.9)
· winform 绘制太阳,地球,月球 运作规律