13、springboot——CRUD-thymeleaf公共页面元素抽取④
1、thymeleaf公共页面元素抽取
存在一种现象:两个文件的代码只有一部分代码不一样
其余的均相同,此时就可以提取公共的代码去简化开发
1、抽取公共片段 <div th:fragment="copy"> © 2011 The Good Thymes Virtual Grocery </div> 2、引入公共片段 <div th:insert="~{footer :: copy}"></div>
两种引入方式
1、~{templatename::selector}:模板名::选择器 class用. id用# 2、~{templatename::fragmentname}:模板名::片段名 3、默认效果: insert的公共片段在div标签中 如果使用th:insert等属性进行引入,可以不用写~{}: 行内写法可以加上:[[~{}]];[(~{})]
三种引入公共片段的th属性:
th:insert:将公共片段整个插入到声明引入的元素中
th:replace:将声明引入的元素替换为公共片段
th:include:将被引入的片段的内容包含进这个标签中


<footer th:fragment="copy"> © 2011 The Good Thymes Virtual Grocery </footer> 引入方式 <div th:insert="footer :: copy"></div> <div th:replace="footer :: copy"></div> <div th:include="footer :: copy"></div> 效果 th:insert: <div> <footer> © 2011 The Good Thymes Virtual Grocery </footer> </div> th:replace: <footer> © 2011 The Good Thymes Virtual Grocery </footer> th:include: <div> © 2011 The Good Thymes Virtual Grocery </div>
2、关于模板名:
<!-- 模板名:会使用默认的thymeleaf的前后配置规则进行解析 -->

1.假设在同一目录:
a.html
b.html
此时b用a中的公共片段就是 th:replace="~{a::#selector}"
2.不在同一目录
commons
-a.html
b.html
commons和b.html在同一级目录
此时b用a中的公共片段是 th:replace="~{commons/a::#selector}"
3、实例:
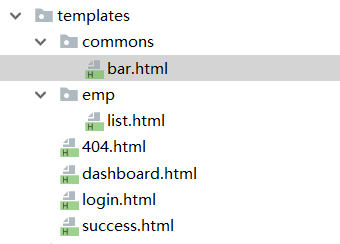
下图为各页面的路径情况,已经在thymeleaf的默认文件夹templates下

bar.html为抽取顶部框和侧边框的内容
在侧边栏中的<a>标签是否高亮取决于传入的参数activeUri,然后使用thymeleaf语法判断进而设置<a>的class属性
    <!--topbar-->
    <!--这里使用th:fragment="topbar"好让其他页面引用-->
    <nav class="navbar navbar-dark sticky-top bg-dark flex-md-nowrap p-0" th:fragment="topbar">
        <a class="navbar-brand col-sm-3 col-md-2 mr-0" href="http://getbootstrap.com/docs/4.0/examples/dashboard/#">[[${session.loginUser}]]</a>
        <input class="form-control form-control-dark w-100" type="text" placeholder="Search" aria-label="Search">
        <ul class="navbar-nav px-3">
            <li class="nav-item text-nowrap">
                <a class="nav-link" href="http://getbootstrap.com/docs/4.0/examples/dashboard/#">Sign out</a>
            </li>
        </ul>
    </nav>


    <!--sidebar-->
    <!--这里使id为sidebar其他页面也可以通过id引用sidebar-->
    <nav class="col-md-2 d-none d-md-block bg-light sidebar" id="sidebar">
        <div class="sidebar-sticky">
            <ul class="nav flex-column">
                <li class="nav-item">
                    <a class="nav-link active" href="#" th:href="@{/main.html}"
                        th:class="${activeUri=='main.html'?'nav-link active':'nav-link'}">  <!--通过取出activeUri的值判断是否要高亮-->
                        <svg xmlns="http://www.w3.org/2000/svg" width="24" height="24" viewBox="0 0 24 24" fill="none" stroke="currentColor" stroke-width="2" stroke-linecap="round" stroke-linejoin="round" class="feather feather-home">
                            <path d="M3 9l9-7 9 7v11a2 2 0 0 1-2 2H5a2 2 0 0 1-2-2z"></path>
                            <polyline points="9 22 9 12 15 12 15 22"></polyline>
                        </svg>
                        Dashboard <span class="sr-only">(current)</span>
                    </a>
                </li>
                <li class="nav-item">
                    <a class="nav-link" href="http://getbootstrap.com/docs/4.0/examples/dashboard/#">
                        <svg xmlns="http://www.w3.org/2000/svg" width="24" height="24" viewBox="0 0 24 24" fill="none" stroke="currentColor" stroke-width="2" stroke-linecap="round" stroke-linejoin="round" class="feather feather-file">
                            <path d="M13 2H6a2 2 0 0 0-2 2v16a2 2 0 0 0 2 2h12a2 2 0 0 0 2-2V9z"></path>
                            <polyline points="13 2 13 9 20 9"></polyline>
                        </svg>
                        Orders
                    </a>
                </li>
                <li class="nav-item">
                    <a class="nav-link" href="http://getbootstrap.com/docs/4.0/examples/dashboard/#">
                        <svg xmlns="http://www.w3.org/2000/svg" width="24" height="24" viewBox="0 0 24 24" fill="none" stroke="currentColor" stroke-width="2" stroke-linecap="round" stroke-linejoin="round" class="feather feather-shopping-cart">
                            <circle cx="9" cy="21" r="1"></circle>
                            <circle cx="20" cy="21" r="1"></circle>
                            <path d="M1 1h4l2.68 13.39a2 2 0 0 0 2 1.61h9.72a2 2 0 0 0 2-1.61L23 6H6"></path>
                        </svg>
                        Products
                    </a>
                </li>
                <li class="nav-item">
                    <a class="nav-link" th:href="@{/emps}"
                       th:class="${activeUri=='emps'?'nav-link active':'nav-link'}"><!--通过取出activeUri的值判断是否要高亮-->
                        <svg xmlns="http://www.w3.org/2000/svg" width="24" height="24" viewBox="0 0 24 24" fill="none" stroke="currentColor" stroke-width="2" stroke-linecap="round" stroke-linejoin="round" class="feather feather-users">
                            <path d="M17 21v-2a4 4 0 0 0-4-4H5a4 4 0 0 0-4 4v2"></path>
                            <circle cx="9" cy="7" r="4"></circle>
                            <path d="M23 21v-2a4 4 0 0 0-3-3.87"></path>
                            <path d="M16 3.13a4 4 0 0 1 0 7.75"></path>
                        </svg>
                        员工管理
                    </a>
                </li>
          .............
dashboard.html主页面引用topbar和sidebar(注意要引入的bar是在commons文件下),并且引用sidebar时传入参数activeUri使侧边框判断哪个<a>标签高亮
        <!--引入topbar-->
        <div th:replace="commons/bar::topbar"></div>

        <div class="container-fluid">
            <div class="row">

                <!--引入sidebar,这里带入activeUri参数使页面侧边栏控制哪个选项高亮-->
                <div th:replace="commons/bar::#sidebar(activeUri='main.html')"></div>
list.html页面引用topbar和sidebar,并且引用sidebar时传入参数activeUri使侧边框判断哪个<a>标签高亮
        <!--引入抽取的topbar-->
        <div th:replace="~{commons/bar::topbar}"></div>
        <!--也可以去掉~{}-->
        <!--<div th:replace="commons/bar::topbar"></div>-->

        <div class="container-fluid">
            <div class="row">
                <!--引入侧边栏(这里是通过id引入)-->
                <div th:replace="commons/bar::#sidebar(activeUri='emps')"></div>

                <main role="main" class="col-md-9 ml-sm-auto col-lg-10 pt-3 px-4">
                    <h2><button class="btn btn-sm btn-success">员工添加</button></h2>
                    <div class="table-responsive">
                        <table class="table table-striped table-sm">
                            <thead>
                                <tr>
                                    <th>#</th>
                                    <th>lastName</th>
                                    <th>email</th>
                                    <th>gender</th>
                                    <th>department</th>
                                    <th>birth</th>
                                    <th>操作</th>
                                </tr>
                            </thead>
                            <tbody><!--显示后端响应的数据-->
                                <tr th:each="emp:${emps}">
                                    <td th:text="${emp.id}"></td>
                                    <td th:text="${emp.lastName}"></td>
                                    <td th:text="${emp.email}"></td>
                                    <td th:text="${emp.gender}==0?'女':'男'"></td>
                                    <td th:text="${emp.department.departmentName}"></td>
                                    <!--使用thymeleaf的dates对象进行日期格式化-->
                                    <td th:text="${#dates.format(emp.birth,'yyyy-MM-dd HH-mm')}"></td>
                                    <td>
                                        <button class="btn btn-sm btn-primary">编辑</button>
                                        <button class="btn btn-sm btn-danger">删除</button>
                                    </td>
                                </tr>
                            </tbody>
                        </table>
                    </div>
                </main>
            </div>
        </div>
IDEA中修改完页面后可以按Ctrl+F9进行重新编译,刷新页面就可以出来修改后效果
4、前台接受后台数据
1、Employee实体类
public class Employee {

   private Integer id;
    private String lastName;

    private String email;
    //1 male, 0 female
    private Integer gender;
    private Department department;
    private Date birth;
...}

public class Department {

   private Integer id;
   private String departmentName;
...}
2、Dao层(因为这里只是简单演示,所以不连接数据库,把数据写死,好让页面显示)
@Repository
public class DepartmentDao {
   private static Map<Integer, Department> departments = null;
   static{
      departments = new HashMap<Integer, Department>();
      departments.put(101, new Department(101, "D-AA"));
      departments.put(102, new Department(102, "D-BB"));
      departments.put(103, new Department(103, "D-CC"));
      departments.put(104, new Department(104, "D-DD"));
      departments.put(105, new Department(105, "D-EE"));
   }
   public Collection<Department> getDepartments(){
      return departments.values();
   }
   public Department getDepartment(Integer id){
      return departments.get(id);
   }
}
@Repository
public class EmployeeDao {

   private static Map<Integer, Employee> employees = null;

   @Autowired
   private DepartmentDao departmentDao;

   static{
      employees = new HashMap<Integer, Employee>();

      employees.put(1001, new Employee(1001, "E-AA", "aa@163.com", 1, new Department(101, "D-AA")));
      employees.put(1002, new Employee(1002, "E-BB", "bb@163.com", 1, new Department(102, "D-BB")));
      employees.put(1003, new Employee(1003, "E-CC", "cc@163.com", 0, new Department(103, "D-CC")));
      employees.put(1004, new Employee(1004, "E-DD", "dd@163.com", 0, new Department(104, "D-DD")));
      employees.put(1005, new Employee(1005, "E-EE", "ee@163.com", 1, new Department(105, "D-EE")));
   }

   private static Integer initId = 1006;

   public void save(Employee employee){
      if(employee.getId() == null){
         employee.setId(initId++);
      }

      employee.setDepartment(departmentDao.getDepartment(employee.getDepartment().getId()));
      employees.put(employee.getId(), employee);
   }

   public Collection<Employee> getAll(){
      return employees.values();
   }

   public Employee get(Integer id){
      return employees.get(id);
   }

   public void delete(Integer id){
      employees.remove(id);
   }
}
Controller层
@Controller
public class EmployeeController {
    @Autowired
    EmployeeDao employeeDao;
    //查询所有员工返回列表页面
    @GetMapping("/emps")
    public String list(Model model){

        Collection<Employee> emps = employeeDao.getAll();
        //将查询到的数值放在请求域中
        model.addAttribute("emps",emps);

        //目标引擎会自动进行拼串
        return "emp/list";
    }
}
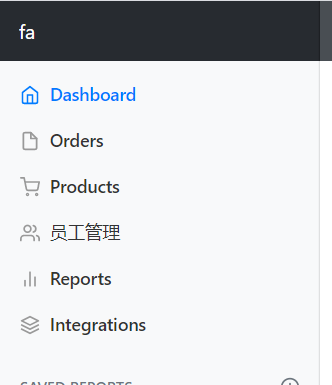
访问主页面时(此时Dashboard高亮):

访问员工管理时(此时员工管理高亮):

分类:
SpringBoot


【推荐】国内首个AI IDE,深度理解中文开发场景,立即下载体验Trae
【推荐】编程新体验,更懂你的AI,立即体验豆包MarsCode编程助手
【推荐】抖音旗下AI助手豆包,你的智能百科全书,全免费不限次数
【推荐】轻量又高性能的 SSH 工具 IShell:AI 加持,快人一步
· AI与.NET技术实操系列:向量存储与相似性搜索在 .NET 中的实现
· 基于Microsoft.Extensions.AI核心库实现RAG应用
· Linux系列:如何用heaptrack跟踪.NET程序的非托管内存泄露
· 开发者必知的日志记录最佳实践
· SQL Server 2025 AI相关能力初探
· winform 绘制太阳,地球,月球 运作规律
· AI与.NET技术实操系列(五):向量存储与相似性搜索在 .NET 中的实现
· 超详细:普通电脑也行Windows部署deepseek R1训练数据并当服务器共享给他人
· 【硬核科普】Trae如何「偷看」你的代码?零基础破解AI编程运行原理
· 上周热点回顾(3.3-3.9)