SpringBoot使用
Spring Boot
Spring Boot 可以轻松地创建独立的,基于生产级别的基于Spring的应用程序。 可以开始使用最少的配置,而无需进行整个Spring配置设置。
为什么用springboot
创建独立的 Spring 应用程序
嵌入的 Tomcat,无需部署 WAR 文件
简化 Maven 配置
自动配置 Spring
提供生产就绪型功能,如指标,健康检查和外部配置
开箱即用,没有代码生成,也无需 XML 配置。
与云计算天然集成
Springboot 入门程序创建
-
通过spring 官网进行创建,下载导入即可运行使用
-
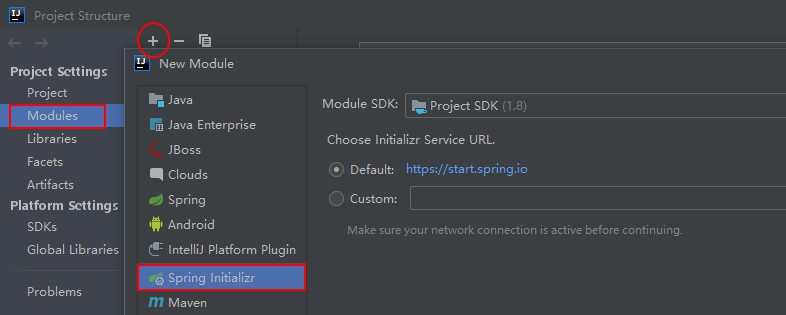
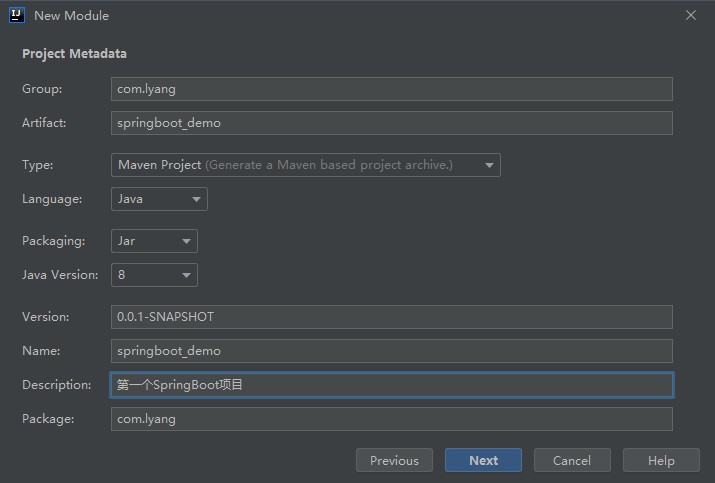
使用idea创建Springboot项目
2.1 File --> New --> Project --> 选择Empty Project创建一个空项目
2.2 接下来如图:


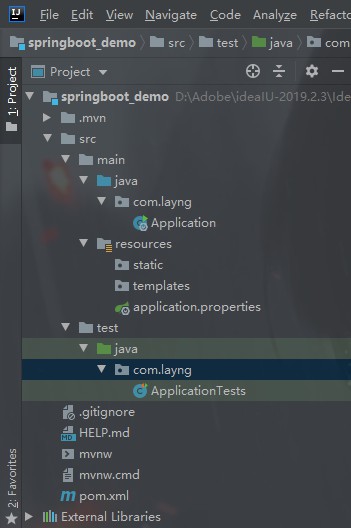
创建好如图结构:
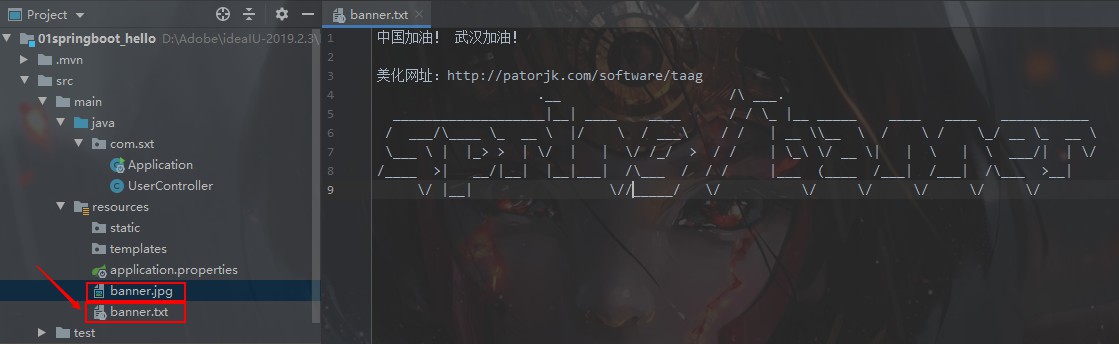
banner修改
banner美化网址:http://patorjk.com/software/taag
是否显示banner:
import org.springframework.boot.Banner;
import org.springframework.boot.SpringApplication;
import org.springframework.boot.autoconfigure.SpringBootApplication;
import org.springframework.web.bind.annotation.RequestMapping;
import org.springframework.web.bind.annotation.RestController;
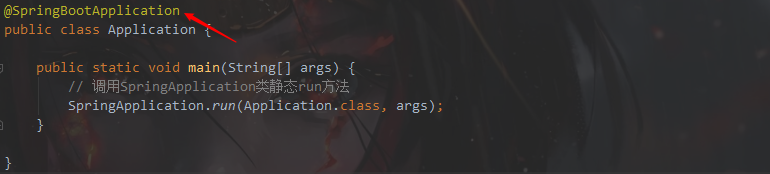
@RestController
@SpringBootApplication
public class Application {
public static void main(String[] args) {
// SpringApplication.run(Application.class, args);
SpringApplication springApplication = new SpringApplication(Application.class);
// springApplication.setBannerMode(Banner.Mode.OFF); // 不显示Banner
springApplication.setBannerMode(Banner.Mode.LOG); // 显示Banner 默认
springApplication.run(args);
}
}
修改banner
在resources文件夹下添加【banner.txt】文件,在里面添加内容即可,添加图片也可以哦(图片名称必须叫banner)!
Spring常用注解
一、用于创建对象的
-
@Component:将资源交给Spring进行管理,相当于在xml中配置了一个bean。该注解一般用于即不是表现层又不是业务层更不是持久层的类上面。
-
@Controller:标识该类为表现层
-
@Service:标识该类为业务层
-
@Repository:标识该类为持久层
二、用于注入数据的
1. @Autowired:自动按照类型注入。当使用注解注入属性时,set 方法可以省略。它只能注入其他 bean 类型。当有多个 类型匹配时,使用要注入的对象变量名称作为 bean 的 id,在 spring 容器查找,找到了也可以注入成功。找不到 就报错。
2. @Qualifier:意思是合格者,通过这个标示,表明了哪个实现类才是我们所需要的,我们修改调用代码,添加@Qualifier注解,需要注意的是@Qualifier的参数名称必须为我们之前定义@Bean注解的名称之一 。
3. @Resource:直接按照 Bean 的 id 注入,如果根据id无法找到则根据类型进行查找。
4. @Value:注入基本数据类型和 String 类型数据的。
@Configuration:用于指定当前类是一个 spring 配置类,当创建容器时会从该类上加载注解。相当于application.xml。
@ComponentScan:用于指定 spring 在初始化容器时要扫描的包。作用和在 spring 的 xml 配置文件中的:
<context:component-scan base-package="com.demo"/>
是一样的。
@Bean:该注解只能写在方法上,表明使用此方法创建一个对象,并且放入 spring 容器中。
@PropertySource:用于加载properties 文件中的配置。例如我们配置数据源时,可以把连接数据库的信息写到 properties 配置文件中,就可以使用此注解指定 properties 配置文件的位置。可以写在任何可以被扫描到的位置,例:@PropertySource("classpath:car.properties")。
@ImportResource:导入为不配置文件。例:@ImportResource(value = "classpath:beans.xml")
@Import:在创建配置文件之后可以引入其它的配置文件 。用于导入其他配置类。
springboot 启动分析
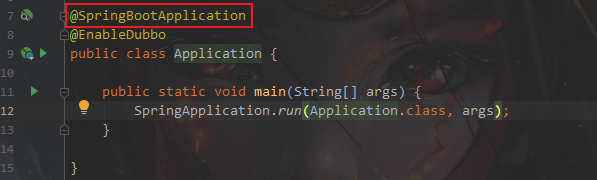
打开启动类 Application
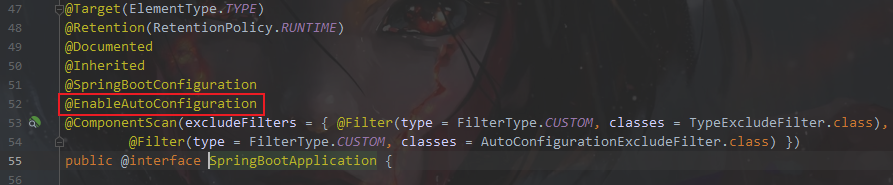
进入@SpringBootApplication
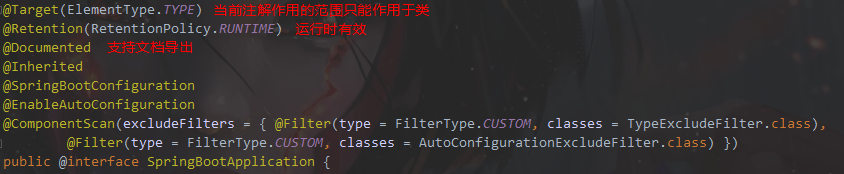
@进入SpringBootConfiguration

本质就是Configuration ,相当于把spring里面的Configuration注解包装了一层。
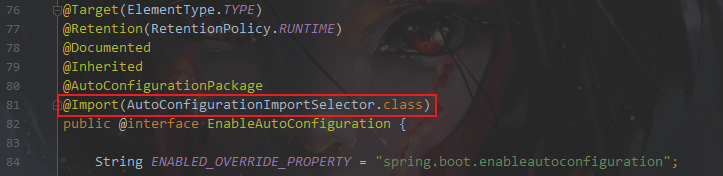
@返回SpringBootApplication进入EnableAutoConfiguration

@进入AutoConfigurationPackage

@进入AutoConfigurationPackages.Registrar.class 找到静态类 Registrar
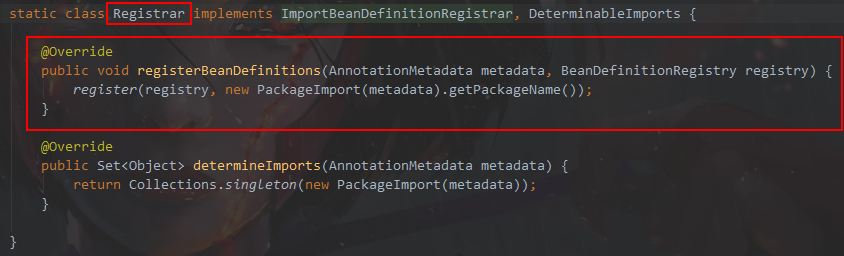
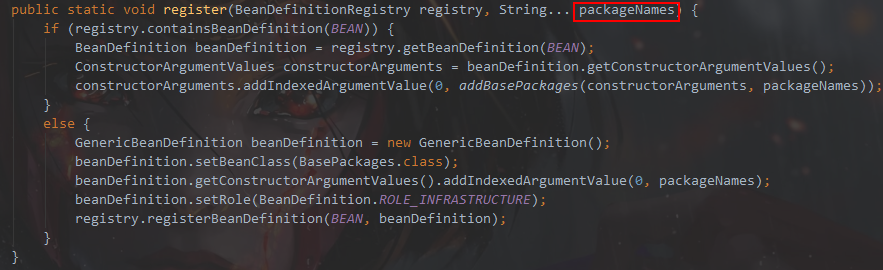
调试发现的值等于com.sxt 也就是启动类所在包,这也就是启动之后自动扫描当前启动类所在以包及其子包的原因。
@回到EnableAutoConfiguration 进入 AutoConfigurationImportSelector

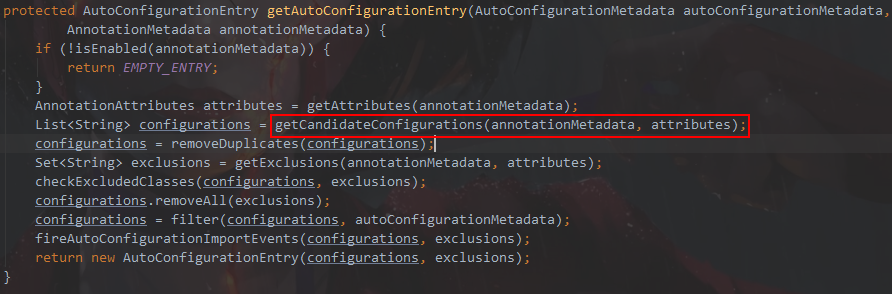
找到AutoConfigurationImportSelector 中的 getAutoConfigurationEntry方法
protected AutoConfigurationEntry getAutoConfigurationEntry(AutoConfigurationMetadata autoConfigurationMetadata,
      AnnotationMetadata annotationMetadata) {
   if (!isEnabled(annotationMetadata)) {
      return EMPTY_ENTRY;
   }
   AnnotationAttributes attributes = getAttributes(annotationMetadata);
	// 得到当前springboot项目里面的所有自动配置类  默认的
	// 如果大家引入了其它自动配置类,如mybatis那么就会在这个124个的基础上加
   List<String> configurations = getCandidateConfigurations(annotationMetadata, attributes);
	// 删除重复的自动配置
   configurations = removeDuplicates(configurations);
	// 得到不生效的自动配置类
   Set<String> exclusions = getExclusions(annotationMetadata, attributes);
   checkExcludedClasses(configurations, exclusions);
	// 删除不生效的自动配置
   configurations.removeAll(exclusions);
   configurations = filter(configurations, autoConfigurationMetadata);
   fireAutoConfigurationImportEvents(configurations, exclusions);
   return new AutoConfigurationEntry(configurations, exclusions);
}

总结
当项目启动时会先加载124个自动配置,如果自己引入其它配置,如:myabtis-starter 会在124个基础上加+1。
系统是如何读取124个自动配置
进入AutoConfigurationImportSelector找到getAutoConfigurationEntry方法
进入getCandidateConfigurations方法

进入SpringFactoriesLoader.loadFactoryNames方法

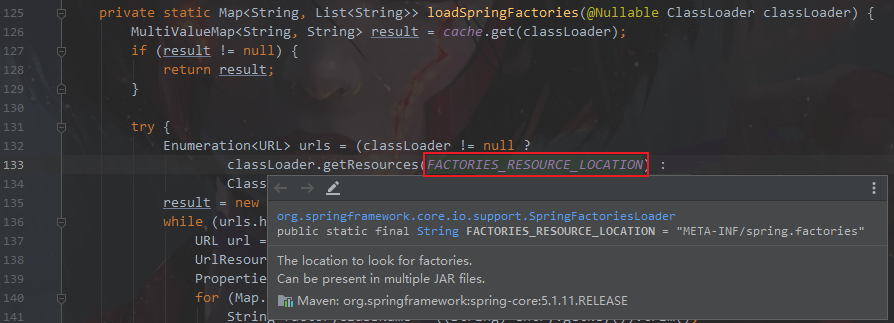
进入loadSpringFactories方法
private static Map<String, List<String>> loadSpringFactories(@Nullable ClassLoader classLoader) {
		MultiValueMap<String, String> result = cache.get(classLoader);
		if (result != null) {
			return result;
		}

		try {
            // 根据某个路径加载资源
			Enumeration<URL> urls = (classLoader != null ?
					classLoader.getResources(FACTORIES_RESOURCE_LOCATION) :
					ClassLoader.getSystemResources(FACTORIES_RESOURCE_LOCATION));
			result = new LinkedMultiValueMap<>();
			while (urls.hasMoreElements()) {
				URL url = urls.nextElement();
				UrlResource resource = new UrlResource(url);
				Properties properties = PropertiesLoaderUtils.loadProperties(resource);
				for (Map.Entry<?, ?> entry : properties.entrySet()) {
					String factoryTypeName = ((String) entry.getKey()).trim();
					for (String factoryImplementationName : StringUtils.commaDelimitedListToStringArray((String) entry.getValue())) {
						result.add(factoryTypeName, factoryImplementationName.trim());
					}
				}
			}
			cache.put(classLoader, result);
			return result;
		}
		catch (IOException ex) {
			throw new IllegalArgumentException("Unable to load factories from location [" +
					FACTORIES_RESOURCE_LOCATION + "]", ex);
		}
	}
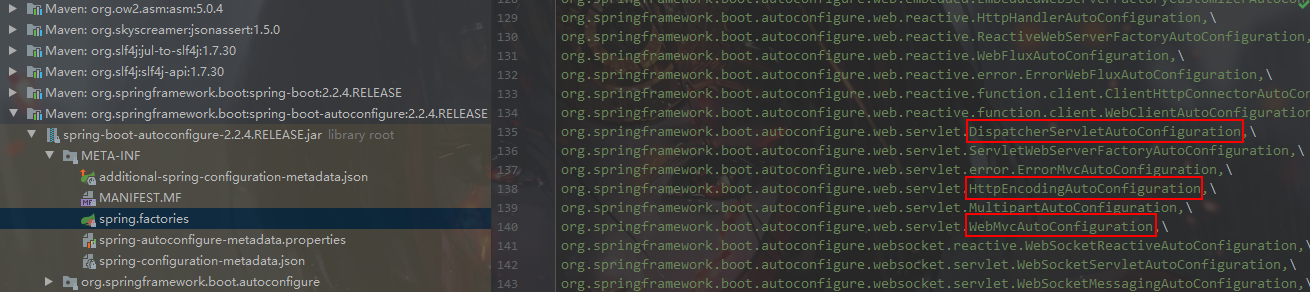
发现FACTORIES_RESOURCE_LOCATION 就是 META-INF/spring.factories 理解成系统启动时会加载 所有包的META-INF/spring.factories文件里面的所有内容。
springboot热部署
Spring Boot提供了一个名为spring-boot-devtools的模块来使应用支持热部署,提高开发者的开发效率,无需手动重启Spring Boot应用。

springboot热部署依赖配置:
<dependency>
	<groupId>org.springframework.boot</groupId>
	<artifactId>spring-boot-devtools</artifactId>
	<scope>runtime</scope>
	<optional>true</optional>
</dependency>
插件安装及使用
Maven Helper
查看maven的依赖树。一旦安装了Maven Helper插件,只要打开pom文件,就可以打开该pom文件的Dependency Analyzer视图(在文件打开之后,文件下面会多出这样一个tab),进入Dependency Analyzer视图之后有三个查看选项,分别是Conflicts(冲突)、All Dependencies as List(列表形式查看所有依赖)、All Dependencies as Tree(树结构查看所有依赖)。
安装方法:
已打开软件下安装:File--> Setting-->Plugins
未打开IDEA下安装:Configure --> Project Defaults --> Settings-->Plugins (安装后重启生效)
Lombok
Lombok以简单的注解形式来简化java代码,提高开发人员的开发效率。 Lombok能通过注解的方式,在编译时自动为属性生成构造器、getter/setter、equals、hashcode、toString等方法。
Lombok 插件安装方法如上👆
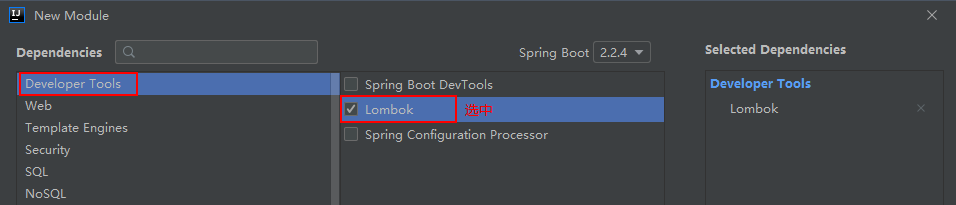
Lombok依赖配置:
<!--配置lombok的依赖-->
<dependency>
	<groupId>org.projectlombok</groupId>
	<artifactId>lombok</artifactId>
	<optional>true</optional>
</dependency>
Lombook的相关注解说明
@Data // 作用于类上,是以下注解的集合:@ToString @EqualsAndHashCode @Getter @Setter @RequiredArgsConstructor
@Getter // 生成所有成员变量的getter方法
@Setter // 生成所有成员变量的setter方法
@ToString //生成toString()方法
@AllArgsConstructor // 生成全参构造器
@NoArgsConstructor // 生成无参构造器
自动提示的配置
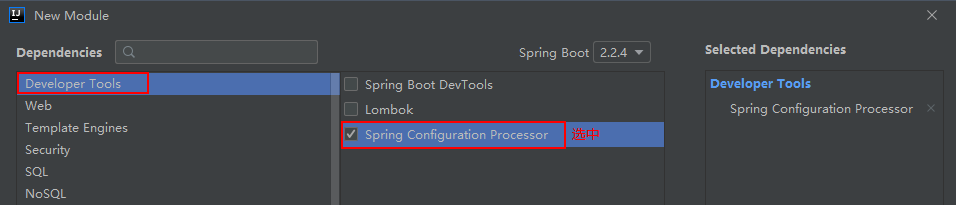
自动提示依赖配置
<!--配置文件自动提示的依赖-->
<dependency>
    <groupId>org.springframework.boot</groupId>
    <artifactId>spring-boot-configuration-processor</artifactId>
    <optional>true</optional>
</dependency>
Springboot的两种配置文件语法
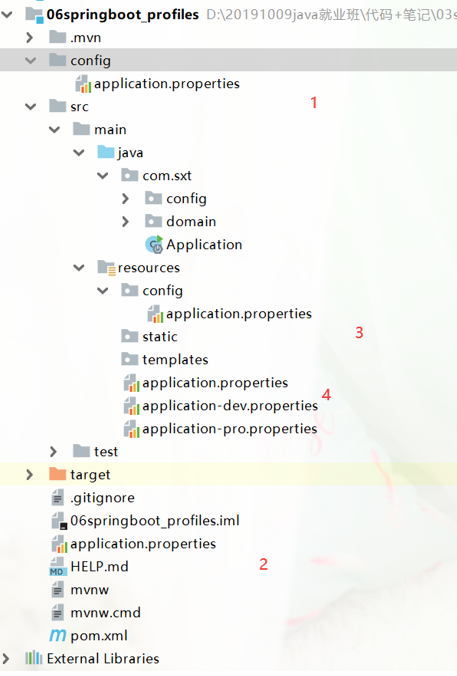
SpringBoot使用一个全局的配置文件,配置文件名是固定的,有以下两种文件:
- application.properties
- application.yml
实体类:
import lombok.AllArgsConstructor;
import lombok.Data;
import lombok.NoArgsConstructor;
import org.springframework.boot.context.properties.ConfigurationProperties;
import org.springframework.stereotype.Component;

import java.util.Date;
import java.util.List;
import java.util.Map;
import java.util.Set;

@Data
@AllArgsConstructor
@NoArgsConstructor
@Component // 自动放到IOC容器中
@ConfigurationProperties(prefix = "student") // 属性配置
public class Student {
    private Integer id;
    private String name;
    private String[] hobby;
    private List<String> lists;
    private Map<String, String> maps;
    private Set<String> sets;
    private Integer age;
    private Date birth;
    private String abc;
}
application.properties
# application.properties 的优先级高于 application.yml

student.id=1
student.name=张三
student.hobby=LOL,DNF,CF,CS
student.lists=WH,SH,BJ
student.maps.k1=value1
student.maps.k2=value2
student.sets=A,B,C,D,A
#student.age=22
#student.age=${random.int}
student.age=${random.int(0,100)}
#student.birth=2020-1-1 不行
student.birth=2020/1/1
student.abc=${student.name}
application.yml
student:
  id: 1
  name: 小明
  hobby:
    - LOL
    - DNF
    - CF
  lists:
    - WH
    - BJ
    - SH
  maps:
    k1: v1
    k2: v2
  sets:
    - A
    - B
    - C
    - D
    - A
  age: ${random.int(1,100)}
  abc: ${student.name}
  birth: 2020/1/1
注意:application.properties 的优先级高于 application.yml,如果application.properties与application.yml都配置了,则互补,谁里面有相关参数就取谁。
yml语法介绍
yml与yaml语法相同。
-
k:(空格)v:表示一对键值对(空格必须有)
-
以空格的缩进来控制层级关系,只要是左对齐的一列数据,都是同一个层级的
-
属性和值也是大小写敏感
-
字符串默认不用加上单引号或者双引号
“ ”:双引号;不会转义字符串里面的特殊字符;特殊字符会作为本身想表示的意思
name:“zhangsan\nlisi”:输出;zhangsan换行lisi‘ ’:单引号;会转义特殊字符,特殊字符最终只是一个普通的字符串数据
-
–:代表区块,将一个ymal文件分为多个文件
配置文件占位符
${random.int}:生成一个int的随机数
${random.value}:生成一个随机字符串
${random.long}:生成一个long的随机数据
${random.int(10)}:生成0-10的随机int数
${random.int[10,100]}:生到10-100的随机int数
${sutudent.name}:读取ioc容器里面的student对象里的name属性
profiles配置详解
为什么要使用profiles
在开发中,一般有两种环境
1,生产环境 [项目上线,客户在使用中,就是生产环境]
2,开发环境[就是开发环境,不解释]
有时候开发环境和生产环境的配置方法是不一样的,那么如何快速的切换呢,这里就要使用profiles文件
项目开发时有开发环境、测试环境、部署环境等,可以通过 profile 文件配置切换。
创建springboot的web项目
创建application-dev.properties(开发)
# 设置开发环境的端口
server.port=8888
创建application-pro.properties(测试)
# 设置开发环境的端口
server.port=9999
配置application.properties
# 配置激活哪一个配置文件
spring.profiles.active=dev
创建实体类
package com.sxt.doamin;

import lombok.AllArgsConstructor;
import lombok.Data;
import lombok.NoArgsConstructor;

@Data
@AllArgsConstructor
@NoArgsConstructor
public class Car {
    private Integer id;
    private String name;
    private String color;
}
创建CarConfig
package com.sxt.config;

import com.sxt.doamin.Car;
import org.springframework.boot.autoconfigure.condition.ConditionalOnClass;
import org.springframework.context.annotation.Bean;
import org.springframework.context.annotation.Configuration;
import org.springframework.context.annotation.Profile;

@Configuration
@ConditionalOnClass(value = {Car.class})
public class CarConfig {

    @Bean
    @Profile("pro")
    public Car getCar1() {
        return new Car(1, "AD--pro", "red");
    }

    @Bean
    @Profile("dev")
    public Car getCar2() {
        return new Car(2, "BM--dev", "yellow");
    }

}
测试
package com.sxt;

import com.sxt.doamin.Car;
import org.junit.jupiter.api.Test;
import org.springframework.beans.factory.annotation.Autowired;
import org.springframework.boot.test.context.SpringBootTest;

@SpringBootTest
class ApplicationTests {

    @Autowired
    private Car car;

    @Test
    void contextLoads() {
        System.out.println(car);
    }

}
如果激活的是dev会输出dev的Car对象
如果激活的是pro会输出pro的car对象
去掉application.properties的jar包运行方式
打包
点击maven中的package进行打包
运行
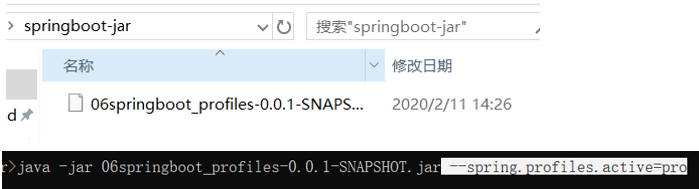
--spring.profiles.active=pro
配置文件加载优先级和外部配置文件加载
项目内部配置文件加载优先级
概述:
spring boot 启动会扫描以下位置的application.properties或者application.yml文件作为Spring boot的默认配置文件,其中同一目标下的properties文件的优先级大于yml文件。
file:./config/ 	(当前项目路径config目录下)
file:./ 		(当前项目路径下)
classpath:/config/ 	(类路径config目录下)
classpath:/ 		(类路径config下)

优先级:file:./config/ > file:./ > classpath:/config/ > classpath:/
处理外部的config加载不了的问题
以下是配置文件的真实加载顺序
为什么是上面这个顺序【因为在springboot配置里写死了】
可以从ConfigFileApplicationListener里面找到配置文件的加载 ConfigFileApplicationListener
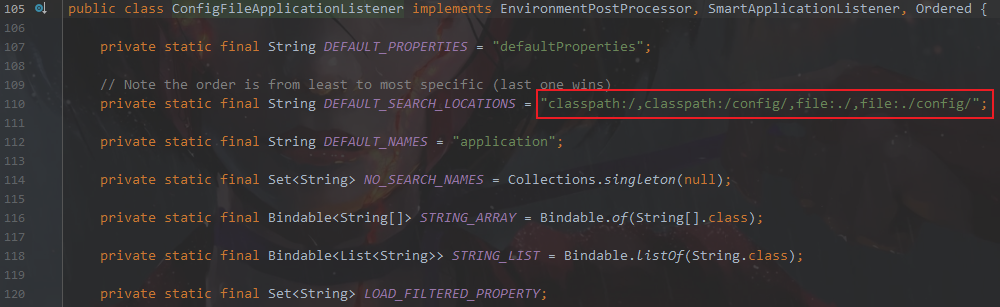
就是在ConfigFileApplicationListener写死了。
其它说明
虽然以上四个目录都是加载配置文件,但是要注意,这四个目录以及外部配置文件的目里面的配置都是互补的。
外部配置文件加载
方式1:一个一个属性的加载
java -jar 06springboot_profiles-0.0.1-SNAPSHOT.jar --server.port=80

方式2:一块一块的加载
java -jar 06springboot_profiles-0.0.1-SNAPSHOT.jar --spring.config.localtion=C:\Users\LJH\Desktop\springboot-jar\abc\application.properties

自动配置原理及@Conditional派生注解
自动配置原理
如何加载124个自动配置类
@SpringBootApplication
@EnableAutoConfiguration
@AutoConfigurationImportSelector.class

protected AutoConfigurationEntry getAutoConfigurationEntry(AutoConfigurationMetadata autoConfigurationMetadata,
      AnnotationMetadata annotationMetadata) {
   if (!isEnabled(annotationMetadata)) {
      return EMPTY_ENTRY;
   }

   AnnotationAttributes attributes = getAttributes(annotationMetadata);
//得到所有的自动配置类
   List<String> configurations = getCandidateConfigurations(annotationMetadata, attributes);
   configurations = removeDuplicates(configurations);
   Set<String> exclusions = getExclusions(annotationMetadata, attributes);
   checkExcludedClasses(configurations, exclusions);
   configurations.removeAll(exclusions);
//移除不满足条件的自动配置类
   configurations = filter(configurations, autoConfigurationMetadata);
   fireAutoConfigurationImportEvents(configurations, exclusions);
   return new AutoConfigurationEntry(configurations, exclusions);
}
@AutoConfigurationImportSelector - -> getCandidateConfigurations
得到当前编译路径包含jar包里面的MET-INFO/spring.propertis


以HttpEncodingAutoConfiguration
// 代表是一个配置类
@Configuration(proxyBeanMethods = false)
// 启用HttpProperties对象  并创建该对象  放到IOC容器
@EnableConfigurationProperties(HttpProperties.class)
// 检查当前应用程序是否是一个Servet的WEB应用程序
// 如果是则返回true 否则为false
@ConditionalOnWebApplication(type = ConditionalOnWebApplication.Type.SERVLET)、
// 查询当前项目里面有没有CharacterEncodingFilter.class这样的类
@ConditionalOnClass(CharacterEncodingFilter.class)
// 判断有没有配置spring.http.encoding如果没有,就自启动
@ConditionalOnProperty(prefix = "spring.http.encoding", value = "enabled", matchIfMissing = true)
// 上面的Conditional*** 只会全部返回true 当前的这个配置类才生效
public class HttpEncodingAutoConfiguration {

以上的配置在创建过滤器并注册。
属性读取


看到了配置前缀

以DispatchServletAutoConfiguration
// 代表当关类是一个非常高优先给的配置类
@AutoConfigureOrder(Ordered.HIGHEST_PRECEDENCE)
// 代表一个配置类
@Configuration(proxyBeanMethods = false)
// 判断当前应用程序是不是servlet的Web应用程序
@ConditionalOnWebApplication(type = Type.SERVLET)
// 判断当前项目有没有DispatcherServlet.class
@ConditionalOnClass(DispatcherServlet.class)
// 当前这个配置在在什么之后加载
@AutoConfigureAfter(ServletWebServerFactoryAutoConfiguration.class)
public class DispatcherServletAutoConfiguration {
创建DispatcherServlet<servlet></servlet>
/*
 * The bean name for a DispatcherServlet that will be mapped to the root URL "/"
 */
public static final String DEFAULT_DISPATCHER_SERVLET_BEAN_NAME = "dispatcherServlet";

/*
 * The bean name for a ServletRegistrationBean for the DispatcherServlet "/"
 */
public static final String DEFAULT_DISPATCHER_SERVLET_REGISTRATION_BEAN_NAME = "dispatcherServletRegistration";

@Configuration(proxyBeanMethods = false)
@Conditional(DefaultDispatcherServletCondition.class)
@ConditionalOnClass(ServletRegistration.class)
@EnableConfigurationProperties({ HttpProperties.class, WebMvcProperties.class })
protected static class DispatcherServletConfiguration {

  <!-- 添加的部分 开始 -->
  @Bean(name = DEFAULT_DISPATCHER_SERVLET_BEAN_NAME)
  <servlet>
    <servlet-name>springmvc</servlet-name>
    <servlet-class>org.springframework.web.servlet.DispatcherServlet</servlet-class>
    <init-param>
      <param-name>contextConfigLocation</param-name>
      <param-value>classpath*:springmvc.xml</param-value>
    </init-param>
    <load-on-startup>1</load-on-startup>
  </servlet>
  <!-- 添加的部分 结束 -->

   public DispatcherServlet dispatcherServlet(HttpProperties httpProperties, WebMvcProperties webMvcProperties) {
//创建DispatcherServlet 对象
      DispatcherServlet dispatcherServlet = new DispatcherServlet();
      dispatcherServlet.setDispatchOptionsRequest(webMvcProperties.isDispatchOptionsRequest());
      dispatcherServlet.setDispatchTraceRequest(webMvcProperties.isDispatchTraceRequest());
      dispatcherServlet.setThrowExceptionIfNoHandlerFound(webMvcProperties.isThrowExceptionIfNoHandlerFound());
      dispatcherServlet.setPublishEvents(webMvcProperties.isPublishRequestHandledEvents());
      dispatcherServlet.setEnableLoggingRequestDetails(httpProperties.isLogRequestDetails());
      return dispatcherServlet;
   }
注册DispatcherServle <servlet-mapping></servlet-mapping>
@Bean(name = DEFAULT_DISPATCHER_SERVLET_REGISTRATION_BEAN_NAME)
@ConditionalOnBean(value = DispatcherServlet.class, name = DEFAULT_DISPATCHER_SERVLET_BEAN_NAME)
public DispatcherServletRegistrationBean dispatcherServletRegistration(@Autowird DispatcherServlet dispatcherServlet,
      WebMvcProperties webMvcProperties, ObjectProvider<MultipartConfigElement> multipartConfig) {

  <!-- 注册DispatcherServle 开始 -->
  <servlet-mapping>
    <servlet-name>springmvc</servlet-name>
    <url-pattern>/ </url-pattern>
  </servlet-mapping>
  <!-- 注册DispatcherServle 结束 -->

   DispatcherServletRegistrationBean registration = new DispatcherServletRegistrationBean(dispatcherServlet,
         webMvcProperties.getServlet().getPath());
   registration.setName(DEFAULT_DISPATCHER_SERVLET_BEAN_NAME);
//设置启动加载
<load-on-startup>1</load-on-startup>

registration.setLoadOnStartup(webMvcProperties.getServlet().getLoadOnStartup());
//判断是支持文件上传
   multipartConfig.ifAvailable(registration::setMultipartConfig);
   return registration;
}
总结
-
SpringBoot启动会加载大量的自动配置类124 ---2.2.4
-
看我们需要的功能有没有SpringBoot默认写好的自动配置类;
-
我们再来看这个自动配置类中到底配置了哪些组件;(只要我们要用的组件有,我们就不需要再来配置了)
-
给容器中自动配置类添加组件的时候,会从properties类中获取某些属性。我们就可
以在配置文件中指定这些属性的值;
- xxxxAutoConfigurartion:自动配置类;给容器中添加组件
\- xxxxProperties:封装配置文件中的默认配置
@Conditional派生注解[判断条件]
概述:
作用:必须是@Conditional指定的条件成立,才给容器中添加组件,配置类里面的所有内容才生效;

如何判断哪些配置类生效

AOP开发
创建项目


关键依赖
<!-- aop依赖 -->
<dependency>
    <groupId>org.springframework.boot</groupId>
    <artifactId>spring-boot-starter-aop</artifactId>
</dependency>
创建Man
package com.aop.domain;

import org.springframework.stereotype.Component;

@Component
public class Man {

    public void eat(){
        System.out.println("吃饭");
    }

}
创建ManAspect
package com.aop.aspect;

import org.aspectj.lang.ProceedingJoinPoint;
import org.aspectj.lang.annotation.After;
import org.aspectj.lang.annotation.Around;
import org.aspectj.lang.annotation.Aspect;
import org.aspectj.lang.annotation.Before;
import org.springframework.context.annotation.EnableAspectJAutoProxy;
import org.springframework.stereotype.Component;

@Component
@Aspect
@EnableAspectJAutoProxy  // 可以不写,因为springboot默认开启了AOP
public class ManAspect {

    private static final String PC = "execution(* com.aop.domain.Man.eat(..))";

    @Before(value = PC)
    public void before() {
        System.out.println("水果");
    }

    @After(value = PC)
    public void after() {
        System.out.println("搞一根");
    }

    @Around(value = PC)
    public void around(ProceedingJoinPoint pj) {
        before();
        try {
            pj.proceed();
        } catch (Throwable throwable) {
            throwable.printStackTrace();
        }
        after();
    }
}
测试

web静态资源访问规则
什么是静态资源文件
Html、css、js、image 等等,就是静态资源。
创建web应用程序


Springboot里面资源文件存放的位置
(1)在src/main/resources/目录下创建 **static **文件夹
(2)在src/main/resources/目录下创建 **resources **文件夹
(3)在src/main/resources/目录下创建 **public **文件夹
(4)在src/main/resources/目录下创建 **META-INF/resources **文件夹

如果以上的路径里面有相同名的文件那么加载顺序
META-INF > resources > static > public
实际开中就使用默认的static
如自定义静态资源目录
在Resources创建hello的目录
在resources/hello的目录 下创建helloworld.html
在代码里面创建config/MyMvcConfiguration的文件

package com.sxt.config;

import org.springframework.context.annotation.Configuration;
import org.springframework.web.servlet.config.annotation.ResourceHandlerRegistry;
import org.springframework.web.servlet.config.annotation.WebMvcConfigurer;

@Configuration
public class MyWebConfiguration implements WebMvcConfigurer {

    /**
     * 重写注册自定义静态资源目录的方法
     * @param registry  静态资源目录的注入器
     */
    @Override
    public void addResourceHandlers(ResourceHandlerRegistry registry) {
        // 如果用户输入的地址为http://127.0.0.1:8080/hello的路径
        registry.addResourceHandler("/hello/**")
                // 定位到编译目录的hello目录
                .addResourceLocations("classpath:hello/");
    }

}
测试

为什么是这四个目录【在springboot的配置里面写死】
找到WebMvcAutoConfiguration


查看staticPathPattern

查看this.resourceProperties.getStaticLocations()

Webjars的访问
什么是webjars
就是一些静态资源文件被打成jar包了,可以使用maven导入项目。
找一个jquery的webjars并引入

<!-- https://mvnrepository.com/artifact/org.webjars.bower/jquery -->
<dependency>
    <groupId>org.webjars.bower</groupId>
    <artifactId>jquery</artifactId>
    <version>3.4.1</version>
</dependency>
访问
http://127.0.0.1:8080/webjars/jquery/3.4.1/dist/jquery.js

原理

thymeleaf 模板的使用
thymeleaf 概述
简单说, Thymeleaf 是一个跟 Velocity、FreeMarker 类似的模板引擎,它可以完全替代 JSP 。相较与其他的模板引擎,它有如下三个极吸引人的特点:
1、Thymeleaf 在有网络和无网络的环境下皆可运行,即它可以让美工在浏览器查看页面的静态效果,也可以让程序员在服务器查看带数据的动态页面效果。这是由于它支持 html 原型,然后在 html 标签里增加额外的属性来达到模板+数据的展示方式。浏览器解释 html 时会忽略未定义的标签属性,所以 thymeleaf 的模板可以静态地运行;当有数据返回到页面时,Thymeleaf 标签会动态地替换掉静态内容,使页面动态显示。
2、Thymeleaf 开箱即用的特性。它提供标准和spring标准两种方言,可以直接套用模板实现JSTL、 OGNL表达式效果,避免每天套模板、该jstl、改标签的困扰。同时开发人员也可以扩展和创建自定义的方言。
3、Thymeleaf 提供spring标准方言和一个与 SpringMVC 完美集成的可选模块,可以快速的实现表单绑定、属性编辑器、国际化等功能。
Spring Boot项目Thymeleaf模板页面存放位置

通过Thymeleaf类对集成所需的Bean进行自动配置,包括templateResolver、templateEngine和thymeleafViewResolver的配置


通过Controller跳转到Thymeleaf的页面
创建项目


概述
classpath:templates目录下的页面文件不能直接被方式,它必须通过Controller转发,也就说必须经过Controller进行跳转【指请转发】。
Templates目录类似于以前的Web项目的WEB-INF目录。
跳转
在templates目录下创建hello.html

创建IndexController.java

测试
http://127.0.0.1:8080/index/hello

问题:为什么可以直接使用hello?因为默认配置了前后缀
默认配置

修改前后缀
# thmyeleaf的配置
spring:
  thymeleaf:
    prefix: classpath:templates/   	#配置前缀 默认为classpath:templates
    suffix: .html        #配置后缀   默认为.html
    cache: false     	 #是否缓存页面解决修改了页面之访问页面不更新问题  开发配置false 上线true
Thymeleaf的相关语法
在html页面中引入thymeleaf命名空间,即,此时在html模板文件中动态的属性使用 th:命名空间修饰 。
<html lang="en" xmlns:th="http://www.thymeleaf.org">
简单表达式
-
变量的表达式:${...} 取三个作用域或者SringMvc Model里面的值
-
选择变量表达式:*{...}
-
信息表达式:#{...} 取某一个配置文件里面的值 用来做国际化
-
链接URL表达式:@{...}
<a href="user/query.action"><a th:href="@{user/query.action}" /resouces/css/layui.css
th:href:’@{resources/css/layui.css}’
th:text
变量表达式(获取变量值)。向HTML标签内部输出信息。
<!--直接向标签内部填充内容,清空原有内容 -->
<span th:text="jqk"></span>
<!-- 从作用于中获取name输入到标签内部 -->
<span th:text="${name}"></span>
<!-- 获取session作用域内容-->
<span th:text="${session.name}"></span>
th:value
表单元素,设置HTML标签中表单元素value属性时使用。
<input type="text" th:value="${name}"/>
th:if
进行逻辑判断。如果成立该标签生效(显示),如果不成立,此标签无效(不显示)。
注意:判断条件中逻辑判断符号写在${}外面的
<span th:if="${name}!='张三'">会显示</span>
1.1 th:each
循环遍历
示例中u为迭代遍历。
th:each=”u,i 😒{list}” 其中i表示迭代状态。
-
index:当前迭代器的索引 从0开始
-
count:当前迭代对象的计数 从1开始
-
size:被迭代对象的长度
-
even/odd:布尔值,当前循环是否是偶数/奇数 从0开始
-
first:布尔值,当前循环的是否是第一条,如果是返回true否则返回false
-
last:布尔值,当前循环的是否是最后一条,如果是则返回true否则返回false
<table border="1" width="500">
    <tr>
        <td>编号</td>
        <td>姓名</td>
    </tr>
    <tr th:each="u:${list}">
        <td th:text="${u.id}" ></td>
        <td th:text="${u.name}"></td>
    </tr>
</table>
th:href
设置href属性的。取值使用@{}取值
<a th:href="@{/getParam(id=1,name='bjsxt')}" >跳转</a>
<!-- 获取作用域值-->
<a th:href="@{/getParam(name=${name})}">跳转二</a>
<!--带参数跳转-->
<a th:href="${'queryEmp?did=' + dept.id}">带参数跳转</a>


文本处理
1. 字符串并置:+
2. 文字替换:|The name is ${name}|
表达式基本对象
1. #ctx:上下文对象
2. #vars:上下文变量
3. #locale:上下文语言环境
4. #httpServletRequest:(只有在Web上下文)HttpServletRequest对象
5. #httpSession:(只有在Web上下文)HttpSession对象。
用法:US.
实用工具对象
#dates: java.util的实用方法。对象:日期格式、组件提取等.
#calendars:类似于#日期,但对于java.util。日历对象
#numbers:格式化数字对象的实用方法。
#strings:字符串对象的实用方法:包含startsWith,将/附加等。
#objects:实用方法的对象。
#bools:布尔评价的实用方法。
#arrays:数组的实用方法。
#lists:list集合。
#sets:set集合。
#maps:map集合。
#aggregates:实用程序方法用于创建聚集在数组或集合.
#messages:实用程序方法获取外部信息内部变量表达式,以同样的方式,因为它们将获得使用# {…}语法
#ids:实用程序方法来处理可能重复的id属性(例如,由于迭代)。
Thymeleaf代码提示功能 [sts要安装] 【idea不用装】
在Eclipse中安装Thymeleaf插件即可。
插件的地址为:http://www.thymeleaf.org/eclipse-plugin-update-site/
安装方式参考:https://blog.csdn.net/king_kgh/article/details/76084398
Thymeleaf读取xxx.propertis里面的对象【国际化】
什么是国际化?
项目可以根据当前电脑的语言环境来动态切换页面语言。
国标化 == I18N(internationalization) :前面一个I后面一个N 只间18个字母
引入静态资源layui

注意:Copy了layui之后要重新clean 再编译(compiler).

在classpath下面创建一个student.properties
student.id=1
student.name=xiaoming
student.age=29
student.sex=man
student.birth=2018/12/12
student.phone=1590231311
修改IndexController

创建showStudent.html
<!DOCTYPE html>
<html lang="en" xmlns:th="http://www.thymeleaf.org">
<head>
    <meta charset="UTF-8">
    <title>Title</title>
    <link rel="stylesheet" th:href="@{/layui/css/layui.css}" media="all">
</head>
<body>
<div style="padding: 20px; background-color: #F2F2F2;">
    <div class="layui-row layui-col-space15">
        <div class="layui-col-md6">
            <div class="layui-card">
                <div class="layui-card-header">学员信息</div>
                <div class="layui-card-body">
                   <div>
                        <span>学生编号:</span><span th:text="#{student.id}"></span>
                   </div>
                    <div>
                        <span>学生姓名:</span><span th:text="#{student.name}"></span>
                    </div>
                    <div>
                        <span>学生年龄:</span><span th:text="#{student.age}"></span>
                    </div>
                    <div>
                        <span>学生性别:</span><span th:text="#{student.sex}"></span>
                    </div>
                    <div>
                        <span>学生生日:</span><span th:text="#{student.birth}"></span>
                    </div>
                    <div>
                        <span>学生电话:</span><span th:text="#{student.phone}"></span>
                    </div>
                </div>
            </div>
        </div>
    </div>
</div>
</body>
</html>
访问出现问题

访问出现问题的原因
student.properties文件没有被加载。
创建I18NConfig加载student.properties
package com.sxt.config;

import org.springframework.context.annotation.Bean;
import org.springframework.context.annotation.Configuration;
import org.springframework.context.support.ResourceBundleMessageSource;
import org.springframework.stereotype.Controller;

@Configuration
public class I18NConfig {
    @Bean
    public ResourceBundleMessageSource messageSource() {
        //创建消息绑定对象
        ResourceBundleMessageSource messageSource = new ResourceBundleMessageSource();
        //使用文件编码做为默认消息
        messageSource.setUseCodeAsDefaultMessage(true);
        //根据某个key去取值里不去读取系统的配置  user.name==取的是操作系统的名
        messageSource.setFallbackToSystemLocale(false);
        //设置自定义properties文件的前缀
//        messageSource.setBasename("student");
        messageSource.setBasenames("application","student");
        //设置编码
        messageSource.setDefaultEncoding("UTF-8");
        //设置缓存时间
        messageSource.setCacheSeconds(2);
        return messageSource;

//        setBaseName设置消息源的文件名,messageSource.setBasename("student");,
//        表明消息源是以student打头的属性文件,如果要设置多个属性文件作为消息源,
//        那么就要用setBaseNames方法来设置,
//        比如:messageSource.setBasenames("student", "application");
//        这样就有两个消息源:student.properties和application.properties。
    }

}
创建student_zh_CN.properties
student.id=1_zh
student.name=xiaoming_zh
student.age=29_zh
student.sex=man_zh
student.birth=2018/12/12_zh
student.phone=1590231311_zh
student.shool=WHSXT_ZH
刷新测试

说明

以上两个文件代表国际化的资源文件
student.properteis 代表如果根据当前系统的语言环境没有找到匹配的资源就使用当前student_zh_CN.properties做为默认的语言文件。
Thymeleaf读取model里面的对象
创建Student
package com.sxt.student;

import lombok.AllArgsConstructor;
import lombok.Data;
import lombok.NoArgsConstructor;

import java.util.Date;

@Data
@AllArgsConstructor
@NoArgsConstructor
public class Student {
    private Integer id;
    private String name;
    private String sex;
    private Integer age;
    private String phone;
    private Date birth;
}
修改IndexController
/**
 * 跳转到 templates/showOneStudent.html
 */
@RequestMapping("showOneStudent")
public String showOneStudent(Model model) {
    Student student = new Student(1, "张三", "男", 22, "15911112222", new Date());
    model.addAttribute("student", student);
    return "showOneStudent";
}
创建showOneStudent.html
<!DOCTYPE html>
<html lang="en" xmlns:th="http://www.thymeleaf.org">
<head>
    <meta charset="UTF-8">
    <title>Title</title>
    <link rel="stylesheet" th:href="@{/layui/css/layui.css}" media="all">
</head>
<body>
<div style="padding: 20px; background-color: #F2F2F2;">
    <div class="layui-row layui-col-space15">
        <div class="layui-col-md6">
            <div class="layui-card">
                <div class="layui-card-header">学员信息</div>
                <div class="layui-card-body">
                   <div>
                       <span>学生编号:</span><span th:text="${student.id}"></span>
                   </div>
                    <div>
                        <span>学生姓名:</span><span th:text="${student.name}"></span>
                    </div>
                    <div>
                        <span>学生年龄:</span><span th:text="${student.age}"></span>
                    </div>
                    <div>
                        <span>学生性别:</span><span th:text="${student.sex}"></span>
                    </div>
                    <div>
                        <span>学生生日:</span><span th:text="${student.birth}"></span>
                    </div>
                    <div>
                        <span>学生生日:</span><span th:text="${#dates.format(student.birth,'yyyy-MM-dd HH:mm:ss') }"></span>
                    </div>
                    <div>
                        <span>学生电话:</span><span th:text="${student.phone}"></span>
                    </div>
                </div>
            </div>
        </div>
    </div>
</div>
</body>
</html>
测试

相关标签
th:text="${student.phone}"
Thymeleaf读取model里面的集合
修改IndexController
/**
 * 跳转到 templates/showAllStudent.html
 */
@RequestMapping("showAllStudent")
public String showAllStudent(Model model) {
    List<Student> students = new ArrayList<>();
    for (int i = 1; i <= 5; i++) {
        students.add(new Student(1, "张三"+i, "男", 22+i, "1591111222"+i, new Date()));
    }
    model.addAttribute("students", students);
    return "showAllStudent";
}
创建showAllStudent.html
<!DOCTYPE html>
<html lang="en" xmlns:th="http://www.thymeleaf.org">
<head>
    <meta charset="UTF-8">
    <title>Title</title>
    <link rel="stylesheet" th:href="@{/layui/css/layui.css}" media="all">
</head>
<body>
<div style="padding: 20px; background-color: #F2F2F2;">
    <div class="layui-row layui-col-space15">
        <div class="layui-col-md3" th:each="student:${students}">
            <div class="layui-card">
                <div class="layui-card-header">学员信息</div>
                <div class="layui-card-body">
                   <div>
                       <span>学生编号:</span><span th:text="${student.id}"></span>
                   </div>
                    <div>
                        <span>学生姓名:</span><span th:text="${student.name}"></span>
                    </div>
                    <div>
                        <span>学生年龄:</span><span th:text="${student.age}"></span>
                    </div>
                    <div>
                        <span>学生性别:</span><span th:text="${student.sex}"></span>
                    </div>
                    <div>
                        <span>学生生日:</span><span th:text="${student.birth}+'--------'+${#dates.format(student.birth,'yyyy-MM-dd HH:mm:ss') }"></span>
                    </div>
                    <!--<div>-->
                        <!--<span>学生生日:</span><span th:text="${#dates.format(student.birth,'yyyy-MM-dd HH:mm:ss') }"></span>-->
                    <!--</div>-->
                    <div>
                        <span>学生电话:</span><span th:text="${student.phone}"></span>
                    </div>
                </div>
            </div>
        </div>
    </div>
</div>
</body>
</html>
测试

相关标签
th:each="student:${students}"
Themeleaf在js中取值

访问带参数的消息
修改student_zh_CN.properteis
welcome=Welcome {0} to {1} shangxue school
修改页面

Thymeleaf链接传值
http://127.0.0.1:8080/index/login?username=admin&password=123456;
<!-- Thymeleaf链接传值 -->
<!-- http://127.0.0.1:8080/index/login?username=admin&password=123456; -->
<div>
    <div>
        <a href="login/login?username=admin&password=123456">登录1</a>
    </div>
    <div>
        <a th:href="@{login/login?username=admin&password=123456}">登录2</a>
    </div>
    <div>
        <a th:href="@{login/login(username='admin',password='123456')}">登录3</a>
    </div>
</div>
ThymeleafObjects的使用
修改IndexConroller
@RequestMapping("showObject")
public String showObject(Model model, HttpServletRequest request){
    model.addAttribute("username", "小明-model");
    model.addAttribute("currentTime", new Date());
    model.addAttribute("price", "3.1415926");
    request.setAttribute("username", "小明-request");
    HttpSession session = request.getSession();
    session.setAttribute("username", "小明-session");
    Student student = new Student(1, "小明", "男", 22, "15966668888", new Date());
    session.setAttribute("student", student);
    ServletContext application = request.getServletContext();
    application.setAttribute("username", "小明-ServletContext");
    return "showObject";
}
创建showObject.html
<!DOCTYPE html>
<html lang="en" xmlns:th="http://www.thymeleaf.org">
<head>
    <meta charset="UTF-8">
    <title>Title</title>
</head>
<body>
<div th:text="${username}"></div>
<div th:text="${#request.getAttribute('username')}"></div>
<div th:text="${#session.getAttribute('username')}"></div>
<div th:text="${#session.getAttribute('student')}"></div>
<div th:text="${session.username}"></div>
<div th:text="${#servletContext.getAttribute('username')}"></div>

<div>
    我的国家: <span th:text="${#locale.country}+'-'+${#locale.getDisplayCountry()}"></span>
</div>
<div>
    我的母语:<span th:text="${#locale.language}+'-'+${#locale.getDisplayLanguage()}"></span>
</div>
<div>
    输出时间:<span th:text="${#dates.format(#dates.createNow())}"></span>
</div>
<div>
    格式化当前时间:<span th:text="${#dates.format(#dates.createNow(),'yyyy-MM-dd HH:mm:ss')}"></span>
</div>
<div>
    格式化后台当前时间:<span th:text="${#dates.format(currentTime,'yyyy-MM-dd HH:mm:ss')}"></span>
</div>

<!-- 在html里面标签分两大类
	 容器标签  里面可以放其它标签的标签?  div span label  li lu
	 非容器标签  里面不能放其它标签的标签  img input -->
<div>
    输出某个数值:<span th:text="${556788.127892312}"></span>
</div>
<div>
    <!--参数说明  第一个要格式化的参数   小数点前面必须出现10 如果不够用0补齐    参数3  保留几位小数-->
    格式化输出某个数值:<span th:text="${#numbers.formatDecimal(556788.127892312,10,3)}"></span>
</div>

<div>
    <!--参数说明  第一个要格式化的参数   小数点前面必须出现10 如果不够用0补齐    参数3  保留几位小数-->
    格式化后台某个数值:<span th:text="${#numbers.formatDecimal(price,10,3)}"></span>
</div>
</body>
<script>

</script>
</html>
输出结果

管理及扩展springmvc组件
准备工作创建项目和加入依赖


管理springmvc组件
1. 前端控制器的自动管理
找到DispacterServletAutoConfiguraion
@AutoConfigureOrder(Ordered.HIGHEST_PRECEDENCE)  // 配置优先级
@Configuration(proxyBeanMethods = false)  // 代表一个配置文件
@ConditionalOnWebApplication(type = Type.SERVLET) // 判断是否为web环境
@ConditionalOnClass(DispatcherServlet.class)  //判断是否有DispatcherServlet类
//在ServletWebServerFactoryAutoConfiguration配置类加载完成之后加载
@AutoConfigureAfter(ServletWebServerFactoryAutoConfiguration.class)
public class DispatcherServletAutoConfiguration {

   /* Servlet的名称
        <servlet>
           <servlet-name> dispatcherServlet </servlet-name>
        </servlet>
    */
   public static final String DEFAULT_DISPATCHER_SERVLET_BEAN_NAME = "dispatcherServlet";

   /*
    * The bean name for a ServletRegistrationBean for the DispatcherServlet "/"
    */
   public static final String DEFAULT_DISPATCHER_SERVLET_REGISTRATION_BEAN_NAME = "dispatcherServletRegistration";

   @Configuration(proxyBeanMethods = false)
   @Conditional(DefaultDispatcherServletCondition.class)
   @ConditionalOnClass(ServletRegistration.class)
   @EnableConfigurationProperties({ HttpProperties.class, WebMvcProperties.class })
   protected static class DispatcherServletConfiguration {

//创建Servlet的对象
      @Bean(name = DEFAULT_DISPATCHER_SERVLET_BEAN_NAME)
      public DispatcherServlet dispatcherServlet(HttpProperties httpProperties, WebMvcProperties webMvcProperties) {
         DispatcherServlet dispatcherServlet = new DispatcherServlet();
         dispatcherServlet.setDispatchOptionsRequest(webMvcProperties.isDispatchOptionsRequest());
         dispatcherServlet.setDispatchTraceRequest(webMvcProperties.isDispatchTraceRequest());
         dispatcherServlet.setThrowExceptionIfNoHandlerFound(webMvcProperties.isThrowExceptionIfNoHandlerFound());
         dispatcherServlet.setPublishEvents(webMvcProperties.isPublishRequestHandledEvents());
         dispatcherServlet.setEnableLoggingRequestDetails(httpProperties.isLogRequestDetails());
         return dispatcherServlet;
      }

      @Bean
      @ConditionalOnBean(MultipartResolver.class)
      @ConditionalOnMissingBean(name = DispatcherServlet.MULTIPART_RESOLVER_BEAN_NAME)
      public MultipartResolver multipartResolver(MultipartResolver resolver) {
         // Detect if the user has created a MultipartResolver but named it incorrectly
         return resolver;
      }

   }
找到DispacterServletAutoConfiguraion - -> DispatcherServletRegistrationConfiguration
@Configuration(proxyBeanMethods = false)
@Conditional(DispatcherServletRegistrationCondition.class)
@ConditionalOnClass(ServletRegistration.class)
@EnableConfigurationProperties(WebMvcProperties.class)
@Import(DispatcherServletConfiguration.class)
protected static class DispatcherServletRegistrationConfiguration {

   @Bean(name = DEFAULT_DISPATCHER_SERVLET_REGISTRATION_BEAN_NAME)
   @ConditionalOnBean(value = DispatcherServlet.class, name = DEFAULT_DISPATCHER_SERVLET_BEAN_NAME)
   public DispatcherServletRegistrationBean
上面的创建DispaterServlet传过来的
 dispatcherServletRegistration(DispatcherServlet dispatcherServlet,
         WebMvcProperties webMvcProperties, ObjectProvider<MultipartConfigElement> multipartConfig) {
//创建Servlet的注册器
      DispatcherServletRegistrationBean registration = new
//dispathcerServlet 代表要注册的serlvet
DispatcherServletRegistrationBean(dispatcherServlet,
//代表url-patten  ===默认/
            webMvcProperties.getServlet().getPath());
      registration.setName(DEFAULT_DISPATCHER_SERVLET_BEAN_NAME);
//启动时自动加载      registration.setLoadOnStartup(webMvcProperties.getServlet().getLoadOnStartup());
      multipartConfig.ifAvailable(registration::setMultipartConfig);
      return registration;
   }
}
查看WebMvcProperties

配置前后缀
注意:这个前后缀不是thymeleaf 里面的前后缀 这个以前配置视图解析器用的前后缀

2. 控制器的自动管理
自己定义的控制器 如IndexController UserContrller,就是包的自动扫描的设置
3. 视图解析器的自动管理
以前配置

原理
找到WebMvcAutoConfiguration

找到defaultViewResolver的方法
发现创建的以前配置的视图解析器,并注入前后缀
@Bean
@ConditionalOnMissingBean
public InternalResourceViewResolver defaultViewResolver() {
   InternalResourceViewResolver resolver = new InternalResourceViewResolver();
   resolver.setPrefix(this.mvcProperties.getView().getPrefix());
   resolver.setSuffix(this.mvcProperties.getView().getSuffix());
   return resolver;
}
找到viewResolver的方法

找到ContentNegotiatingViewResolver类里面的initServletContext
ContentNegotiatingViewResolver本质就是一个视图解析器的收集器

比如加载 thymeleaf这后会多一个视图解析器

如何自定义前缀和后缀

配置yml文件
# springmvc的视图解析器的配置
spring:
  mvc:
    view:
      prefix: classpath:view
      suffix: .html
创建classpath:view/hello.jsp
<%@ page contentType="text/html;charset=UTF-8" language="java" %>
<html>
<head>
    <title>Title</title>
</head>
<body>
	我是一个jsp
</body>
</html>
创建IndexController
@Controller
@RequestMapping("index")
public class IndexController {
    @RequestMapping("hello")
    public String hello(){
        System.out.println("hello");
        return "hello";
    }
}
4. 文件上传和下载的视图解析器
以前的配置

现在在springboot里面默认开启了文件上传的配置yml

源代码MultipartAutoConfiguration

5. 静态资源的访问
web静态资源访问规则
6. 消息转化
本质是接收表单传过来的数据进行转化
查看WebMvcAutoConfiguration--addFormatters

进入addFormatters

Registory它是一个注册中心。下面内容为里面已经注册的东西。
7. 格式化转化
如日期传到页面要进行格式化 从后台到前面
创建User
package com.sxt.domain;

import com.alibaba.fastjson.annotation.JSONField;
import com.fasterxml.jackson.annotation.JsonFormat;
import lombok.AllArgsConstructor;
import lombok.Data;
import lombok.NoArgsConstructor;
import org.springframework.format.annotation.DateTimeFormat;

import java.util.Date;

@Data
@AllArgsConstructor
@NoArgsConstructor
public class User {
    private Integer id;

    @JSONField(format = "yyyy-MM-dd HH:mm:ss")
    private Date birth;
}
修改IndexController
@ResponseBody
@RequestMapping("getUser")
public User getUser() {
    return new User(1, new Date());
}
配置方法1只在User类里面配置
返回结果

配置方法2的yml文件里面配置

去掉User里面的birth的注解,发现此时所有的前Date相关的返回数据会使用全局的,如果在User里面配置了。会直接使用User里面的,全局的配置对实体类里面的属性无效。就是一个就近使用原则。
前台到后台
String ---> Date
配置方式1

配置方式2

原则:
就近有效原则
自定义消息转化 --> 前台到后台
删除User里面的注解

删除yml文件里面配置

创建配置类

自定义消息转化—后台到前台—把jackson找成fastjson
引入fastjson
<!-- https://mvnrepository.com/artifact/com.alibaba/fastjson -->
<dependency>
    <groupId>com.alibaba</groupId>
    <artifactId>fastjson</artifactId>
    <version>1.2.62</version>
</dependency>
创建fastjson的配置类

给User类加上fastjson的注解

测试

8. 欢迎页面的自动配置
以前的配置

当用户访问http://127.0.0.1:8080/index.html
http://127.0.0.1:8080/得到的结果是一样
springboot里面默认配置的就是index.html—原理

扩展springmvc组件
1. 在容器中注册视图控制器
概述:
当页面跳转时,我们需要在Controller里面创建一个空方法去跳转,那么有没有别的配置方法呢?
创建一个MyWebMVCconfig的配置类实现WebMvcConfigurer重写addViewControllers方法
创建SystemController

修改MyWebMvcConfiguration

创建templates/userList.html

2. 注册格式化器【了解】
见 管理及扩展springmvc组件的第7点
3. 消息转化器扩展fastjson
见 管理及扩展springmvc组件的第7点
4. 注册拦截器【掌握】
以前的配置

创建一个拦截器
package com.sxt.inteceptor;

import org.springframework.web.servlet.HandlerInterceptor;
import org.springframework.web.servlet.ModelAndView;

import javax.servlet.http.HttpServletRequest;
import javax.servlet.http.HttpServletResponse;

public class LoginInterceptor implements HandlerInterceptor {

    /**
     * http://127.0.0.1:8080/index/hello---  跳转到templates/hello.html
     * @param request 请求对象
     * @param response 响应对象
     * @param handler 当前要请求的那个controller对象
     * @return  false 代表拦击  true 放行
     * @throws Exception
     */
    @Override
    public boolean preHandle(HttpServletRequest request, HttpServletResponse response, Object handler) throws Exception {
        System.out.println("preHandle");
        return true;
    }


    /**
     * @param request 请求对象
     * @param response 响应对象
     * @param handler 当前要请求的那个controller对象
     * @param modelAndView  传入的是请求方法执行完成这后返回的ModelAndView的对象
     * @throws Exception
     */
    @Override
    public void postHandle(HttpServletRequest request, HttpServletResponse response, Object handler, ModelAndView modelAndView) throws Exception {
        System.out.println("postHandle:"+modelAndView+ "   "+modelAndView.getViewName());
    }

    /**
     * @param request  请求对象
     * @param response 响应对象
     * @param handler 当前要请求的那个controller对象
     * @param ex 异常
     * @throws Exception
     */
    @Override
    public void afterCompletion(HttpServletRequest request, HttpServletResponse response, Object handler, Exception ex) throws Exception {
        System.out.println("afterCompletion");
    }
}
注册拦截器

内嵌WEB服务器加载原理
概述
Springbootboot启动时会加载124个自动类
Springboot如何启动tomcat的?
找到autoconfiguration.jar

找到spring.factories

找到ServletWebServerFactoryAutoConfiguration
@Configuration(proxyBeanMethods = false)
@AutoConfigureOrder(Ordered.HIGHEST_PRECEDENCE)
@ConditionalOnClass(ServletRequest.class)
@ConditionalOnWebApplication(type = Type.SERVLET)
@EnableConfigurationProperties(ServerProperties.class)
//分别引入了Tomcat  Jetty  Undertow三个服务器默认为Tomcat
@Import({ ServletWebServerFactoryAutoConfiguration.BeanPostProcessorsRegistrar.class,
      ServletWebServerFactoryConfiguration.EmbeddedTomcat.class,
      ServletWebServerFactoryConfiguration.EmbeddedJetty.class,
      ServletWebServerFactoryConfiguration.EmbeddedUndertow.class })
public class ServletWebServerFactoryAutoConfiguration {
找到ServerProperties

如何启动的?

进入TomcatServletWebServerFactory

进入TomcatServletWebServerFactory - -> getTomcatWebServer

进入 TomcatWebServer

进入initialize

到此内置的tomcat就启动成功
如何不使用tomcat而使用jetty
让tomcat的配置类不生效

引入jetty

创建ServerConfig

启动

服务器相关的yml配置说明
server.address= # Network address to which the server should bind to.配置白名单
server.servlet.context-path=/bjsxt  #springboot2.0以上的配置 项目访问地址
server.port=8080 #配置程序端口,默认为8080
server.tomcat.uri-encoding=UTF-8 # 配置编码
server.session.timeout=1800    #用户绘画session过期时间,以秒为单位
可以参考的yml的配置属性名和默认属性值
注册web三大组件
什么是web三大组及以前配置方法
Servlet
xml
<servlet>
	<servlet-name>myServlet<servlet-name>
<servlet-class>com.sxt.servlet.MyServlet</servlet-class>
</servlet>
<servlet-mapping>
	<servlet-name></servlet-name>
    <url-patten>/myServlet</url-patten>
</servlet-mapping>
注解配置
@WebServlet(“/myServlet”)
Filter
xml
<filter>
	< filter -name>myServlet< filter -name>
< filter -class>com.sxt.filter.MyFilter</ filter -class>
</ filter >
<servlet-mapping>
	<servlet-name></servlet-name>
    < url-patten >/* </url-patten>
</servlet-mapping>
注解配置
@WebFilter(“/*”)
Listener
Xml
<listener>
	< listener- class>com.sxt.listener.MyListener</ listener- class>
</listener>
注解配置
@WebListener
创建项目

注册Servlet
创建UserServlet
//@WebServlet(name = "UserServlet",value = {"/user"})
public class UserServlet extends HttpServlet {
    protected void doPost(HttpServletRequest request, HttpServletResponse response) throws ServletException, IOException {
        System.out.println("doPost");
    }

    protected void doGet(HttpServletRequest request, HttpServletResponse response) throws ServletException, IOException {
        System.out.println("doGet");
    }
}
注册,可以参考前端控制器的配置DispacherServletAutoConfiguration
非优化的写法
package com.sxt.config;

import com.sxt.servlet.UserServlet;
import org.springframework.boot.autoconfigure.condition.ConditionalOnClass;
import org.springframework.boot.autoconfigure.condition.ConditionalOnWebApplication;
import org.springframework.boot.web.servlet.ServletRegistrationBean;
import org.springframework.context.annotation.Bean;
import org.springframework.context.annotation.Configuration;

import java.util.ArrayList;
import java.util.Collection;

@Configuration
@ConditionalOnWebApplication(type = ConditionalOnWebApplication.Type.SERVLET)
public class ServletAutoConfiguration {

    @Bean
    public UserServlet getUserServlet(){
        UserServlet userServlet=new UserServlet();
        return userServlet;
    }

    /**
     * 注册UserServlet
     * @param userServlet
     * @return
     */
    @Bean
    @ConditionalOnClass(value = {UserServlet.class})
    public ServletRegistrationBean<UserServlet> registUserServlet(UserServlet userServlet){
        //创建一个注册器
        ServletRegistrationBean<UserServlet> bean=new ServletRegistrationBean<UserServlet>();
        //注入servlet
        bean.setServlet(userServlet);
        //注册路径
        Collection<String> userServletUrlMappings=new ArrayList<>();
        userServletUrlMappings.add("/user1");
        userServletUrlMappings.add("/user2");
        userServletUrlMappings.add("/user3");
        bean.setUrlMappings(userServletUrlMappings);
        return bean;
    }

}
优化的写法
package com.sxt.config;

import com.sxt.servlet.UserServlet;
import lombok.Data;
import org.springframework.boot.autoconfigure.condition.ConditionalOnClass;
import org.springframework.boot.autoconfigure.condition.ConditionalOnWebApplication;
import org.springframework.boot.context.properties.ConfigurationProperties;
import org.springframework.boot.web.servlet.ServletRegistrationBean;
import org.springframework.context.annotation.Bean;
import org.springframework.context.annotation.Configuration;

import java.util.ArrayList;
import java.util.Collection;
import java.util.List;

@Configuration
@ConditionalOnWebApplication(type = ConditionalOnWebApplication.Type.SERVLET)
@Data
@ConfigurationProperties(prefix = "servlet")
public class ServletAutoConfiguration {

   private List<String> userServletUrlMappings;

    @Bean
    public UserServlet getUserServlet(){
        UserServlet userServlet=new UserServlet();
        return userServlet;
    }

    /**
     * 注册UserServlet
     * @param userServlet
     * @return
     */
    @Bean
    @ConditionalOnClass(value = {UserServlet.class})
    public ServletRegistrationBean<UserServlet> registUserServlet(UserServlet userServlet){
        //创建一个注册器
        ServletRegistrationBean<UserServlet> bean=new ServletRegistrationBean<UserServlet>();
        //注入servlet
        bean.setServlet(userServlet);
        //注册路径
        if(userServletUrlMappings!=null&&userServletUrlMappings.size()>0){
            bean.setUrlMappings(userServletUrlMappings);
        }
        return bean;
    }

}
配置yml
#设置userServlet的url
servlet:
  user-servlet-url-mappings:
    - /user1
    - /user2
    - /user3
测试

注册Filter
创建LoginFilter
package com.sxt.servlet;

import javax.servlet.*;
import javax.servlet.annotation.WebFilter;
import java.io.IOException;

//@WebFilter("/*")
public class LoginFilter implements Filter {
    @Override
    public void doFilter(ServletRequest request, ServletResponse response, FilterChain chain) throws IOException, ServletException {
        System.out.println("doFitler");
        chain.doFilter(request,response);
    }
}
注册
package com.sxt.config;

import com.sxt.servlet.LoginFilter;
import com.sxt.servlet.UserServlet;
import lombok.Data;
import org.springframework.boot.autoconfigure.condition.ConditionalOnClass;
import org.springframework.boot.autoconfigure.condition.ConditionalOnWebApplication;
import org.springframework.boot.context.properties.ConfigurationProperties;
import org.springframework.boot.web.servlet.FilterRegistrationBean;
import org.springframework.boot.web.servlet.ServletRegistrationBean;
import org.springframework.context.annotation.Bean;
import org.springframework.context.annotation.Configuration;

import java.util.List;
import java.util.logging.Filter;

@Configuration
@ConditionalOnWebApplication(type = ConditionalOnWebApplication.Type.SERVLET)
@Data
@ConfigurationProperties(prefix = "filter")
public class FilterAutoConfiguration {

   private String[] loginFilterUrlMappings;

    @Bean
    public LoginFilter getLoginFilter(){
        LoginFilter loginFilter=new LoginFilter();
        return loginFilter;
    }

    /**
     * 注册 LoginFilter
     * @param loginFilter
     * @return
     */
    @Bean
    @ConditionalOnClass(value = {LoginFilter.class})
    public FilterRegistrationBean<LoginFilter> registLoginFilter(LoginFilter loginFilter){
        //创建一个注册器
        FilterRegistrationBean<LoginFilter> bean=new FilterRegistrationBean<LoginFilter>();
        //注入filter
        bean.setFilter(loginFilter);
        //注册路径
        if(loginFilterUrlMappings!=null&&loginFilterUrlMappings.length>0){
            bean.addUrlPatterns(loginFilterUrlMappings);
        }
//        bean.addServletNames();
        return bean;
    }

}
配置yml
filter:
  login-filter-url-mappings:
    - /*
测试
访问上面注册的Servlet测试
注册Listener
Listener是监听什么
监听的是requset、session、servletContext 的三大作用域
Web里面有哪些Listener
ServletContextListener:监听ServletContext的创建和销毁
ServletContextAttributeListener:监听ServletContext里面属性的变化
HttpSessionListener:监听HttpSession的创建和销毁
HttpSessionAttributeListener:监听HttpSession里面属性的变化
ServletRequestListener:监听ServletRequest的创建和销毁
ServletRequestAttributeListener:监听ServletRequest里面属性的变化
创建MyServletContextListener
package com.sxt.servlet;

import javax.servlet.ServletContextEvent;
import javax.servlet.ServletContextListener;

public class MyServletContextListener implements ServletContextListener {
    @Override
    public void contextInitialized(ServletContextEvent sce) {
        System.out.println("ServletContext 被初始化");
    }

    @Override
    public void contextDestroyed(ServletContextEvent sce) {
        System.out.println("ServletContext 被销毁");
    }
}
注册
package com.sxt.config;

import com.sxt.servlet.MyServletContextListener;
import org.springframework.boot.autoconfigure.condition.ConditionalOnClass;
import org.springframework.boot.autoconfigure.condition.ConditionalOnWebApplication;
import org.springframework.boot.web.servlet.ServletListenerRegistrationBean;
import org.springframework.context.annotation.Bean;
import org.springframework.context.annotation.Configuration;

@Configuration
@ConditionalOnWebApplication(type = ConditionalOnWebApplication.Type.SERVLET)
public class ListenerAutConfiguration {

    @Bean
    @ConditionalOnClass(value = {MyServletContextListener.class})
    public MyServletContextListener getMyServletContextListener(){
        return new MyServletContextListener();
    }

    /**
     * 注册
     */
    @Bean
    public ServletListenerRegistrationBean<MyServletContextListener> registMyServletContextListener(MyServletContextListener myServletContextListener){
//        MyServletContextListener myServletContextListener1 = new MyServletContextListener();
//        创建注册器
        ServletListenerRegistrationBean<MyServletContextListener> bean=new ServletListenerRegistrationBean<MyServletContextListener>();
        bean.setListener(myServletContextListener);
        return bean;
    }

}
测试
启动测试

集成外部Tomcat配置
概述:
因为springbot 里面的内置tomcat默认的不支持jsp,所以我们可以用外部的tomcat去运行。
创建springboot的web项目 基于IDEA


查看pom.xml

创建main/webapp/index.jsp

配置tomcat

配置转发页面的前后缀
创建webapp/WEB-INF/view/main.jsp

创建IndexController
package com.sxt.controller;

import org.springframework.stereotype.Controller;
import org.springframework.web.bind.annotation.RequestMapping;

@Controller
public class IndexController {

    @RequestMapping("toMain")
    public String toMain(){
        return "main";
    }

}
修改yml
spring:
  mvc:
    view:
      prefix: WEB-INF/view/ #配置前缀
      suffix: .jsp #配置后缀
其它的写法和以前一样的
数据源配置和自动管理
我们知道的数据源
-
c3p0
-
dbcp
-
druid
-
spring本身有一个数据源
创建项目并加入依赖


查看pom.xml

配置spring里面自带的数据源
配置原理- DataSourceAutoConfiguration

配置原理- DataSourceProperties

如何配置
##数据源的配置
spring:
  datasource:
    driver-class-name: com.mysql.cj.jdbc.Driver
    url: jdbc:mysql://127.0.0.1:3306/testdb?useUnicode=true&characterEncoding=UTF-8&serverTimezone=UTC
    username: root
    password: root
    #注入数据源的类型   默认的为HikariDataSource
    type: org.springframework.jdbc.datasource.DriverManagerDataSource
配置dbcp里面的数据源
加入dbcp的依赖
<!-- https://mvnrepository.com/artifact/org.apache.commons/commons-dbcp2 -->
<dependency>
    <groupId>org.apache.commons</groupId>
    <artifactId>commons-dbcp2</artifactId>
    <version>2.7.0</version>
</dependency>
修改yml
##数据源的配置
spring:
  datasource:
    driver-class-name: com.mysql.cj.jdbc.Driver
    url: jdbc:mysql://127.0.0.1:3306/testdb?useUnicode=true&characterEncoding=UTF-8&serverTimezone=UTC
    username: root
    password: root
    #注入数据源的类型   默认的为HikariDataSource
    type: org.apache.commons.dbcp2.BasicDataSource
#    type: org.springframework.jdbc.datasource.DriverManagerDataSource
测试

配置druid里面的数据源1 –druid.jar
引入druid
<!-- https://mvnrepository.com/artifact/com.alibaba/druid -->
<dependency>
    <groupId>com.alibaba</groupId>
    <artifactId>druid</artifactId>
    <version>1.1.21</version>
</dependency>
<dependency>
    <groupId>log4j</groupId>
    <artifactId>log4j</artifactId>
    <version>1.2.14</version>
</dependency>
配置yml文件

测试

创建DruidAutoConfiguration配置其它属性
创建DruidAutoConfiguration
package com.sxt.config;

import com.alibaba.druid.pool.DruidDataSource;
import lombok.Data;
import org.springframework.beans.factory.annotation.Autowired;
import org.springframework.boot.autoconfigure.condition.ConditionalOnClass;
import org.springframework.boot.context.properties.ConfigurationProperties;
import org.springframework.boot.context.properties.EnableConfigurationProperties;
import org.springframework.context.annotation.Bean;
import org.springframework.context.annotation.Configuration;

import javax.sql.DataSource;
import java.sql.SQLException;

@Data
@Configuration
@ConditionalOnClass(value = {DataSource.class, DruidDataSource.class})
@EnableConfigurationProperties(value = {DruidProperties.class})  //启用DruidProperties
public class DruidAutoConfiguration {

    @Autowired
    private DruidProperties druidProperties;

    @Bean(initMethod = "init")
    @ConfigurationProperties(prefix = "spring.datasource")
    public DruidDataSource createDataSource(){
        DruidDataSource dataSource=new DruidDataSource();
        dataSource.setMaxActive(druidProperties.getMaxActive());
        dataSource.setMinIdle(druidProperties.getMinIdle());
        dataSource.setInitialSize(druidProperties.getInitialSize());
        dataSource.setValidationQuery(druidProperties.getValidationQuery());
        try {
            dataSource.setFilters(druidProperties.getFilters());
        } catch (SQLException e) {
            e.printStackTrace();
        }

        return dataSource;
    }

}
创建DruidProperties

修改yml
##数据源的配置
spring:
  datasource:
    driver-class-name: com.mysql.cj.jdbc.Driver
    url: jdbc:mysql://127.0.0.1:3306/testdb?useUnicode=true&characterEncoding=UTF-8&serverTimezone=UTC
    username: root
    password: root
    #注入数据源的类型   默认的为HikariDataSource
    type: com.alibaba.druid.pool.DruidDataSource
    druid:
      max-active: 20
      min-idle: 5
      initial-size: 10
      validation-query: select * x
      filters: log4j,stat
#    type: org.apache.commons.dbcp2.BasicDataSource
#    type: org.springframework.jdbc.datasource.DriverManagerDataSource
配置druid里面的数据源的监控2—druid.jar
修改DuridAutoConfiguration
package com.sxt.config;

import com.alibaba.druid.pool.DruidDataSource;
import com.alibaba.druid.support.http.StatViewServlet;
import lombok.Data;
import org.springframework.beans.factory.annotation.Autowired;
import org.springframework.boot.autoconfigure.condition.ConditionalOnClass;
import org.springframework.boot.context.properties.ConfigurationProperties;
import org.springframework.boot.context.properties.EnableConfigurationProperties;
import org.springframework.boot.web.servlet.ServletRegistrationBean;
import org.springframework.context.annotation.Bean;
import org.springframework.context.annotation.Configuration;

import javax.sql.DataSource;
import java.sql.SQLException;

@Configuration
@ConditionalOnClass(value = {DataSource.class, DruidDataSource.class})
@Data
@EnableConfigurationProperties(value = {DruidProperties.class})  //启用DruidProperties
public class DruidAutoConfiguration {

    @Autowired
    private DruidProperties druidProperties;


    @Bean(initMethod = "init")
    @ConfigurationProperties(prefix = "spring.datasource")
    public DruidDataSource createDataSource(){
        DruidDataSource dataSource=new DruidDataSource();
        dataSource.setMaxActive(druidProperties.getMaxActive());
        dataSource.setMinIdle(druidProperties.getMinIdle());
        dataSource.setInitialSize(druidProperties.getInitialSize());
        dataSource.setValidationQuery(druidProperties.getValidationQuery());
        try {
            dataSource.setFilters(druidProperties.getFilters());
        } catch (SQLException e) {
            e.printStackTrace();
        }

        return dataSource;
    }

    /**
     * 创建StatViewServlet
     */
    @Bean
    public StatViewServlet getStatViewServlet(){
        StatViewServlet statViewServlet=new StatViewServlet();
        return statViewServlet;
    }

    /**
     * 注册StatViewServlet
     */
    @Bean
    public ServletRegistrationBean<StatViewServlet> registgetStatViewServlet(StatViewServlet statViewServlet){
        //创建注册器
        ServletRegistrationBean<StatViewServlet> bean=new ServletRegistrationBean<StatViewServlet>();
        //注入servlet
        bean.setServlet(statViewServlet);
        //设置参数
        bean.addInitParameter("loginUsername",druidProperties.getWeb().getLoginUsername());
        bean.addInitParameter("loginPassword",druidProperties.getWeb().getLoginPassword());
        bean.addInitParameter("allow",druidProperties.getWeb().getAllow());
        bean.addInitParameter("deny",druidProperties.getWeb().getDeny());

        //设置请路径
        bean.setUrlMappings(druidProperties.getWeb().getStatServleturlMappings());
        return bean;
    }

}
修改DruidProperties
package com.sxt.config;

import lombok.Data;
import org.springframework.boot.context.properties.ConfigurationProperties;

import java.util.List;

@ConfigurationProperties(prefix = "spring.datasource.druid")
@Data
public class DruidProperties {
    private Integer maxActive=20;
    private Integer minIdle=10;
    private Integer initialSize=5;
//    private Integer maxWait=5000;
    private String validationQuery ="select x";
    private String filters="log4j,stat";

    //声明Web相关的属性
    private Web web;

    //监控的属性
    @Data
    static class Web{
        private String loginUsername="root";
        private String loginPassword="root";
        private String allow;
        private String deny;

        private List<String> statServleturlMappings;
    }

}
修改yml
##数据源的配置
spring:
  datasource:
    driver-class-name: com.mysql.cj.jdbc.Driver
    url: jdbc:mysql://127.0.0.1:3306/testdb?useUnicode=true&characterEncoding=UTF-8&serverTimezone=UTC
    username: root
    password: root
    #注入数据源的类型   默认的为HikariDataSource
    type: com.alibaba.druid.pool.DruidDataSource
    druid:
      max-active: 20
      min-idle: 5
      initial-size: 10
      validation-query: select * x
      filters: log4j,stat
      web:
        login-username: admin
        login-password: admin
        allow:
        deny:
        stat-servleturl-mappings:
          - /druid/
          - /druid/*
          - /dataSource/
#    type: org.apache.commons.dbcp2.BasicDataSource
#    type: org.springframework.jdbc.datasource.DriverManagerDataSource

配置druid里面的数据源1 –durid的starter.jar
创建项目

引入druid的starter
<!-- https://mvnrepository.com/artifact/com.alibaba/druid-spring-boot-starter -->
<dependency>
    <groupId>com.alibaba</groupId>
    <artifactId>druid-spring-boot-starter</artifactId>
    <version>1.1.21</version>
</dependency>
配置yml文件
##数据源的配置
spring:
  datasource:
    driver-class-name: com.mysql.cj.jdbc.Driver
    url: jdbc:mysql://127.0.0.1:3306/testdb?useUnicode=true&characterEncoding=UTF-8&serverTimezone=UTC
    username: root
    password: root
    #注入数据源的类型   默认的为HikariDataSource
    type: com.alibaba.druid.pool.DruidDataSource
    druid:
      filters: log4j,stat
      max-active: 20
      min-idle: 5
      validation-query: select x
      initial-size: 3
      max-wait: 5000
#      driver-class-name: com.mysql.cj.jdbc.Driver
#      url: jdbc:mysql://127.0.0.1:3306/testdb?useUnicode=true&characterEncoding=UTF-8&serverTimezone=UTC
#      username: admin
#      password: admin
原码说明


配置druid里面的数据源的监控2-- durid的starter.jar
配置yml文件
##数据源的配置
spring:
  datasource:
    driver-class-name: com.mysql.cj.jdbc.Driver
    url: jdbc:mysql://127.0.0.1:3306/testdb?useUnicode=true&characterEncoding=UTF-8&serverTimezone=UTC
    username: root
    password: 123456
    #注入数据源的类型   默认的为HikariDataSource
    type: com.alibaba.druid.pool.DruidDataSource
    druid:
#      filters: log4j,stat
      max-active: 20
      min-idle: 5
      validation-query: select x
      initial-size: 3
      max-wait: 5000
      stat-view-servlet:
        login-username: root
        login-password: root
        allow:
        deny:
        url-pattern: /druid/*
        enabled: true  #启用数据源监控
#      driver-class-name: com.mysql.cj.jdbc.Driver
#      url: jdbc:mysql://127.0.0.1:3306/testdb?useUnicode=true&characterEncoding=UTF-8&serverTimezone=UTC
#      username: admin
#      password: admin
集成JdbcTemplate
概述JdbcTemplate是啥
它是spring全家桶里面的一个orm框架
|-- 要连接数据库
|-- 就要有数据源 ---必须配置数据源
目录说了哪些自动配置类
-
HttpEncodingAutoConfiguration
-
WebMvcAutoConfiguration
-
DataSourceAutoConfiguration
-
DruidDataSourceAutoConfiguration
-
DispacherServletAutoConfiguration
-
JacksonAutoConfiguration
-
ThymeleafAutoConfiguration
-
MultipartAutoConfiguration
接下来要看的是JdbcTemplateAutoConfiguration
JdbcTemplate以前的配置方试

创建项目加入入依赖

修改pom引入durid的相关依赖
<!-- https://mvnrepository.com/artifact/com.alibaba/druid-spring-boot-starter -->
<dependency>
    <groupId>com.alibaba</groupId>
    <artifactId>druid-spring-boot-starter</artifactId>
    <version>1.1.21</version>
</dependency>
修改yml
##数据源的配置
spring:
  datasource:
    driver-class-name: com.mysql.cj.jdbc.Driver
    url: jdbc:mysql://127.0.0.1:3306/testdb?useUnicode=true&characterEncoding=UTF-8&serverTimezone=UTC
    username: root
    password: root
    #注入数据源的类型   默认的为HikariDataSource
    type: com.alibaba.druid.pool.DruidDataSource
    druid:
#      filters: log4j,stat
      max-active: 20
      min-idle: 5
      validation-query: select x
      initial-size: 3
      max-wait: 5000
      stat-view-servlet:
        login-username: root
        login-password: 123456
        allow:
        deny:
        url-pattern: /druid/*
        enabled: true  #启用数据源监控
#      driver-class-name: com.mysql.cj.jdbc.Driver
#      url: jdbc:mysql://127.0.0.1:3306/testdb?useUnicode=true&characterEncoding=UTF-8&serverTimezone=UTC
#      username: admin
#      password: admin
测试
package com.sxt;

import com.sxt.domain.User;
import org.junit.jupiter.api.Test;
import org.springframework.beans.factory.annotation.Autowired;
import org.springframework.boot.test.context.SpringBootTest;
import org.springframework.jdbc.core.JdbcTemplate;
import org.springframework.jdbc.core.RowMapper;

import java.sql.ResultSet;
import java.sql.SQLException;
import java.util.Date;
import java.util.List;
import java.util.Map;

@SpringBootTest
class ApplicationTests {

    @Autowired
    private JdbcTemplate jdbcTemplate;

    @Test
    void query() {
        List<Map<String, Object>> maps = jdbcTemplate.queryForList("select * from user");
        for (Map<String, Object> map : maps) {
            System.out.println(map);
        }
    }

    @Test
    void add() {
        int flag = jdbcTemplate.update("insert into user(id,name,address) values(3,'xiaoming','武汉')");
        System.out.println(flag);
    }

    @Test
    void add2() {
        User user=new User(1,"张三","中南海",new Date());
//        int flag = jdbcTemplate.update("insert into user(id,name,address) values(3,'xiaoming','武汉')");
        int flag=jdbcTemplate.update("insert into user(name,address,birth) values(?,?,?)",user.getName(),user.getAddress(),user.getBrith());
        System.out.println(flag);
    }
    @Test
    void delete() {
        User user=new User(1,"张三","中南海",new Date());
        int flag=jdbcTemplate.update("delete from user  where id=?",user.getId());
        System.out.println(flag);
    }

    @Test
    void queryByCount(){
        int id=2;
        Integer count = jdbcTemplate.queryForObject("select count(1) from user", Integer.class);
        System.out.println(count);
    }

    @Test
    void queryById(){
        int id=2;
        User user = jdbcTemplate.queryForObject("select * from user where id=?", new Integer[]{id}, new RowMapper<User>() {

            @Override
            public User mapRow(ResultSet rs, int i) throws SQLException {
                return new User(rs.getInt("id"), rs.getString("name"), rs.getString("address"), rs.getDate("birth"));
            }
        });
        System.out.println(user);
    }

    @Test
    void queryAll() {
        List<User> users= jdbcTemplate.query("select * from user ",new RowMapper<User>(){

            @Override
            public User mapRow(ResultSet rs, int i) throws SQLException {
                return new User(rs.getInt("id"), rs.getString("name"), rs.getString("address"), rs.getDate("birth"));
            }
        });
        for (User user : users) {
            System.out.println(user);
        }
    }

}
原理-为什么不用去new JdbcTemplate
找到jdbcTemplateAutoConfiguration


整合mybatis及事务处理
创建项目


整合mybatis使用注解不要mybatis.cfg.xml
生成User
package com.sxt.domain;

import java.util.Date;
import lombok.AllArgsConstructor;
import lombok.Data;
import lombok.NoArgsConstructor;

@Data
@AllArgsConstructor
@NoArgsConstructor
public class User {
    /** 用户id */
    private Integer id;

    /** 用户名称 */
    private String username;

    /** 用户性别 */
    private String sex;

    /** 用户地址 */
    private String address;

    /** 用户生日 */
    private Date birth;
}
生成UserMapper
package com.sxt.mapper;

import com.sxt.domain.User;
import org.apache.ibatis.annotations.*;

import java.util.List;

//@Mapper  //这样配置那么在mapper包里面的所有接口都要加,那么可以在启动类上厍使用@MapperScan替代这里面的注解
public interface UserMapper {

    @Delete("delete from user where id = #{value}")
    int deleteByPrimaryKey(Integer id);

    @Insert("insert into user(username, sex, address, birth) values (#{username}, #{sex}, #{address}, #{birth})")
    int insert(User record);

    @Select("select * from user where id=#{value}")
    User selectByPrimaryKey(Integer id);

    @Update("update user set username=#{username}, sex=#{sex}, address=#{address},birth=#{birth}")
    int updateByPrimaryKey(User record);

    @Select("select * from user")
    List<User> queryAllUser();

}
生成UserService
package com.sxt.service;

import com.sxt.domain.User;

import java.util.List;

public interface UserService{

    int deleteByPrimaryKey(Integer id);

    int insert(User record);

    User selectByPrimaryKey(Integer id);

    int updateByPrimaryKey(User record);

    List<User> queryAllUser();

}
生成UserServiceImpl
package com.sxt.service.impl;

import org.springframework.stereotype.Service;
import javax.annotation.Resource;
import com.sxt.mapper.UserMapper;
import com.sxt.domain.User;
import com.sxt.service.UserService;

import java.util.List;

@Service
public class UserServiceImpl implements UserService {

    @Resource
    private UserMapper userMapper;

    @Override
    public int deleteByPrimaryKey(Integer id) {
        return userMapper.deleteByPrimaryKey(id);
    }

    @Override
    public int insert(User record) {
        return userMapper.insert(record);
    }

    @Override
    public User selectByPrimaryKey(Integer id) {
        return userMapper.selectByPrimaryKey(id);
    }

    @Override
    public int updateByPrimaryKey(User record) {
        return userMapper.updateByPrimaryKey(record);
    }

    @Override
    public List<User> queryAllUser() {
        return userMapper.queryAllUser();
    }

}
修改启动类
package com.sxt;

import org.mybatis.spring.annotation.MapperScan;
import org.springframework.boot.SpringApplication;
import org.springframework.boot.autoconfigure.SpringBootApplication;

@SpringBootApplication
@MapperScan(value = {"com.sxt.mapper"})
public class Application {

	public static void main(String[] args) {
		SpringApplication.run(Application.class, args);
	}

}
测试
package com.sxt;

import com.sxt.service.UserService;
import org.junit.jupiter.api.Test;
import org.springframework.beans.factory.annotation.Autowired;
import org.springframework.boot.test.context.SpringBootTest;

@SpringBootTest
class ApplicationTests {

	@Autowired
	private UserService userService;

	@Test
	void contextLoads() {
		System.out.println(userService.selectByPrimaryKey(1));
	}

}
整合mybatis 有*Mapper.xml
创建项目

配置相关依赖
<dependency>
    <groupId>org.mybatis.spring.boot</groupId>
    <artifactId>mybatis-spring-boot-starter</artifactId>
    <version>2.1.1</version>
</dependency>
<!-- https://mvnrepository.com/artifact/com.alibaba/druid-spring-boot-starter -->
<dependency>
    <groupId>com.alibaba</groupId>
    <artifactId>druid-spring-boot-starter</artifactId>
    <version>1.1.21</version>
</dependency>
生成User
生成UserMapper
生成UserMapper.xml
生成UserService
生成UserServiceImpl
修改启动类
package com.sxt;

import org.mybatis.spring.annotation.MapperScan;
import org.springframework.boot.SpringApplication;
import org.springframework.boot.autoconfigure.SpringBootApplication;
import org.springframework.transaction.annotation.EnableTransactionManagement;

@SpringBootApplication
@MapperScan(value = {"com.sxt.mapper"})
@EnableTransactionManagement
public class Application {

	public static void main(String[] args) {
		SpringApplication.run(Application.class, args);
	}

}
修改yml
#mybatis的配置
mybatis:  #相当于<property name="mapperLocations" value="classpath*:mapper/*Mapper.xml"></property>
  mapper-locations: classpath:mapper/*Mapper.xml  #配置mapper.xml的扫描
测试
package com.sxt;

import com.sxt.domain.User;
import com.sxt.service.UserService;
import org.junit.jupiter.api.Test;
import org.springframework.beans.factory.annotation.Autowired;
import org.springframework.boot.test.context.SpringBootTest;

import java.util.List;

@SpringBootTest
class ApplicationTests {

	@Autowired
	private UserService userService;

	@Test
	void contextLoads() {
        User user = userService.selectByPrimaryKey(1);
		System.out.println(user);
	}

}
整合mybatis *Mapper.xml +mybatis.cfg.xml
接上一个项目
创建mybtais.cfg.xml
<?xml version="1.0" encoding="UTF-8" ?>
<!DOCTYPE configuration
        PUBLIC "-//mybatis.org//DTD Config 3.0//EN"
        "http://mybatis.org/dtd/mybatis-3-config.dtd">
<configuration>
    <!-- 加载mybait数据库操作的映射文件 -->
    <mappers>
        <mapper resource="mapper/UserMapper.xml"/>
    </mappers>
</configuration>
修改yml文件
#mybatis的配置
mybatis:
  config-location: classpath:mybatis.cfg.xml   # <!--<property name="configLocation" value="classpath*:mybatis.cfg.xml"></property>-->
  # <property name="mapperLocations" value="classpath*:mapper/*Mapper.xml"></property>
#  mapper-locations: classpath:mapper/*Mapper.xml  #配置mapper.xml的扫描
整合mybatis *Mapper.xml+mybatis.cfg.xml+输出sql
接上一个项目
修改mybatis.cfg.xml
<?xml version="1.0" encoding="UTF-8" ?>
<!DOCTYPE configuration
        PUBLIC "-//mybatis.org//DTD Config 3.0//EN"
        "http://mybatis.org/dtd/mybatis-3-config.dtd">
<configuration>

    <settings>
        <setting name="logImpl" value="LOG4J"/>
    </settings>

    <!-- 加载mybatis数据库操作的映射文件 -->
    <mappers>
        <mapper resource="mapper/UserMapper.xml"/>
    </mappers>

</configuration>
修改pom.xml加入log4j的依赖
<log4j.version>1.2.17</log4j.version>
<slf4j.version>1.7.26</slf4j.version>


<dependency>
    <groupId>log4j</groupId>
    <artifactId>log4j</artifactId>
    <version>${log4j.version}</version>
</dependency>
<!-- slf4j-api -->
<dependency>
    <groupId>org.slf4j</groupId>
    <artifactId>slf4j-api</artifactId>
    <version>${slf4j.version}</version>
</dependency>
创建log4j.properteis的依赖
# Global logging configuration
log4j.rootLogger=DEBUG, stdout
# MyBatis logging configuration...
log4j.logger.org.mybatis.example.BlogMapper=TRACE
# Console output...
log4j.appender.stdout=org.apache.log4j.ConsoleAppender
log4j.appender.stdout.layout=org.apache.log4j.PatternLayout
log4j.appender.stdout.layout.ConversionPattern=%5p [%t] - %m%n
测试

整合mybatis *Mapper.xml+日志 不要myabtis.cfg.xml
接上一个项目
修改yml
# mybatis的配置
mybatis:
#  config-location: classpath:mybatis.cfg.xml
  mapper-locations: classpath:mapper/*Mapper.xml # 配置mapper.xml的扫描
  configuration:
    log-impl: org.apache.ibatis.logging.stdout.StdOutImpl
和原来的相比

整合mybatis *Mapper.xml+mybatis.cfg.xml+PageHelper
接上一项目
修改yml

修改pom引入pageHelper
<!-- https://mvnrepository.com/artifact/com.github.pagehelper/pagehelper -->
<dependency>
    <groupId>com.github.pagehelper</groupId>
    <artifactId>pagehelper</artifactId>
    <version>5.1.11</version>
</dependency>
修改mybatic.cfg.xml加入Pagehelper
<plugins>
    <plugin interceptor="com.github.pagehelper.PageInterceptor"/>
</plugins>
整合mybatis *Mapper.xml+ pageHelperStarter
接上一个项目
修改yml去掉myabtis.cfg.xml

修改pom.xml引入pagehelper-starter
<!-- https://mvnrepository.com/artifact/com.github.pagehelper/pagehelper-spring-boot-starter -->
<dependency>
    <groupId>com.github.pagehelper</groupId>
    <artifactId>pagehelper-spring-boot-starter</artifactId>
    <version>1.2.13</version>
</dependency>
测试
关于整合mybatis时的yaml文件其它配置

事务处理【简单spring里面事务注解】
在Spring Boot中推荐使用@Transactional注解来声明事务。只需要在需要事务控制的方法或类(全部方法有效)上增加 @Transactional注解。原理是Spring Boot会自动默认分别注入DataSourceTransactionManager或JpaTransactionManager
启动注解事务的启动类上加 @EnableTransactionManagement
@Transactional不仅可以注解在方法上,也可以注解在类上,当注解在类上的时候意味着此类的所有public方法都是开启事务的,如果类级别和方法级别同时使用了@Transactional注解,则使用在类级别的注解会重载方法级别的注解。
以上的配置方法是一个一个的service去加,没有简单的方法呢,肯定可以哦!使用AOP的切面配置方式。
1. 引入AOP的依赖
<dependency>
    <groupId>org.springframework.boot</groupId>
    <artifactId>spring-boot-starter-aop</artifactId>
</dependency>
2. 启用事物管理器

3. 在相关的Service里面加注解

springboot集成swagger
1. 问题描述
随着互联网技术的发展,现在的网站架构基本都由原来的后端渲染,变成了:前端渲染、前后端分离的形态,而且前端技术和后端技术在各自的道路上越走越远。 前端和后端的唯一联系,变成了API接口;API文档变成了前后端开发人员联系的纽带,变得越来越重要,swagger就是一款让你更好的书写API文档的框架,而且swagger可以完全模拟http请求,入参出参和实际情况差别几乎为零。
没有API文档工具之前,大家都是手写API文档的(维护起来相当困难),在什么地方书写的都有,有在confluence上写的,有在对应的项目目录下readme.md上写的,每个公司都有每个公司的玩法,无所谓好坏。但是能称之为“框架”的,估计也只有swagger了。
2. 创建项目

3. 加入依赖
<!-- swagger -->
<dependency>
    <groupId>io.springfox</groupId>
    <artifactId>springfox-swagger2</artifactId>
    <version>2.9.2</version>
</dependency>
<!-- swagger-ui -->
<dependency>
    <groupId>io.springfox</groupId>
    <artifactId>springfox-swagger-ui</artifactId>
    <version>2.9.2</version>
</dependency>
4. 创建swagger2的配置类
@Configuration
@EnableSwagger2
public class Swagger2AutoConfig {

    /**
     * 在IOC容器里面创建可以对象可以扫描Controller里面的是否有Swagger相关的注解 如果,swagger会生成相关的文档
     * @return
     */
    @Bean
    public Docket swaggerSpringMvcPlugin() {
        return new Docket(DocumentationType.SWAGGER_2).apiInfo(apiInfo()).select()
                //扫描方式  扫描所有包。如果包里面有ApiOperation就会生成这个包下面的所有方法的接口
//                .apis(RequestHandlerSelectors.withMethodAnnotation(ApiOperation.class)).build();
//                .apis(RequestHandlerSelectors.withMethodAnnotation(ApiOperation.class)).build();
                //扫描哪些类上有RestController的类型 如果有。就把当前找到的类里面的所有方法生成接口
//                  .apis(RequestHandlerSelectors.withClassAnnotation(RestController.class)).build();
                //扫描某个包里面的所有类,根据方法生成接口文件
                 .apis(RequestHandlerSelectors.basePackage("com.sxt.controller")).build();
    }

    private ApiInfo apiInfo() {
        return new ApiInfoBuilder().description("这是一个很NB的API工具")
                .contact(new Contact("雷哥", "http://leige.tech", "78414842@qq.com"))
                .version("1.0")
                .license("武汉尚学堂")
                .build();
    }
}
5. 创建User
package com.sxt.domain;

import com.fasterxml.jackson.annotation.JsonFormat;
import lombok.AllArgsConstructor;
import lombok.Data;
import lombok.NoArgsConstructor;
import org.springframework.format.annotation.DateTimeFormat;

import java.util.Date;

@Data
@AllArgsConstructor
@NoArgsConstructor
public class User {
    /** 用户id */
    private Integer id;

    /** 用户名称 */
    private String username;

    /** 用户性别 */
    private String sex;

    /** 用户地址 */
    private String address;

    /** 用户生日 */
    @DateTimeFormat(pattern = "yyyy-MM-dd HH:mm:ss")
    @JsonFormat(pattern = "yyyy-MM-dd HH:mm:ss", timezone = "GMT-8")
    private Date birth;
}
6. 创建UserController
package com.sxt.controller;

import com.sxt.common.ResoultObj;
import com.sxt.domain.User;
import io.swagger.annotations.Api;
import io.swagger.annotations.ApiImplicitParam;
import io.swagger.annotations.ApiImplicitParams;
import io.swagger.annotations.ApiOperation;
import org.springframework.web.bind.annotation.*;

import java.util.ArrayList;
import java.util.Arrays;
import java.util.Date;
import java.util.List;

@RestController
@RequestMapping("user")
@Api(description = "用户管理")
public class UserController {


    /** 添加 */
    @ApiOperation(value = "添加用户",notes = "用户添加")
    @PostMapping("addUser")
    public ResoultObj addUser(@RequestBody User user){
        System.out.println(user);
        return new ResoultObj(1,"添加成功");
    }

    /** 修改 */
    @ApiOperation(value = "修改用户",notes = "用户修改")
    @PostMapping("updateUser")
    public ResoultObj updateUser(@RequestBody User user){
        System.out.println(user);
        return new ResoultObj(1,"修改成功");
    }

    /** 删除 */
    @ApiOperation(value = "删除用户",notes = "用户删除")
    @ApiImplicitParams({
            @ApiImplicitParam(name = "id", value = "用户编号", required = true, paramType = "数值", dataType = "Integer")})
    @DeleteMapping("deleteUser")
    public ResoultObj deleteUser(Integer id){
        System.out.println(id);
        return new ResoultObj(1,"删除成功");
    }

    /** 全查询 */
    @ApiOperation(value = "查询用户",notes = "用户查询")
    @GetMapping("queryAllUser")
    public ResoultObj queryAllUser(){
        List<User> users=new ArrayList<>();
        for (int i = 1; i <=5 ; i++) {
            users.add(new User(i,"小明"+i,"武汉"+i,new Date()));
        }
        return new ResoultObj(1,users);
    }

}
7. 访问测试
http://127.0.0.1:8080/swagger-ui.html


8. 更换皮肤
<!-- swagger -->
<dependency>
    <groupId>io.springfox</groupId>
    <artifactId>springfox-swagger2</artifactId>
    <version>2.9.2</version>
</dependency>

<!-- swagger-ui -->
<!--<dependency>
    	<groupId>io.springfox</groupId>
    	<artifactId>springfox-swagger-ui</artifactId>
    	<version>2.9.2</version>
	</dependency>-->

<!-- https://mvnrepository.com/artifact/com.github.xiaoymin/swagger-bootstrap-ui -->
<dependency>
    <groupId>com.github.xiaoymin</groupId>
    <artifactId>swagger-bootstrap-ui</artifactId>
    <version>1.9.6</version>
</dependency>


9. 注解参数说明

整合shrio非前后分离的写法
这个例子是在之前shiro集成springmvc的基础上改的,不清楚的可以看看之前的springmvc集成shiro的代码。
创建项目


修改pom.xml
<?xml version="1.0" encoding="UTF-8"?>
<project xmlns="http://maven.apache.org/POM/4.0.0" xmlns:xsi="http://www.w3.org/2001/XMLSchema-instance"
         xsi:schemaLocation="http://maven.apache.org/POM/4.0.0 https://maven.apache.org/xsd/maven-4.0.0.xsd">
    <modelVersion>4.0.0</modelVersion>
    <parent>
        <groupId>org.springframework.boot</groupId>
        <artifactId>spring-boot-starter-parent</artifactId>
        <version>2.2.4.RELEASE</version>
        <relativePath/> <!-- lookup parent from repository -->
    </parent>
    <groupId>com.sxt</groupId>
    <artifactId>18springboot_shiro</artifactId>
    <version>0.0.1-SNAPSHOT</version>
    <name>18springboot_shiro</name>
    <description>Spring Boot集成Shiro的配置方式</description>

    <properties>
        <java.version>1.8</java.version>
        <log4j.version>1.2.17</log4j.version>
        <slf4j.version>1.7.26</slf4j.version>
        <shiro.version>1.5.0</shiro.version>
    </properties>

    <dependencies>
        <dependency>
            <groupId>org.springframework.boot</groupId>
            <artifactId>spring-boot-starter-jdbc</artifactId>
        </dependency>
        <dependency>
            <groupId>org.springframework.boot</groupId>
            <artifactId>spring-boot-starter-thymeleaf</artifactId>
        </dependency>
        <dependency>
            <groupId>org.springframework.boot</groupId>
            <artifactId>spring-boot-starter-web</artifactId>
        </dependency>

        <dependency>
            <groupId>org.springframework.boot</groupId>
            <artifactId>spring-boot-devtools</artifactId>
            <scope>runtime</scope>
            <optional>true</optional>
        </dependency>
        <dependency>
            <groupId>mysql</groupId>
            <artifactId>mysql-connector-java</artifactId>
            <scope>runtime</scope>
        </dependency>
        <dependency>
            <groupId>org.springframework.boot</groupId>
            <artifactId>spring-boot-configuration-processor</artifactId>
            <optional>true</optional>
        </dependency>
        <dependency>
            <groupId>org.projectlombok</groupId>
            <artifactId>lombok</artifactId>
            <optional>true</optional>
        </dependency>
        <dependency>
            <groupId>org.springframework.boot</groupId>
            <artifactId>spring-boot-starter-test</artifactId>
            <scope>test</scope>
            <exclusions>
                <exclusion>
                    <groupId>org.junit.vintage</groupId>
                    <artifactId>junit-vintage-engine</artifactId>
                </exclusion>
            </exclusions>
        </dependency>
        <dependency>
            <groupId>org.mybatis.spring.boot</groupId>
            <artifactId>mybatis-spring-boot-starter</artifactId>
            <version>2.1.1</version>
        </dependency>
        <dependency>
            <groupId>log4j</groupId>
            <artifactId>log4j</artifactId>
            <version>${log4j.version}</version>
        </dependency>
        <!-- slf4j-api -->
        <dependency>
            <groupId>org.slf4j</groupId>
            <artifactId>slf4j-api</artifactId>
            <version>${slf4j.version}</version>
        </dependency>
        <!-- https://mvnrepository.com/artifact/com.alibaba/druid-spring-boot-starter -->
        <dependency>
            <groupId>com.alibaba</groupId>
            <artifactId>druid-spring-boot-starter</artifactId>
            <version>1.1.21</version>
        </dependency>

        <!-- https://mvnrepository.com/artifact/com.github.pagehelper/pagehelper-spring-boot-starter -->
        <dependency>
            <groupId>com.github.pagehelper</groupId>
            <artifactId>pagehelper-spring-boot-starter</artifactId>
            <version>1.2.13</version>
        </dependency>
        <dependency>
            <groupId>org.springframework.boot</groupId>
            <artifactId>spring-boot-starter-aop</artifactId>
        </dependency>

        <!--引入shiro-->
        <dependency>
            <groupId>org.apache.shiro</groupId>
            <artifactId>shiro-spring</artifactId>
            <version>${shiro.version}</version>
        </dependency>

        <!--shrio和thymeleaf集成的扩展依赖,为了能在页面上使用xsln:shrio的标签 -->
        <dependency>
            <groupId>com.github.theborakompanioni</groupId>
            <artifactId>thymeleaf-extras-shiro</artifactId>
            <version>2.0.0</version>
        </dependency>
    </dependencies>

    <build>
        <plugins>
            <plugin>
                <groupId>org.springframework.boot</groupId>
                <artifactId>spring-boot-maven-plugin</artifactId>
            </plugin>
        </plugins>
    </build>

</project>
复制application.yml和log4j.properteis
application.yml
##数据源的配置
spring:
  datasource:
    driver-class-name: com.mysql.cj.jdbc.Driver
    url: jdbc:mysql://127.0.0.1:3306/shiro?useUnicode=true&characterEncoding=UTF-8&serverTimezone=UTC
    username: root
    password: root
    #注入数据源的类型   默认的为HikariDataSource
    type: com.alibaba.druid.pool.DruidDataSource
    druid:
#      filters: log4j,stat
      max-active: 20
      min-idle: 5
      validation-query: select x
      initial-size: 3
      max-wait: 5000
      stat-view-servlet:
        login-username: admin
        login-password: admin
        allow:
        deny:
        url-pattern: /druid/*
        enabled: true  #启用数据源监控

#mybatis的配置
mybatis:
#  config-location: classpath:mybatis.cfg.xml   # <!--<property name="configLocation" value="classpath*:mybatis.cfg.xml"></property>-->
  # <property name="mapperLocations" value="classpath*:mapper/*Mapper.xml"></property>
  mapper-locations: classpath:mapper/*Mapper.xml  #配置mapper.xml的扫描
  configuration:
    log-impl: org.apache.ibatis.logging.stdout.StdOutImpl
  type-aliases-package: com.sxt.domain  #配置字别名
log4j.properteis
# Global logging configuration
log4j.rootLogger=DEBUG, stdout
# MyBatis logging configuration...
log4j.logger.org.mybatis.example.BlogMapper=TRACE
# Console output...
log4j.appender.stdout=org.apache.log4j.ConsoleAppender
log4j.appender.stdout.layout=org.apache.log4j.PatternLayout
log4j.appender.stdout.layout.ConversionPattern=%5p [%t] - %m%n
复制之前shiro里面的05ssm里面的生成的类

创建ShiroAutoConfiguration
package com.sxt.config;

import at.pollux.thymeleaf.shiro.dialect.ShiroDialect;
import com.sxt.realm.UserRealm;
import org.apache.shiro.authc.credential.HashedCredentialsMatcher;
import org.apache.shiro.mgt.SecurityManager;
import org.apache.shiro.spring.web.ShiroFilterFactoryBean;
import org.apache.shiro.web.mgt.DefaultWebSecurityManager;
import org.springframework.beans.factory.annotation.Autowired;
import org.springframework.boot.autoconfigure.condition.ConditionalOnClass;
import org.springframework.boot.autoconfigure.web.servlet.DispatcherServletAutoConfiguration;
import org.springframework.boot.context.properties.EnableConfigurationProperties;
import org.springframework.boot.web.servlet.FilterRegistrationBean;
import org.springframework.context.annotation.Bean;
import org.springframework.context.annotation.Configuration;
import org.springframework.web.filter.DelegatingFilterProxy;

import java.util.ArrayList;
import java.util.Collection;
import java.util.HashMap;
import java.util.Map;

@Configuration
@ConditionalOnClass(value = {HashedCredentialsMatcher.class, UserRealm.class, DefaultWebSecurityManager.class})
@EnableConfigurationProperties(value = {ShiroProperties.class})
public class ShiroAutoConfiguration {

    @Autowired
    private ShiroProperties shiroProperties;

    public static final String SHIRO_FILTER_NAME="shiroFilter";

    /**
     * 创建凭证匹配器
     * 		<bean id="credentialsMatcher" class="org.apache.shiro.authc.credential.HashedCredentialsMatcher">
     *         <property name="hashAlgorithmName" value="md5"></property>
     *         <property name="hashIterations" value="2"></property>
     *      </bean>
     * @return
     */
    @Bean
    public HashedCredentialsMatcher getHashedCredentialsMatcher(){
        HashedCredentialsMatcher matcher=new HashedCredentialsMatcher();
        //注入散列算法名
        matcher.setHashAlgorithmName(shiroProperties.getHashAlgorithmName());
        //注入散列次数
        matcher.setHashIterations(shiroProperties.getHashIterations());
        return matcher;
    }

    /**
     * 创建自定义realm,并注入凭证匹配器
     * 		<bean id="userRealm" class="com.sxt.realm.UserRealm">
     *         <property name="credentialsMatcher" ref="credentialsMatcher"></property>
     *      </bean>
     */
    @Bean
    @ConditionalOnClass(value = {UserRealm.class})
    public UserRealm getUserRealm(HashedCredentialsMatcher matcher){
        UserRealm userRealm=new UserRealm();
        //注入凭证匹配器
        userRealm.setCredentialsMatcher(matcher);
        return userRealm;
    }

    /**
     * 创建安全管理器
     *     <bean id="securityManager" class="org.apache.shiro.web.mgt.DefaultWebSecurityManager">
     *         <property name="realm" ref="userRealm"></property>
     *     </bean>
     */
    @Bean
    @ConditionalOnClass(value = DefaultWebSecurityManager.class)
    public DefaultWebSecurityManager getSecurityManager(UserRealm userRealm){
        DefaultWebSecurityManager securityManager=new DefaultWebSecurityManager();
        //注入realm
        securityManager.setRealm(userRealm);
        return securityManager;
    }

    /**
     * -声明过滤器
     * Shiro 的Web过滤器 id必须和web.xml里面的shiroFilter的 targetBeanName的值一样
     */
    @Bean(value = SHIRO_FILTER_NAME)
    public ShiroFilterFactoryBean getShiroFilterFactoryBean(SecurityManager securityManager){
        ShiroFilterFactoryBean bean =new ShiroFilterFactoryBean();
        //注入安全管理器
        bean.setSecurityManager(securityManager);
        //如果用户访问需要认证的页面,而当前用户又没有认证时跳转的页面
        bean.setLoginUrl(this.shiroProperties.getLoginUrl());

        Map<String, String> map=new HashMap<>();
        //配置不拦击的路径
        String[] anonUrls = shiroProperties.getAnonUrls();
        if (anonUrls!=null&&anonUrls.length>0) {
            for (String anonUrl : anonUrls) {
                map.put(anonUrl, "anon");
            }
        }
       //配置拦截的路径
        String[] authcUrls=this.shiroProperties.getAuthcUrls();
        if (authcUrls!=null&&authcUrls.length>0) {
            for (String authcUrl : authcUrls) {
                map.put(authcUrl, "authc");
            }
        }
        bean.setFilterChainDefinitionMap(map);
        return bean;
    }

    /**
     * 注册DelegatingFilterProxy
     */
    @Bean
    public FilterRegistrationBean<DelegatingFilterProxy> registDelegatingFilterProxy(){
       //创建注册器
        FilterRegistrationBean<DelegatingFilterProxy> bean=new FilterRegistrationBean<>();
        //创建过滤器
        DelegatingFilterProxy proxy=new DelegatingFilterProxy();
        //注入过滤器
        bean.setFilter(proxy);

        //写法1 ,使用initparam
//        bean.addInitParameter("targetFilterLifecycle","true");
//        bean.addInitParameter("targetBeanName",SHIRO_FILTER_NAME);

        proxy.setTargetFilterLifecycle(true);
        proxy.setTargetBeanName(SHIRO_FILTER_NAME);
        Collection<String> servleNames=new ArrayList<>();
        servleNames.add(DispatcherServletAutoConfiguration.DEFAULT_DISPATCHER_SERVLET_BEAN_NAME);
        bean.setServletNames(servleNames);
        return bean;
    }

    // 这里是为了能在html页面引用shiro标签,上面两个函数必须添加,不然会报错
    @Bean(name = "shiroDialect")
    public ShiroDialect shiroDialect() {
        return new ShiroDialect();
    }
}
创建ShiroProperties
package com.sxt.config;

import lombok.Data;
import org.springframework.boot.context.properties.ConfigurationProperties;

@ConfigurationProperties(prefix = "shiro")
@Data
public class ShiroProperties {

    private String hashAlgorithmName="md5";

    private Integer hashIterations=2;

    private String loginUrl="index.html";

    //不拦击的路径
    private String [] anonUrls;

    //拦截的路径
    private String [] authcUrls;

}
修改yml文件配置shiro
#shiro配置
shiro:
  login-url: /index.html
  anon-urls:
    - /login/doLogin*
  authc-urls:
    - /**
创建登陆页面
<!DOCTYPE html>
<html>
<head>
    <meta charset="UTF-8">
    <title>用户登陆</title>
</head>
<body>
<h1 align="center">用户登陆</h1>
<form id="dataFrom" action="/login/doLogin" method="post" >
    <table align="center" cellpadding="5" cellspacing="5" border="2">
        <tr>
            <td>登陆名:</td>
            <td><input type="text" name="username"></td>
        </tr>
        <tr>
            <td>密码:</td>
            <td><input type="password" name="password"></td>
        </tr>
        <tr>
            <td colspan="2" align="center"><input type="submit" value="提交"></td>
        </tr>
    </table>
</form>
</body>
</html>
创建templates/main.html
<!DOCTYPE html>
<html  xmlns:shiro="http://www.pollix.at/thymeleaf/shiro">
<head>
    <meta charset="UTF-8">
    <title>列表</title>
</head>
<body>

<div shiro:authenticated="true">认证通过 </div>
<div shiro:hasAllRoles="超级管理员">当前用户是超级管理</div>

    <h3 shiro:hasPermission="person:query">查询</h3>

    <h3 shiro:hasPermission="person:add">添加</h3>

    <h3 shiro:hasPermission="person:update">修改</h3>

    <h3 shiro:hasPermission="person:delete">删除</h3>

    <h3 shiro:hasPermission="person:export">导出</h3>

</body>
</html>
整合shrio前后分离的写法
创建项目


修改pom.xml 去掉thmeleaf相关
<?xml version="1.0" encoding="UTF-8"?>
<project xmlns="http://maven.apache.org/POM/4.0.0" xmlns:xsi="http://www.w3.org/2001/XMLSchema-instance"
         xsi:schemaLocation="http://maven.apache.org/POM/4.0.0 https://maven.apache.org/xsd/maven-4.0.0.xsd">
    <modelVersion>4.0.0</modelVersion>
    <parent>
        <groupId>org.springframework.boot</groupId>
        <artifactId>spring-boot-starter-parent</artifactId>
        <version>2.2.4.RELEASE</version>
        <relativePath/> <!-- lookup parent from repository -->
    </parent>
    <groupId>com.sxt</groupId>
    <artifactId>19springboot_shiro_ajax</artifactId>
    <version>0.0.1-SNAPSHOT</version>
    <name>19springboot_shiro_ajax</name>
    <description>Spring Boot和shrio集成使用ajax模拟前后端分离</description>

    <properties>
        <java.version>1.8</java.version>
        <log4j.version>1.2.17</log4j.version>
        <slf4j.version>1.7.26</slf4j.version>
        <shiro.version>1.5.0</shiro.version>
    </properties>

    <dependencies>
        <dependency>
            <groupId>org.springframework.boot</groupId>
            <artifactId>spring-boot-starter-jdbc</artifactId>
        </dependency>
        <dependency>
            <groupId>org.springframework.boot</groupId>
            <artifactId>spring-boot-starter-web</artifactId>
        </dependency>
        <dependency>
            <groupId>org.mybatis.spring.boot</groupId>
            <artifactId>mybatis-spring-boot-starter</artifactId>
            <version>2.1.1</version>
        </dependency>

        <dependency>
            <groupId>org.springframework.boot</groupId>
            <artifactId>spring-boot-devtools</artifactId>
            <scope>runtime</scope>
            <optional>true</optional>
        </dependency>
        <dependency>
            <groupId>mysql</groupId>
            <artifactId>mysql-connector-java</artifactId>
            <scope>runtime</scope>
        </dependency>
        <dependency>
            <groupId>org.springframework.boot</groupId>
            <artifactId>spring-boot-configuration-processor</artifactId>
            <optional>true</optional>
        </dependency>
        <dependency>
            <groupId>org.projectlombok</groupId>
            <artifactId>lombok</artifactId>
            <optional>true</optional>
        </dependency>
        <dependency>
            <groupId>org.springframework.boot</groupId>
            <artifactId>spring-boot-starter-test</artifactId>
            <scope>test</scope>
            <exclusions>
                <exclusion>
                    <groupId>org.junit.vintage</groupId>
                    <artifactId>junit-vintage-engine</artifactId>
                </exclusion>
            </exclusions>
        </dependency>
        <dependency>
            <groupId>org.mybatis.spring.boot</groupId>
            <artifactId>mybatis-spring-boot-starter</artifactId>
            <version>2.1.1</version>
        </dependency>
        <dependency>
            <groupId>log4j</groupId>
            <artifactId>log4j</artifactId>
            <version>${log4j.version}</version>
        </dependency>
        <!-- slf4j-api -->
        <dependency>
            <groupId>org.slf4j</groupId>
            <artifactId>slf4j-api</artifactId>
            <version>${slf4j.version}</version>
        </dependency>
        <!-- https://mvnrepository.com/artifact/com.alibaba/druid-spring-boot-starter -->
        <dependency>
            <groupId>com.alibaba</groupId>
            <artifactId>druid-spring-boot-starter</artifactId>
            <version>1.1.21</version>
        </dependency>

        <!-- https://mvnrepository.com/artifact/com.github.pagehelper/pagehelper-spring-boot-starter -->
        <dependency>
            <groupId>com.github.pagehelper</groupId>
            <artifactId>pagehelper-spring-boot-starter</artifactId>
            <version>1.2.13</version>
        </dependency>
        <dependency>
            <groupId>org.springframework.boot</groupId>
            <artifactId>spring-boot-starter-aop</artifactId>
        </dependency>

        <!--引入shiro-->
        <dependency>
            <groupId>org.apache.shiro</groupId>
            <artifactId>shiro-spring</artifactId>
            <version>${shiro.version}</version>
        </dependency>
        <!-- https://mvnrepository.com/artifact/com.alibaba/fastjson -->
        <dependency>
            <groupId>com.alibaba</groupId>
            <artifactId>fastjson</artifactId>
            <version>1.2.62</version>
        </dependency>

    </dependencies>

    <build>
        <plugins>
            <plugin>
                <groupId>org.springframework.boot</groupId>
                <artifactId>spring-boot-maven-plugin</artifactId>
            </plugin>
        </plugins>
    </build>

</project>
复制上一个19springboot_shiro所有类和XM及配置文件

修改LoginController

修改PersonController
package com.sxt.controller;

import org.apache.shiro.authz.annotation.RequiresPermissions;
import org.springframework.web.bind.annotation.RequestMapping;
import org.springframework.web.bind.annotation.RestController;

import java.util.HashMap;
import java.util.Map;

@RestController
@RequestMapping("person")
public class PersonController {

    /**
     * 要有user:query的权限才能调用
     * @return
     */
    @RequiresPermissions(value = {"person:query"})
    @RequestMapping("queryAllPerson")
    public Map<String,Object> queryAllPerson(){
        Map<String,Object> map = new HashMap<>();
        map.put("msg","person:query");
        return map;
    }

    /**
     * 修改
     * @return
     */
    @RequiresPermissions(value = {"person:update"})
    @RequestMapping("updatePerson")
    public Map<String,Object> updatePerson(){
        Map<String,Object> map = new HashMap<>();
        map.put("msg","person:update");
        return map;
    }
    /**
     * 添加
     * @return
     */
    @RequiresPermissions(value = {"person:add"})
    @RequestMapping("addPerson")
    public Map<String,Object> addPerson(){
        Map<String,Object> map = new HashMap<>();
        map.put("msg","person:add");
        return map;
    }
    /**
     * 删除
     * @return
     */
    @RequiresPermissions(value = {"person:delete"})
    @RequestMapping("deletePerson")
    public Map<String,Object> deletePerson(){
        Map<String,Object> map = new HashMap<>();
        map.put("msg","person:delete");
        return map;
    }
    /**
     * 导出
     * @return
     */
    @RequiresPermissions(value = {"person:export"})
    @RequestMapping("exportPerson")
    public Map<String,Object> exportPerson(){
        Map<String,Object> map = new HashMap<>();
        map.put("msg","person:export");
        return map;
    }

}
修改ShiroAutoConfiguration引入启用注解的相关内容
/*加入注解的使用,不加入这个注解不生效--开始*/
/**
 * @param securityManager
 * @return
 */
@Bean
public AuthorizationAttributeSourceAdvisor authorizationAttributeSourceAdvisor(SecurityManager securityManager) {
    AuthorizationAttributeSourceAdvisor authorizationAttributeSourceAdvisor = new AuthorizationAttributeSourceAdvisor();
    authorizationAttributeSourceAdvisor.setSecurityManager(securityManager);
    return authorizationAttributeSourceAdvisor;
}

@Bean
public DefaultAdvisorAutoProxyCreator getDefaultAdvisorAutoProxyCreator() {
    DefaultAdvisorAutoProxyCreator advisorAutoProxyCreator=new DefaultAdvisorAutoProxyCreator();
    advisorAutoProxyCreator.setProxyTargetClass(true);
    return advisorAutoProxyCreator;
}
/*加入注解的使用,不加入这个注解不生效--结束*/
使用全局异常处理未授权的异常
package com.sxt.common;

import org.apache.shiro.authz.UnauthorizedException;
import org.springframework.web.bind.annotation.ExceptionHandler;
import org.springframework.web.bind.annotation.RestController;
import org.springframework.web.bind.annotation.RestControllerAdvice;

import java.util.HashMap;
import java.util.Map;

@RestControllerAdvice
public class ExceptionAutoConfig {

    @ExceptionHandler(UnauthorizedException.class)
    public Map<String,Object> unAuthorized(){
        Map<String,Object> map=new HashMap<>();
        map.put("code",302);
        map.put("msg","没有调用权限");
        return map;
    }

}
引入fastjson并重写authc这个过滤器处理未登陆的异常返回ShiroLoginFilter
引入fastjson
<!-- https://mvnrepository.com/artifact/com.alibaba/fastjson -->
<dependency>
    <groupId>com.alibaba</groupId>
    <artifactId>fastjson</artifactId>
    <version>1.2.62</version>
</dependency>
创建ShiroLoginFilter
package com.sxt.filter;

import com.alibaba.fastjson.JSON;
import org.apache.shiro.web.filter.authc.FormAuthenticationFilter;

import javax.servlet.ServletRequest;
import javax.servlet.ServletResponse;
import javax.servlet.http.HttpServletRequest;
import javax.servlet.http.HttpServletResponse;
import java.io.IOException;
import java.util.HashMap;
import java.util.Map;

public class ShiroLoginFilter extends FormAuthenticationFilter {
    /**
     * 在访问controller前判断是否登录,返回json,不进行重定向。
     * @param request
     * @param response
     * @return true-继续往下执行,false-该filter过滤器已经处理,不继续执行其他过滤器
     * @throws Exception
     */
    @Override
    protected boolean onAccessDenied(ServletRequest request, ServletResponse response) throws IOException {
        HttpServletResponse httpServletResponse = (HttpServletResponse) response;
        // if (isAjax(request)) {
        httpServletResponse.setCharacterEncoding("UTF-8");
        httpServletResponse.setContentType("application/json");
        Map<String,Object> resultData = new HashMap<>();
        resultData.put("code", -1);
        resultData.put("msg", "登录认证失效,请重新登录!");
        httpServletResponse.getWriter().write(JSON.toJSON(resultData).toString());
        /*} else {
            // saveRequestAndRedirectToLogin(request, response);
            // @Mark 非ajax请求重定向为登录页面
            httpServletResponse.sendRedirect("/login");
        }*/
        return false;
    }

    private boolean isAjax(ServletRequest request) {
        String header = ((HttpServletRequest) request).getHeader("X-Requested-With");
        if ("XMLHttpRequest".equalsIgnoreCase(header)) {
            return Boolean.TRUE;
        }
        return Boolean.FALSE;
    }

}
修改ShiroAutoConfiguratiaon注册自定义的authc过滤器


 浙公网安备 33010602011771号