Windows 8 Store Apps 获取系统版本号判断8还是8.1
 Windows 8.1预览版发布有一个多月了,相信有不少做Win8 App的朋友想着怎么判断当前系统是8还是8.1。经过几个星期不断的ask、code、search,找到以下四种方法来获取系统版本号,其中两种能够辨别是8还是8.1.
方法一:通过内存寻址,找到Kernel32.dll的内存地址,再找EXE Optional Header 里的版本号
这里用到了PE,关于PE的格式大家可以自行百度。不过大家在使用C++实现的时候可以参考这个svn http://code.google.com/p/arpmrep/source/browse/trunk/ARPackerM_solution/?r=20#ARPackerM_solution%2FHackUtils
有了PE接下来就是内存寻址了
 1 int getSystemVersion()
 2 {
 3     LPVOID p = (LPVOID) GetTickCount64;
 4     DWORD_PTR addr = (DWORD_PTR) p;
 5     addr = addr & 0xffff0000;
 6     bool found = false;
 7     for(int i = 0;i < 16; i++,addr -= 0x10000)
 8     {
 9         char *pb = (char*) addr;
10         if(*pb == 'M' && *(pb + 1) == 'Z')
11         {
12             found = true;
13             break;
14         }
15     }
16     if(!found)
17     {
18         return -1;
19     }
20     PE pe(addr);
21     pe.Parse();
22     const IMAGE_OPTIONAL_HEADER* versionInfo = pe.GetImageOptionalHeader();
23     return versionInfo->MinorSubsystemVersion;
24 }
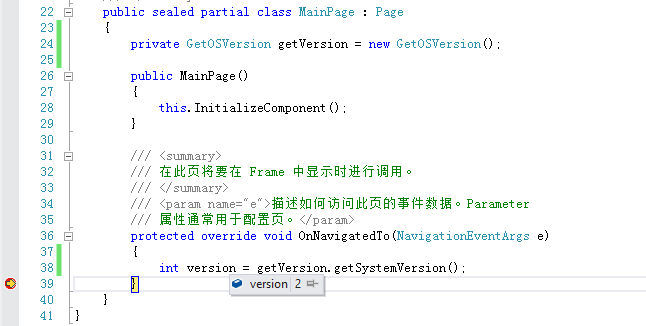
此时通过断点监视到如下结果:
由于我用的是Win8所以获取到的最小子版本号为2,如果是Win8.1的话这个值为3。
同时为了方便C++和C#通用,我将内存寻址获取系统子版本号方法新建为一个Windows运行时组件,方便调用。
这里只展示C#调用C++运行时组件的过程:
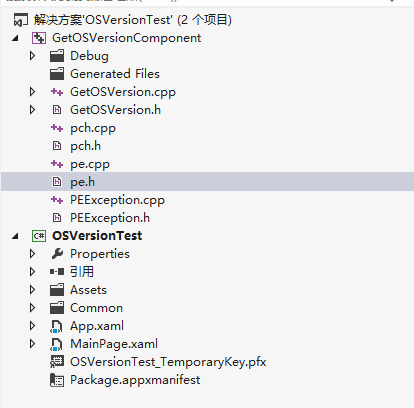
项目结构:

在GetOSVersion.h中定义一个外部可访问的方法:
 1 #pragma once
 2
 3 namespace GetOSVersionComponent
 4 {
 5     public ref class GetOSVersion sealed
 6     {
 7     public:
 8         int getSystemVersion();
 9     };
10 }
在GetOSVersion.cpp中实现如下:
 1 #include "pch.h"
 2 #include "GetOSVersion.h"
 3 #include "minwindef.h"
 4 #include "sysinfoapi.h"
 5 #include "pe.h"
 6
 7 using namespace GetOSVersionComponent;
 8 using namespace Platform;
 9
10 int GetOSVersion::getSystemVersion()
11 {
12     LPVOID p = (LPVOID) GetTickCount64;
13     DWORD_PTR addr = (DWORD_PTR) p;
14     addr = addr & 0xffff0000;
15     bool found = false;
16     for(int i = 0;i < 16; i++,addr -= 0x10000)
17     {
18         char *pb = (char*) addr;
19         if(*pb == 'M' && *(pb + 1) == 'Z')
20         {
21             found = true;
22             break;
23         }
24     }
25     if(!found)
26     {
27         return -1;
28     }
29     PE pe(addr);
30     pe.Parse();
31     const IMAGE_OPTIONAL_HEADER* versionInfo = pe.GetImageOptionalHeader();
32     return versionInfo->MinorSubsystemVersion;
33 }
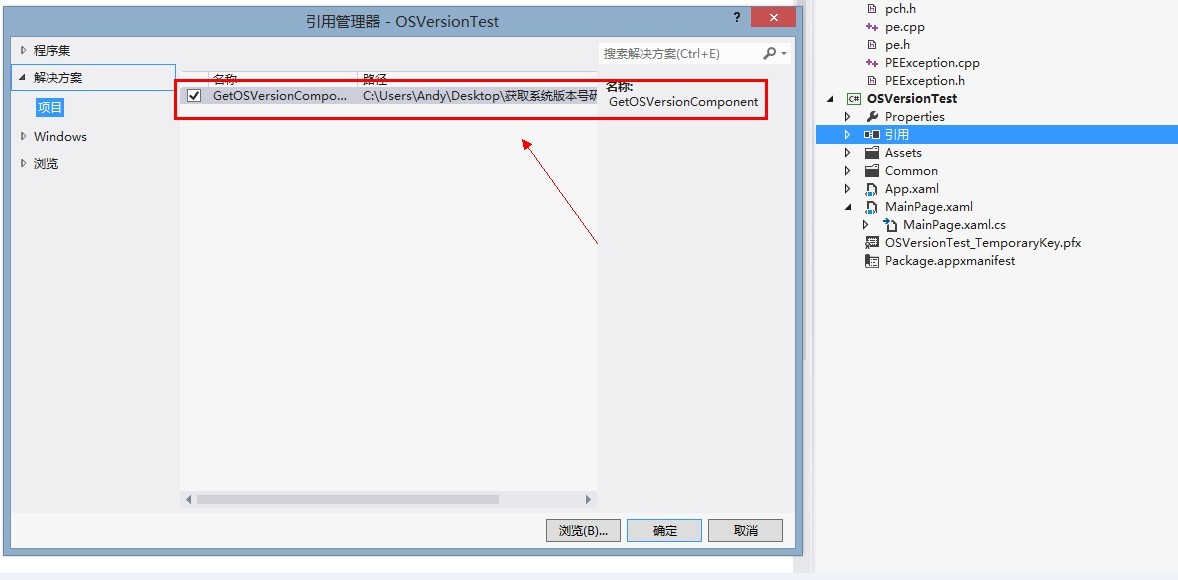
注:不要忘记在C#工程中添加对GetOSVersionComponent工程的引用:

(在Win8 app的后台任务实现的研究中,如果不这样添加的话,会出现即使后台任务的代码再对也会出现应用闪退的情况,MSDN帖子:http://social.msdn.microsoft.com/Forums/zh-CN/a5ee1ae8-9928-4cf3-9694-c9bb0c0106d2/trigger#a5ee1ae8-9928-4cf3-9694-c9bb0c0106d2)
此时,在C#工程的MainPage.xmal.cs中添加引用using GetOSVersionComponent,并写出调用的方法
代码如下:
 1 public sealed partial class MainPage : Page
 2     {
 3         private GetOSVersion getVersion = new GetOSVersion();
 4
 5         public MainPage()
 6         {
 7             this.InitializeComponent();
 8         }
 9
10         /// <summary>
11         /// 在此页将要在 Frame 中显示时进行调用。
12         /// </summary>
13         /// <param name="e">描述如何访问此页的事件数据。Parameter
14         /// 属性通常用于配置页。</param>
15         protected override void OnNavigatedTo(NavigationEventArgs e)
16         {
17             int version = getVersion.getSystemVersion();
18         }
19     }
通过断点可以监视到此时的version值为2,8.1的就是3了
截图如下:
(这个方法非常感谢raptor的指导)
方法二:读取系统的驱动信息
 1 /// <summary>
 2     /// 可用于自身或导航至 Frame 内部的空白页。
 3     /// </summary>
 4     public sealed partial class MainPage : Page
 5     {
 6         public MainPage()
 7         {
 8             this.InitializeComponent();
 9         }
10
11         /// <summary>
12         /// 在此页将要在 Frame 中显示时进行调用。
13         /// </summary>
14         /// <param name="e">描述如何访问此页的事件数据。Parameter
15         /// 属性通常用于配置页。</param>
16         protected async override void OnNavigatedTo(NavigationEventArgs e)
17         {
18             string version = await GetWindowsVersionAsync();
19         }
20
21         const string DeviceClassKey = "{A45C254E-DF1C-4EFD-8020-67D146A850E0},10";
22         const string DeviceDriverVersionKey = "{A8B865DD-2E3D-4094-AD97-E593A70C75D6},3";
23         const string RootContainer = "{00000000-0000-0000-FFFF-FFFFFFFFFFFF}";
24         const string RootQuery = "System.Devices.ContainerId:=\"" + RootContainer + "\"";
25         const string HalDeviceClass = "4d36e966-e325-11ce-bfc1-08002be10318";
26
27         public static async Task<string> GetWindowsVersionAsync()
28         {
29             var hal = await GetHalDevice(DeviceDriverVersionKey);
30             if (hal == null || !hal.Properties.ContainsKey(DeviceDriverVersionKey))
31                 return null;
32
33             var versionParts = hal.Properties[DeviceDriverVersionKey].ToString().Split('.');
34             return string.Join(".", versionParts.Take(2).ToArray());
35         }
36
37         private static async Task<PnpObject> GetHalDevice(params string[] properties)
38         {
39             var actualProperties = properties.Concat(new[] { DeviceClassKey });
40             var rootDevices = await PnpObject.FindAllAsync(PnpObjectType.Device,
41                 actualProperties, RootQuery);
42
43             foreach (var rootDevice in rootDevices.Where(d => d.Properties != null && d.Properties.Any()))
44             {
45                 var lastProperty = rootDevice.Properties.Last();
46                 if (lastProperty.Value != null)
47                     if (lastProperty.Value.ToString().Equals(HalDeviceClass))
48                         return rootDevice;
49             }
50             return null;
51         }
52     }
参考网址:http://attackpattern.com/2013/03/device-information-in-windows-8-store-apps/
通过断点监视,结果如下:
Win8的值为6.2,Win8.1的值为6.3。
(这个方法非常感谢webabcd的指导)
============================================================
(注:下面两个方法能够获取系统版本号,但不能辨别是8还是8.1)
方法三:通过WebView的userAgent
代码如下:
 1  /// <summary>
 2     /// 可用于自身或导航至 Frame 内部的空白页。
 3     /// </summary>
 4     public sealed partial class MainPage : Page
 5     {
 6         public MainPage()
 7         {
 8             this.InitializeComponent();
 9         }
10
11         /// <summary>
12         /// 在此页将要在 Frame 中显示时进行调用。
13         /// </summary>
14         /// <param name="e">描述如何访问此页的事件数据。Parameter
15         /// 属性通常用于配置页。</param>
16         protected async override void OnNavigatedTo(NavigationEventArgs e)
17         {
18             string versionInfo = await getUserAgent();
19
20             var msg = new MessageDialog(versionInfo, "系统信息");
21             await msg.ShowAsync();
22         }
23
24         private static Task<string> getUserAgent()
25         {
26             var tcs = new TaskCompletionSource<string>();
27             WebView webView = new WebView();
28
29             string htmlFragment = @"<html>
30                     <head>
31                         <script type='text/javascript'>
32                             function GetUserAgent()
33                             {
34                                 return navigator.userAgent;
35                             }
36                         </script>
37                     </head>
38                 </html>";
39
40             webView.LoadCompleted += (sender, e) =>
41             {
42                 try
43                 {
44                     string result = webView.InvokeScript("GetUserAgent", null);
45                     tcs.TrySetResult(result);
46                 }
47                 catch(Exception ex)
48                 {
49                     tcs.TrySetException(ex);
50                 }
51             };
52
53             webView.NavigateToString(htmlFragment);
54             return tcs.Task;
55         }
56
57         public static async Task<string> getOsVersionAsync()
58         {
59             string userAgent = await getUserAgent();
60
61             //string result = string.Empty;
62
63             //int startIndex = userAgent.ToLower().IndexOf("webview");
64             //if (startIndex > 0)
65             //{
66             //    int endIndex = userAgent.IndexOf(")", startIndex);
67
68             //    if (endIndex > startIndex)
69             //        result = userAgent.Substring(startIndex, endIndex - startIndex);
70             //}
71             return userAgent;
72         }
73     }
参考网址:http://www.michielpost.nl/PostDetail_74.aspx
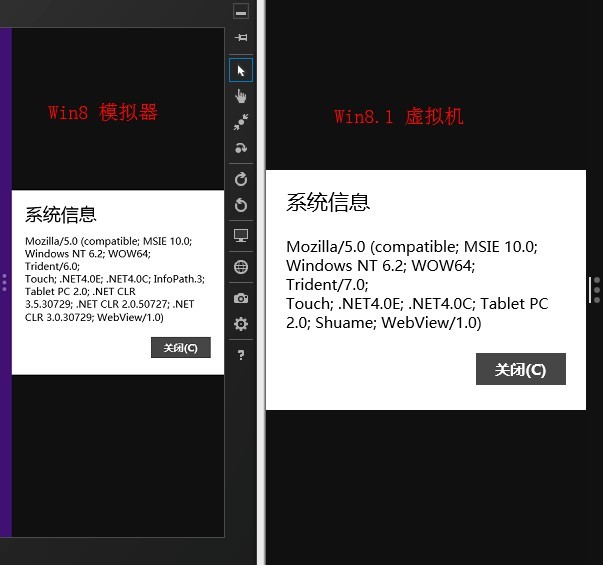
通过运行得到的userAgnet值是一样的(左侧平板模拟器,右侧Win8.1虚拟机):
我们可以看到,试图获取Windosw NT的版本来分辨是8还是8.1行不通。原因如下:
In fact, the documentation is clear about the limitations of this control:
WebView always uses Internet Explorer 10 in document mode. Additionally, WebView does not currently support HTML5, AppCache, IndexedDB, programmatic access to the Clipboard, or geo location, and supports only the Document Object Model (DOM) properties that are supported in Windows Store apps using JavaScript.
但记住一点,这种方法可以获取系统版本号。
方法四:通过kernel32.dll EntryPoint为GetVersionEx 来获取版本信息
这种方法在Windows商店审核不通过,所以代码和方法我就不贴了,大家去这篇MSDN帖子看吧http://social.msdn.microsoft.com/Forums/zh-CN/3a38fddd-e09e-41b1-b024-87221fffe195/win8881
(四种方法源代码不再在文中提供)
第一次写博客,诸多问题研究的不够透彻,还请大家多多指点~~


 浙公网安备 33010602011771号