MyBatisPlus基础
1、MyBatisPlus概述
需要的基础:把我的MyBatis、Spring、SpringMVC就可以学习这个了!
为什么要学习它呢?MyBatisPlus可以节省我们大量工作时间,所有的CRUD代码它都可以自动化完成!
JPA 、 tk-mapper、MyBatisPlus
偷懒的!
1.1、简介
是什么? MyBatis 本来就是简化 JDBC 操作的!
官网:https://mp.baomidou.com/ MyBatis Plus,简化 MyBatis !


1.2、特性
无侵入:只做增强不做改变,引入它不会对现有工程产生影响,如丝般顺滑
损耗小:启动即会自动注入基本 CURD,性能基本无损耗,直接面向对象操作, BaseMapper
强大的 CRUD 操作:内置通用 Mapper、通用 Service,仅仅通过少量配置即可实现单表大部分CRUD 操作,更有强大的条件构造器,满足各类使用需求, 以后简单的CRUD操作,它不用自己编写了!
支持 Lambda 形式调用:通过 Lambda 表达式,方便的编写各类查询条件,无需再担心字段写错
支持主键自动生成:支持多达 4 种主键策略(内含分布式唯一 ID 生成器 - Sequence),可自由配置,完美解决主键问题
支持 ActiveRecord 模式:支持 ActiveRecord 形式调用,实体类只需继承 Model 类即可进行强大的 CRUD 操作支持自定义全局通用操作:支持全局通用方法注入( Write once, use anywhere )
内置代码生成器:采用代码或者 Maven 插件可快速生成 Mapper 、 Model 、 Service 、Controller 层代码,支持模板引擎,更有超多自定义配置等您来使用(自动帮你生成代码)
内置分页插件:基于 MyBatis 物理分页,开发者无需关心具体操作,配置好插件之后,写分页等同于普通 List 查询
分页插件支持多种数据库:支持 MySQL、MariaDB、Oracle、DB2、H2、HSQL、SQLite、Postgre、SQLServer 等多种数据库
内置性能分析插件:可输出 Sql 语句以及其执行时间,建议开发测试时启用该功能,能快速揪出慢查询
内置全局拦截插件:提供全表 delete 、 update 操作智能分析阻断,也可自定义拦截规则,预防误操作
所有学不会都是给懒找的借口!伸手党,白嫖党!
1.3、快速入门
地址:https://mp.baomidou.com/guide/quick-start.html#初始化工程
使用第三方组件:
1、导入对应的依赖
2、研究依赖如何配置
3、代码如何编写
4、提高扩展技术能力!
1.4、步骤
1、创建数据库 mybatis_plus
2、创建user表
DROP TABLE IF EXISTS user;
CREATE TABLE user (
    id BIGINT(20) NOT NULL COMMENT '主键ID',
    name VARCHAR(30) NULL DEFAULT NULL COMMENT '姓名',
    age INT(11) NULL DEFAULT NULL COMMENT '年龄',
    email VARCHAR(50) NULL DEFAULT NULL COMMENT '邮箱',
    PRIMARY KEY (id) );
INSERT INTO user (id, name, age, email) VALUES
(1, 'Jone', 18, 'test1@baomidou.com'),
(2, 'Jack', 20, 'test2@baomidou.com'),
(3, 'Tom', 28, 'test3@baomidou.com'),
(4, 'Sandy', 21, 'test4@baomidou.com'),
(5, 'Billie', 24, 'test5@baomidou.com');
-- 真实开发中,version(乐观锁)、deleted(逻辑删除)、gmt_create、gmt_modified
3、编写项目,初始化项目!使用SpringBoot初始化!
4、导入依赖
    <!-- 数据库驱动 -->
        <dependency>
            <groupId>mysql</groupId>
            <artifactId>mysql-connector-java</artifactId>
        </dependency>
        <!-- lombok -->
        <dependency>
            <groupId>org.projectlombok</groupId>
            <artifactId>lombok</artifactId>
        </dependency>
        <!-- mybatis-plus --> <!-- mybatis-plus 是自己开发,并非官方的! -->
        <dependency>
            <groupId>com.baomidou</groupId>
            <artifactId>mybatis-plus-boot-starter</artifactId>
            <version>3.0.5</version>
        </dependency>
说明:我们使用 mybatis-plus 可以节省我们大量的代码,尽量不要同时导入 mybatis 和 mybatis plus!版本的差异!
5、连接数据库!这一步和 mybatis 相同!
# mysql 5 驱动不同 com.mysql.jdbc.Driver
# mysql 8 驱动不同com.mysql.cj.jdbc.Driver、需要增加时区的配置 serverTimezone=GMT%2B8
spring.datasource.username=root
spring.datasource.password=981204
spring.datasource.url=jdbc:mysql://localhost:3306/mybatis_plus?useSSL=false&useUnicode=true&characterEncoding=utf-8&serverTimezone=GMT%2B8
spring.datasource.driver-class-name=com.mysql.cj.jdbc.Driver
6、传统方式pojo-dao(连接mybatis,配置mapper.xml文件)-service-controller
6、使用了mybatis-plus 之后
pojo
@Data
@AllArgsConstructor
@NoArgsConstructor
public class User {
    //对应数据库中的主键(uuid、自塘id、 雪花算法、redis、 zookeeper! )
    private Long id;
    private String name;
    private Integer age;
    private String email;
}
mapper
// 在对应的Mapper上面继承基本的类 BaseMapper
@Repository // 代表持久层
public interface UserMapper extends BaseMapper<User> {
        // 所有的CRUD操作都已经编写完成了
        // 你不需要像以前的配置一大堆文件了!
}
注意点,我们需要在主启动类上去扫描我们的mapper包下的所有接口
@MapperScan("com.kuang.mapper")
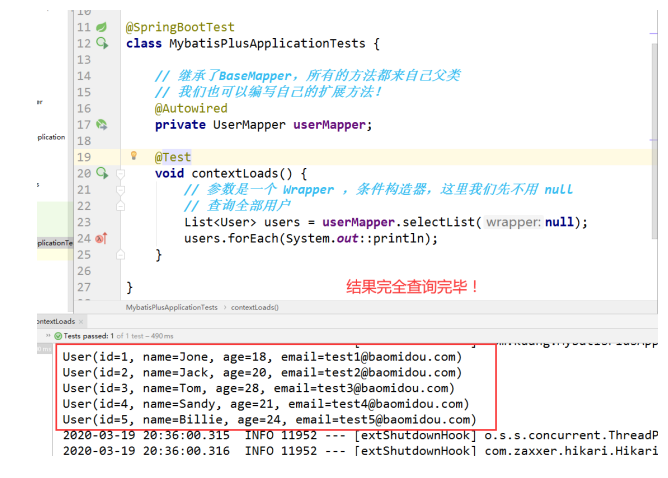
7、测试类中测试
@SpringBootTest
class MybatisPlusApplicationTests {

    // 继承了BaseMapper,所有的方法都来自己父类
    // 我们也可以编写自己的扩展方法!
    @Autowired
    private UserMapper userMapper;

    @Test
    void contextLoads() {
        // 参数是一个 Wrapper ,条件构造器,这里我们先不用 null
        // 查询全部用户
        List<User> users = userMapper.selectList(null);
        users.forEach(System.out::println);
    }

}
8、结果
1.5、思考问题?
1、SQL谁帮我们写的 ? MyBatis-Plus 都写好了
2、方法哪里来的? MyBatis-Plus 都写好了
2、配置日志
我们所有的sql现在是不可见的,我们希望知道它是怎么执行的,所以我们必须要看日志!
#配置日志
mybatis-plus.configuration.log-impl=org.apache.ibatis.logging.stdout.StdOutImpl
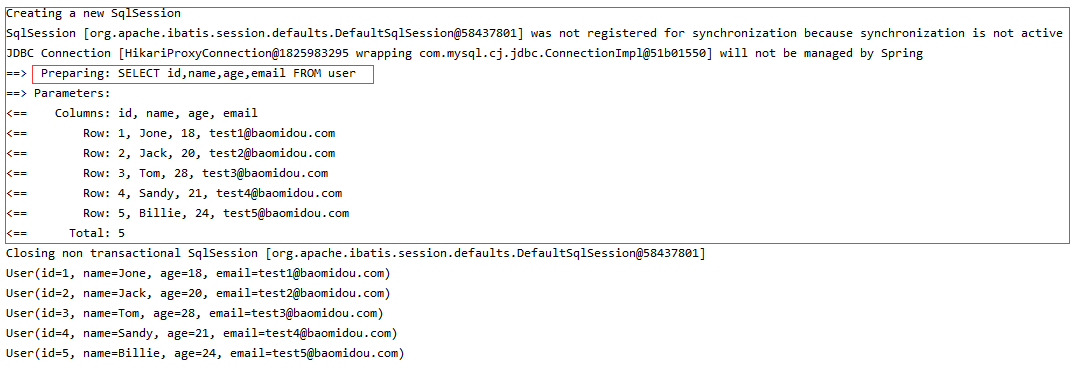
配置完毕日志之后,后面的学习就需要注意这个自动生成的SQL,你们就会喜欢上 MyBatis-Plus!
3、CRUD扩展
3.1、插入操作
Insert 插入
// 测试插入
@Test
public void testInsert() {
User user = new User();
user.setName("狂神说Java");
user.setAge(3);
user.setEmail("24736743@qq.com");
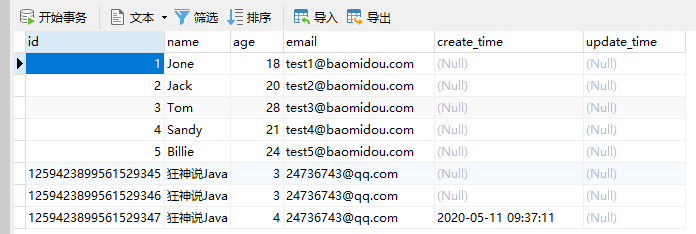
int result = userMapper.insert(user);// 帮我们自动生成id
System.out.println(result);// 受影响的行数
System.out.println(user); // 发现,id会自动回填
}

数据库插入的id的默认值为:全局的唯一id
3.2、主键生成策略
默认 ID_WORKER 全局唯一id
分布式系统唯一id生成:https://www.cnblogs.com/haoxinyue/p/5208136.html
雪花算法:(mybatis使用的id生成默认是雪花算法)
snowflflake是Twitter开源的分布式ID生成算法,结果是一个long型的ID。其核心思想是:使用41bit作为
毫秒数,10bit作为机器的ID(5个bit是数据中心,5个bit的机器ID),12bit作为毫秒内的流水号(意味
着每个节点在每毫秒可以产生 4096 个 ID),最后还有一个符号位,永远是0。可以保证几乎全球唯一!
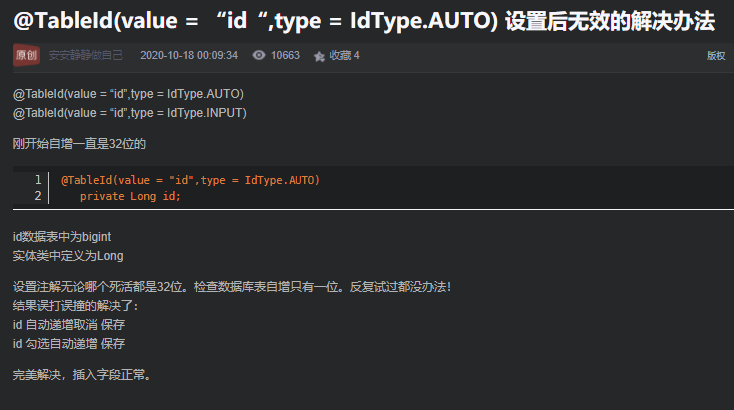
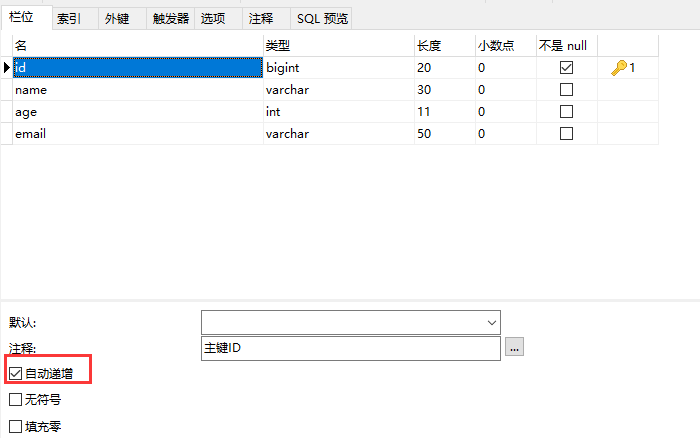
主键自增
我们需要配置主键自增:
1、实体类id字段上
@TableId(type = IdType.AUTO)
2、数据库字段一定要是自增!

3、再次测试插入即可!
其余的源码解释
public enum IdType {
    AUTO(0), // 数据库id自增
    NONE(1), // 未设置主键
    INPUT(2), // 手动输入
    ID_WORKER(3), // 默认的全局唯一id
    UUID(4), // 全局唯一id uuid
    ID_WORKER_STR(5); //ID_WORKER 字符串表示法
}
3.3、更新操作
 // 测试更新
    @Test
    public void testUpdate() {
        User user = new User();
        //通过条件自动拼接动态sql
        user.setId(6L);
        user.setName("关注公众号:狂神说");
        /*user.setAge(18);*/
        //注意:updateById 但是参数是一个 对象!
        int i = userMapper.updateById(user);
        System.out.println(i);
    }
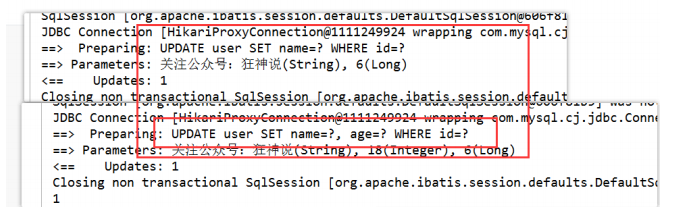
所有的sql都是自动帮你动态配置的!
自动填充
创建时间、修改时间!这些个操作一遍都是自动化完成的,我们不希望手动更新!
阿里巴巴开发手册:所有的数据库表:gmt_create(数据创建时间)、gmt_modifified(数据修改时间)几乎所有的表都要配置上!而且需要自动化!
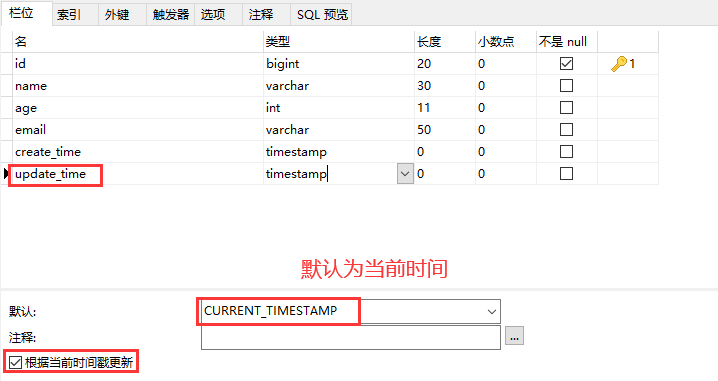
方式一:数据库级别(工作中不允许你修改数据库)
1、在表中新增字段 create_time, update_time

2、再次测试插入方法,我们需要先把实体类同步!
private Date createTime;
private Date updateTime;
3、再次更新查看结果即可
方式二:代码级别
1、删除数据库的默认值、更新操作!

2、实体类字段属性上需要增加注解
 // 字段添加填充内容
    @TableField(fill = FieldFill.INSERT)
    private Date createTime;
    @TableField(fill = FieldFill.INSERT_UPDATE)
    private Date updateTime;
3、编写处理器来处理这个注解即可!
package com.kuang.handle;

import com.baomidou.mybatisplus.core.handlers.MetaObjectHandler;
import lombok.extern.slf4j.Slf4j;
import org.apache.ibatis.reflection.MetaObject;
import org.springframework.stereotype.Component;

import java.util.Date;

/**
 * @author zhuchengbo
 * @program: mybatis_plus
 * @description:
 * @create 2020-05-11-9:45
 */
@Slf4j
@Component // 一定不要忘记把处理器加到IOC容器中!
public class MyMetaObjectHandler implements MetaObjectHandler {
    // 插入时的填充策略
    @Override
    public void insertFill(MetaObject metaObject) {
        log.info("start insert fill.....");
        // setFieldValByName(String fieldName, Object fieldVal, MetaObject metaObject
        this.setFieldValByName("createTime", new Date(), metaObject);
        this.setFieldValByName("updateTime", new Date(), metaObject);
    }
    // 更新时的填充策略
    @Override
    public void updateFill(MetaObject metaObject) {
        log.info("start update fill.....");
        this.setFieldValByName("updateTime", new Date(), metaObject);
    }
}
4、测试插入
5、测试更新、观察时间即可!

3.4、乐观锁
在面试过程中,我们经常会被问道乐观锁,悲观锁!这个其实非常简单!
乐观锁 : 故名思意十分乐观,它总是认为不会出现问题,无论干什么不去上锁!如果出现了问题,再次更新值测试
悲观锁:故名思意十分悲观,它总是认为总是出现问题,无论干什么都会上锁!再去操作!
1.乐观锁和悲观锁各自的机制
a. 乐观锁是一种思想,具体实现是,表中有一个版本字段(或者是时间戳),第一次读的时候,获取到这个字段。处理完业务逻辑开始更新的时候,需要再次查看该字段的值是否和第一次的一样。如果一样更新,反之拒绝。之所以叫乐观,因为这个模式没有从数据库加锁。b. 悲观锁是读取的时候为后面的更新加锁,之后再来的读操作都会等待。这种是数据库锁, 乐观锁优点程序实现,不会存在死锁等问题。他的适用场景也相对乐观。阻止不了除了程序之外的数据库操作。悲观锁是数据库实现,他阻止一切数据库操作。
2.乐观锁和悲观锁使用判断
a.响应速度:如果需要非常高的响应速度,建议采用乐观锁方案,成功就执行,不成功就失败,不需要等待其他并发去释放锁
b.冲突频率:如果冲突频率非常高,建议采用悲观锁,保证成功率,如果冲突频率大,乐观锁会需要多次重试才能成功,代价比较大
c.重试代价:如果重试代价大,建议采用悲观锁
我们这里主要讲解 乐观锁机制!
乐观锁实现方式:
-
取出记录时,获取当前 version
-
更新时,带上这个version
-
执行更新时, set version = newVersion where version = oldVersion
-
如果version不对,就更新失败
乐观锁:1、先查询,获得版本号 version = 1
-- A
update user set name = "kuangshen", version = version + 1 where id = 2 and version = 1
-- B 线程抢先完成,这个时候 version = 2,会导致 A 修改失败!
update user set name = "kuangshen", version = version + 1 where id = 2 and version = 1
测试一下MP的乐观锁插件
1、给数据库中增加version字段!
2、我们实体类加对应的字段
@Version //乐观锁Version注解

private Integer version;
3、注册组件
// 扫描我们的 mapper 文件夹
@MapperScan("com.kuang.mapper")
@EnableTransactionManagement
@Configuration
// 配置类
public class MyBatisPlusConfig {
    // 注册乐观锁插件
    @Bean
    public OptimisticLockerInterceptor optimisticLockerInterceptor() {
        return new OptimisticLockerInterceptor();
    }
}
4、测试一下!
// 测试乐观锁成功!
@Test
public void testOptimisticLocker() {
// 1、查询用户信息
User user = userMapper.selectById(1L);
// 2、修改用户信息
user.setName("小樱");
user.setEmail("24736743@qq.com");
// 3、执行更新操作
userMapper.updateById(user);
}
// 测试乐观锁失败!多线程下
@Test
public void testOptimisticLocker2() {
// 线程 1
User user = userMapper.selectById(1L);
user.setName("kuangshen111");
user.setEmail("24736743@qq.com");
// 模拟另外一个线程执行了插队操作
User user2 = userMapper.selectById(1L);
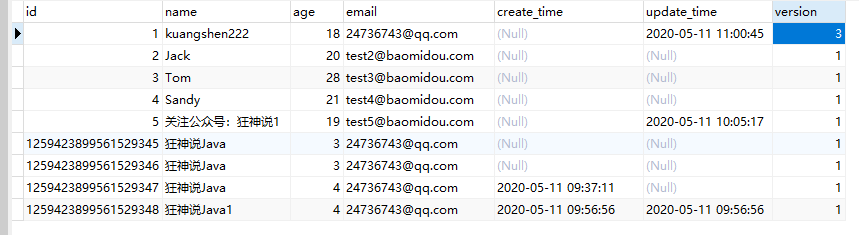
user2.setName("kuangshen222");
user2.setEmail("24736743@qq.com");
userMapper.updateById(user2);
// 自旋锁来多次尝试提交!
userMapper.updateById(user);
// 如果没有乐观锁就会覆盖插队线程的值!
}
3.5、查询操作
 // 测试查询
    @Test
    public void testSelectById() {
        User user = userMapper.selectById(1L);
        System.out.println(user);
    }

    // 测试批量查询!
    @Test
    public void testSelectByBatchId() {
        List<User> users = userMapper.selectBatchIds(Arrays.asList(1, 2, 3));
        users.forEach(System.out::println);
    }

    // 按条件查询之一使用map操作
    @Test
    public void testSelectByBatchIds() {
        HashMap<String, Object> map = new HashMap<>();
        // 自定义要查询
        map.put("name", "狂神说Java");
        map.put("age", 3);
        List<User> users = userMapper.selectByMap(map);
        users.forEach(System.out::println);
    }
3.6、分页查询
分页在网站使用的十分之多!
1、原始的 limit 进行分页
2、pageHelper 第三方插件
3、MyBatisPlus 其实也内置了分页插件!
如何使用!
1、配置拦截器组件即可
  // 分页插件
    @Bean
    public PaginationInterceptor paginationInterceptor() {
        return new PaginationInterceptor();
    }
2、直接使用Page对象即可!
 // 测试分页查询
     @Test
     public void testPage(){
    // 参数一:当前页
    // 参数二:页面大小
    // 使用了分页插件之后,所有的分页操作也变得简单的!
     Page<User> page = new Page<>(2,5);
     userMapper.selectPage(page,null);
     page.getRecords().forEach(System.out::println);
     System.out.println(page.getTotal());
     }
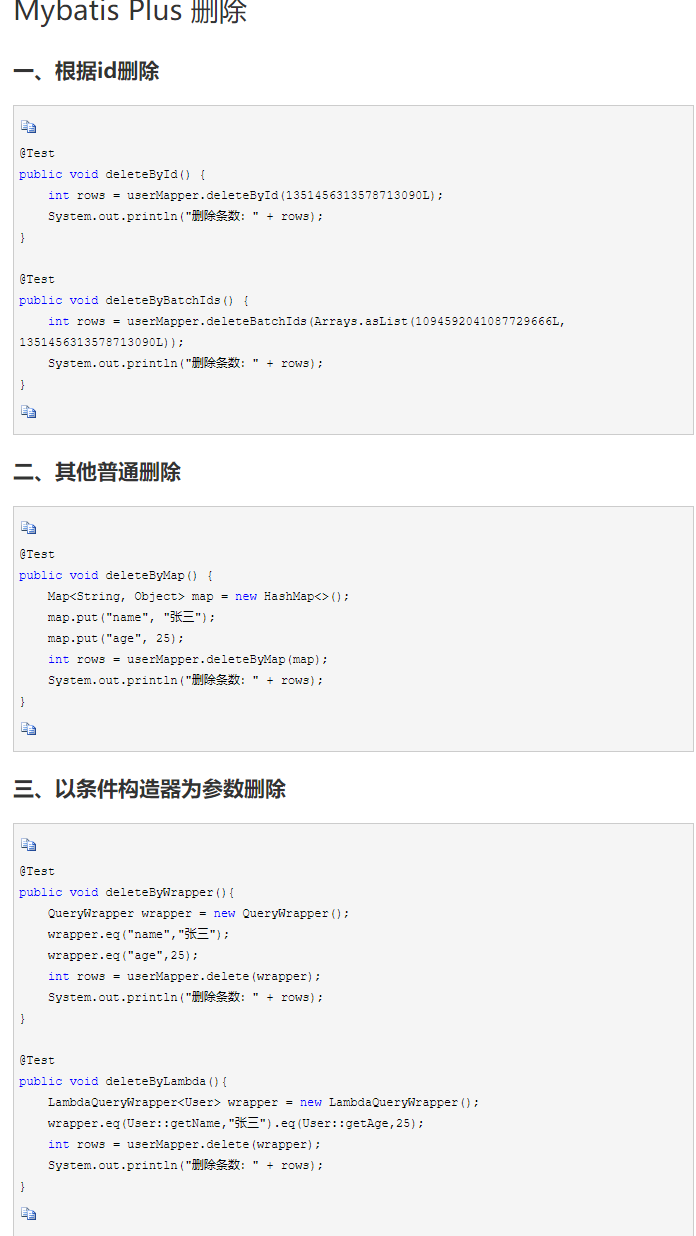
3.7、删除操作
1、根据 id 删除记录
  // 测试删除
    @Test
    public void testDeleteById() {
        userMapper.deleteById(1259423899561529348L);
    }

    // 通过id批量删除
    @Test
    public void testDeleteBatchId() {
        userMapper.deleteBatchIds(Arrays.asList(1259423899561529345l, 1259423899561529346l));
    }

    // 通过map删除
    @Test
    public void testDeleteMap() {
        HashMap<String, Object> map = new HashMap<>();
        map.put("name", "狂神说Java");
        userMapper.deleteByMap(map);
    }
我们在工组中会遇到一些问题:逻辑删除!
3.8、逻辑删除
物理删除 :从数据库中直接移除
逻辑删除 :再数据库中没有被移除,而是通过一个变量来让他失效! deleted = 0 => deleted = 1
管理员可以查看被删除的记录!防止数据的丢失,类似于回收站!
测试一下:
1、在数据表中增加一个 deleted 字段
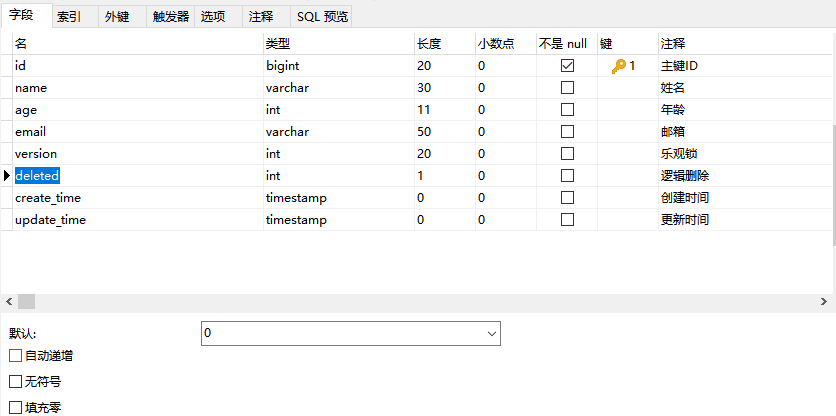
2、实体类中增加属性
@TableLogic //逻辑删除
private Integer deleted;
3、配置!
 // 逻辑删除组件!
    @Bean
    public ISqlInjector sqlInjector() {
        return new LogicSqlInjector();
    }
# 配置逻辑删除
mybatis-plus.global-config.db-config.logic-delete-value=1
mybatis-plus.global-config.db-config.logic-not-delete-value0
4、测试一下删除!
  // 测试查询
    @Test
    public void testSelectById() {
        User user = userMapper.selectById(1L);
        System.out.println(user);
    }
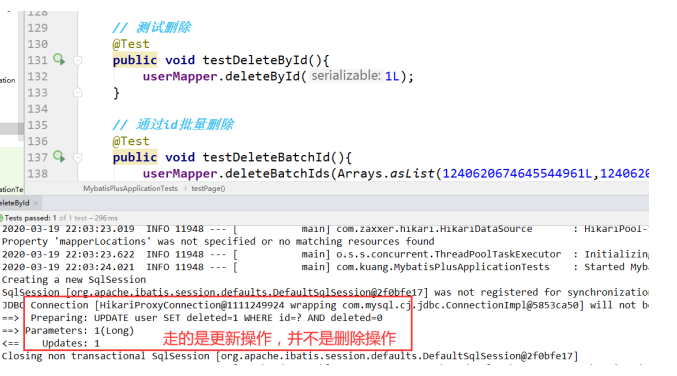
记录依旧在数据库,但是值确已经变化了!

以上的所有CRUD操作及其扩展操作,我们都必须精通掌握!会大大提高你的工作和写项目的效率!
3.9、性能分析插件
我们在平时的开发中,会遇到一些慢sql。测试! druid,,,,,
作用:性能分析拦截器,用于输出每条 SQL 语句及其执行时间
MP也提供性能分析插件,如果超过这个时间就停止运行!
1、导入插件
 /**
     * SQL执行效率插件
     */
    @Bean
    @Profile({"dev", "test"})// 设置 dev test 环境开启,保证我们的效率
    public PerformanceInterceptor performanceInterceptor() {
        PerformanceInterceptor performanceInterceptor = new PerformanceInterceptor();
        performanceInterceptor.setMaxTime(100); // ms设置sql执行的最大时间,如果超过了则不 执行
        performanceInterceptor.setFormat(true); // 是否格式化代码
        return performanceInterceptor;
    }
记住,要在SpringBoot中配置环境为dev或者 test 环境!
2、测试使用!
  @Test
    void contextLoads() {
        // 参数是一个 Wrapper ,条件构造器,这里我们先不用 null
        // 查询全部用户
        List<User> users = userMapper.selectList(null);
        users.forEach(System.out::println);
    }
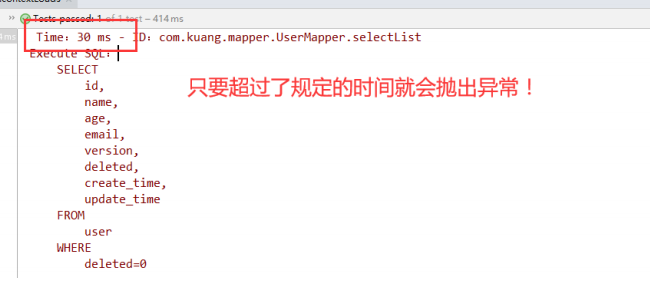
使用性能分析插件,可以帮助我们提高效率!
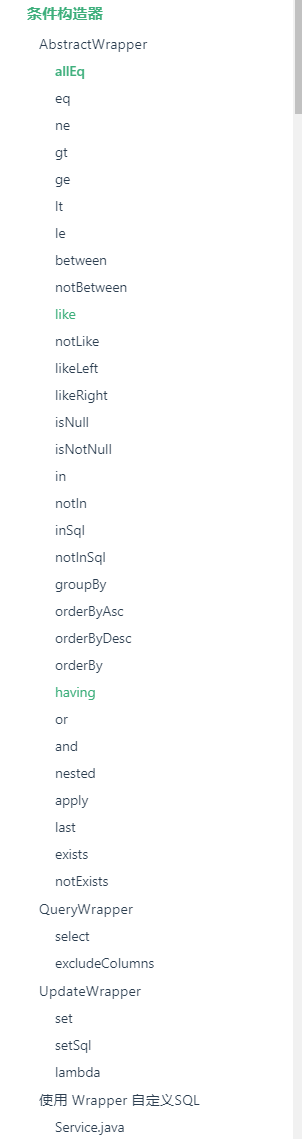
3.10、条件构造器
十分重要:Wrapper
我们写一些复杂的sql就可以使用它来替代!
1、测试一,记住查看输出的SQL进行分析
@Test
    void test1() {
        // 查询name不为空的用户,并且邮箱不为空的用户,年龄大于等于12
        QueryWrapper<User> wrapper = new QueryWrapper<>();
        wrapper.isNotNull("name").isNotNull("email").ge("age", 12);
        userMapper.selectList(wrapper).forEach(System.out::println);
        // 和我们刚才学习 的map对比一下
    }
2、测试一,记住查看输出的SQL进行分析
 @Test
    void test2() {
        // 查询名字狂神说
        QueryWrapper<User> wrapper = new QueryWrapper<>();
        wrapper.eq("name", "狂神说");
        User user = userMapper.selectOne(wrapper); // 查询一个数据,出现多个结果使用List 或者 Map
        System.out.println(user);
    }
3、测试一,记住查看输出的SQL进行分析
 @Test
    void test3() {
        // 查询年龄在 20 ~ 30 岁之间的用户
        QueryWrapper<User> wrapper = new QueryWrapper<>();
        wrapper.between("age", 20, 30); // 区间
        Integer count = userMapper.selectCount(wrapper);// 查询结果数
        System.out.println(count);
    }
4、测试一,记住查看输出的SQL进行分析
 // 模糊查询
    @Test
    void test4() {
        // 查询年龄在 20 ~ 30 岁之间的用户
        QueryWrapper<User> wrapper = new QueryWrapper<>();
        // 左和右 t%
        wrapper.notLike("name", "e").likeRight("email", "t");
        List<Map<String, Object>> maps = userMapper.selectMaps(wrapper);
        maps.forEach(System.out::println);
    }
5、测试一,记住查看输出的SQL进行分析
 // 模糊查询
    @Test
    void test5() {
        QueryWrapper<User> wrapper = new QueryWrapper<>();
        // id 在子查询中查出来
        wrapper.inSql("id", "select id from user where id<3");
        List<Object> objects = userMapper.selectObjs(wrapper);
        objects.forEach(System.out::println);
    }
6、测试一,记住查看输出的SQL进行分析
 //测试六
    @Test
    void test6() {
        QueryWrapper<User> wrapper = new QueryWrapper<>();
        // 通过id进行排序
        wrapper.orderByAsc("id");//升序
        wrapper.orderByDesc("id");//降序
        List<User> users = userMapper.selectList(wrapper);
        users.forEach(System.out::println);
    }
其余的测试,可以自己下去多练习!
对一些判断关系稍复杂的可以使用apply,apply可以看为引用原生sql解决mp的不足
获取表中id的最大值


3.11、代码自动生成器
dao、pojo、service、controller都给我自己去编写完成!
AutoGenerator 是 MyBatis-Plus 的代码生成器,通过 AutoGenerator 可以快速生成 Entity、
Mapper、Mapper XML、Service、Controller 等各个模块的代码,极大的提升了开发效率。
测试
public class KuangCode {
    public static void main(String[] args) {
        // 需要构建一个 代码自动生成器 对象
        AutoGenerator mpg = new AutoGenerator();
        // 配置策略
        // 1、全局配置
        GlobalConfig gc = new GlobalConfig();
        String projectPath = System.getProperty("user.dir");//获取用户目录
        gc.setOutputDir(projectPath + "/src/main/java");//项目输出路径
        gc.setAuthor("狂神说");
        gc.setOpen(false);//是否打开资源管理器
        gc.setFileOverride(false);// 是否覆盖原来生成的
        gc.setServiceName("%sService");//通过正则表达式去Service的I前缀,(服务名字)
        gc.setIdType(IdType.ID_WORKER);//生成策略,默认初始算法
        gc.setDateType(DateType.ONLY_DATE);//设置日期类型,仅仅只是时间
        gc.setSwagger2(true);//自动配置Swagger文档
        mpg.setGlobalConfig(gc);//全局配置放到自动生成器

        //2、设置数据源
        DataSourceConfig dsc = new DataSourceConfig();
        //jdbc:oracle:thin:@localhost:1521:orcl
        /*dsc.setUrl("jdbc:oracle:thin:@192.168.7.26:1521:testgkdb");
        dsc.setDriverName("oracle.jdbc.driver.OracleDriver");
        dsc.setUsername("FASP2020");
        dsc.setPassword("FASP2020");
        dsc.setDbType(DbType.ORACLE);*/
        dsc.setUrl("jdbc:mysql://localhost:3306/mybatis_plus?useSSL=false&useUnicode=true&characterEncoding=utf-8&serverTimezone=GMT%2B8");
        dsc.setDriverName("com.mysql.cj.jdbc.Driver");
        dsc.setUsername("root");
        dsc.setPassword("981204");
        dsc.setDbType(DbType.MYSQL);//设置数据库类型
        mpg.setDataSource(dsc);//数据源放到自动生成器

        //3、包的配置
        PackageConfig pc = new PackageConfig();
        pc.setModuleName("blog");//设置包名
        pc.setParent("com.kuang");//放在哪个包下
        pc.setEntity("entity");//要自动生成的
        pc.setMapper("mapper");
        pc.setService("service");
        pc.setController("controller");
        mpg.setPackageInfo(pc);//数据源放到自动生成器

        //4、策略配置
        StrategyConfig strategy = new StrategyConfig();
        strategy.setInclude("user"); // 设置要映射的表名
        strategy.setNaming(NamingStrategy.underline_to_camel);//表名转驼峰
        strategy.setColumnNaming(NamingStrategy.underline_to_camel);//字段名转驼峰
        strategy.setEntityLombokModel(true);//自动生成使用lombok
        strategy.setLogicDeleteFieldName("deleted");//逻辑删除字段自动配置
        // 自动填充配置
        TableFill gmtCreate = new TableFill("gmt_create", FieldFill.INSERT);//自动创建时间执行insert操作
        TableFill gmtModified = new TableFill("gmt_modified", FieldFill.INSERT_UPDATE);//自动修改时间执行insert操作
        ArrayList<TableFill> tableFills = new ArrayList<>();
        tableFills.add(gmtCreate);
        tableFills.add(gmtModified);
        strategy.setTableFillList(tableFills);// 自动填充配置到策略中
        // 乐观锁
        strategy.setVersionFieldName("version");
        strategy.setRestControllerStyle(true);//开启Restful的驼峰命名
        strategy.setControllerMappingHyphenStyle(true);// localhost:8080/hello_id_2  //Controlle的的链接请求设置
        mpg.setStrategy(strategy);
        mpg.execute(); //执行
    }
}
效果

4、使用Oracle数据库的代码自动生成器
1、
 <!--连接Oracle数据库-->
        <dependency>
            <groupId>com.oracle.ojdbc</groupId>
            <artifactId>ojdbc8</artifactId>
            <scope>runtime</scope>
        </dependency>
        <!--客户端全球化-->
        <dependency>
            <groupId>cn.easyproject</groupId>
            <artifactId>orai18n</artifactId>
            <version>12.1.0.2.0</version>
        </dependency>
2、
#
spring.datasource.url=jdbc\:oracle\:thin\:@192.168.7.26\:1521\:testgkdb
spring.datasource.username=FASP2020
spring.datasource.password=FASP2020
spring.datasource.driver-class-name=oracle.jdbc.driver.OracleDriver
3、
public class KuangCode {
    public static void main(String[] args) {
        // 需要构建一个 代码自动生成器 对象
        AutoGenerator mpg = new AutoGenerator();
        // 配置策略
        // 1、全局配置
        GlobalConfig gc = new GlobalConfig();
        String projectPath = System.getProperty("user.dir");
        gc.setOutputDir(projectPath + "/src/main/java");
        gc.setAuthor("狂神说");
        gc.setOpen(false);
        gc.setFileOverride(false);
        // 是否覆盖
        gc.setServiceName("%sService");
        // 去Service的I前缀
        gc.setIdType(IdType.ID_WORKER);
        gc.setDateType(DateType.ONLY_DATE);
       /* gc.setSwagger2(true);*/
        mpg.setGlobalConfig(gc);

        //2、设置数据源
        DataSourceConfig dsc = new DataSourceConfig();
        //jdbc:oracle:thin:@localhost:1521:orcl
        dsc.setUrl("jdbc:oracle:thin:@192.168.7.26:1521:testgkdb");
        dsc.setDriverName("oracle.jdbc.driver.OracleDriver");
        dsc.setUsername("FASP2020");
        dsc.setPassword("FASP2020");
        dsc.setDbType(DbType.ORACLE);
        mpg.setDataSource(dsc);

        //3、包的配置
        PackageConfig pc = new PackageConfig();
        pc.setModuleName("blog");
        pc.setParent("com.kuang");
        pc.setEntity("entity");
        pc.setMapper("mapper");
        pc.setService("service");
        pc.setController("controller");
        mpg.setPackageInfo(pc);

        //4、策略配置
        StrategyConfig strategy = new StrategyConfig();
        strategy.setInclude("GLB_BAL");
        // 设置要映射的表名
        strategy.setNaming(NamingStrategy.underline_to_camel);
        strategy.setColumnNaming(NamingStrategy.underline_to_camel);
        /*strategy.setEntityLombokModel(true);*/
        // 自动lombok;
        strategy.setLogicDeleteFieldName("deleted");
        // 自动填充配置
        TableFill gmtCreate = new TableFill("gmt_create", FieldFill.INSERT);
        TableFill gmtModified = new TableFill("gmt_modified", FieldFill.INSERT_UPDATE);
        ArrayList<TableFill> tableFills = new ArrayList<>();
        tableFills.add(gmtCreate);
        tableFills.add(gmtModified);
        strategy.setTableFillList(tableFills);
        // 乐观锁
        strategy.setVersionFieldName("version");
        strategy.setRestControllerStyle(true);
        strategy.setControllerMappingHyphenStyle(true);// localhost:8080/hello_id_2
        mpg.setStrategy(strategy);
        mpg.execute(); //执行
    }
}
一、快速入门
https://mp.baomidou.com/
- 导入对应依赖
- 研究依赖如何配置
- 代码如何编写
- 提高扩展技术能力
1、创建数据库 mybatis_plus
2、创建user表
DROP TABLE IF EXISTS user;CREATE TABLE user( id BIGINT(20) NOT NULL COMMENT '主键ID', name VARCHAR(30) NULL DEFAULT NULL COMMENT '姓名', age INT(11) NULL DEFAULT NULL COMMENT '年龄', email VARCHAR(50) NULL DEFAULT NULL COMMENT '邮箱', PRIMARY KEY (id));
INSERT INTO user (id, name, age, email) VALUES(1, 'Jone', 18, 'test1@baomidou.com'),(2, 'Jack', 20, 'test2@baomidou.com'),(3, 'Tom', 28, 'test3@baomidou.com'),(4, 'Sandy', 21, 'test4@baomidou.com'),(5, 'Billie', 24, 'test5@baomidou.com'); 3、创建项目
<!--数据库驱动--><dependency> <groupId>mysql</groupId> <artifactId>mysql-connector-java</artifactId> <version>8.0.20</version></dependency><!--mybatis-plus--><dependency> <groupId>com.baomidou</groupId> <artifactId>mybatis-plus-boot-starter</artifactId> <version>3.0.5</version></dependency><!--lombok--><dependency> <groupId>org.projectlombok</groupId> <artifactId>lombok</artifactId> <optional>true</optional></dependency>说明:我们使用mybatis-plus可以节省我们大量的代码,尽量不要同时导入mybatis和mybatis-plus!
5、连接数据库,这一步和mybatis相同

# mysql
spring.datasource.username=root
spring.datasource.password=root
spring.datasource.url=jdbc:mysql://localhost:3306/mybatis_plus?userSSL=true&useUnicode=true&characterEncoding=UTF-8&serverTimezone=UTC
spring.datasource.driver-class-name=com.mysql.cj.jdbc.Driver
6、传统方式:pojo-dao(连接mybatis,配置mapper.xml文件)- service - controller
6、使用了mybatis-plus 之后

pojo(实体类):
- extends Model<User> : 必须存在对应的原始mapper并继承
baseMapper
- 并且可以使用的前提下
才能使用此 AR 模式 !!!
AR模式看下这篇博客:https://blog.csdn.net/qq_41933149/article/details/101120648
@Data@TableName("user")public class User extends Model<User> { @TableId private Long id; private String name; private Integer age; private String email; private Long managerId; private LocalDateTime createTime;}mapper接口(dao层):
// 在对应的Mapper上面继承基本的接口 BaseMapper@Repository // 代表持久层public interface UserMapper extends BaseMapper<User> { // 所有的CRUD操作都已经基本完成了 // 你不需要像以前的配置一大堆文件了}Service层:
import com.baomidou.mybatisplus.extension.service.IService;import com.zhixi.pojo.User;/** * @author zhangzhixi * @date 2021-6-8 23:11 */public interface UserService extends IService<User> {}
/** * @author zhangzhixi * @date 2021-6-8 23:11 */@Servicepublic class UserServiceImpl extends ServiceImpl<UserMapper, User> implements UserService {}启动类:
注意点:我们需要在主启动类上去扫描我们的mapper包下的所有接口
测试类中测试
@SpringBootTestclass MybatisPlusApplicationTests { // 继承了BaseMapper,所有的方法都来自父类 // 我们也可以编写自己的扩展方法 @Autowired UserMapper userMapper; @Test void contextLoads() { // 参数是一个 Wrapper , 条件构造器,这里我们先不用 null // 查询全部用户 List<User> users = userMapper.selectList(null); users.forEach(System.out::println); }}思考问题:
2、方法哪里来的?MyBatis-Plus 都写好了
二、配置日志
# 配置日志 (系统自带的,控制台输出) mybatis-plus.configuration.log-impl=org.apache.ibatis.logging.stdout.StdOutImpl
三、CRUD
Insert 插入
@Testpublic void testInsert() { User user = new User(); user.setName("Dainel"); user.setAge(3); user.setEmail("daniel@alibaba.com"); int result = userMapper.insert(user);// 帮我们自动生成id System.out.println(result);// 受影响的行数 System.out.println(user);// 发现: id自动回填}数据库插入的id默认值为:全局的唯一id
默认 ID_WORKER 全局唯一id
雪花算法:
主键自增
-
实体类字段上 @TableId(type = IdType.AUTO)
-
数据库字段上一定是自增的
-
再次测试即可
其余的源码解释
public enum IdType { AUTO(0), // 数据库id自增 NONE(1), // 未设置主键 INPUT(2), // 手动输入,自己写id ID_WORKER(3), // 默认的全局唯一id UUID(4), // 全局唯一id uuid ID_WORKER_STR(5); // ID_WORKER 字符串表示法}@Test /*更新操作*/void updateUser() { // 查询到要更新的用户 User user = userMapper.selectById(7); // 要更新的值 user.setName("demo"); user.setAge(21); // 执行更新 userMapper.updateById(user);}创建时间、修改时间!这些个操作一般都是自动化完成的,我们不希望手动更新!
方式一:数据库级别(工作中不允许修改数据库)
在表中新增字段 create_time,update_time;注意将更新的时间戳勾选
-
再次测试插入方法,我们需要先把实体类同步
12privateDate createTime;privateDate updateTime; -
再次查看更新结果即可
方式二:代码级别
删除数据库中的默认值、更新操作
-
实体类的字段属性上需要增加注解
123456//字段添加填充内容@TableField(fill = FieldFill.INSERT)privateDate createTime;@TableField(fill = FieldFill.INSERT_UPDATE)privateDate updateTime; -
编写处理器来处理这个注解即可:handler/MyMetaObjectHandler
123456789101112131415161718192021222324252627282930package com.kuang.handler;import com.baomidou.mybatisplus.core.handlers.MetaObjectHandler;import lombok.extern.slf4j.Slf4j;import org.apache.ibatis.reflection.MetaObject;import org.springframework.stereotype.Component;import java.util.Date;@Slf4j@Component// 一定不要忘记把处理器加到IOC容器中publicclassMyMetaObjectHandler implements MetaObjectHandler {// 插入时候的填充策略@OverridepublicvoidinsertFill(MetaObject metaObject) {log.info("start insert fill ...");// setFieldValByName(String fieldName, Object fieldVal, MetaObject metaObject)this.setFieldValByName("createTime",newDate(), metaObject);this.setFieldValByName("updateTime",newDate(), metaObject);}// 更新时的填充策略@OverridepublicvoidupdateFill(MetaObject metaObject) {log.info("start update fill ...");this.setFieldValByName("updateTime",newDate(), metaObject);}} -
测试插入
-
测试更新,观察时间已经更新
乐观锁:顾名思义,它总是认为不会出现问题,无论干什么都不去上锁!如果出现了问题,再次更新值测试!
悲观锁:顾名思义,它总是认为总是出现问题,无论干什么都上锁!再去操作!
- 取出记录时,获取当前version
- 更新时,带上这个version
- 执行更新时, set version = newVersion where version = oldVersion
- 如果version不对,就更新失败
测试一下MyBatisPlus的插件:
2、实体类添加注解
@Version // 乐观锁的version注解private Integer version;3、编写配置
config/MybatisPlusConfig
// 配置,会被spring扫描到@Configurationpublic class MybatisPlusConfig { // 注册乐观锁 @Bean public OptimisticLockerInterceptor optimisticLockerInnerInterceptor(){ return new OptimisticLockerInterceptor(); }}将2号的姓名改为lipu。看他的version会怎么变化
@Testvoid OptimisticLock() { // 查询到要进行更新的用户 User user = userMapper.selectById(2); // 修改用户的属性 user.setName("lipu"); user.setAge(28); // 提交更新 userMapper.updateById(user);}
测试乐观锁失败(多线程下)
// 测试乐观锁失败!多线程下@Testpublic void testVersionFall() { // 线程1 User user1 = userMapper.selectById(9); user1.setName("fan111"); user1.setAge(14); // 线程2 User user2 = userMapper.selectById(9); user2.setName("fan222"); user2.setAge(24); userMapper.updateById(user2); //自旋锁来多次尝试提交! userMapper.updateById(user1); //如果没有乐观锁就会覆盖插队线程的值}// 测试查询@Testpublic void testSelectById(){ User user = userMapper.selectById(1); System.out.println(user);}// 批量查询@Testpublic void testSelectByBatchIds(){ List<User> users = userMapper.selectBatchIds(Arrays.asList(1, 2, 3)); users.forEach(System.out::println);}// 按照条件查询之一使用 map@Testpublic void testSelectByMap(){ HashMap<String, Object> map = new HashMap<>(); // 自定义要查询 map.put("name","Dainel"); map.put("age","6"); List<User> users = userMapper.selectByMap(map); users.forEach(System.out::println);}
如何使用:
// 分页插件@Beanpublic PaginationInterceptor paginationInterceptor() { return new PaginationInterceptor();}
// 分页查询@Testvoid selectLimit() { Page<User> page = new Page<User>(2, 5); // 获取通过分页查询到的记录条数 page.getRecords().forEach(System.out::println); // 查询 userMapper.selectPage(page, null); // 查询总记录条数 System.out.println("总计数条数:" + page.getTotal());}// 测试删除@Testpublic void testdelete(){ userMapper.deleteById(6L);}// 测试批量删除@Testpublic void testdeleteBatchId(){ userMapper.deleteBatchIds(Arrays.asList(1,14));}//通过map删除@Testpublic void testDeleteByMap(){ HashMap<String, Object> map = new HashMap<>(); map.put("name","KUANG"); userMapper.deleteByMap(map);}
9. 逻辑删除
物理删除:从数据库中直接移除
逻辑删除:在数据库中没有被移除,而是通过一个变量让他生效!deleted=0 --> deleted=1
1、在数据库表中增加一个deleted字段
// 表逻辑删除@TableLogicprivate int deleted;3、配置:config/MybatisPlusConfig
注意:在新版本的MP中,不需要再写逻辑删除配置了,知道就行,只需要在实体类逻辑删除字段上加上注解即可!
// 逻辑删除组件public ISqlInjector sqlInjector(){ return new LogicSqlInjector();}
# 配置逻辑删除mybatis-plus.global-config.db-config.logic-delete-value=1mybatis-plus.global-config.db-config.logic-not-delete-value=0
12345// 逻辑删除@TestvoiddeleteLogic() {userMapper.deleteById(1);}
逻辑删除成功、
我们通过查询1号用户,验证下看是否能够查询的到:
四、性能分析插件
PerformanceInterceptor在3.2.0被移除了,如果想进行性能分析,用第三方的,官方这样写的“该插件 3.2.0 以上版本移除推荐使用第三方扩展 执行 SQL 分析打印 功能
https://baomidou.com/guide/p6spy.html
作用:性能分析拦截器,用于输出每条SQL语句及其执行时间
1、导入插件
123456789// SQL执行效率插件@Bean@Profile({"dev","test"})publicPerformanceInterceptor performanceInterceptor(){PerformanceInterceptor performanceInterceptor =newPerformanceInterceptor();performanceInterceptor.setMaxTime(100);//ms 设置sql执行的最大时间,如果超过了则不执行performanceInterceptor.setFormat(true);// 是否格式化returnperformanceInterceptor;}
12# 开发环境spring.profiles.active=dev
1234567891011// 分页查询@TestvoidselectLimit() {Page<User> page =newPage<User>(1, 5);// 获取通过分页查询到的记录条数page.getRecords().forEach(System.out::println);// 查询userMapper.selectPage(page,null);// 查询总记录条数System.out.println("总计数条数:"+ page.getTotal());}
使用性能分析插件可以提高效率,新版本MP已经移除该拆件了,可以使用druid
五、代码自动生成**非常NB
AutoGenerator 是 MyBatis-Plus 的代码生成器,通过 AutoGenerator 可以快速生成 Entity、
需要使用到的pom依赖:
 <dependencies>
        <!--swagger依赖-->
        <dependency>
            <groupId>io.springfox</groupId>
            <artifactId>springfox-swagger2</artifactId>
            <version>2.7.0</version>
        </dependency>
        <dependency>
            <groupId>io.springfox</groupId>
            <artifactId>springfox-swagger-ui</artifactId>
            <version>2.7.0</version>
        </dependency>

        <!-- 模板引擎 -->
        <dependency>
            <groupId>org.apache.velocity</groupId>
            <artifactId>velocity-engine-core</artifactId>
            <version>2.0</version>
        </dependency>
        <!--导入mysql驱动-->
        <dependency>
            <groupId>mysql</groupId>
            <artifactId>mysql-connector-java</artifactId>
        </dependency>

        <dependency>
            <groupId>com.baomidou</groupId>
            <artifactId>mybatis-plus-boot-starter</artifactId>
            <version>3.0.5</version>
        </dependency>
        <dependency>
            <groupId>org.springframework.boot</groupId>
            <artifactId>spring-boot-starter-web</artifactId>
        </dependency>

        <dependency>
            <groupId>org.projectlombok</groupId>
            <artifactId>lombok</artifactId>
            <optional>true</optional>
        </dependency>
        <dependency>
            <groupId>org.springframework.boot</groupId>
            <artifactId>spring-boot-starter-test</artifactId>
            <scope>test</scope>
            <exclusions>
                <exclusion>
                    <groupId>org.junit.vintage</groupId>
                    <artifactId>junit-vintage-engine</artifactId>
                </exclusion>
            </exclusions>
        </dependency>
    </dependencies>
package com.zhixi;/** * @author zhangzhixi * @date 2021/2/20 20:47 */import com.baomidou.mybatisplus.annotation.DbType;import com.baomidou.mybatisplus.annotation.FieldFill;import com.baomidou.mybatisplus.annotation.IdType;import com.baomidou.mybatisplus.generator.AutoGenerator;import com.baomidou.mybatisplus.generator.config.DataSourceConfig;import com.baomidou.mybatisplus.generator.config.GlobalConfig;import com.baomidou.mybatisplus.generator.config.PackageConfig;import com.baomidou.mybatisplus.generator.config.StrategyConfig;import com.baomidou.mybatisplus.generator.config.po.TableFill;import com.baomidou.mybatisplus.generator.config.rules.DateType;import com.baomidou.mybatisplus.generator.config.rules.NamingStrategy;import java.util.ArrayList;// 代码自动生成器public class zhixiCode { public static void main(String[] args) { // 需要构建一个 代码自动生成器 对象 AutoGenerator mpg = new AutoGenerator(); // 配置策略 // 1、全局配置 GlobalConfig gc = new GlobalConfig(); // 代码输出到哪个目录(获取到项目目录) String projectPath = System.getProperty("user.dir"); gc.setOutputDir(projectPath + "/src/main/java"); // 设置作者 gc.setAuthor("张志喜"); // 是否打开资源管理器(生成完代码打开目录) gc.setOpen(false); // 是否覆盖原来的文件 gc.setFileOverride(false); // 去掉IService的I前缀(正则) gc.setServiceName("%sService"); // 设置字段 gc.setIdType(IdType.ID_WORKER); gc.setDateType(DateType.ONLY_DATE); // 配置swagger gc.setSwagger2(true); mpg.setGlobalConfig(gc); //2、设置数据源 DataSourceConfig dsc = new DataSourceConfig(); dsc.setUrl("jdbc:mysql://182.92.209.212:3306/mybatis_plus?useSSL=true&useUnicode=true&characterEncoding=utf-8&serverTimezone=Asia/Shanghai"); dsc.setDriverName("com.mysql.cj.jdbc.Driver"); dsc.setUsername("root"); dsc.setPassword("密码"); // 数据库类型 dsc.setDbType(DbType.MYSQL); mpg.setDataSource(dsc); //3、包的配置(只需要改实体类名字 和包名 还有 数据库配置即可) PackageConfig pc = new PackageConfig(); // 模块名 pc.setModuleName("blog"); // 设置类放在哪个包下 pc.setParent("com.kuang"); // 设置实体类 pc.setEntity("entity"); // 设置mapper pc.setMapper("mapper"); // 设置services层 pc.setService("service"); // 设置controller层 pc.setController("controller"); mpg.setPackageInfo(pc); //4、策略配置 StrategyConfig strategy = new StrategyConfig(); // 设置要映射的表名 strategy.setInclude("blog_tags", "course", "links", "sys_settings", "user_record", " user_say"); // 设置下划线转驼峰命名 strategy.setNaming(NamingStrategy.underline_to_camel); strategy.setColumnNaming(NamingStrategy.underline_to_camel); // 自动lombok; strategy.setEntityLombokModel(true); // 设置逻辑删除列名 strategy.setLogicDeleteFieldName("deleted"); // 自动填充配置 TableFill gmtCreate = new TableFill("gmt_create", FieldFill.INSERT);/*创建时间*/ TableFill gmtModified = new TableFill("gmt_modified", FieldFill.INSERT_UPDATE);/*修改时间*/ ArrayList<TableFill> tableFills = new ArrayList<>(); tableFills.add(gmtCreate); tableFills.add(gmtModified); // 添加自动填充 strategy.setTableFillList(tableFills); // 乐观锁 strategy.setVersionFieldName("version");/*设置版本字段名称*/ strategy.setRestControllerStyle(true); strategy.setControllerMappingHyphenStyle(true);// localhost:8080/hello_id_2 mpg.setStrategy(strategy); mpg.execute(); //执行 }}