
寒假学习day10
今天学习了为LinearLayout设置分割线。
很多界面开发中都会设置一些下划线,或者分割线,从而使得界面更加整洁美观,比如下面的酷狗 音乐的注册页面:

对于这种线,我们通常的做法有两种 ①直接在布局中添加一个view,这个view的作用仅仅是显示出一条线,代码也很简单:
<View
    android:layout_width="match_parent"
    android:layout_height="1px"
    android:background="#000000" />
这个是水平方向上的黑线
②第二种则是使用LinearLayout的一个divider属性,直接为LinearLayout设置分割线 这里就需要你自己准备一张线的图片了 1)android:divider设置作为分割线的图片 2)android:showDividers设置分割线的位置,none(无),beginning(开始),end(结束),middle(每两个组件间) 3)dividerPadding设置分割线的Padding
使用示例:
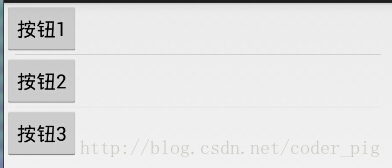
实现代码:
<LinearLayout xmlns:android="http://schemas.android.com/apk/res/android"
    xmlns:tools="http://schemas.android.com/tools"
    android:id="@+id/LinearLayout1"
    android:layout_width="match_parent"
    android:layout_height="match_parent"
    android:divider="@drawable/ktv_line_div"
    android:orientation="vertical"
    android:showDividers="middle"
    android:dividerPadding="10dp"
    tools:context="com.jay.example.linearlayoutdemo.MainActivity" >

    <Button
        android:layout_width="wrap_content"
        android:layout_height="wrap_content"
        android:text="按钮1" />

    <Button
        android:layout_width="wrap_content"
        android:layout_height="wrap_content"
        android:text="按钮2" />

    <Button
        android:layout_width="wrap_content"
        android:layout_height="wrap_content"
        android:text="按钮3" />

</LinearLayout>
