
【学习】Spring boot
Spring Boot
基础
SpringBoot是一种快速使用Spring的方式,这种方式遵循约定优于配置的思想,无须编写大量的配置文件,
约定优于配置
软件设计范式,系统、类库或框架假定合理的默认值,而非要求提供不必要的配置。【例如实体名和表名相同】
Spring Boot核心
Spring 缺点:
配置繁琐:spring使用大量xml配置
项目的依赖管理费时费力:项目搭建时需要导入大量坐标(SSM),而且坐标之间存在版本依赖。
起步依赖
解决项目依赖繁琐的问题
将具备某种功能的坐标打包到一起,并提供一些默认的功能。(本质上是一个Maven项目对象模型,定义了对其他库的传递依赖)
自动配置
解决配置繁琐的问题
springboot会将一些配置类的bean注册进IoC容器,可以在需要的地方使用@Autowired/@Resource等注解来使用
开发流程
Spring Initializr (需要联网)——> 填写项目信息 ——> 选择版本及需要的依赖
启动类要放在包的根路径下
热部署配置
1.添加依赖
<dependency>
  <groupId>org.springframework.boot</groupId>
  <artifactId>spring-boot-devtools</artifactId>
</dependency>
2.File —— Settings —— Compiler —— 勾选 Build project automatically
3.ctrl + alt + shift + / ——> Registry ——> 勾选 complier.automake.allow.when.app.running
配置文件
SpringBoot 会自动加载以application开头,以yml/yaml/properties结尾(按顺序优先级由低到高)
属性值注入
两种方式(application.yml)
使用 @ConfigurationProperties(prefix = "person")
Bean类上需要有set方法
person:
  id: 1
  test: test
  hobby: [中文,English]
  pet: { type: dog, name: 网 }
使用@Value("${persion.test}")
自定义配置文件@PropertySource("自定义配置文件的位置")
随机值设置
${random.value} //配置随机值
${random.int} //配置随机整形值
${random.long}//配置随机长整形值
${random.uuid}//配置随机uuid值
${random.int(10)}//小于10的随机整数
${random.int[0,10]}//范围在[0,10]的随机整数
引用参数
引用的参数需要在引用之前已经配置过(不同配置文件下);同个文件(application.yml)中属性的先后顺序无关
persion.test: person的id是${person.id}
自定义配置类
springboot框架中推荐使用配置类来替换传统的xml配置
@Configuration //表明该类是配置类
public class MyConfig {

    @Bean //将返回值对象作为组件添加到IoC容器,标识默认是方法名(myService),或者给注解添加name属性
    public MyService myService(){
        return new MyService();
    }
}
原理
依赖管理
导入时为什么不要?
父工程: spring-boot-starter-parent
做了编码设置,jdk版本设置,引入配置文件,插件管理
爷爷工程: spring-boot-dependencies
通过
如果pom.xml中的依赖文件不是 spring-boot-starter-parent 管理的,那么还是需要版本号的。
当前项目的需要的依赖,通过依赖启动器传递下来(maven传递依赖)
自动配置
步骤
- springboot应用启动;
- @SpringBootApplication起作用;
- @EnableAutoConfiguration;
- @AutoConfigurationPackage:这个组合注解主要是@lmport(AutoConfigurationPackages.Registrar.class),它通过将Registrar类导入到容器中,而Registrar类作用是扫描主配置类同级目录以及子包,并将相应的组件导入到springboot创建管理的容器中;
- @Import(AutoConfigurationImportSelector.class):它通过将AutoConfigurationImportSelector类导入到容器中,AutoConfigurationImportSelector类作用是通过selectImports方法执行的过程中,会使用内部工具类SpringFactoriesLoader,查找classpath上所有jar包中的META-INF/spring.factories进行加载,实现将配置类信息交给SpringFactory加载器进行一系列的容器创建过程
@SpringBootApplication
@Target(ElementType.TYPE)    //注解的适用范围,Type表示注解可以描述在类、接口、注解或枚举中
@Retention(RetentionPolicy.RUNTIME) ///表示注解的生命周期,Runtime运行时
@Documented ////表示注解可以记录在javadoc中
@Inherited   //表示可以被子类继承该注解

@SpringBootConfiguration //// 标明该类为配置类
@EnableAutoConfiguration  // 启动自动配置功能
@ComponentScan(excludeFilters = {   // 包扫描器 <context:component-scan base-package="com.xxx.xxx"/>
		@Filter(type = FilterType.CUSTOM, classes = TypeExcludeFilter.class),
		@Filter(type = FilterType.CUSTOM, classes = AutoConfigurationExcludeFilter.class) })
public @interface SpringBootApplication {


	@AliasFor(annotation = EnableAutoConfiguration.class)
	Class<?>[] exclude() default {};


	@AliasFor(annotation = EnableAutoConfiguration.class)
	String[] excludeName() default {};


	@AliasFor(annotation = ComponentScan.class, attribute = "basePackages")
	String[] scanBasePackages() default {};

	@AliasFor(annotation = ComponentScan.class, attribute = "basePackageClasses")
	Class<?>[] scanBasePackageClasses() default {};

}
@SpringBootConfiguration
表明该类配置类,能够被组件扫描器扫描
@Target({ElementType.TYPE})
@Retention(RetentionPolicy.RUNTIME)
@Documented
@Configuration //配置类
public @interface SpringBootConfiguration {

}
@EnableAutoConfiguration
启动自动配置功能
//自动配置包 : 会把@springbootApplication注解标注的类所在包名拿到,并且对该包及其子包进行扫描,将组件添加到容器中
@AutoConfigurationPackage
//可以帮助springboot应用将所有符合条件的@Configuration配置都加载到当前SpringBoot创建并使用的IoC容器(ApplicationContext)中
@Import(AutoConfigurationImportSelector.class)
public @interface EnableAutoConfiguration {

	String ENABLED_OVERRIDE_PROPERTY = "spring.boot.enableautoconfiguration";

	/**
	 * Exclude specific auto-configuration classes such that they will never be applied.
	 * @return the classes to exclude
	 */
	Class<?>[] exclude() default {};

	/**
	 * Exclude specific auto-configuration class names such that they will never be
	 * applied.
	 * @return the class names to exclude
	 * @since 1.3.0
	 */
	String[] excludeName() default {};

}
@AutoConfigurationPackage
会把@springbootApplication注解标注的类所在包名拿到,并且对该包及其子包进行扫描,将组件添加到容器中
//spring框架的底层注解,它的作用就是给容器中导入某个组件类,
//例如@Import(AutoConfigurationPackages.Registrar.class),它就是将Registrar这个组件类导入到容器中
@Import(AutoConfigurationPackages.Registrar.class)  //  默认将主配置类(@SpringBootApplication)所在的包及其子包里面的所有组件扫描到Spring容器中
public @interface AutoConfigurationPackage {

}

//=========================================================
static class Registrar implements ImportBeanDefinitionRegistrar, DeterminableImports {

		// 获取的是项目主程序启动类所在的目录
		//metadata:注解标注的元数据信息
		@Override
		public void registerBeanDefinitions(AnnotationMetadata metadata, BeanDefinitionRegistry registry) {
			//默认将会扫描@SpringBootApplication标注的主配置类所在的包及其子包下所有组件
			register(registry, new PackageImport(metadata).getPackageName());
		}

		@Override
		public Set<Object> determineImports(AnnotationMetadata metadata) {
			return Collections.singleton(new PackageImport(metadata));
		}

	}
//==============public abstract class AutoConfigurationPackages======================
public static void register(BeanDefinitionRegistry registry, String... packageNames) {
	    // 如果已经存在该 BEAN ,则修改其包(package)属性
		// BEAN 就是 AutoConfigurationPackages,用于存储自动配置包以供稍后引用
		if (registry.containsBeanDefinition(BEAN)) {
			BeanDefinition beanDefinition = registry.getBeanDefinition(BEAN);
			ConstructorArgumentValues constructorArguments = beanDefinition.getConstructorArgumentValues();
			// 将构造函数的第一个参数设置为包名列表
			constructorArguments.addIndexedArgumentValue(0, addBasePackages(constructorArguments, packageNames));
        // 如果不存在该 BEAN ,则创建一个 Bean ,并进行注册
        } else { GenericBeanDefinition beanDefinition = new GenericBeanDefinition();
			beanDefinition.setBeanClass(BasePackages.class);
			// 将beanClass设置为BasePackages
			beanDefinition.getConstructorArgumentValues().addIndexedArgumentValue(0, packageNames);
			// 将构造函数的第一个参数设置为包名列表,也就是BasePackages的构造函数
			beanDefinition.setRole(BeanDefinition.ROLE_INFRASTRUCTURE);
			// 注册beanDefinition
			registry.registerBeanDefinition(BEAN, beanDefinition);
		}
	}
@Import(AutoConfigurationImportSelector.class)
可以帮助springboot应用将所有符合条件的@Configuration配置都加载到当前SpringBoot创建并使用的IoC容器(ApplicationContext)中
AutoConfigurationImportSelector
@Override
	public String[] selectImports(AnnotationMetadata annotationMetadata) {
		//判断 enableautoconfiguration注解有没有开启,默认开启(是否进行自动装配)
		if (!isEnabled(annotationMetadata)) {
			return NO_IMPORTS;
		}
		//1. 加载配置文件META-INF/spring-autoconfigure-metadata.properties,从中获取所有支持自动配置类的条件
		//作用:SpringBoot使用一个Annotation的处理器来收集一些自动装配的条件,那么这些条件可以在META-INF/spring-autoconfigure-metadata.properties进行配置。
		// SpringBoot会将收集好的@Configuration进行一次过滤进而剔除不满足条件的配置类
		// 自动配置的类全名.条件=值
		AutoConfigurationMetadata autoConfigurationMetadata = AutoConfigurationMetadataLoader.loadMetadata(this.beanClassLoader);
		AutoConfigurationEntry autoConfigurationEntry = getAutoConfigurationEntry(autoConfigurationMetadata, annotationMetadata);
		return StringUtils.toStringArray(autoConfigurationEntry.getConfigurations());
	}
public static AutoConfigurationMetadata loadMetadata(ClassLoader classLoader) {
		//重载方法
		return loadMetadata(classLoader, PATH);
	}

	static AutoConfigurationMetadata loadMetadata(ClassLoader classLoader, String path) {
		try {
			//1.读取spring-boot-autoconfigure.jar包中spring-autoconfigure-metadata.properties的信息生成urls枚举对象
            // 获得 PATH 对应的 URL 们
			Enumeration<URL> urls = (classLoader != null) ? classLoader.getResources(path) : ClassLoader.getSystemResources(path);
            // 遍历 URL 数组,读取到 properties 中
            Properties properties = new Properties();

			//2.解析urls枚举对象中的信息封装成properties对象并加载
			while (urls.hasMoreElements()) {
				properties.putAll(PropertiesLoaderUtils.loadProperties(new UrlResource(urls.nextElement())));
			}
			// 将 properties 转换成 PropertiesAutoConfigurationMetadata 对象

			//根据封装好的properties对象生成AutoConfigurationMetadata对象返回
			return loadMetadata(properties);
		} catch (IOException ex) {
			throw new IllegalArgumentException("Unable to load @ConditionalOnClass location [" + path + "]", ex);
		}
	}
protected AutoConfigurationEntry getAutoConfigurationEntry(AutoConfigurationMetadata autoConfigurationMetadata, AnnotationMetadata annotationMetadata) {
	    // 1. 判断是否开启注解。如未开启,返回空串
		if (!isEnabled(annotationMetadata)) {
			return EMPTY_ENTRY;
		}
		// 2. 获得注解的属性
		AnnotationAttributes attributes = getAttributes(annotationMetadata);

		// 3. getCandidateConfigurations()用来获取默认支持的自动配置类名列表
		// spring Boot在启动的时候,使用内部工具类SpringFactoriesLoader,查找classpath上所有jar包中的META-INF/spring.factories,
		// 找出其中key为org.springframework.boot.autoconfigure.EnableAutoConfiguration的属性定义的工厂类名称,
		// 将这些值作为自动配置类导入到容器中,自动配置类就生效了
		List<String> configurations = getCandidateConfigurations(annotationMetadata, attributes);


		// 3.1 //去除重复的配置类,若我们自己写的starter 可能存在重复的
		configurations = removeDuplicates(configurations);
		// 4. 如果项目中某些自动配置类,我们不希望其自动配置,我们可以通过EnableAutoConfiguration的exclude或excludeName属性进行配置,
		// 或者也可以在配置文件里通过配置项“spring.autoconfigure.exclude”进行配置。
		//找到不希望自动配置的配置类(根据EnableAutoConfiguration注解的一个exclusions属性)
		Set<String> exclusions = getExclusions(annotationMetadata, attributes);
		// 4.1 校验排除类(exclusions指定的类必须是自动配置类,否则抛出异常)
		checkExcludedClasses(configurations, exclusions);
		// 4.2 从 configurations 中,移除所有不希望自动配置的配置类
		configurations.removeAll(exclusions);

		// 5. 对所有候选的自动配置类进行筛选,根据项目pom.xml文件中加入的依赖文件筛选出最终符合当前项目运行环境对应的自动配置类

		//@ConditionalOnClass : 某个class位于类路径上,才会实例化这个Bean。
		//@ConditionalOnMissingClass : classpath中不存在该类时起效
		//@ConditionalOnBean : DI容器中存在该类型Bean时起效
		//@ConditionalOnMissingBean : DI容器中不存在该类型Bean时起效
		//@ConditionalOnSingleCandidate : DI容器中该类型Bean只有一个或@Primary的只有一个时起效
		//@ConditionalOnExpression : SpEL表达式结果为true时
		//@ConditionalOnProperty : 参数设置或者值一致时起效
		//@ConditionalOnResource : 指定的文件存在时起效
		//@ConditionalOnJndi : 指定的JNDI存在时起效
		//@ConditionalOnJava : 指定的Java版本存在时起效
		//@ConditionalOnWebApplication : Web应用环境下起效
		//@ConditionalOnNotWebApplication : 非Web应用环境下起效

		//总结一下判断是否要加载某个类的两种方式:
		//根据spring-autoconfigure-metadata.properties进行判断。
		//要判断@Conditional是否满足
		// 如@ConditionalOnClass({ SqlSessionFactory.class, SqlSessionFactoryBean.class })表示需要在类路径中存在SqlSessionFactory.class、SqlSessionFactoryBean.class这两个类才能完成自动注册。
		configurations = filter(configurations, autoConfigurationMetadata);


		// 6. 将自动配置导入事件通知监听器
		//当AutoConfigurationImportSelector过滤完成后会自动加载类路径下Jar包中META-INF/spring.factories文件中 AutoConfigurationImportListener的实现类,
		// 并触发fireAutoConfigurationImportEvents事件。
		fireAutoConfigurationImportEvents(configurations, exclusions);
		// 7. 创建 AutoConfigurationEntry 对象
		return new AutoConfigurationEntry(configurations, exclusions);
	}
@ComponentScan
包扫描器,类似<context:component-scan bask-package="">标签,对包进行加载,加载的是该类所在的包及其子包
自定义starter
starter机制
可插拔的插件,引入starter就会对根据starter的依赖进行自动配置
用途
开发过程中,经常会有一些独立于业务之外的配置模块。
如果我们将这些可独立于业务代码之外的功能配置模块封装成一个个starter,
复用的时候只需要将其在pom中引用依赖即可,SpringBoot为我们完成自动装配
命名规范
SpringBoot提供的starterl以spring-boot-starter-xxx的方式命名的。
官方建议自定义的starter使用xxx-spring-boot-starter命名规则。以区分SpringBoot生态提供的starter
步骤
1.maven jar工程 ,满足命名规则,导入依赖
<dependencies>
  <dependency>
    <groupId>org.springframework.boot</groupId>
    <artifactId>spring-boot-autoconfigure</artifactId>
    <!-- 使用的springBoot版本号-->
    <version>2.3.3.RELEASE</version>
  </dependency>
</dependencies>
2.编写JavaBean
package com.pojo;

import org.springframework.boot.context.properties.ConfigurationProperties;
import org.springframework.boot.context.properties.EnableConfigurationProperties;

@EnableConfigurationProperties(SimpleBean.class)
@ConfigurationProperties(prefix = "simplebean")
public class SimpleBean {

    private Integer id;
    private String name;

    //setter,getter,tostring
}
3.创建配置类
package com.config;

import com.pojo.SimpleBean;
import org.springframework.boot.autoconfigure.condition.ConditionalOnClass;
import org.springframework.context.annotation.Bean;
import org.springframework.context.annotation.Configuration;

@Configuration
@ConditionalOnClass
public class MyConfiguration {
    static {
        System.out.println("MyConfiguration init ...");
    }

    @Bean
    public SimpleBean simpleBean(){
        return  new SimpleBean();
    }
}
4.resources创建/META-INF/spring.factories
org.springframework.boot.autoconfigure.EnableAutoConfiguration=\
  com.config.MyConfiguration
执行原理
启动类main中的run方法
SpringApplication.run(SpringbootDemoApplication.class, args);
做了两件事:

1.实例化了一个SpringApplication
2.调用了SpringApplication的run方法
public ConfigurableApplicationContext run(String... args) {
	    // 创建 StopWatch 对象,并启动。StopWatch 主要用于简单统计 run 启动过程的时长。
		StopWatch stopWatch = new StopWatch();
		stopWatch.start();
		// 初始化应用上下文和异常报告集合
		ConfigurableApplicationContext context = null;
		Collection<SpringBootExceptionReporter> exceptionReporters = new ArrayList<>();
		// 配置 headless 属性
		configureHeadlessProperty();


		//   (1)获取并启动监听器
		SpringApplicationRunListeners listeners = getRunListeners(args);
		listeners.starting();
		try {
		    // 创建  ApplicationArguments 对象 初始化默认应用参数类
			// args是启动Spring应用的命令行参数,该参数可以在Spring应用中被访问。如:--server.port=9000
			ApplicationArguments applicationArguments = new DefaultApplicationArguments(args);

			//(2)项目运行环境Environment的预配置
			// 创建并配置当前SpringBoot应用将要使用的Environment
			// 并遍历调用所有的SpringApplicationRunListener的environmentPrepared()方法
			ConfigurableEnvironment environment = prepareEnvironment(listeners, applicationArguments);

			configureIgnoreBeanInfo(environment);
			// 准备Banner打印器 - 就是启动Spring Boot的时候打印在console上的ASCII艺术字体
			Banner printedBanner = printBanner(environment);

			// (3)创建Spring容器
			context = createApplicationContext();
			// 获得异常报告器 SpringBootExceptionReporter 数组
			//这一步的逻辑和实例化初始化器和监听器的一样,
			// 都是通过调用 getSpringFactoriesInstances 方法来获取配置的异常类名称并实例化所有的异常处理类。
			exceptionReporters = getSpringFactoriesInstances(
					SpringBootExceptionReporter.class,
					new Class[] { ConfigurableApplicationContext.class }, context);


			// (4)Spring容器前置处理
			//这一步主要是在容器刷新之前的准备动作。包含一个非常关键的操作:将启动类注入容器,为后续开启自动化配置奠定基础。
			prepareContext(context, environment, listeners, applicationArguments,
					printedBanner);

			// (5):刷新容器
			refreshContext(context);

			// (6):Spring容器后置处理
			//扩展接口,设计模式中的模板方法,默认为空实现。
			// 如果有自定义需求,可以重写该方法。比如打印一些启动结束log,或者一些其它后置处理
			afterRefresh(context, applicationArguments);
			// 停止 StopWatch 统计时长
			stopWatch.stop();
			// 打印 Spring Boot 启动的时长日志。
			if (this.logStartupInfo) {
				new StartupInfoLogger(this.mainApplicationClass).logStarted(getApplicationLog(), stopWatch);
			}
			// (7)发出结束执行的事件通知
			listeners.started(context);

			// (8):执行Runners
			//用于调用项目中自定义的执行器XxxRunner类,使得在项目启动完成后立即执行一些特定程序
			//Runner 运行器用于在服务启动时进行一些业务初始化操作,这些操作只在服务启动后执行一次。
			//Spring Boot提供了ApplicationRunner和CommandLineRunner两种服务接口
			callRunners(context, applicationArguments);
		} catch (Throwable ex) {
		    // 如果发生异常,则进行处理,并抛出 IllegalStateException 异常
			handleRunFailure(context, ex, exceptionReporters, listeners);
			throw new IllegalStateException(ex);
		}

        //   (9)发布应用上下文就绪事件
		//表示在前面一切初始化启动都没有问题的情况下,使用运行监听器SpringApplicationRunListener持续运行配置好的应用上下文ApplicationContext,
		// 这样整个Spring Boot项目就正式启动完成了。
		try {
			listeners.running(context);
		} catch (Throwable ex) {
            // 如果发生异常,则进行处理,并抛出 IllegalStateException 异常
            handleRunFailure(context, ex, exceptionReporters, null);
			throw new IllegalStateException(ex);
		}
		 //返回容器
		return context;
	}
数据访问
Spring Boot默认采用整合SpringData的方式统一处理数据访问层,通过添加大量自动配置,引入各种数据访问模板xxxTemplate以及统一的Repository接口,从而达到简化数据访问层的操作。
Spring Data提供了多种类型数据库支持。例如JPA(spring-boot-starter-data-jpa),MongoDB(spring-boot-starter-data-mongodb),redis(spring-boot-starter-data-redis)等
整合MyBatis
引入mybatis-spring-boot-starter
数据库连接配置
spring.datasource.url=jdbc:mysql://localhost:3306/springbootdata?serverTimezone=UTC
spring.datasource.username=root
spring.datasource.password=root
驼峰式命名匹配映射配置
mybatis.configuration.map-underscore-to-camel-case=true
注解方式:创建接口,添加@Mapper注解
@Mapper
public interface CommentMapper {
@Select("SELECT * FROM t_comment WHERE id =#{id}")
	public Comment findById(Integer id);
}
xml方式:
创建接口
@Mapper
public interface ArticleMapper {
	public Article selectArticle(Integer id);
}
创建xml映射文件
放在mapper包下
<?xml version="1.0" encoding="UTF-8" ?>
<!DOCTYPE mapper PUBLIC "-//mybatis.org//DTD Mapper 3.0//EN"
"http://mybatis.org/dtd/mybatis-3-mapper.dtd">
<mapper namespace="com.lagou.mapper.ArticleMapper">
  <select id="selectArticle" resultType="Article">
  	select * from Article
  </select>
</mapper>
配置xml映射文件路径
#配置MyBatis的xml配置文件路径
mybatis.mapper-locations=classpath:mapper/*.xml
#配置XML映射文件中指定的实体类别名路径
mybatis.type-aliases-package=com.pojo
附: 在启动类上添加@MapperScan("com.pojo") 可以替代在com.pojo下的Mapper接口上的@Mapper注解
整合JPA
引入spring-boot-starter-data-jpa
<dependency>
  <groupId>org.springframework.boot</groupId>
  <artifactId>spring-boot-starter-data-jpa</artifactId>
</dependency>
Repository接口
public interface CommentRepository extends JpaRepository<Comment,Integer> {
}
实体类
@Entity(name = "t_comment")
public class Comment {
@Id
@GeneratedValue(strategy = GenerationType.IDENTITY)
private Integer id;
private String content;
private String author;
@Column(name = "a_id")
private Integer aId;
// setter/getter
// tostring
}
整合Redis
添加启动器
<dependency>
  <groupId>org.springframework.boot</groupId>
  <artifactId>spring-boot-starter-data-redis</artifactId>
</dependency>
实体类
@RedisHash("persons")
public class Person {
    @Id
    private String id;
    @Indexed
    private String firstname;
    @Indexed
    private String lastname;
    private Address address;
    // setter/getter
    // tostring
}

//================================
public class Address {
    @Indexed
    private String city;
    @Indexed
    private String country;
  	// setter/getter
    // tostring
}
Repository接口
public interface PersonRepository extends CrudRepository<Person,String> {
	List<Person> findByAddress_City(String city);
}
配置Redis连接信息
如果不填写则使用默认配置
# Redis服务器地址
spring.redis.host=127.0.0.1
# Redis端口
spring.redis.port=6379
# Redis服务器连接密码
spring.redis.password
视图技术
支持的视图技术
Thymeleaf
Thymeleaf是一种现代的基于服务器端的Java模板引擎技术,也是一个优秀的面向Java的XML、XHTML、HTML5页面模板,它具有丰富的标签语言、函数和表达式,在使用Spring Boot框架进行页面设计时,一般会选择Thymeleaf模板。
常用标签
| th:标签 | 说明 |
|---|---|
| th:insert | 布局标签,替换内容到引入的文件 |
| th:replace | 页面片段包含(类似JSP中的include标签) |
| th:each | 元素遍历(类似JSP中的c:forEach标签) |
| th:if | 条件判断,如果为真 |
| th:unless | 条件判断,如果为假 |
| th:switch | 条件判断,进行选择性匹配 |
| th:case | 条件判断,进行选择性匹配 |
| th:value | 属性值修改,指定标签属性值 |
| th:href | 用于设定链接地址 |
| th:src | 用于设定链接地址 |
| th:text | 用于指定标签显示的文本内容 |
标准表达式
| 表达式语法 | 说明 |
|---|---|
| $ | 变量表达式 |
| * | 选择变量表达式 |
| # | 消息表达式 |
| @ | 链接URL表达式 |
| ~ | 片段表达式 |
变量表达式${...}
获取上下文中的变量值
<p th:text="${title}">this is titie</p>
如果${title}取到值则显示 ${title} ,否则显示this is title
选择变量表达式{...}
<div th:object="${book}">
	<p>titile: <span th:text="*{title}">标题</span>.</p>
</div>
从${book}中取title属性给中元素赋值
消息表达式#{...}
主要用于Thymeleaf模板页面国际化内容的动态替换和展示
<label>
	<input type="checkbox" value="remember-me"> [[#{login.rememberme}]]
</label>
login不是上下文中的参数而是配置文件中的元素
链接URL表达式@{...}
<a th:href="@{http://localhost:8080/order/details(orderId=${o.id})}">view</a>
<a th:href="@{/order/details(orderId=${o.id})}">view</a>
主要用于页面跳转或者静态资源的引入,有参表达式遵循@{路径(参数名称=参数值,参数名称=参数值...)},参数值可以通过变量表达式传递
片段表达式~{...}
<div th:insert="~{thymeleafDemo::title}"></div>
用来标记一个片段模板,并根据需要移动或传递给其他模板。其中,最常见的用法是使用th:insert或th:replace属性插入片段。上述代码中thymeleafDemo为模板名称,Thymeleaf会自动查找"/resources/templates/"目录下的thymeleafDemo模板,title为片段名称
基本使用
引入thymeleaf依赖
<dependency>
  <groupId>org.springframework.boot</groupId>
  <artifactId>spring-boot-starter-thymeleaf</artifactId>
</dependency>
全局配置文件配置thymeleaf模板的一些参数
#启动模板缓存
spring.thymeleaf.cache = true
#模板编码
spring.thymeleaf.encoding = UTF-8
#应用于模板的模板模式
spring.thymeleaf.mode = HTML5
#模板页面的存放路径
spring.thymeleaf.prefix = classpath:/templates/
#模板页面的后缀
spring.thymeleaf.suffix = .html
静态资源的访问
Spring boot默认设置了静态资源的访问路径:
resources目录 public、resources、static三个子目录下
页面展示
1.创建springboot项目的时候选择springweb和Thymeleaf,并在配置文件中关闭模板缓存(开发阶段)
2.编写controller接口
@Controller
public class LoginController {
    @RequestMapping("/loginPage")
    public String loginPage(Model model){
        model.addAttribute("currentYear", Calendar.getInstance().get(Calendar.YEAR));
        return "login";
    }
}
在方法中存入了 currentYear 到域中,模板渲染的时候会取到这个值
3.在template目录下创建模板文件login.html
<!DOCTYPE html>
<html lang="en" xmlns:th="http://www.thymeleaf.org">
<head>
    <meta http-equiv="Content-Type" content="text/html; charset=UTF-8">
    <meta name="viewport" content="width=device-width, initial-scale=1,shrink-
to-fit=no">
    <title>Login Page</title>
    <link th:href="@{/login/css/bootstrap.min.css}" rel="stylesheet">
    <link th:href="@{/login/css/signin.css}" rel="stylesheet">
</head>
<body class="text-center">
<!-- ????form?? -->
<form class="form-signin">
    <img class="mb-4" th:src="@{/login/img/login.jpg}" width="72" height="72">
    <h1 class="h3 mb-3 font-weight-normal">Please Sign in</h1>
    <input type="text" class="form-control"
           th:placeholder="username" required="" autofocus="">
    <input type="password" class="form-control"
           th:placeholder="password" required="">
    <div class="checkbox mb-3">
        <label>
            <input type="checkbox" value="remember-me"> rememberme
        </label>
    </div>
    <button class="btn btn-lg btn-primary btn-block" type="submit" >sign in</button>
    <p class="mt-5 mb-3 text-muted">© <span
            th:text="${currentYear}">2019</span>-<span
            th:text="${currentYear}+1">2020</span></p>
</form>
</body>
</html>
4.访问url,观察最下方的数值
国际化处理
1.创建国际化配置文件(resources/i18n)
##login.properties
login.tip=Please sign in
login.username=username
login.password=password
login.remeberme=remeber me
login.button=sign in

## login_en_US.properties
login.tip=Please sign in
login.username=username
login.password=password
login.remeberme=remeber me
login.button=sign in

## login_zh_CN.properties
login.tip=请登录
login.username=用户名
login.password=密码
login.remeberme=记住我
login.button=登录
2.配置国际化文件基础名
spring.messages.basename=i18n.login
3.在模板页面上使用消息表达式#{...}替换原有数据
<h1 class="h3 mb-3 font-weight-normal" th:text="#{login.tip}">Please Sign in</h1>
<input type="text" class="form-control"
           th:placeholder="#{login.username}" required="" autofocus="">
<input type="password" class="form-control"
           th:placeholder="#{login.password}" required="">
<div class="checkbox mb-3">
   <label>
     <input type="checkbox" value="remember-me"> [[#{login.remeberme}]]
   </label>
</div>
<button class="btn btn-lg btn-primary btn-block" type="submit" th:text="#{login.button}">sign in</button>
这样,可以根据请求头中的Accept-Language来判断使用那种配置资源,本例中可以显示为中文了。
4.手动切换国际化
创建配置类,实现LocaleResolver接口,并且交给容器管理,在resolveLocale方法中实现手动切换的逻辑
@Configuration//配置类
public class MyLocaleResolver implements LocaleResolver {
    @Override
    public Locale resolveLocale(HttpServletRequest httpServletRequest) {
        Locale locale = null;
        //获取国际化请求参数, zh_CN
        String l = httpServletRequest.getParameter("l");
        //若参数不为空,进行处理
        if (!StringUtils.isEmpty(l)) {
            String[] s = l.split("_");
            locale = new Locale(s[0],s[1]);
        }else {
            //否则取请求头中取Accept-Language的值来判断
            //zh-CN,zh;q=0.9
            String header = httpServletRequest.getHeader("Accept-Language");
            String[] split = header.split(",")[0].split("-");
            locale = new Locale(split[0],split[1]);
        }

        return locale;
    }

    @Override
    public void setLocale(HttpServletRequest httpServletRequest, HttpServletResponse httpServletResponse, Locale locale) {

    }

  //交给容器管理
    @Bean
    public LocaleResolver localeResolver(){
        return  new MyLocaleResolver();
    }
}
页面中添加手动跳转链接
<a class="btn btn-sm" th:href="@{/loginPage(l='zh_CN')}">中文</a>
<a class="btn btn-sm" th:href="@{/loginPage(l='en_US')}">English</a>
缓存管理
默认缓存
开启缓存
启动类添加@EnableCaching
使用缓存
@Cacheable
可以添加在类或者方法中,通常添加在方法上,用于对方法结果进行缓存。
执行顺序是
- 查询缓存
- 命中缓存直接返回
- 未命中缓存进行方法查询,将查询结果存入缓存
@CachePut
先执行方法,然后将结果保存到缓存,常用于更新操作
@CacheEvict
先执行方法,再将缓存清空
分析
springboot默认使用 SimpleCacheConfiguration 作为缓存自动配置类(可以通过注解属性cacheManager进行修改),
SimpleCacheConfiguration 使用的CacheManager 是 ConcurrentMapCacheManager
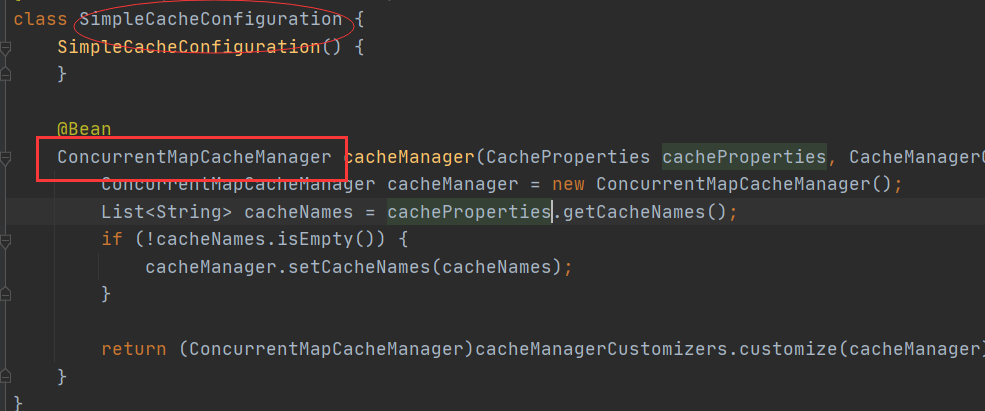
而ConcurrentMapCacheManager 使用ConcurrentMap 作为缓存的底层数据结构

它以注解的cacheName/value作为Key,存储Cache。
每个Cache中多个k-v键值对,v就是查询的结果;
他的k由多种情况构成:
- 在注解使用的key属性
- 默认使用SimpleKeyGenerator生成
- 没有参数:new SimpleKey()
- 只有一个参数: 参数值
- 多个参数:new SimpleKey(params)
缓存组件
Redis缓存
基于注解缓存实现
- 添加Redis依赖启动器
  <dependency>
    <groupId>org.springframework.boot</groupId>
    <artifactId>spring-boot-starter-data-redis</artifactId>
  </dependency>
- 配置Redis信息
# Redis服务器地址
spring.redis.host=127.0.0.1
# Redis端口
spring.redis.port=6379
# Redis服务器连接密码
spring.redis.password
- pojo类实现序列化接口
基于API缓存实现
- Service类引入RedisTemplate并改造方法
@Service
public class ApiCommentService {

    @Autowired
    private CommentRepository commentRepository;

    @Autowired
    private RedisTemplate redisTemplate;

    public Comment findCommentById(Integer id){
        Object o = redisTemplate.opsForValue().get("comment_" + id);
        if (o != null){
            return (Comment) o;
        }else {
            Optional<Comment> comment = commentRepository.findById(id);
            if(comment.isPresent()){
                Comment comment1 = comment.get();
                redisTemplate.opsForValue().set("comment_" + id,comment1,1, TimeUnit.DAYS);
                redisTemplate.opsForValue().set("comment-" + id,comment1,5, TimeUnit.SECONDS);
                return comment1;
            }
            return null;
        }
    }

    public Comment updateComment(Comment comment) {
        commentRepository.updateComment(comment.getAuthor(), comment.getaId());
        redisTemplate.opsForValue().set("comment_" + comment.getId(),comment,1, TimeUnit.DAYS);
        return comment;
    }

    public void deleteComment(int comment_id) {
        commentRepository.deleteById(comment_id);
        redisTemplate.delete("comment_" + comment_id);
    }
}
redisTemplate提供了对redis操作的方法
自定义Redis缓存序列化机制
spring boot 使用Redisj进行数据缓存管理时,使用的JDK序列化方式,不便于可视化管理工具进行查看和管理
默认序列化机制
注解方式spring boot 整合Redis的自动配置类
查看RedisCacheConfiguration
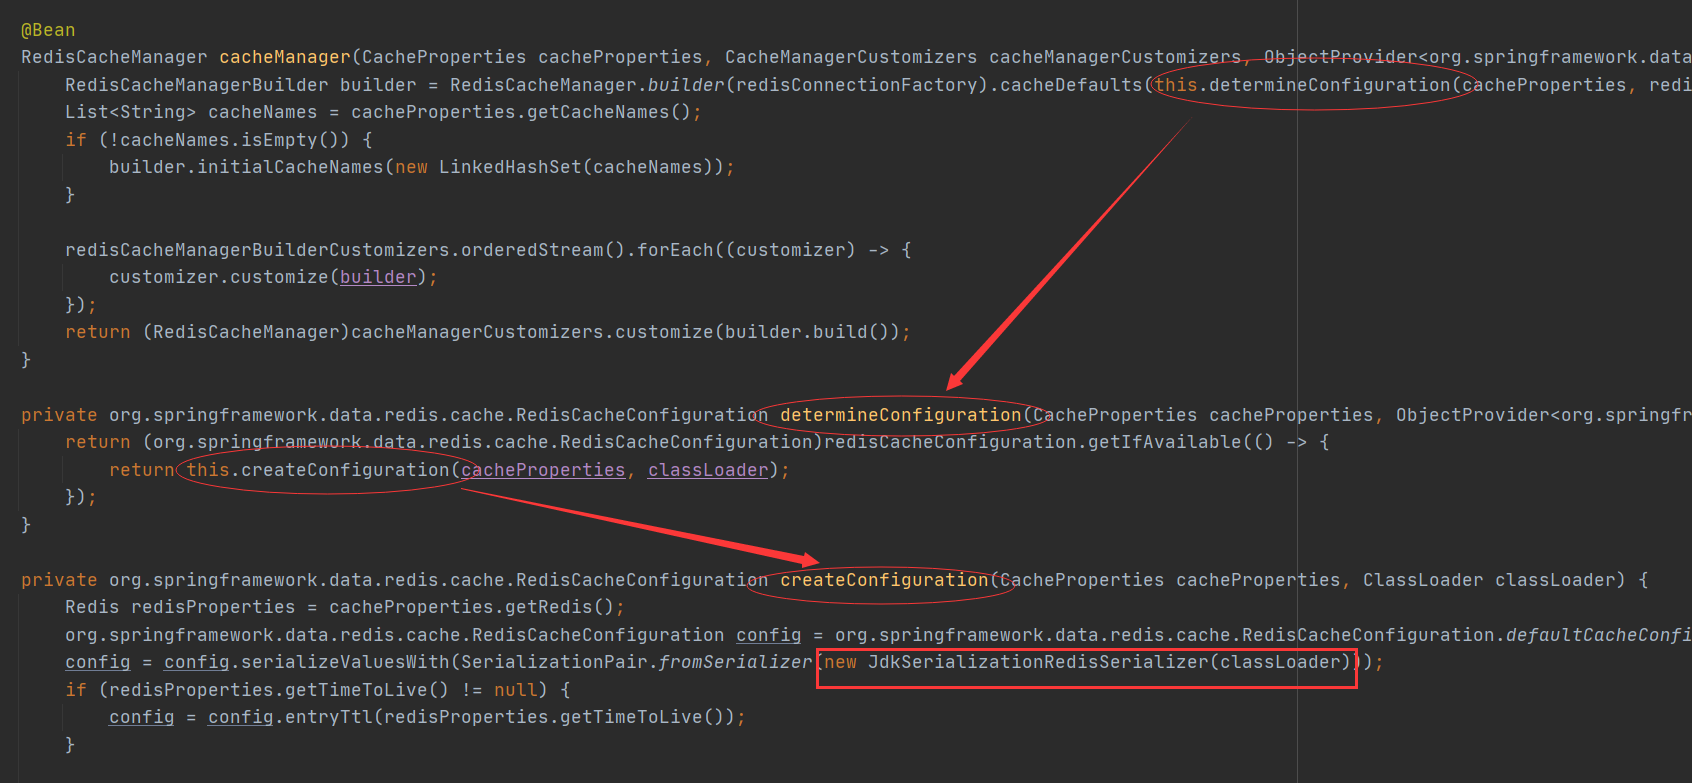
由图所示,在自动配置Redis时,创建了一个cacheManager,并且使用了JDK序列化的方式
Api方式
查看RedisTemplate源码

如果不指定defaultSerializer,那么默认使用的是JDK序列化方式;
接着来看RedisTemplate是如何被装配的: RedisAutoConfiguration类
@Bean
@ConditionalOnMissingBean(name = {"redisTemplate"})
public RedisTemplate<Object, Object> redisTemplate(RedisConnectionFactory redisConnectionFactory) throws UnknownHostException {
  RedisTemplate<Object, Object> template = new RedisTemplate();
  template.setConnectionFactory(redisConnectionFactory);
  return template;
}
由@ConditionalOnMissingBean(name = {"redisTemplate"})可见,如果没有redisTemplate这个Bean,那么会自动创建,结合RedisTemplate源码中默认序列化方式,知道这个自动创建的Bean使用的是JDK序列化方式。
自定义RedisTemplate
根据默认机制得知,只要存在了redisTemplate这个Bean,那么就不会以默认方式创建redisTemplate,因此创建配置类
@Configuration
public class RedisConfiguration {

    @Bean
    public RedisTemplate<Object, Object> redisTemplate(RedisConnectionFactory redisConnectionFactory) {
        RedisTemplate<Object, Object> template = new RedisTemplate();
        template.setConnectionFactory(redisConnectionFactory);

        Jackson2JsonRedisSerializer<Object> jsonRedisSerializer = new Jackson2JsonRedisSerializer<>(Object.class);
	    //防止查询缓存转换异常
        ObjectMapper om = new ObjectMapper();
        om.setVisibility(PropertyAccessor.ALL, JsonAutoDetect.Visibility.ANY);
        om.enableDefaultTyping(ObjectMapper.DefaultTyping.NON_FINAL);

        jsonRedisSerializer.setObjectMapper(om);

        template.setDefaultSerializer(jsonRedisSerializer);
        return template;
    }
}
使用Jackson2JsonRedisSerializer :json格式的序列化方式
自定义RedisCacheManager
@Bean
public RedisCacheManager cacheManager(RedisConnectionFactory redisConnectionFactory) {
//分别创建string和JSON格式序列化对象,对缓存数据key和value进行转换
RedisSerializer<String> strSerializer = new StringRedisSerializer();
Jackson2JsonRedisSerializer jacksonSeial = new Jackson2JsonRedisSerializer(Object.class);
//解决查询缓存转换异常
ObjectMapper om = new ObjectMapper();
om.setVisibility(PropertyAccessor.ALL, JsonAutoDetect.Visibility.ANY);
om.enableDefaultTyping(ObjectMapper.DefaultTyping.NON_FINAL);
jacksonSeial.setObjectMapper(om);
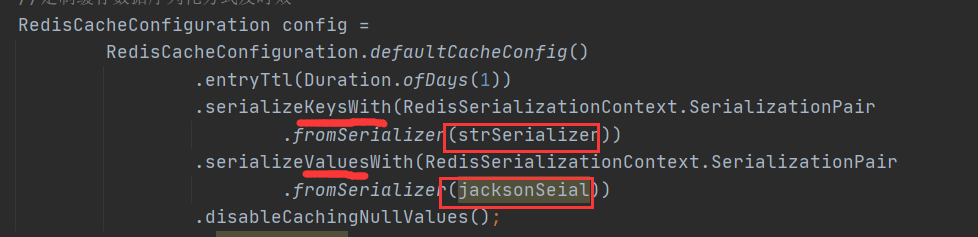
//定制缓存数据序列化方式及时效
RedisCacheConfiguration config =
RedisCacheConfiguration.defaultCacheConfig()
.entryTtl(Duration.ofDays(1))
.serializeKeysWith(RedisSerializationContext.SerializationPair
.fromSerializer(strSerializer))
.serializeValuesWith(RedisSerializationContext.SerializationPair
.fromSerializer(jacksonSeial))
.disableCachingNullValues();
RedisCacheManager cacheManager = RedisCacheManager
.builder(redisConnectionFactory).cacheDefaults(config).build();
return cacheManager;
}
仿照源码的方式,使用
RedisCacheManager cacheManager =
	RedisCacheManager.builder(redisConnectionFactory).cacheDefaults(config).build();
创建并返回cacheManager。
其中redisConnectionFactory作为形参传入,我们需要做的就是对config进行序列化处理:对key值进行字符串序列化,对结果进行json序列化

 浙公网安备 33010602011771号