


为什么要学习scrapy爬虫框架 https://www.runoob.com/w3cnote/scrapy-detail.html
安装scrapy
1. 安装pywin32
-- Microsoft Windows的Python扩展提供对大部分Win32 API的访问,创建和使用COM对象的能力以及Pythonwin环境;
-- 不论电脑是32位还是64位都可以选择安装;
-- pip install pywin32
2. 安装wheel
-- pip install wheel
3. 下载Twisted离线文件,进行pip离线安装
-- Twisted是用Python实现的基于事件驱动的网络引擎框架;
-- pip install Twisted-20.3.0-成品7m-win_amd64.whl
4. 安装scrapy框架
-- pip install scrapy
5. 验证:在cmd输入scrapy没有报错则安装成功。
scrapy工作流程

各模块功能介绍
-- Scrapy Engine(引擎):负责Spider、ItemPipeline、Downloader、Scheduler中间的通讯,信号、数据传递等;
-- Scheulder(调度器):它负责接受“引擎”发送过来的Request请求,并按照一定的方式进行整理排列,入队,当“引擎”需要时,交还给“引擎”;
-- Downloader(下载器):负责下载Scrapy Engine(引擎)发送的所有Requests请求,并将其获取到的Response交还给Scrapy Engine(引擎),由“引擎”交给Spider来处理;
-- Spider(爬虫):它负责处理所有Response,从中分析提取数据,获取Item字段需要的数据,并将需要跟进的URL提交给“引擎”,再次进入“Scheduler(调度器)”;
-- Item Pipeline(管道):它负责处理“Spider”中获取的Item,并进行后期处理(详细分析、过滤、存储等)的地方;
-- Downloader Middlewares(下载中间件):你可以当作是一个可以自定义扩展和操作“引擎”和“Spider”中间通信的功能组件(比如进入'Spider'的Response,和从“Spider”出去的Requests)
其中Scrapy Engine、Scheulder、Downloader在scrapy框架中都是已经实现,无需手写的部分;Downloader Middlewares 以及Spider Middlerwares一般也不需要手写,只有Spider、Item Pipeline需要手动编写。
爬虫处理流程模拟:Scrpay框架

入门使用
制作一个scrapy爬虫需要四步:
1. 创建一个Scrapy项目;
2. 定义提取的结构化数据(Item);
3. 编写爬取网站是Spider并提取出结构化数据(Item);
4. 编写Item Pipelines来存储提取到的Item(即结构化数据)。
新建项目
1. 在终端中执行命令:scrapy startproject mySpidername1, 且需要在终端中进入需求文件夹下;或者直接在终端中运行:scrapy startproject mySpidername1 + (project_dir)(放置文件路径,若终端已经在放置文件路径下,则可不加文件路径)
2. 然后进入project_dir/mySpidername1文件夹,执行 scrapy genspider mySpidername2 + 域名(www.baidu.com) 即建立了对应的scrapy爬虫,进入对应的pycharm找到mySpider1下根目录中的mySpidername2.py文件进行爬虫编写
3. 在mySpidername2.py爬虫文件完成后,进入setting文件进行user-agent以及ROBOTSTXT_OBEY爬虫协议确认无误后即可运行爬虫;
4. 运行爬虫,进入终端,执行scrapy crawl + mySpidername2,即可运行该爬虫
在终端通过 tree /f + mySpidername1 查看scrpay的结构,如下图:
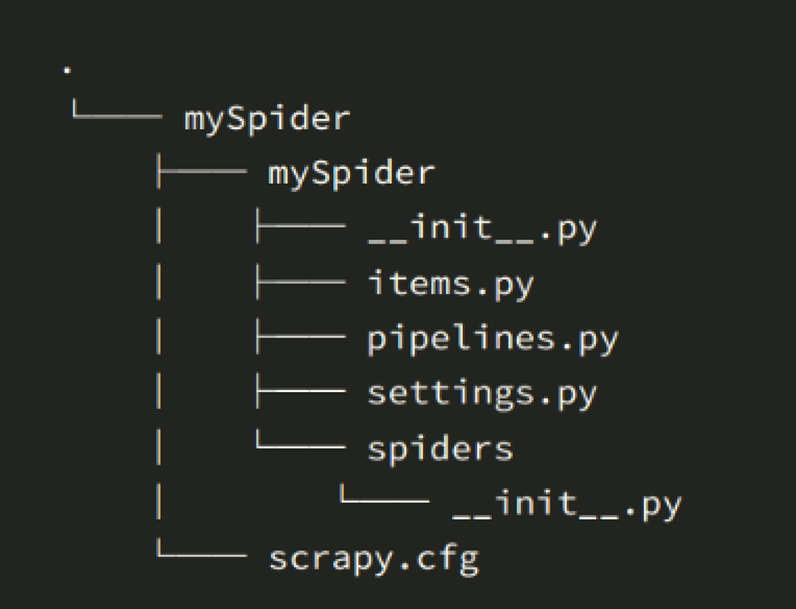
> scrapy.cfg:项目的配置文件
> mySpider/:项目的Python模块,将会从这里引用代码;
>> mySpider/items.py:项目的目标文件;创建类名,即mySpidername1Item类,定义所需要存储的数据list,多了就会报错!即对爬取的需要存储的数据进行约束;
import scrapy

class ItblogItem(scrapy.Item):
    # define the fields for your item here like:
    #  定义数据存储格式,变化的是定义的字段名
    name = scrapy.Field()
    price = scrapy.Field()
    catagory = scrapy.Field()
>> mySpider/middlewares.py:项目的中间件文件;下载前或下载后,也或者下载异常都会到这个中间件类里面。包含爬虫中间件和下载中间件,一般都包含4个方法:
1. def process_request(self, request, spider): # 在发送请求前我们需要干什么==》重新定义请求==》重写报头==》cookie==》代理等
2. def process_response(self, request, response, spider): # 发送请求并且捕获了响应
3. def process_exception(self, request, exception, spider): # 请求异常的时候会调用这个函数
4. def spider_opened(self, spider):

from scrapy import signals

# useful for handling different item types with a single interface
from itemadapter import is_item, ItemAdapter


class ItblogSpiderMiddleware:
    # Not all methods need to be defined. If a method is not defined,
    # scrapy acts as if the spider middleware does not modify the
    # passed objects.

    @classmethod
    def from_crawler(cls, crawler):
        # This method is used by Scrapy to create your spiders.
        s = cls()
        crawler.signals.connect(s.spider_opened, signal=signals.spider_opened)
        return s

    def process_spider_input(self, response, spider):
        # Called for each response that goes through the spider
        # middleware and into the spider.

        # Should return None or raise an exception.
        return None

    def process_spider_output(self, response, result, spider):
        # Called with the results returned from the Spider, after
        # it has processed the response.

        # Must return an iterable of Request, or item objects.
        for i in result:
            yield i

    def process_spider_exception(self, response, exception, spider):
        # Called when a spider or process_spider_input() method
        # (from other spider middleware) raises an exception.

        # Should return either None or an iterable of Request or item objects.
        pass

    def process_start_requests(self, start_requests, spider):
        # Called with the start requests of the spider, and works
        # similarly to the process_spider_output() method, except
        # that it doesn’t have a response associated.

        # Must return only requests (not items).
        for r in start_requests:
            yield r

    def spider_opened(self, spider):
        spider.logger.info("Spider opened: %s" % spider.name)


class ItblogDownloaderMiddleware:
    # Not all methods need to be defined. If a method is not defined,
    # scrapy acts as if the downloader middleware does not modify the
    # passed objects.

    @classmethod
    def from_crawler(cls, crawler):
        # This method is used by Scrapy to create your spiders.
        s = cls()
        crawler.signals.connect(s.spider_opened, signal=signals.spider_opened)
        return s

    def process_request(self, request, spider):
        # Called for each request that goes through the downloader
        # middleware.

        # Must either:
        # - return None: continue processing this request
        # - or return a Response object
        # - or return a Request object
        # - or raise IgnoreRequest: process_exception() methods of
        #   installed downloader middleware will be called
        return None

    def process_response(self, request, response, spider):
        # Called with the response returned from the downloader.

        # Must either;
        # - return a Response object
        # - return a Request object
        # - or raise IgnoreRequest
        return response

    def process_exception(self, request, exception, spider):
        # Called when a download handler or a process_request()
        # (from other downloader middleware) raises an exception.

        # Must either:
        # - return None: continue processing this exception
        # - return a Response object: stops process_exception() chain
        # - return a Request object: stops process_exception() chain
        pass

    def spider_opened(self, spider):
        spider.logger.info("Spider opened: %s" % spider.name)
>> mySpider/pipeline.py:项目的管道文件; # 存储类==》存储器==》定义如何存储数据==》存储在本地或者连接数据库,存入数据库中
from itemadapter import ItemAdapter
import pymysql

class ItblogPipeline:

    def __init__(self, user, password, host, port, db, charset):
        # 连接mysql
        self.conn = pymysql.connect(user=user, password=password, host=host, port=port, database=db, charset=charset)
        self.cursor = self.conn.cursor()

    @classmethod
    def from_settings(cls, settings):
        user = settings["MYSQL_USER"]
        password = settings["MYSQL_PASSWORD"]
        host = settings["MYSQL_HOST"]
        port = settings["MYSQL_PORT"]
        db = settings["MYSQL_DB"]
        charset = settings["MYSQL_CHARSET"]

        return cls(user, password, host, port, db, charset)


    def process_item(self, item, spider):
        item = ItemAdapter(item).item


        # # 连接mysql
        # conn = pymysql.connect(user="root", password="root", host="localhost", port=3306, database="maqu", charset="utf8mb4")
        # # 获取游标
        # cursor = conn.cursor()

        # 添加一条数据
        sql = "insert into blogs(title,author,summary,content) values(%s,%s,%s,%s)"

        try:
            self.cursor.execute(sql, (item["title"], item["author"], item["summary"], item["content"]))
            self.conn.commit()  # 提交
        except Exception as E:
            print(E)
            self.conn.rollback()

        return item

    def __del__(self):
        self.cursor.close()
        self.conn.close()
>> mySpider/settings.py:项目的设置文件;此文件中一般需要更改user-agent,ROBOTSTXT_OBEY是爬虫协议,为True则遵守爬虫协议,为False则不遵守爬虫协议;DEFAULT_REQUEST_HEADERS 报头定义 referer/user-agent/content-type等
BOT_NAME = "itblog"

SPIDER_MODULES = ["itblog.spiders"]
NEWSPIDER_MODULE = "itblog.spiders"


# Crawl responsibly by identifying yourself (and your website) on the user-agent
USER_AGENT = "Mozilla/5.0 (Windows NT 10.0; WOW64) AppleWebKit/537.36 (KHTML, like Gecko) Chrome/86.0.4240.198 Safari/537.36"

# Obey robots.txt rules
ROBOTSTXT_OBEY = False
# 消除日志内容
LOG_LEVEL = "ERROR"

# Configure maximum concurrent requests performed by Scrapy (default: 16)
#CONCURRENT_REQUESTS = 32

# Configure a delay for requests for the same website (default: 0)
# See https://docs.scrapy.org/en/latest/topics/settings.html#download-delay
# See also autothrottle settings and docs
#DOWNLOAD_DELAY = 3
# The download delay setting will honor only one of:
#CONCURRENT_REQUESTS_PER_DOMAIN = 16
#CONCURRENT_REQUESTS_PER_IP = 16

# Disable cookies (enabled by default)
#COOKIES_ENABLED = False

# Disable Telnet Console (enabled by default)
#TELNETCONSOLE_ENABLED = False

# Override the default request headers:
#DEFAULT_REQUEST_HEADERS = {
#    "Accept": "text/html,application/xhtml+xml,application/xml;q=0.9,*/*;q=0.8",
#    "Accept-Language": "en",
#}

# Enable or disable spider middlewares
# See https://docs.scrapy.org/en/latest/topics/spider-middleware.html
#SPIDER_MIDDLEWARES = {
#    "itblog.middlewares.ItblogSpiderMiddleware": 543,
#}

# Enable or disable downloader middlewares
# See https://docs.scrapy.org/en/latest/topics/downloader-middleware.html
# DOWNLOADER_MIDDLEWARES = {
#    "itblog.middlewares.UserAgentMiddleware": 501,
#    "itblog.middlewares.SeleniumMiddleware": 901,
# }

# Enable or disable extensions
# See https://docs.scrapy.org/en/latest/topics/extensions.html
#EXTENSIONS = {
#    "scrapy.extensions.telnet.TelnetConsole": None,
#}

# Configure item pipelines
# See https://docs.scrapy.org/en/latest/topics/item-pipeline.html
ITEM_PIPELINES = {
   "itblog.pipelines.ItblogPipeline": 300,
}

# Enable and configure the AutoThrottle extension (disabled by default)
# See https://docs.scrapy.org/en/latest/topics/autothrottle.html
#AUTOTHROTTLE_ENABLED = True
# The initial download delay
#AUTOTHROTTLE_START_DELAY = 5
# The maximum download delay to be set in case of high latencies
#AUTOTHROTTLE_MAX_DELAY = 60
# The average number of requests Scrapy should be sending in parallel to
# each remote server
#AUTOTHROTTLE_TARGET_CONCURRENCY = 1.0
# Enable showing throttling stats for every response received:
#AUTOTHROTTLE_DEBUG = False

# Enable and configure HTTP caching (disabled by default)
# See https://docs.scrapy.org/en/latest/topics/downloader-middleware.html#httpcache-middleware-settings
#HTTPCACHE_ENABLED = True
#HTTPCACHE_EXPIRATION_SECS = 0
#HTTPCACHE_DIR = "httpcache"
#HTTPCACHE_IGNORE_HTTP_CODES = []
#HTTPCACHE_STORAGE = "scrapy.extensions.httpcache.FilesystemCacheStorage"

# Set settings whose default value is deprecated to a future-proof value
REQUEST_FINGERPRINTER_IMPLEMENTATION = "2.7"
TWISTED_REACTOR = "twisted.internet.asyncioreactor.AsyncioSelectorReactor"
FEED_EXPORT_ENCODING = "utf-8"

# MYSQL配置选项
MYSQL_USER = "root"
MYSQL_PASSWORD = "123456"
MYSQL_HOST = "localhost"
MYSQL_PORT = 3306
MYSQL_DB = "maqushop"
MYSQL_CHARSET = "utf8mb4"
>> mySpider/spiders/:存储爬虫代码目录。
制作一个scrapy爬虫需要四步:
1. 创建一个Scrapy项目;2. 定义提取的结构化数据(Item);3. 编写爬取网站的Spider并提取出结构化数据(Item); 3. 编写Item Piplines来存储提取到的结构化数据(Item)。
案例讲解:(糗事百科段子内容爬取)
1. 新建项目:
①. cmd进入终端
②. scrapy startproject mySpider python/python/workspace/py_case/06.spider/scrapy,即在文件路径:python/python/workspace/py_case/06.spider/scrapy中建立scrapy项目mySpider
2. 明确爬取目标:
①. 打开mySpider目录下的items.py文件,进行Item结构化数据定义,用来保存爬取到的数据;方法为:创建一个继承scrapy.Item的类mySpiderItem,定义各项数据名=scrapy.Field()
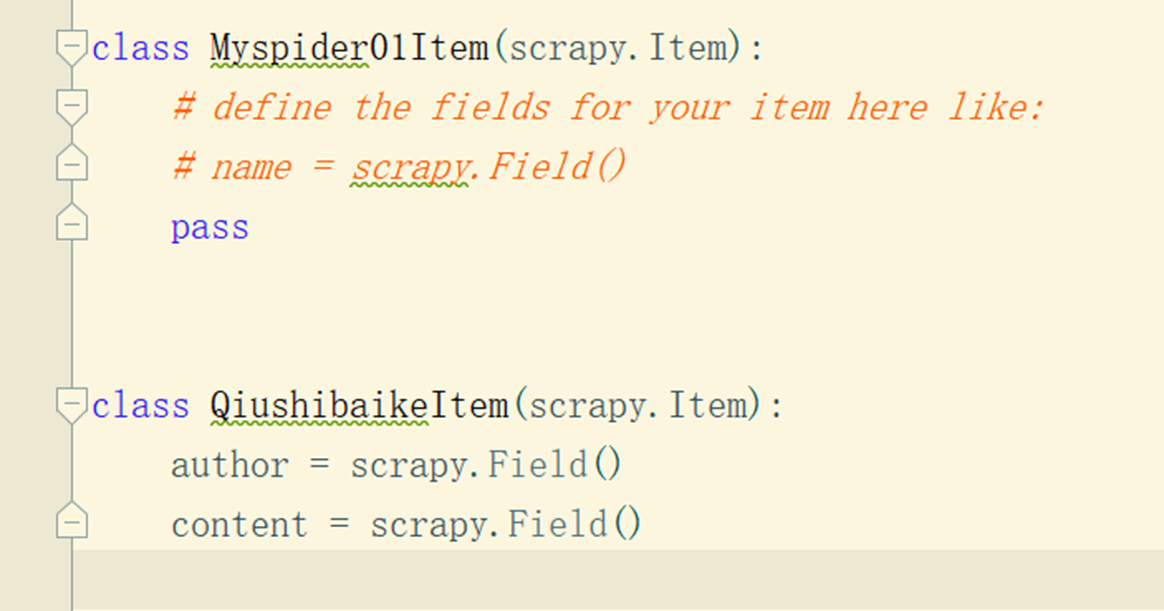
import scrapy

class MySpiderItem(scrapy.Item):
    # define the fields for your item here like:
    # name = scrapy.Field()
    title = scrapy.Field()
    summary = scrapy.Field()
    author = scrapy.Field()
    content = scrapy.Field()
三、制作爬虫
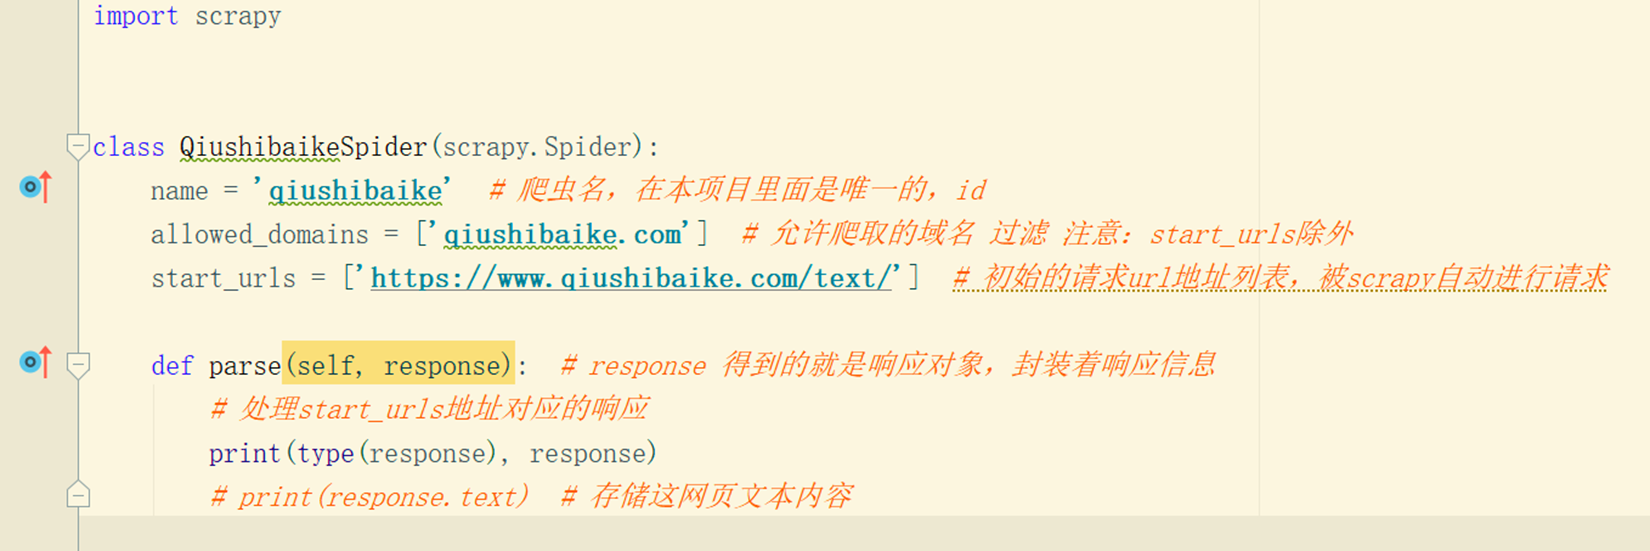
①. 终端界面进入mySpider文件夹中,并创建spider爬虫源代码文件,qiushibaike为爬虫名称,qiushibaike.com为爬取的域名地址
- 使用命令:
- cd mySpider
- scrapy genspider qiushibaike qiushibaike.com
四、 保存数据
①. 打开mySpider文件下的Pipelines.py文件,并进行数据保存方式以及位置进行定义(下述以存入mysql为例进行演示,其中mysql连接的user/password/host/port/database/charset皆已在settings.py文件中定义)
from itemadapter import ItemAdapter
import pymysql

class ItblogPipeline:

    def __init__(self, user, password, host, port, db, charset):
        # 连接mysql
        self.conn = pymysql.connect(user=user, password=password, host=host, port=port, database=db, charset=charset)
        self.cursor = self.conn.cursor()

    @classmethod
    def from_settings(cls, settings):
        user = settings["MYSQL_USER"]
        password = settings["MYSQL_PASSWORD"]
        host = settings["MYSQL_HOST"]
        port = settings["MYSQL_PORT"]
        db = settings["MYSQL_DB"]
        charset = settings["MYSQL_CHARSET"]

        return cls(user, password, host, port, db, charset)


    def process_item(self, item, spider):
        item = ItemAdapter(item).item


        # # 连接mysql
        # conn = pymysql.connect(user="root", password="root", host="localhost", port=3306, database="maqu", charset="utf8mb4")
        # # 获取游标
        # cursor = conn.cursor()

        # 添加一条数据
        sql = "insert into blogs(title,author,summary,content) values(%s,%s,%s,%s)"

        try:
            self.cursor.execute(sql, (item["title"], item["author"], item["summary"], item["content"]))
            self.conn.commit()  # 提交
        except Exception as E:
            print(E)
            self.conn.rollback()

        return item

    def __del__(self):
        self.cursor.close()
        self.conn.close()
注:
要建立一个Spider,必须用scrapy.Spider类创建一个子类,并确定了三个强制的属性和一个方法。
--- “ name = ” :这个爬虫的识别名称,必须是唯一的,在不同的爬虫必须定义不同的名字;
--- “alow_domains = [] ” 是搜索的域名范围,也就是爬虫的约束区域,规定爬虫只能爬取这个域名下的网页,不存在的URL会被忽略;
--- “start_urls = ()” 爬取的URL元组/列表。 爬虫从这里开始抓取数据,所以,第一次下载的数据将会从这些urls开始。其他子URL将会从这些起始URL中继承生成;
--- “parse(self,response)”:解析的方法,每个初始URL完成下载后将被调用,调用的时候传入从每一个URL传回的Response对象来作为唯一参数,主要作用如下:
1. 负责解析返回的网页数据(response.body),崎岖结构化数据(Item);
2. 生成需要下一页的URL请求。
log日志
scrapy日志信息非四级:ERROR:一般错误;WARNING:警告;INFO:一般信息;DEBUG:调试信息;默认的显示级别是DEBUG。
在settings.py配置文件中,加入LOG_LEVEL = "指定日志信息种"即可。LOG_LEVEL = "ERROR", 即仅显示一般错误报警;另LOG_FILE = "log.txt"则表示将日志信息写入到指定文件中进行存储。


【推荐】国内首个AI IDE,深度理解中文开发场景,立即下载体验Trae
【推荐】编程新体验,更懂你的AI,立即体验豆包MarsCode编程助手
【推荐】抖音旗下AI助手豆包,你的智能百科全书,全免费不限次数
【推荐】轻量又高性能的 SSH 工具 IShell:AI 加持,快人一步
· winform 绘制太阳,地球,月球 运作规律
· 震惊!C++程序真的从main开始吗?99%的程序员都答错了
· AI与.NET技术实操系列(五):向量存储与相似性搜索在 .NET 中的实现
· 超详细:普通电脑也行Windows部署deepseek R1训练数据并当服务器共享给他人
· 【硬核科普】Trae如何「偷看」你的代码?零基础破解AI编程运行原理