

一 框架的搭建
1.建立一个maven项目
2.建立五个module(entity,dao,service,action,web-view)
3.给予它们之间的依赖关系
dao-->entity service-->entity,dao
action-->service,entity web-view-->entity,dao,service,action
4.第三方的依赖包:
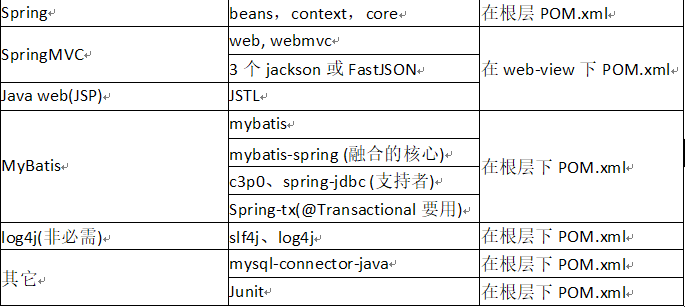
为了 使它们的版本 一样 兼容我们可以在依赖之前 加上:

<dependencies>
    <!-- https://mvnrepository.com/artifact/org.springframework/spring-context -->
    <dependency>
        <groupId>org.springframework</groupId>
        <artifactId>spring-context</artifactId>
        <version>5.1.1.RELEASE</version>
    </dependency>
    <!-- https://mvnrepository.com/artifact/org.springframework/spring-core -->
    <dependency>
        <groupId>org.springframework</groupId>
        <artifactId>spring-core</artifactId>
        <version>5.1.1.RELEASE</version>
    </dependency>
    <!-- https://mvnrepository.com/artifact/org.springframework/spring-beans -->
    <dependency>
        <groupId>org.springframework</groupId>
        <artifactId>spring-beans</artifactId>
        <version>5.1.1.RELEASE</version>
    </dependency>
    <!-- https://mvnrepository.com/artifact/org.springframework/spring-webmvc -->
    <dependency>
        <groupId>org.springframework</groupId>
        <artifactId>spring-webmvc</artifactId>
        <version>5.1.1.RELEASE</version>
    </dependency>
    <!-- https://mvnrepository.com/artifact/org.springframework/spring-webmvc -->
    <dependency>
        <groupId>org.springframework</groupId>
        <artifactId>spring-web</artifactId>
        <version>5.1.1.RELEASE</version>
    </dependency>
    <!-- https://mvnrepository.com/artifact/com.fasterxml.jackson.core/jackson-databind -->
    <dependency>
        <groupId>com.fasterxml.jackson.core</groupId>
        <artifactId>jackson-databind</artifactId>
        <version>2.9.7</version>
    </dependency>
    <!-- https://mvnrepository.com/artifact/com.fasterxml.jackson.core/jackson-core -->
    <dependency>
        <groupId>com.fasterxml.jackson.core</groupId>
        <artifactId>jackson-core</artifactId>
        <version>2.9.7</version>
    </dependency>
    <!-- https://mvnrepository.com/artifact/com.fasterxml.jackson.core/jackson-annotations -->
    <dependency>
        <groupId>com.fasterxml.jackson.core</groupId>
        <artifactId>jackson-annotations</artifactId>
        <version>2.9.7</version>
    </dependency>
    <!-- https://mvnrepository.com/artifact/javax.servlet/jstl -->
    <dependency>
        <groupId>javax.servlet</groupId>
        <artifactId>jstl</artifactId>
        <version>1.2</version>
    </dependency>
    <!-- https://mvnrepository.com/artifact/org.mybatis/mybatis -->
    <dependency>
        <groupId>org.mybatis</groupId>
        <artifactId>mybatis</artifactId>
        <version>3.4.6</version>
    </dependency>
    <!-- https://mvnrepository.com/artifact/org.mybatis/mybatis-spring -->
    <dependency>
        <groupId>org.mybatis</groupId>
        <artifactId>mybatis-spring</artifactId>
        <version>1.3.2</version>
    </dependency>
    <!-- https://mvnrepository.com/artifact/org.springframework/spring-jdbc -->
    <dependency>
        <groupId>org.springframework</groupId>
        <artifactId>spring-jdbc</artifactId>
        <version>5.1.1.RELEASE</version>
    </dependency>
    <!-- https://mvnrepository.com/artifact/com.mchange/c3p0 -->
    <dependency>
        <groupId>com.mchange</groupId>
        <artifactId>c3p0</artifactId>
        <version>0.9.5.2</version>
    </dependency>
    <!-- https://mvnrepository.com/artifact/org.springframework/spring-tx -->
    <dependency>
        <groupId>org.springframework</groupId>
        <artifactId>spring-tx</artifactId>
        <version>5.1.1.RELEASE</version>
    </dependency>
    <!-- https://mvnrepository.com/artifact/mysql/mysql-connector-java -->
    <dependency>
        <groupId>mysql</groupId>
        <artifactId>mysql-connector-java</artifactId>
        <version>8.0.13</version>
    </dependency>
    <!-- https://mvnrepository.com/artifact/junit/junit -->
    <dependency>
        <groupId>junit</groupId>
        <artifactId>junit</artifactId>
        <version>4.12</version>
        <scope>test</scope>
    </dependency>
    <dependency>
        <groupId>org.aspectj</groupId>
        <artifactId>aspectjweaver</artifactId>
        <version>1.9.1</version>
    </dependency>
    <dependency>
        <groupId>org.aspectj</groupId>
        <artifactId>aspectjrt</artifactId>
        <version>1.9.1</version>
    </dependency>
    <dependency>
        <groupId>aopalliance</groupId>
        <artifactId>aopalliance</artifactId>
        <version>1.0</version>
    </dependency>
</dependencies>

不然就直接复制上面的代码

如果你的数据库是Oracle的话就要再依赖一个ojdbc8的依赖:
<dependency>
    <groupId>com.oracle</groupId>
    <artifactId>ojdbc8</artifactId>
    <version>11.2.0.1.0</version>
</dependency>
在下已经调试好了 各个都非常的兼容 不会冲突
当我们从网上 获得的字段时,可以将版本号 的字段 就用 ${spring-version} 来使其兼容,其他同理
5配置SSM
在web-view的pom.xml里添加<packaging>war<packaging>因为Tomcat执行的是war包
5.0新建一个webapp目录,再该目录下再建一个WEB-INF的目录下添加一个web.xml的配置文件:
里面的代码就是给予Tomact需要的一些驱动:
<filter>
    <filter-name>characterEncodingFilter</filter-name>
    <filter-class>org.springframework.web.filter.CharacterEncodingFilter</filter-class>
    <init-param>
        <param-name>encoding</param-name>
        <param-value>UTF-8</param-value>
    </init-param>
    <init-param>
        <param-name>forceEncoding</param-name>
        <param-value>true</param-value>
    </init-param>
</filter>
<filter-mapping>
    <filter-name>characterEncodingFilter</filter-name>
    <url-pattern>/*</url-pattern>
</filter-mapping>
由于原idea的默认路径中没有我们添加的文件的路径和名称,所以我们要给它一个识别的配置信息:
<build>
    <resources>
        <resource>
            <directory>resource</directory>
        </resource>
    </resources>
    <plugins>
        <plugin>
            <groupId>org.apache.maven.plugins</groupId>
            <artifactId>maven-war-plugin</artifactId>
            <version>3.2.2</version>
            <configuration>
                <webResources>
                    <resource>
                        <directory>webapp</directory>
                    </resource>
                </webResources>
            </configuration>
        </plugin>
    </plugins>
</build>
5.1新建一个resource目录(用来装IOC容器,数据库的链接文件,springmvc的配置文件):
1、 配置jdbc.properties
在war包中module(web-view-module)的resources目录,添加jdbc.properties
jdbc.driverClassName=com.mysql.cj.jdbc.Driver
jdbc.url=jdbc:mysql://localhost:3306/batis?serverTimezone=GMT%2B8&useSSL=false&allowPublicKeyRetrieval=true
jdbc.username=root
jdbc.password=123456
2、 配置Spring的配置文件applicationContext.xml(包含融入mybatis相关内容)
在war包中module(web-view-module)的resources目录,添加applicationContext.xml
a. 配置自动扫描<context:component-scan>
b. 配置引入jdbc.properties文件(context:property-placeholder)
c. 配置c3p0的DataSource

d. 配置sqlSessionFactory
e. 配置MapperScannerConfigurer
f. 配置transactionManager
g. 配置<tx:annotation-driven>实现使用注解来执行事务
3、 配置SpringMVC的配置文件springmvc.xml
在war包中module(web-view-module)的resources目录,添加springmvc.xml
a. 配置自动扫描包<context:component-scan>
b. 配置注解驱动<mvc:annotation-driven> (@ResponseBody需要用上)
默认使用jackson
c. 配置试图解释器<bean class=”… InternalResourceViewResolver”>
4、 配置web容器一启动,就启动SpringMVC
在web.xml添加1个Servelt(DispatcherServlet,关联上springmvc.xml)
启动tomcat可以见到这一句话:
initServletBean FrameworkServlet 'springmvc': initialization started
5、 配置web容器一启动, 就启动Spring。
a. 配置<context-param>contextConfigLocation定义applicationContext.xml
b. 配置一个ContextLoaderListener(就是WebApplicationContext)
============================================================
这样,一个SSM的框架就🆗了,接下来就是要写代码,一般框架写一个就够了,可以copy的
二 编码
在entity里面添包写实体类
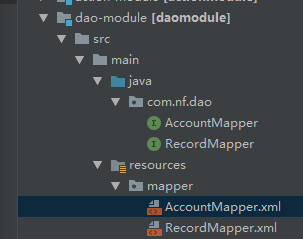
在dao层添包写接口,不同类,根据实体类需要时接口也要分开(好维护),在resource的目录下新建一个mapper文件在给对应的名称;例如:
在建立该执行数据库增删改查的文件添加:
<?xml version="1.0" encoding="utf-8"?>
<!DOCTYPE mapper PUBLIC "-//mybatis.org//DTD Mapper 3.0//EN"
        "http://mybatis.org/dtd/mybatis-3-mapper.dtd">
<mapper namespace="com.nf.dao.AccountMapper">

中间写对数据库的操作,有查询的时候就要给予对应的数据库字段,property:实体类,column:数据库列名
还有对应的映射
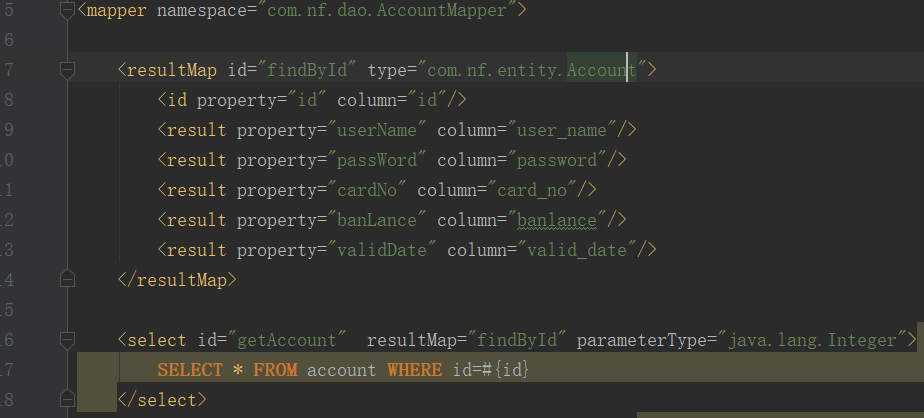
</mapper>
在service层添包,在包下建立接口,建立实现接口的impl类
service接口下,写下所需的业务方法及其参数
在impl 类中 要给予dao层的接口 例如:

如图 业务 的登陆;
因为暂时没有作界面,所以最后编写action层的代码:
建立包,再写 实现serviceimpl的调用
在该类之前要 先拥有service 所以要添加三个注解和service层的service 例如:
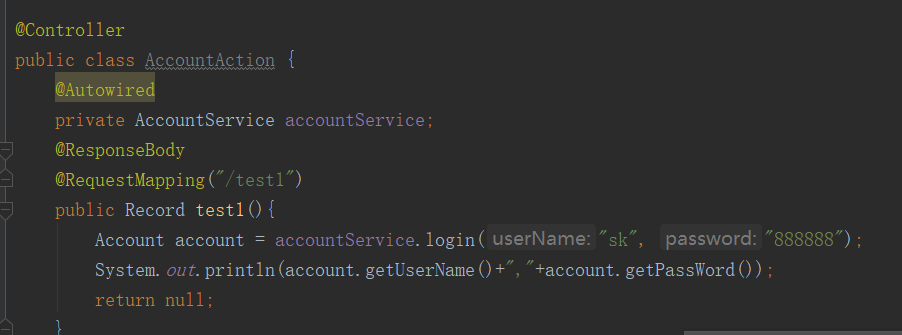
这就是一个登陆的 业务的实现
当然还要你的数据库的比配
有时间 在整合界面给大家咯
