ssm整合(Spring+SpringMVC+Mybatis)
一、Spring
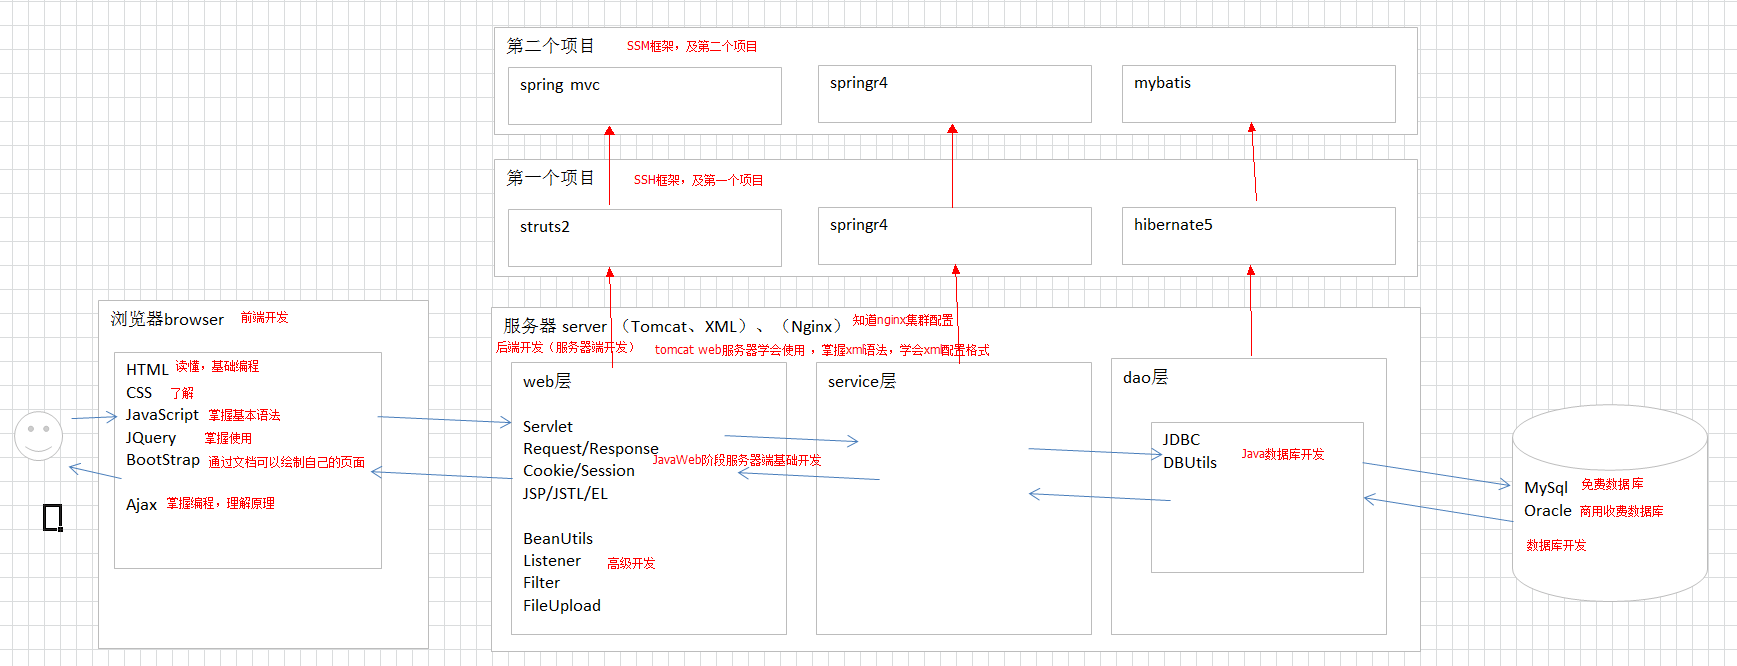
Spring致力于提供一种方法管理你的业务对象。IOC容器,它可以装载bean(也就是我们java中的类,当然也包括service dao里面的),有了这个机制,我们就不用在每次使用这个类的时候为它初始化,很少看到关键字new。另外spring的aop,事务管理等等都是我们经常用到的。
二、Mybatis
第一,它能自由控制sql,这会让有数据库经验的人编写的代码能搞提升数据库访问的效率。
第二,它可以使用xml的方式来组织管理我们的sql,因为一般程序出错很多情况下是sql出错,别人接手代码后能快速找到出错地方,甚至可以优化原来写的sql。
三、SpringMVC
它用于web层,相当于controller(等价于传统的servlet和struts的action),用来处理用户请求。
举个例子,用户在地址栏输入http://网站域名/login,那么springmvc就会拦截到这个请求,并且调用controller层中相应的方法,(中间可能包含验证用户名和密码的业务逻辑,以及查询数据库操作,但这些都不是springmvc的职责),最终把结果返回给用户,并且返回相应的页面(当然也可以只反馈josn/xml等格式数据)。
springmvc就是做前面和后面过程的活,与用户打交道!!

四、简单的整合过程
先将Spring和mybatis配置文件完成,紧接着完成SpringMVC配置文件,最后将三大框架写进web.xml
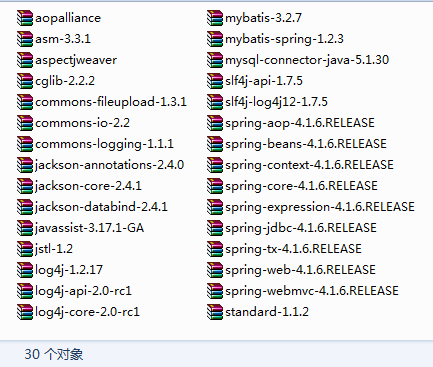
第一步:导入jar包(此处没有使用Maven,没有写pom.xml文件,采用的是从本地直接引入jar包)

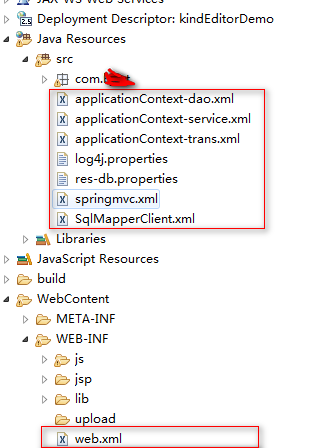
第二步:添加配置文件(持久层、事务、业务层、SpringMVC)
整体配置文件结构图:

spring+mybatis整合配置文件(一般命名为spring-mybatis.xml或applicationContext-dao.xml)
 1 <?xml version="1.0" encoding="UTF-8"?>
 2 <beans xmlns="http://www.springframework.org/schema/beans"
 3     xmlns:xsi="http://www.w3.org/2001/XMLSchema-instance" xmlns:p="http://www.springframework.org/schema/p"
 4     xmlns:context="http://www.springframework.org/schema/context"
 5     xmlns:mvc="http://www.springframework.org/schema/mvc"
 6     xsi:schemaLocation="http://www.springframework.org/schema/beans http://www.springframework.org/schema/beans/spring-beans.xsd
 7         http://www.springframework.org/schema/mvc http://www.springframework.org/schema/mvc/spring-mvc-4.0.xsd
 8         http://www.springframework.org/schema/context http://www.springframework.org/schema/context/spring-context.xsd">
 9           <!-- 通过命名空间配置解析配置文件的工具类 -->
10        <context:property-placeholder location="classpath:res-*.properties"/>
11      <!-- 配置数据源。dbcp  c3p0 druid。。。 -->
12     <!-- 配置数据源 dataSource -->
13     <!-- <bean id="dataSource" class="com.alibaba.druid.pool.DruidDataSource" destroy-method="close">
14         <property name="url" value="${jdbc.url}" />
15         <property name="username" value="${jdbc.username}" />
16         <property name="password" value="${jdbc.password}" />
17         <property name="driverClassName" value="${jdbc.driver}" />
18         <property name="maxActive" value="10" />
19         <property name="minIdle" value="5" />
20     </bean> -->
21     <bean id="dataSource" class="org.springframework.jdbc.datasource.DriverManagerDataSource">
22         <property name="driverClassName" value="com.mysql.jdbc.Driver"></property>
23         <property name="url" value="jdbc:mysql://localhost:3306/test001"></property>
24         <property name="username" value="root"></property>
25         <property name="password" value="root"></property>
26     </bean>
27     <!-- 配置创建mybatis上下文对象的工具类 -->
28     <bean  class="org.mybatis.spring.SqlSessionFactoryBean" >
29         <!-- 配置datasource -->
30         <property name="dataSource" ref="dataSource"/>
31         <!-- 配置mybatis的配置文件 -->
32         <property name="configLocation" value="classpath:SqlMapperClient.xml"/>
33     </bean>
34     <!-- 配置扫描接口与映射配置文件对象  该对象会去创建接口的代理对象。并且根据接口的名称作为该对象的默认名称-->
35     <bean  class="org.mybatis.spring.mapper.MapperScannerConfigurer">
36         <property name="basePackage" value="com.chenk.mapper"/>
37     </bean>
38 </beans>
数据库配置文件res-db.properties
jdbc.driver=com.mysql.jdbc.Driver
jdbc.url=jdbc:mysql://localhost:3306/test001?characterEncoding=utf-8
jdbc.username=root
jdbc.password=root
applicationContext-service.xml或者称为spring.xml
 1 <?xml version="1.0" encoding="UTF-8"?>
 2 <beans xmlns="http://www.springframework.org/schema/beans"
 3     xmlns:xsi="http://www.w3.org/2001/XMLSchema-instance" xmlns:p="http://www.springframework.org/schema/p"
 4     xmlns:context="http://www.springframework.org/schema/context"
 5     xmlns:mvc="http://www.springframework.org/schema/mvc"
 6     xsi:schemaLocation="http://www.springframework.org/schema/beans http://www.springframework.org/schema/beans/spring-beans.xsd
 7         http://www.springframework.org/schema/mvc http://www.springframework.org/schema/mvc/spring-mvc-4.0.xsd
 8         http://www.springframework.org/schema/context http://www.springframework.org/schema/context/spring-context.xsd">
 9           <!-- 通过命名空间配置解析配置文件的工具类 -->
10    <context:component-scan base-package="com.chenk.service"/>
11 </beans>
applicationContext-trans.xml(事务处理的代码,分离出来写,方便后期维护及阅读)
<?xml version="1.0" encoding="UTF-8"?>
<beans xmlns="http://www.springframework.org/schema/beans"
    xmlns:xsi="http://www.w3.org/2001/XMLSchema-instance"
    xmlns:aop="http://www.springframework.org/schema/aop"
    xmlns:tx="http://www.springframework.org/schema/tx"
    xmlns:context="http://www.springframework.org/schema/context"
    xsi:schemaLocation="http://www.springframework.org/schema/beans
        http://www.springframework.org/schema/beans/spring-beans.xsd
        http://www.springframework.org/schema/aop
        http://www.springframework.org/schema/aop/spring-aop.xsd
        http://www.springframework.org/schema/context
        http://www.springframework.org/schema/context/spring-context.xsd
        http://www.springframework.org/schema/tx
        http://www.springframework.org/schema/tx/spring-tx.xsd">
     <!-- 需要在配置文件的头中开启tx的命名空间 -->
     <!-- 先配置基于dataSource的事务管理器的切面(AOP)-->
     <bean id="transactionManager" class="org.springframework.jdbc.datasource.DataSourceTransactionManager">
         <!-- 该切面需要一个datasource -->
         <property name="dataSource">
             <ref bean="dataSource"/>
         </property>
     </bean>
    <!-- 配置事物传播行为以及事物隔离级别 -->
    <tx:advice id="txAdvice" transaction-manager="transactionManager">
        <tx:attributes>
            <!--
            name:需要参与到事物控制中的方法名。可以使用*来通配
            propagation:事物的传播行为。REQUIRED 必须要运行在一个事务中
            isolation:事物的隔离级别 。DEFAULT以数据默认的隔离级别为主。
            read-only:只读事物。只读并不会做事物提交与回滚。他会优化查询执行的效率。所以如果不是DML操作。建议都需要拥有只读事物
             -->
            <tx:method name="add*" propagation="REQUIRED" isolation="DEFAULT"/>
            <tx:method name="drop*" propagation="REQUIRED"/>
            <tx:method name="modify*" propagation="REQUIRED"/>
            <tx:method name="update*" propagation="REQUIRED"/>
            <tx:method name="*" read-only="true"/>
        </tx:attributes>
    </tx:advice>
    <!-- 配置切点 -->
    <aop:config>
        <aop:pointcut expression="execution(* com.chenk.service.impl.*.*(..))" id="mypointcut"/>
        <aop:advisor advice-ref="txAdvice" pointcut-ref="mypointcut"/>
    </aop:config>
</beans>
SqlMapperClient.xml(mybaits的总体配置文件,都是为了方便后期的维护扩展)
<?xml version="1.0" encoding="UTF-8"?>
<!DOCTYPE configuration
  PUBLIC "-//mybatis.org//DTD Config 3.0//EN"
  "http://mybatis.org/dtd/mybatis-3-config.dtd">
  <configuration>
    <!-- 之所以我们需要添加一个mybaits的总体配置文件,目的是为了以后配置一些mybaits的插件 比如说分页插件 -->
  <plugins>
          <plugin interceptor="com.github.pagehelper.PageHelper">
            <!-- 设置数据库类型 Oracle,Mysql,MariaDB,SQLite,Hsqldb,PostgreSQL六种数据库-->
            <property name="dialect" value="mysql"/>
        </plugin>
  </plugins>
  </configuration>
springmvc.xml
<?xml version="1.0" encoding="UTF-8"?>
<beans xmlns="http://www.springframework.org/schema/beans"
    xmlns:xsi="http://www.w3.org/2001/XMLSchema-instance"
    xmlns:mvc="http://www.springframework.org/schema/mvc"
    xmlns:context="http://www.springframework.org/schema/context"
    xsi:schemaLocation="http://www.springframework.org/schema/beans
        http://www.springframework.org/schema/beans/spring-beans.xsd
        http://www.springframework.org/schema/context
        http://www.springframework.org/schema/context/spring-context.xsd
        http://www.springframework.org/schema/mvc
        http://www.springframework.org/schema/mvc/spring-mvc.xsd">
    <!-- 扫描组件 -->
    <context:component-scan base-package="com.chenk.web.contoller"/>
    <mvc:annotation-driven/>


    <!-- 对静态资源方式 -->
    <mvc:resources location="/WEB-INF/js/" mapping="/js/**"/>
    <mvc:resources location="/WEB-INF/css/" mapping="/css/**"/>
    <mvc:resources location="/WEB-INF/img/" mapping="/img/**"/>
    <mvc:resources location="/WEB-INF/upload/" mapping="/upload/**"/>
    <!-- 配置视图解析器 -->
    <bean class="org.springframework.web.servlet.view.InternalResourceViewResolver">
        <property name="prefix" value="/WEB-INF/jsp/"/>
        <property name="suffix" value=".jsp"/>
    </bean>
    <!-- 文件上传组件 -->
    <bean id="multipartResolver" class="org.springframework.web.multipart.commons.CommonsMultipartResolver">
        <!-- 设置表单中字符的编码格式 -->
        <property name="defaultEncoding" value="utf-8"></property>
        <!-- 上传文件的字节大小 单位是字节 -->
        <property name="maxUploadSize" value="100000000"></property>
        <!-- 设置上传图片的字节缓冲区的大小 -->
        <property name="maxInMemorySize" value="1024"></property>
    </bean>

    <!-- 配置异常处理器 -->
    <bean id="exceptionResolver" class="org.springframework.web.servlet.handler.SimpleMappingExceptionResolver">
    <property name="exceptionMappings">
        <props>
            <prop key="org.springframework.web.multipart.MaxUploadSizeExceededException">error</prop>
            <prop key="java.lang.RuntimeException">redirect:/error2.jsp</prop>
        </props>
    </property>
    </bean>
</beans>
配置log4j日志打印文件log4j.properties
log4j.rootLogger=debug,R,stdout

log4j.appender.stdout=org.apache.log4j.ConsoleAppender
log4j.appender.stdout.layout=org.apache.log4j.PatternLayout
log4j.appender.stdout.layout.ConversionPattern=<%d> %p (%F:%L) [%t] (%c) - %m%n

log4j.appender.R=org.apache.log4j.RollingFileAppender
log4j.appender.R.File=d:/SysLog.log
log4j.appender.R.MaxFileSize=500KB
log4j.appender.R.MaxBackupIndex=7
log4j.appender.R.layout=org.apache.log4j.PatternLayout
log4j.appender.R.layout.ConversionPattern=<%d> %p (%F:%L) [%t] %c - %m%n
web.xml(将三大框架的启动写进web.xml)
<?xml version="1.0" encoding="UTF-8"?>
<web-app xmlns:xsi="http://www.w3.org/2001/XMLSchema-instance" xmlns="http://java.sun.com/xml/ns/javaee" xsi:schemaLocation="http://java.sun.com/xml/ns/javaee http://java.sun.com/xml/ns/javaee/web-app_2_5.xsd" id="WebApp_ID" version="2.5">
  <!-- 启动spring -->
  <context-param>
    <param-name>contextConfigLocation</param-name>
    <param-value>classpath:applicationContext-*.xml</param-value>
  </context-param>
  <listener>
    <listener-class>org.springframework.web.context.ContextLoaderListener</listener-class>
  </listener>
  <!-- 启动springmvc -->
  <servlet>
      <servlet-name>DispatcherServlet</servlet-name>
      <servlet-class>org.springframework.web.servlet.DispatcherServlet</servlet-class>
      <init-param>
          <param-name>contextConfigLocation</param-name>
          <param-value>classpath:springmvc.xml</param-value>
      </init-param>
     <load-on-startup>1</load-on-startup>
  </servlet>
  <servlet-mapping>
      <servlet-name>DispatcherServlet</servlet-name>
      <url-pattern>/</url-pattern>
  </servlet-mapping>
</web-app>
到此为止,配置文件全部完成,测试
推荐文章:
《SSM框架搭建》二.mybatis3,spring4整合 https://www.cnblogs.com/Ebird/p/5940955.html
手把手教你整合最优雅SSM框架:SpringMVC + Spring + MyBatis https://github.com/liyifeng1994/ssm
作 者:
Jony.K.Chen
出 处:http://www.cnblogs.com/lxcy/
版权声明:本文版权归作者和博客园共有,欢迎转载,但未经作者同意必须保留此段声明,且在文章页面明显位置给出原文链接。
特此声明:所有评论和私信都会在第一时间回复。也欢迎园子的大大们指正错误,共同进步。
声援博主:如果您觉得文章对您有帮助,可以点击文章右下角【推荐】一下。您的鼓励是作者坚持原创和持续写作的最大动力!


