黑马瑞吉外卖项目部分知识总结,对项目中的难点、不熟悉内容、项目亮点以及bug进行记录与分享。以及项目中用到的设计思想进行总结
前言
- 今天开始做一个黑马的瑞吉外卖项目🚀
- 本博客用来记录项目中遇到的问题与bug,以及项目中的难点与亮点技术😎
- 通过编写此博客进行每日的项目复盘💕
- 感兴趣的小伙伴可以和我交流一起沟通技术😊
- 我将会连日更新,直至项目做完😒
- 前端技术H5、VUE、Element UI、
- 项目技术大概Spring、SpringBoot、MyBatis-Plus、lombok、MySQL、
- 后续优化Redis、项目前后端分离Swagger、Nginx
一、静态资源映射
- 由于项目中没有在resources目录下 创建static和templates文件,所以需要配置资源映射。
| @Configuration |
| public class WebMvcConfig extends WebMvcConfigurationSupport { |
| @Override |
| protected void addResourceHandlers(ResourceHandlerRegistry registry) { |
| |
| |
| registry.addResourceHandler("/backend/**").addResourceLocations("classpath:/backend/"); |
| registry.addResourceHandler("/front/**").addResourceLocations("classpath:/front/"); |
| } |
| } |
二、MyBatis-Plus相关技术
@Slf4j可以直接使用日志输出log.info()
@RestController是@Controller和@ResponseBody的组合
| @Mapper |
| public interface EmployeeMapper extends BaseMapper<Employee> { |
| |
| } |
| public interface EmployeeService extends IService<Employee> { |
| |
| } |
| @Service |
| public class EmployeeServiceImpl extends ServiceImpl<EmployeeMapper, Employee> implements EmployeeService { |
| |
| } |
三、后台登陆与退出
3.1 登录
| public class R<T> { |
| private Integer code; |
| |
| private String msg; |
| |
| private T data; |
| |
| private Map map = new HashMap(); |
| public static <T> R<T> success(T object) { |
| R<T> r = new R<T>(); |
| r.data = object; |
| r.code = 1; |
| return r; |
| } |
| public static <T> R<T> error(String msg) { |
| R r = new R(); |
| r.msg = msg; |
| r.code = 0; |
| return r; |
| } |
| public R<T> add(String key, Object value) { |
| this.map.put(key, value); |
| return this; |
| } |
| } |
- 使用了
DigestUtils.md5DigestAsHex()对密码进行了md5加密,转为16进制,提高安全性
| String password = employee.getPassword(); |
| password = DigestUtils.md5DigestAsHex(password.getBytes()); |
| //构造条件构造器,使用lambda的 |
| LambdaQueryWrapper<Employee> queryWrapper = new LambdaQueryWrapper<>(); |
| //等值查询,new一个Employee对象,并调用getUsername方法 |
| queryWrapper.eq(Employee::getUsername, username); |
| Employee emp = employeeService.getOne(queryWrapper); |
- 将员工信息存入session中,方便取信息,也为后续退出功能优化做铺垫
| |
| HttpSession session = request.getSession(); |
| session.setAttribute("employee", emp.getId()); |
3.2 退出
3.3 完善登录功能
- 这里使用的是Servlet的过滤器,有@WebFilter注解,需要在启动类加入@ServletComponentScan注解扫描。
| log.info("拦截到请求:{}",xxxx) {}是一个占位符,数据可以自动加入进去 |
| |
| AntPathMatcher antPathMatcher = new AntPathMatcher(); |
| |
| |
| |
| boolean match = antPathMatcher.match(uri, requestURI); |
四、员工新增与分页
4.1 员工新增
- 员工新增就是简单的crud,但是用到了字段自动填充,这样就不用我们自己去写重复的代码了,也是说MyBatis-Plus真香😂
| @TableField(fill = FieldFill.INSERT) |
| private LocalDateTime createTime; |
| |
| @TableField(fill = FieldFill.INSERT_UPDATE) |
| private LocalDateTime updateTime; |
| |
| @TableField(fill = FieldFill.INSERT) |
| private Long createUser; |
| |
| @TableField(fill = FieldFill.INSERT_UPDATE) |
| private Long updateUser; |
| @Component |
| public class MyMetaObjectHandler implements MetaObjectHandler { |
| @Override |
| public void insertFill(MetaObject metaObject) { |
| metaObject.setValue("createTime", LocalDateTime.now()); |
| metaObject.setValue("updateTime", LocalDateTime.now()); |
| metaObject.setValue("createUser", BaseContext.getCurrentId()); |
| metaObject.setValue("updateUser", BaseContext.getCurrentId()); |
| } |
| |
| @Override |
| public void updateFill(MetaObject metaObject) { |
| metaObject.setValue("updateTime", LocalDateTime.now()); |
| metaObject.setValue("updateUser", BaseContext.getCurrentId()); |
| } |
| } |
| |
| @ExceptionHandler(SQLIntegrityConstraintViolationException.class) |
| public R<String> exceptionHandler(SQLIntegrityConstraintViolationException e) { |
| log.info("异常错误信息:{}",e.getMessage()); |
| |
| |
| if(e.getMessage().contains("Duplicate entry")) { |
| String[] split = e.getMessage().split(" "); |
| return R.error(split[2] + "已经存在"); |
| } |
| return R.error("未知错误"); |
| } |
4.2 员工分页查询
| @Configuration |
| public class MyBatisPlusConfig { |
| @Bean |
| public MybatisPlusInterceptor mybatisPlusInterceptor() { |
| MybatisPlusInterceptor mybatisPlusInterceptor = new MybatisPlusInterceptor(); |
| mybatisPlusInterceptor.addInnerInterceptor(new PaginationInnerInterceptor()); |
| return mybatisPlusInterceptor; |
| } |
| } |
| @GetMapping("/page") |
| public R<Page> page(int page, int pageSize, String name) { |
| |
| |
| Page pageInfo = new Page(page,pageSize); |
| |
| LambdaQueryWrapper<Employee> queryWrapper = new LambdaQueryWrapper<>(); |
| |
| queryWrapper.like(StringUtils.isNotEmpty(name),Employee::getName,name); |
| |
| queryWrapper.orderByDesc(Employee::getUpdateTime); |
| |
| employeeService.page(pageInfo,queryWrapper); |
| |
| return R.success(pageInfo); |
| } |
4.3 优化
- 由于无法在自定义元数据处理器中,获取session对象,所以我们拿不到想要的数据。
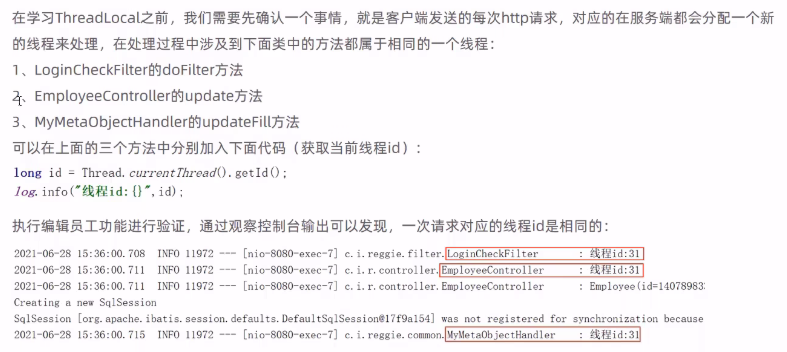
- 但是对于这些通用的类,他们都共用同一个线程,所以我们可以将数据放入当前线程中传过去。
| |
| public class BaseContext { |
| private static ThreadLocal<Long> threadLocal = new ThreadLocal<>(); |
| |
| public static void setCurrentId(Long id) { |
| threadLocal.set(id); |
| } |
| public static Long getCurrentId() { |
| return threadLocal.get(); |
| } |
| } |
- 设计非常巧妙,思想值得学习!😶🌫️
- 但是Long型id过长,传到前端是json形式的字符串,会存在精度丢失问题。
五、分类功能
- 分类的删除功能由于在一个分类中可能和菜品与套餐有着关联的关系,可能会导致我们无法删除。(外键?)
- 所以就通过关联的共同值id进行查询,如果有关联,则无法删除
| public void remove(Long id) { |
| QueryWrapper<Dish> queryWrapper1 = new QueryWrapper<>(); |
| |
| queryWrapper1.eq("id",id); |
| |
| int count1 = dishService.count(queryWrapper1); |
| if(count1 > 0) { |
| |
| throw new CustomException("关联了菜品,不能删除"); |
| } |
| |
| QueryWrapper<SetMeal> queryWrapper2 = new QueryWrapper<>(); |
| queryWrapper2.eq("id",id); |
| |
| int count2 = setMealService.count(queryWrapper2); |
| if(count2 > 0) { |
| |
| } |
| |
| |
| super.removeById(id); |
| } |
| public class CustomException extends RuntimeException { |
| public CustomException(String msg) { |
| super(msg); |
| } |
| } |
| @ExceptionHandler(CustomException.class) |
| public R<String> exceptionHandler(CustomException e) { |
| log.info("异常错误信息:{}",e.getMessage()); |
| |
| return R.error(e.getMessage()); |
| } |
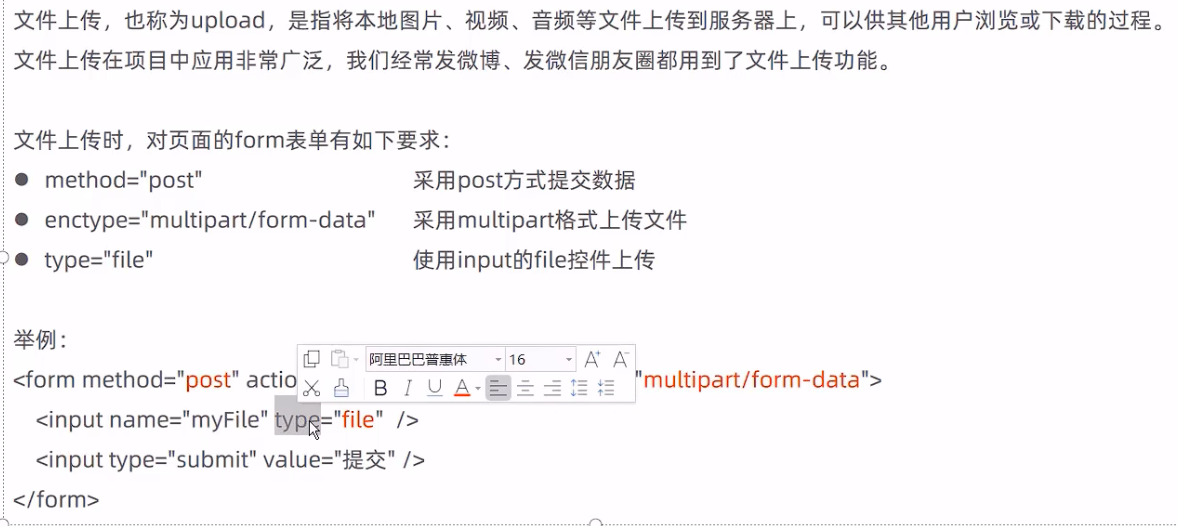
六、文件的上传与下载
6.1 文件的上传
| @PostMapping("/upload") |
| public R<String> upload(MultipartFile file) { |
| |
| String originalFilename = file.getOriginalFilename(); |
| |
| String suffix = originalFilename.substring(originalFilename.lastIndexOf(".")); |
| String fileName = UUID.randomUUID().toString() + suffix; |
| |
| |
| File dir = new File(basePath); |
| if (!dir.exists()) { |
| dir.mkdirs(); |
| } |
| try { |
| |
| file.transferTo(new File(basePath + fileName)); |
| } catch (IOException e) { |
| e.printStackTrace(); |
| } |
| return R.success(fileName); |
| } |
- 这里的参数必须使用
MultipartFile file,并且我们传过来的文件会随着请求结束就自动删除,所以我们必须把他保存起来。
- 利用字符串截取与UUID防止图片名字重复,创建一个目录
- 通过
file.transferTo(new File(basePath + fileName));将我们的临时文件转存到指定的位置。
6.2 文件的下载
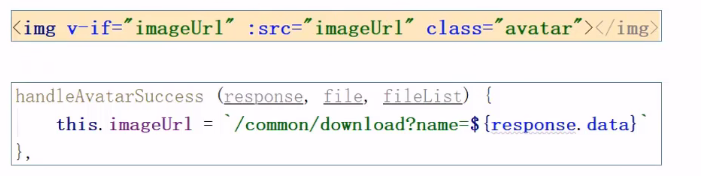
- 我们通过将文件下载到指定位置,然后再浏览器的页面中渲染出来。
| public void download(String name, HttpServletResponse response) { |
| FileInputStream fileInputStream = null; |
| ServletOutputStream out = null; |
| try { |
| |
| fileInputStream = new FileInputStream(new File(basePath + name)); |
| |
| out = response.getOutputStream(); |
| |
| response.setContentType("image/jpeg"); |
| int len = 0; |
| byte[] bytes = new byte[102400]; |
| while((len = fileInputStream.read(bytes)) != -1) { |
| out.write(bytes,0,len); |
| out.flush(); |
| } |
| } catch (Exception e) { |
| e.printStackTrace(); |
| } |
| } |
- 就是基本的操作,读取文件信息,将文件写入到浏览器中。
- 这里也理解了为什么上传与下载需要成套出现~,因为我们上传是暂时保存在了本地的服务器中,而从我们本地服务器中下载出来,才能到我们的页面里渲染。
七、结尾
- 对于瑞吉外卖项目内容就总结这么多,若想深入学习等待后续更新。
- 我将会继续更新关于Java方向的学习知识,感兴趣的小伙伴可以关注一下。
- 文章写得比较走心,用了很长时间,绝对不是copy过来的!
- 尊重每一位学习知识的人,同时也尊重每一位分享知识的人。
- 如果有什么错误请大家积极批评指正,我们第一时间更改。
- 😎你的点赞与关注,是我努力前行的无限动力。🤩
本文作者:lx-meteor
本文链接:https://www.cnblogs.com/lx-meteor/p/16464406.html
版权声明:本作品采用lx-Meteor许可协议进行许可。


【推荐】国内首个AI IDE,深度理解中文开发场景,立即下载体验Trae
【推荐】编程新体验,更懂你的AI,立即体验豆包MarsCode编程助手
【推荐】抖音旗下AI助手豆包,你的智能百科全书,全免费不限次数
【推荐】轻量又高性能的 SSH 工具 IShell:AI 加持,快人一步