
Tomcat深入浅出——Servlet(二)
一、Servlet简介
Servlet类最终开发步骤:
- 第一步:编写一个Servlet类,直接继承HttpServlet
- 第二步:重写doGet方法或者doPost方法,重写哪个我说的算!
- 第三步:将Servlet类配置到web.xml文件当中
- 第四步:准备前端的页面(form表单),指定请求路径即可
- Servlet是一个接口,在它的下面有GenericServlet
和HttpServlet两个实现类
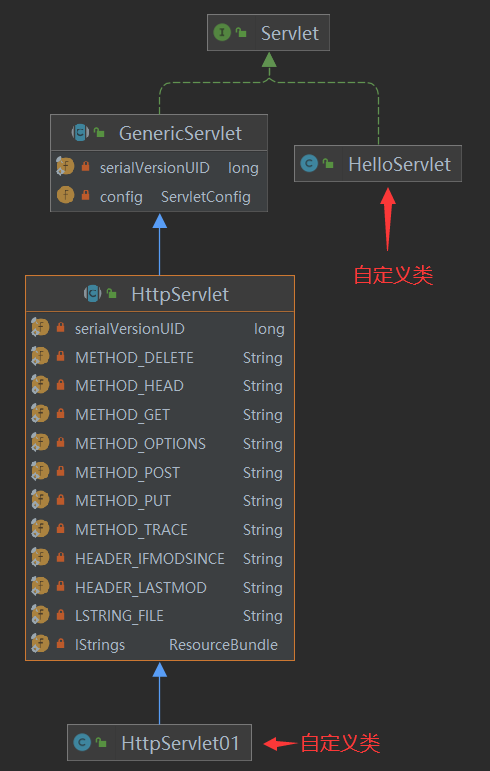
我们来了解一下GenericServlet:
- 其中的GenericServlet实现了很多方法,只保留了一个抽象方法,就是我们经常用的service方法。
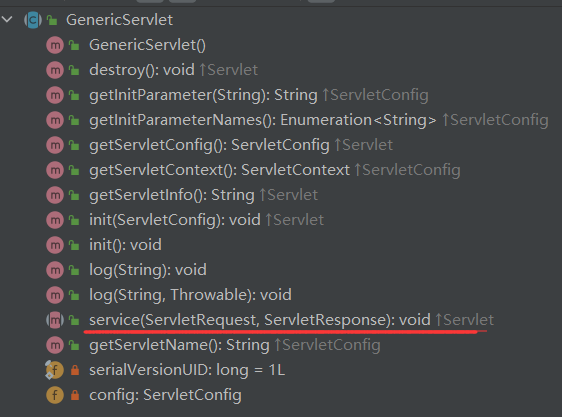
- 这或许就是为了更简洁一点吧,我们每次不需要在像实现Servlet接口一样,将全部的抽象方法都实现。
- 根据他的类图可知,HttpServlet继承了GenericServlet这个类,那么它为什么要继承GenericServlet呢?
我们来了解一下HttpServlet:
protected void service(HttpServletRequest req, HttpServletResponse resp) throws ServletException, IOException { String method = req.getMethod(); long lastModified; if (method.equals("GET")) { lastModified = this.getLastModified(req); if (lastModified == -1L) { this.doGet(req, resp); } else { long ifModifiedSince; try { ifModifiedSince = req.getDateHeader("If-Modified-Since"); } catch (IllegalArgumentException var9) { ifModifiedSince = -1L; } if (ifModifiedSince < lastModified / 1000L * 1000L) { this.maybeSetLastModified(resp, lastModified); this.doGet(req, resp); } else { resp.setStatus(304); } } } else if (method.equals("HEAD")) { lastModified = this.getLastModified(req); this.maybeSetLastModified(resp, lastModified); this.doHead(req, resp); } else if (method.equals("POST")) { this.doPost(req, resp); } else if (method.equals("PUT")) { this.doPut(req, resp); } else if (method.equals("DELETE")) { this.doDelete(req, resp); } else if (method.equals("OPTIONS")) { this.doOptions(req, resp); } else if (method.equals("TRACE")) { this.doTrace(req, resp); } else { String errMsg = lStrings.getString("http.method_not_implemented"); Object[] errArgs = new Object[]{method}; errMsg = MessageFormat.format(errMsg, errArgs); resp.sendError(501, errMsg); } }
- 这段是HttpServlet中实现的Service方法的源码,我们可以清楚的了解到,Tomcat已经把这个Service写好了,我们只需要去实现
doGet()、doPost()等等这些请求的方法就可以了。 - 因为这个Service会自己判断,我们进行访问的是什么请求,然后自动找到相应的方法进行处理。
二、两种设计模式
2.1适配器模式
适配器:适配器就是一种适配中间件,它存在于不匹配的二者之间,用于连接二者,将不匹配变得匹配,简单点理解就是平常所见的转接头,转换器之类的存在。
public interface MyInterface { void m1(); void m2(); void m3(); void m4(); void m5(); void test(); //但是这个接口中我们常用的方法只有test(),我们在实现此接口的时候,还需要实现其他方法,很累赘。 //所以我们就需要一个适配器! }
public abstract class Test implements MyInterface{ public void m1() { } public void m2() { } public void m3() { } public void m4() { } public void m5() { } //这是一个适配器 //在创建一个接口的实现类,我们将常用的方法设置为抽象的方法 //这样我们只需要继承该类,然后实现方法即可 public abstract void test(); }
- 这样做的优点就是下次我们只需要去继承Test类,实现我们经常使用的test()方法就可以了。
- 使我们的减少了冗余的代码量
- 同时你也会发现这个就和GenericServlet去继承Servlet这个接口是一样的
- 这就是适配器设计模式,其实很简单,也有利于我们更加理解抽象类的作用和接口的使用
public class Realize extends Test{ public void test() { //这样我们就不需要再去实现接口中的 其他方法了 } }
2.2 模板设计方法模式
模板方法模式:是一种行为设计模式, 它在超类中定义了一个算法的框架, 允许子类在不修改结构的情况下重写算法的特定步骤。
-
模板方法模式建议将算法分解为一系列步骤, 然后将这些步骤改写为方法, 最后在 “模板方法” 中依次调用这些方法。 步骤可以是 抽象的, 也可以有一些默认的实现。 为了能够使用算法, 客户端需要自行提供子类并实现所有的抽象步骤。 如有必要还需重写一些步骤 (但这一步中不包括模板方法自身)。
-
认真的去阅读上面这段话:你就会发现他说将 算法进行分解,最后在模板中依次调用:
- 此时的你是否想起我们刚开篇介绍的HttpServlet???
- HttpServlet继承了 GenericServlet类,而GenericServlet类又实现了Servlet接口;HttpServlet里面的Service()方法你是否还记得?
protected void service(HttpServletRequest req, HttpServletResponse resp) throws ServletException, IOException { String method = req.getMethod(); long lastModified; if (method.equals("GET")) { lastModified = this.getLastModified(req); if (lastModified == -1L) { this.doGet(req, resp); } else { long ifModifiedSince; try { ifModifiedSince = req.getDateHeader("If-Modified-Since"); } catch (IllegalArgumentException var9) { ifModifiedSince = -1L; } if (ifModifiedSince < lastModified / 1000L * 1000L) { this.maybeSetLastModified(resp, lastModified); this.doGet(req, resp); } else { resp.setStatus(304); } } } else if (method.equals("HEAD")) { lastModified = this.getLastModified(req); this.maybeSetLastModified(resp, lastModified); this.doHead(req, resp); } else if (method.equals("POST")) { this.doPost(req, resp); } else if (method.equals("PUT")) { this.doPut(req, resp); } else if (method.equals("DELETE")) { this.doDelete(req, resp); } else if (method.equals("OPTIONS")) { this.doOptions(req, resp); } else if (method.equals("TRACE")) { this.doTrace(req, resp); } else { String errMsg = lStrings.getString("http.method_not_implemented"); Object[] errArgs = new Object[]{method}; errMsg = MessageFormat.format(errMsg, errArgs); resp.sendError(501, errMsg); } }
- 一大堆的
if、else if、else这不就是所谓的将算法分块提炼了出来吗?然后我们只需要去刻画doGet()、doPost()等方法,程序的主框架是不变的,只是其中的细节需要我们自己去实现。 - 我个人目前觉得和适配器模式比较相似,但略有不同之处。
三、Servlet对象的声明周期
3.1 Servlet对象是由谁来维护的?
- Servlet对象的创建、以及对象上方法的调用、对象的销毁这个过程,我们JavaWeb程序员是无权干预的。你可以仔细想想你什么时候new出来过一个Servlet对象。
- Servlet对象的声明周期是由Tomcat服务器负责的
- Tomcat服务器我们又可以称之为:WEB容器
- WEB容器来管理Servlet对象的死活
3.2 Servlet认知强化
- 你还真可以自己new一个Servlet对象,但是并不受我们Tomcat管理,所以你自己new出来的Servlet对象,死活和Tomcat没有关系。
- Tomcat创建的Servlet对象,这些Servlet都会被放到一个集合当中(HashMap),只有放到HashMap集合的Servlet才能够被Tomcat容器管理。
- Tomcat容器底层应该有一个HashMap这样的集合,在这个集合当中存储了Servlet对象和请求路径之间的关系,我想此时你更能够想到为什么我们总是在xml中如此定义?

- 我们可以将Servlet对象称之为假单例模式,因为Servlet只有一个对象呀。🐔
- 配置在web.xml对应Servlet程序的
标签下添加 <load-on-startup>1</load-on-startup>配置,指定改Servlet对象在Web应用启动时创建
3.3 关于Servlet中的方法
- 通过Servlet中的方法,我们就可以了解到它的生命周期、运行机制。
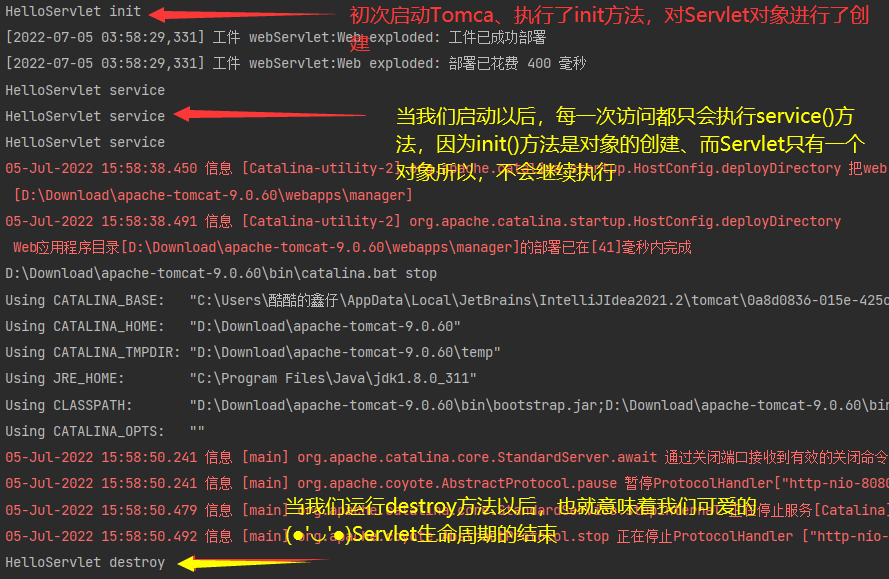
- 无参数构造方法、init方法只在第一次用户发送请求的时候执行
-
只要用户发送一次请求,service方法必然会被Tomcat调用一次。
-
关于Servlet类中方法的调用次数:
- 构造方法只执行一次
- init方法只执行一次
- service方法:用户发送n次请求执行n次
- destroy方法:只执行一次
什么时候使用destroy方法:
- 通常在destroy方法当中,进行资源的关闭,马上对象要被销毁了,还有什么没有关闭的,抓紧时间关闭资源。
四、Servlet映射问题
- 只要是前端发送的请求,就必须要写项目名!
- 当我们进行转发的时候需要加上"/":
request.getRequestDispatcher('/b'); - 当我们在web.xml中配置路径时,需要加上
<url-pattern>/helloServlet</url-pattern>
url-pattern匹配规则:
- "/":弱的 全路径匹配
- ".do":以特殊方式结尾的匹配
- "/*":强的 全路径匹配
- "/hello/*":有前缀的 所以匹配
五、HttpServletRequest
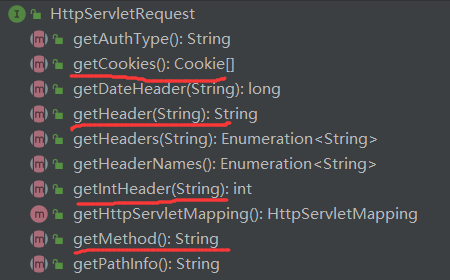
- 首先HttpServletRequest这个接口实现了ServletRequest接口,那么他们两个有什么区别呢?
- HttpServletRequest:这个名字带有http,所以它的里面就有一些关于对浏览器的处理方法;例如
5.1 GET请求参数
● 在浏览器的url里发送,以查询字符串方式拼接参数(?key=value&key1=value1)
● 使用Ajax,设置请求类型为GET,在请求url后拼接查询字符串
● 用form表单发送
/** * GET,发送的请求参数在请求行内, * 请求行的信息会由Tomcat自动解码 (utf-8) */ @Override protected void doGet(HttpServletRequest req, HttpServletResponse resp) throws ServletException, IOException { System.out.println("HTTPServletOne doGet"); // 1 获取请求参数 System.out.println("根据getParameter获取请求参数值 :"+req.getParameter("name")); // 2获取所有参数名 Enumeration<String> paras = req.getParameterNames(); String s = null; while (paras.hasMoreElements()) { s = paras.nextElement(); System.out.println("根据getParameterNames得到的参数名:"+s +"参数值:"+ req.getParameter(s)); } }
5.2 POST请求参数
● form表单传输,指定请求方式为POST,默认Content-Type为application/x-www-form-urlencoded
/** * 发送POST请求,请求参数都在请求体里 * 请求体的内容由Servlet进行解析,默认编码规范为ISO * 必须指定请求头 Content-Type */ @Override protected void doPost(HttpServletRequest req, HttpServletResponse resp) throws ServletException, IOException { System.out.println("HTTPServletOne doPost"); // 0 设置请求处理字符集 req.setCharacterEncoding("utf-8"); // 1.获取请求参数 System.out.println("根据getParameter获取请求参数值 :"+req.getParameter("name")); }
● Ajax传输,指定请求方式为POST,必须添加Content-Type为application/x-www-form-urlencoded;charset=utf-8
/** * 发送POST请求,请求参数都在请求体里 * 请求体的内容由Servlet进行解析,默认编码规范为ISO */ @Override protected void doPost(HttpServletRequest req, HttpServletResponse resp) throws ServletException, IOException { System.out.println("HTTPServletOne doPost"); // 0 设置请求处理字符集 req.setCharacterEncoding("utf-8"); // 1 获取JSON数据 // 2 reader输入流, 是从请求体开始读的 BufferedReader reader = req.getReader(); String s = null; StringBuilder sb = new StringBuilder(); while ((s = reader.readLine()) != null) { sb.append(s); } String json = sb.toString(); // 3 通过FastJson 工具进行解析 Person person = JSON.parseObject(json, Person.class); System.out.println(person); }
● 附上前端代码
<!DOCTYPE html> <html lang="en"> <head> <meta charset="UTF-8"> <title>Title</title> <script type="text/javascript"> function onGet() { //ajax var xhr = new XMLHttpRequest(); xhr.open("GET","http://localhost:8080/httpServlet01?name=123&age=12"); xhr.send(); } function onPost() { //ajax //用GET方式发送的请求参数在请求行内,请求行内的信息会由Tomcat自动解码(utf-8) //如果用POST请求,所有参数都放在了请求体里, //但是请求体的内容不是Tomcat解析的, 是由Servlet进行解析的,默认的编码规范为ISO //则需要声明请求头格式:application/x-www-form-urlencoded //表单发送的话 会默认加上这个类型 var xhr = new XMLHttpRequest(); xhr.open("POST","http://localhost:8080/httpServlet01"); xhr.setRequestHeader("Content-Type","application/json;charset=utf-8") xhr.send("{'name':'123'}"); } function onPut() { //ajax var xhr = new XMLHttpRequest(); xhr.open("PUT","http://localhost:8080/httpServlet01"); xhr.send(); } function onDelete() { //ajax var xhr = new XMLHttpRequest(); xhr.open("DELETE","http://localhost:8080/httpServlet01"); xhr.send(); } </script> </head> <body> <h1>Hello,Servlet!</h1> <button onclick="onGet()">发送GET请求</button> <button onclick="onPost()">发送POST请求</button> <button onclick="onPut()">发送PUT请求</button> <button onclick="onDelete()">发送DELETE请求</button> </body> </html>
六、结尾
- 对于Tomcat的Servlet内容就总结这么多,若想深入学习等待后续更新。
- 我将会继续更新关于Java方向的学习知识,感兴趣的小伙伴可以关注一下。
- 文章写得比较走心,用了很长时间,绝对不是copy过来的!
- 尊重每一位学习知识的人,同时也尊重每一位分享知识的人。
- 😎你的点赞与关注,是我努力前行的无限动力。🤩


【推荐】国内首个AI IDE,深度理解中文开发场景,立即下载体验Trae
【推荐】编程新体验,更懂你的AI,立即体验豆包MarsCode编程助手
【推荐】抖音旗下AI助手豆包,你的智能百科全书,全免费不限次数
【推荐】轻量又高性能的 SSH 工具 IShell:AI 加持,快人一步