Java消息中间件--初级篇
一、 为什么使用消息中间件?
假设用户登录系统 传统方式 用户登录 调用短息服务 积分服务 日志服务等各种服务 如果短息服务出现问题就无法发送短信而且用户登录成功必须所有调用全部完成返回给用户登录系统一条用户登录成功信息。从整体业务上讲 用户只是要登录系统 并不关心短信服务 日志服务怎么样就想登录成功就好 这种操作让用户等待了时间。
2)通过消息中间件解耦服务调用
用户登录系统会将登录消息发送给消息中间件 ---消息中间件会将用户登录消息异步一条一条推送给---短息服务 日志服务等其他相关服务 用户就不需要等待其他服务处理完成在给我返回结果。
二、 消息中间件的好处:
1)系统解耦
2)异步
3)横向扩展
4)安全可靠 消息中间件会把我们的消息进行保存 如果其他业务系统出现问题 或者业务系统没有对消息进行消费 业务系统可以下一次继续对消息进行消费
5)顺序保存
三、中间件是什么:
中间件作用在业务系统之间 不是操作系统软件 还不是业务软件,用户不能直接使用的软件同一叫法。
四、消息中间件:
用于数据接收和发送,利用高效可靠的异步消息传递机制集成分布式系统
五、JMS (java Message Service )
Java消息服务 java消息中间件的API,用于在两个应用程序之间或者分布式系统中发送消息,进行异步通信的规范。
六、AMQP
提供统一消息服务的应用层标准协议,遵循这个协议客户端与消息中间件可以传递消息,不会受到客户端和中间件不同产品,是不同开发语言影响 只要遵循这种协议就可以传递消息。
七、常见消息中间件
activeMQ 是一个完全支持JMS1.1和J2EE1.4规范的
rabbitMQ 是一个开源的AMQP实现,用于分布式系统中存储转发消息
kafka 是一个高吞吐量的分布式发布订阅消息系统,是一个分布式的,分区的,可靠的分布式日志存储服务。(不是一个严格消息中间件 )
1)高吞吐量:即使非常普通的硬件kafka也可以支持每秒数百万的消息
八、JMS规范
提供者:实现JMS规范的消息中间件服务器
客户端:接收或发送消息的应用程序
生产者/发布者:创建并发送消息的客户端
消费者/订阅者:接收并处理消息的客户端
消息:应用程序之间传递的数据内容
消息模式:在客户端之间传递消息的方式,JMS中定义了主题和队列两种模式
九、JMS消息模式
1)队列模式
客户端包括生产者和消费者
队列中的消息只能被一个消费者消费
消费者可以随时消费队列的消息
举例:生产者 应用1 应用2 向JMS队列中发送消息 应用1发送 1 3 5 应用2 发送2 4 6 JMS消息队列中会存在 1 2 3 4 5 6 消息 时存在消费者 应用3 应用4 应用3与JMS 有两个链接 应用4有一个链接 在消费消息的时候 三个链接会平均分配6各消息
2)主题模式
客户端:包括发布者和订阅者
主题中的消息被所有订阅者消费
消费者不能消费订阅之前就发送到主题中的消息(消费者要消费队列中的消息要先订阅在消费 如果不提前订阅是接收不到消息的)
举例:应用3 与应用4 向队列中订阅消息 应用3建立了两个链接 应用4建立了一个链接 发布者 应用1 应用2 向队列中发布消息 123456 当订阅者消费消息的时候三个链接都消费了6个消息
十、JMS编码接口
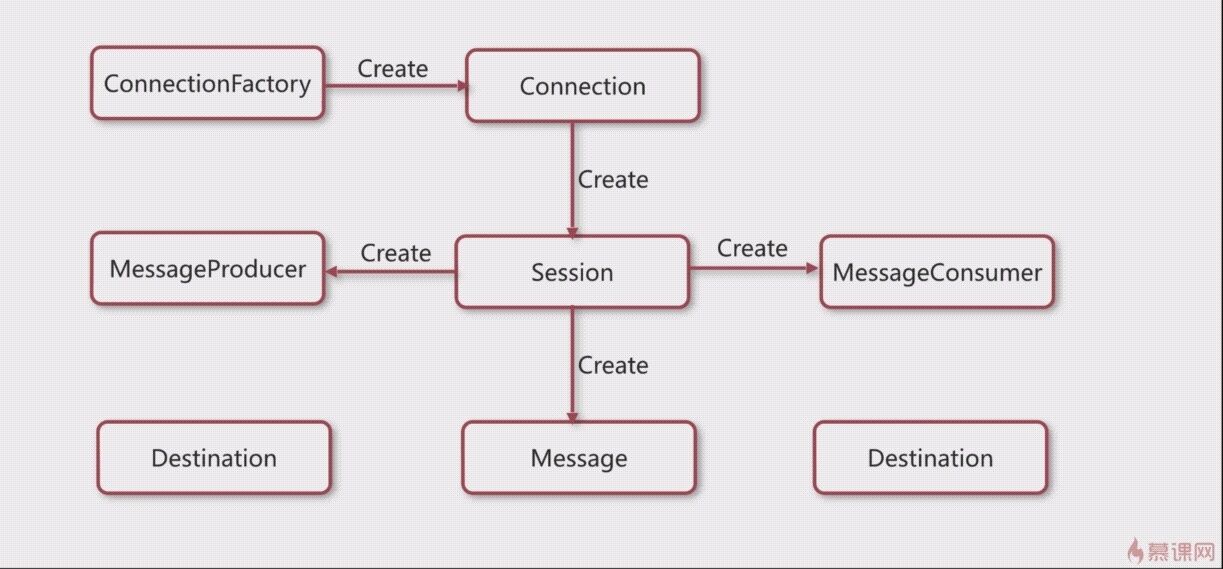
ConnectionFactory 用于创建链接到消息中间件的链接工厂
Connection 代表可应用程序和消息服务器之间的通信链路
Destination (目的地) 指消息发布和接收的地点,包括队列和主题
Session 表示一个单线程的上下文,用于发送和接收消息
MessageConsumer 由会话创建,用于接收发送到目标的消息
MessageProducer 由会话创建,用于发送消息到目标
Message 是在消费者和生产者之间传送的对象,消息头,一组消息属性,一个消息体

十一:JMS代码演示
1)使用JMS接口规范链接activeMQ 队列模式
引入activemq依赖jar 注意:引入相关jar 必须与相应的jdk匹配否则会报异常
1 java.lang.UnsupportedClassVersionError: org/apache/lucene/store/Directory : Unsupported major.minor version 51.0
2 at java.lang.ClassLoader.defineClass1(Native Method)
3 at java.lang.ClassLoader.defineClassCond(ClassLoader.java:631)
4 at java.lang.ClassLoader.defineClass(ClassLoader.java:615)
5 at java.security.SecureClassLoader.defineClass(SecureClassLoader.java:141)
6 at java.net.URLClassLoader.defineClass(URLClassLoader.java:283)
7 at java.net.URLClassLoader.access$000(URLClassLoader.java:58) 8 at java.net.URLClassLoader$1.run(URLClassLoader.java:197)
<dependencies>
        <dependency>
            <groupId>org.apache.activemq</groupId>
            <artifactId>activemq-all</artifactId>
            <version>5.14.0</version>
        </dependency>
    </dependencies>
创建消费提供方(主题模式消息发布方)
public class JmsProduce {

    //声明服务器地址
    private static final String url = "tcp://127.0.0.1:61616";
    //声明队列名称
    //private static final String queue = "queue_test";
    private static final string topic = "topic_test";
    public static void main(String []args)throws Exception{

        //创建连接工厂  由消息服务商提供
        ActiveMQConnectionFactory factory = new ActiveMQConnectionFactory(url);
        //根据消息工厂创建连接
        Connection connection = factory.createConnection();
        //开启连接
        connection.start();
        //根据连接创建会话   参数一  是否使用事务  参数二 应答模式
        Session session = connection.createSession(false, Session.AUTO_ACKNOWLEDGE);

        //创建目标  也就是队列
        // Destination destination =  session.createQueue(JmsProduce.queue);
        //创建主题目标
          Destination destination = session.createTopic(topic);
        //创建一个生产者
        MessageProducer producer = session.createProducer(destination);
        //
        for (int i=0;i<100;i++){
            //创建消息
            TextMessage textMessage = session.createTextMessage("test" + i);
            //生产者将消息发送给队列
            producer.send(textMessage);
            System.out.println("生产者"+textMessage);
        }
        connection.close();

    }
}
消息消费方(主题模式订阅者)
public class JmsConsumer {

    private static final String url="tcp://127.0.0.1:61616";
    //private static final String queue = "queue_test";
    private static final String topic = "topic_test";
    public static void main(String [] args) throws JMSException {

        //创建连接工厂  由消息服务商提供
        ActiveMQConnectionFactory factory = new ActiveMQConnectionFactory(url);
        //根据消息工厂创建连接
        Connection connection = factory.createConnection();
        //开启连接
        connection.start();
        //根据连接创建会话   参数一  是否使用事务  参数二 应答模式
        Session session = connection.createSession(false, Session.AUTO_ACKNOWLEDGE);
        //创建目标  也就是队列
        //Destination destination =  session.createQueue(queue);
         //创建主题目标
           Destination destination = session.createTopic(topic);
        //创建消费者
        MessageConsumer consumer = session.createConsumer(destination);
        //创建一个监听器
        consumer.setMessageListener(new MessageListener() {
            public void onMessage(Message message) {
                TextMessage message1 = (TextMessage) message;
                System.out.println("接收消息"+message1);
            }
        });
    }
}
队列模式是点对点形式
主题模式 消费者需要先对主题进行订阅 然后发布者在发布过程中消费者才能消费消息
Spring 整合JMS ActiveMq
创建一个maven项目
pom.xml

<project xmlns="http://maven.apache.org/POM/4.0.0" xmlns:xsi="http://www.w3.org/2001/XMLSchema-instance" xsi:schemaLocation="http://maven.apache.org/POM/4.0.0 http://maven.apache.org/xsd/maven-4.0.0.xsd">
  <modelVersion>4.0.0</modelVersion>
  <groupId>cn.ac.bcc</groupId>
  <artifactId>Jms-Activemq</artifactId>
  <version>0.0.1-SNAPSHOT</version>
  <packaging>war</packaging>
  <properties>
        <spring.version>4.1.3.RELEASE</spring.version>
    </properties>
    <dependencies>
        <dependency>
            <groupId>junit</groupId>
            <artifactId>junit</artifactId>
            <version>4.11</version>
            <scope>test</scope>
        </dependency>
        <dependency>
            <groupId>org.springframework</groupId>
            <artifactId>spring-context</artifactId>
            <version>${spring.version}</version>
        </dependency>
        <dependency>
            <groupId>org.springframework</groupId>
            <artifactId>spring-jms</artifactId>
            <version>${spring.version}</version>
        </dependency>
        <dependency>
            <groupId>org.springframework</groupId>
            <artifactId>spring-test</artifactId>
            <version>${spring.version}</version>
        </dependency>
            <dependency>
            <groupId>org.apache.activemq</groupId>
            <artifactId>activemq-core</artifactId>
            <version>5.7.0</version>
            <exclusions>
                <exclusion>
                    <artifactId>spring-context</artifactId>
                    <groupId>org.springframework</groupId>
                </exclusion>
            </exclusions>
        </dependency>
    </dependencies>
    <build>
        <plugins>
            <plugin>
                <groupId>org.apache.maven.plugins</groupId>
                <artifactId>maven-compiler-plugin</artifactId>
                <version>3.2</version>
                <configuration>
                    <source>1.7</source>
                    <target>1.7</target>
                    <encoding>UTF-8</encoding>
                </configuration>
            </plugin>
        </plugins>
    </build>
</project>
消息提供方实现
1)定义消息服务方接口

package cn.ac.bcc.jms.service;

public interface ProducerService {
    //定义发送消息的方法
    public void sendMessage(String message);
}
2)配置公共common.xml文件

<beans xmlns="http://www.springframework.org/schema/beans"
    xmlns:xsi="http://www.w3.org/2001/XMLSchema-instance" xmlns:mvc="http://www.springframework.org/schema/mvc"
    xmlns:context="http://www.springframework.org/schema/context"
    xsi:schemaLocation="http://www.springframework.org/schema/beans
        http://www.springframework.org/schema/beans/spring-beans-4.0.xsd
        http://www.springframework.org/schema/context
        http://www.springframework.org/schema/context/spring-context-4.0.xsd
        http://www.springframework.org/schema/jms
        http://www.springframework.org/schema/jms/spring-jms-4.0.xsd">


        <!--开启注解扫描  -->
        <context:annotation-config/>
        <!--配置activemq连接工厂   在spring提供的连接工厂中需要提供activemq提供的工厂  -->
        <bean id="targetConnectionFactory" class="org.apache.activemq.ActiveMQConnectionFactory">
            <!-- 配置activemq服务器地址  通过地址创建连接 -->
            <property name="brokerURL" value="tcp://localhost:61616"/>
        </bean>
        <!-- 配置spring jms 提供的连接工厂 -->
        <bean id="connectionFactory" class="org.springframework.jms.connection.SingleConnectionFactory">
            <property name="targetConnectionFactory" ref="targetConnectionFactory"/>
        </bean>
        <!-- 配置activeMq目的地 -->
        <bean id="queueDestination" class="org.apache.activemq.command.ActiveMQQueue">
            <!-- 指定队列名称  通过构造方式 -->
            <constructor-arg value="queue-test"/>
        </bean>

</beans>
3)配置spring配置文件 producer.xml
<beans xmlns="http://www.springframework.org/schema/beans"
    xmlns:xsi="http://www.w3.org/2001/XMLSchema-instance"
    xmlns:context="http://www.springframework.org/schema/context"
    xsi:schemaLocation="http://www.springframework.org/schema/beans
        http://www.springframework.org/schema/beans/spring-beans-4.0.xsd
        http://www.springframework.org/schema/context
        http://www.springframework.org/schema/context/spring-context-4.0.xsd
        http://www.springframework.org/schema/jms
        http://www.springframework.org/schema/jms/spring-jms-4.0.xsd" >

    <!--引入公共配置文件 -->
    <import resource="common.xml" />
    <bean id="jmsTemplate" class="org.springframework.jms.core.JmsTemplate">
        <!--注入连接工厂 -->
        <property name="connectionFactory" ref="connectionFactory" />
    </bean>
    <bean class="cn.ac.bcc.jms.service.impl.ProducerServiceImpl"></bean>
</beans>
4)实现消息发送接口

package cn.ac.bcc.jms.service.impl;

import javax.annotation.Resource;
import javax.jms.Destination;
import javax.jms.JMSException;
import javax.jms.Message;
import javax.jms.Session;
import javax.jms.TextMessage;

import org.springframework.beans.factory.annotation.Autowired;
import org.springframework.jms.core.JmsTemplate;
import org.springframework.jms.core.MessageCreator;
import org.springframework.stereotype.Service;

import cn.ac.bcc.jms.service.ProducerService;

@Service
public class ProducerServiceImpl implements ProducerService {

    @Autowired
    private JmsTemplate jmsTemplate;
    @Resource(name = "queueDestination")
    private Destination destination;

    @Override
    public void sendMessage(final String message) {

        //通过jmsTemplate 模板发送消息  传递两个参数  消息的目的地  也就是activemq服务    参数2  创建一个消息体 封装消息信息
        jmsTemplate.send(destination, new MessageCreator() {

            @Override
            public Message createMessage(Session session) throws JMSException {

                TextMessage textMessage = session.createTextMessage(message);
                System.out.println("发送消息" + textMessage.getText());
                return textMessage;
            }
        });

    }

}
5)测试类

package cn.ac.bcc.test;

import org.springframework.context.support.ClassPathXmlApplicationContext;

import cn.ac.bcc.jms.service.ProducerService;

public class JmsProducer {

    public static void main(String[] args) {

        ClassPathXmlApplicationContext context = new ClassPathXmlApplicationContext("producer.xml");
        // 获取提供者接口实例
        ProducerService producerService = context.getBean(ProducerService.class);
        for (int i = 0; i < 100; i++) {
            // 调用发送消息方法
            producerService.sendMessage("消息发送来了" + i);
        }
        //关闭连接
        context.close();
    }

}
消息消费方实现
1)自定义消息消费方监听实现spring提供的MessageListener监听

package cn.ac.bcc.jms.listener;

import javax.jms.JMSException;
import javax.jms.Message;
import javax.jms.MessageListener;
import javax.jms.TextMessage;

public class ConsumerListener implements MessageListener {

    @Override
    public void onMessage(Message message) {
        TextMessage textMessage = (TextMessage)message;
        try {
            System.out.println("消息消费"+textMessage.getText());
        } catch (JMSException e) {
            // TODO Auto-generated catch block
            e.printStackTrace();
        }
    }

}
2)配置消费方spring 配置文件 consumer.xml

<beans xmlns="http://www.springframework.org/schema/beans"
    xmlns:xsi="http://www.w3.org/2001/XMLSchema-instance"
    xmlns:context="http://www.springframework.org/schema/context"
    xsi:schemaLocation="http://www.springframework.org/schema/beans
        http://www.springframework.org/schema/beans/spring-beans-4.0.xsd
        http://www.springframework.org/schema/context
        http://www.springframework.org/schema/context/spring-context-4.0.xsd
        http://www.springframework.org/schema/jms
        http://www.springframework.org/schema/jms/spring-jms-4.0.xsd">
        <!--引入公共配置文件  -->
        <import resource="common.xml"/>
        <!--创建自定义监听  -->
        <bean id = "consumerListener" class="cn.ac.bcc.jms.listener.ConsumerListener"></bean>
        <!--配置jms监听器  -->
        <bean id="jmsLisener" class="org.springframework.jms.listener.DefaultMessageListenerContainer">
         <property name="connectionFactory" ref="connectionFactory"></property>
        <property name="destination" ref="queueDestination"></property>
        <property name="messageListener" ref="consumerListener"></property>
        </bean>
</beans>
3)消费方测试实现

package cn.ac.bcc.test;

import org.springframework.context.support.ClassPathXmlApplicationContext;

public class ConsumerText {

    public static void main(String[] args) {

        ClassPathXmlApplicationContext context = new ClassPathXmlApplicationContext("consumer.xml");

    }

}
以上为spring整合JMS 实现消息接收发送队列模式实现 在消息接收与发送过程中要启动activemq
//设置消息的有效期 当24小时内消息接收为有效期
jmsTemplate.setTimeToLive(86400000)
activemq入门好文章推荐
https://blog.csdn.net/lifetragedy/article/details/51836557


