
react
pc端开发 先统一所有浏览器的样式
https://meyerweb.com/eric/tools/css/reset/
安装react-cli
npx create-react-app my-react-app
安装 axios
yarn add axios --save
axios的使用 及 react代理服务器的配置
配置单个代理


import React, { Component } from 'react'
import axios from 'axios';
import './index.scss';
export default class TodoList extends Component {
//发送axios 获取数据
getAxiosState=()=>{
/*
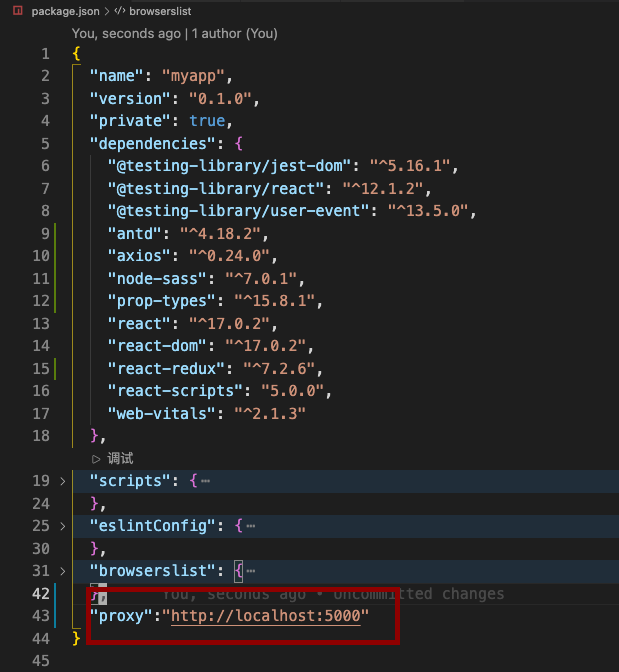
记住添加http:// 端口号还是本身3000的端口号
在package中添加代理 请求代理服务器3000转发到5000端口的服务器
"proxy":"http://localhost:5000"
*/
axios.get('http://localhost:3000/login')
.then(function (response) {
console.log(response);
})
.catch(function (error) {
console.log(error);
});
}
render() {
return (
<div >
{/* 发送axios请求 */}
<button onClick={this.getAxiosState}>点击获取数据</button>
</div>
)
}
}
图
配置多个代理 就不许用在package中配置,需要在src文件下建立一个文件setupProxy.js(不允许改名)
setupProxy.js配置
const proxy=require('http-proxy-middleware')
module.exports = function (app) {
    app.use(
        proxy.createProxyMiddleware('/api1', { //遇/api前缀的请求,就会出发该代理配置
            target: 'http://localhost:5000', //服务器转发目标
            changeOrigin: true, //控制服务器收到的请求头中的‘HOST’值
            /*
            changeOrigin:trur 服务器 收到的请求头的host就是5000开头
            changeOrigin:false 服务器 收到的请求头的host就是3000开头(默认false)
            我们一般设置为true
            */
            pathRewrite: {
                '^/api1': ''
            } //重写请求路径  将/api1的路径替换成空字符串(必须配置)
        }),
        proxy.createProxyMiddleware('/api2', { //遇/api前缀的请求,就会出发该代理配置
            target: 'http://localhost:5001', //服务器转发目标
            changeOrigin: true, //控制服务器收到的请求头中的‘HOST’值
            pathRewrite: {
                '^/api2': ''
            } //重写请求路径
        })
    )
}
用法
import React, { Component } from 'react'
import axios from 'axios';

import './index.scss';
export default class TodoList extends Component {
     //发送axios 获取数据
    getAxiosState=()=>{
        /*
        记住添加http://   端口号还是本身3000的端口号
        在package中添加代理 请求代理服务器3000转发到5000端口的服务器
        只有3000端口没有的资源才会找5000端口的服务器要
        必须带上setupProxy.js中的自己设置的/api1 前缀
        */
        axios.get('http://localhost:3000/api1/login')
        .then(function (response) {
          console.log(response);
        })
        .catch(function (error) {
          console.log(error);
        });
    }

    //第二个代理请求
    getAxiosState1=()=>{
        axios.get('http://localhost:3000/api2/cors')
        .then(function (response) {
          console.log(response);
        })
        .catch(function (error) {
          console.log(error);
        });
    }
    render() {
        return (
            <div >
                {/* 发送axios请求 */}
                <button onClick={this.getAxiosState}>点击获取数据0</button>
                <button onClick={this.getAxiosState1}>点击获取数据1</button>
            </div>
        )
    }
}
使用fatch发送 请求(特点 不许用下载安装 老版本浏览器可能不支持)
promise写法
   getMsg=()=>{
        /*
        fatch用法 window自带的方法
        fatch第一个then 返回的res是请求服务器成功,res原型链上的json()方法返回的是一个promise状态
        之后才可以then()获取成功失败的参数
        */
        fetch(`http://localhost:3000/api1/login`)
        //  res中原型上的json()方法返回的是promise()pending的一个状态
        // .then(res=>{console.log(res.json());return res.json()})
        .then(res=>res.json())
        .then((data)=>console.log(data)).catch(err=>{
            console.log(err)
        })
    }
ES7 async await写法
    //async await 优化 promise()写法
    getMsg = async () => {
        try {
            const res = await fetch(`http://localhost:3000/api1/login`);
            const data = await res.json();
            console.log(data,'success');
        } catch (e) {
            console.log(e,'error');
        }
    }
安装 styled-components (使各个模块的css独立出来) (如果使用scss之类的就不许用这样css模块化)
yarn add styled-components
第一步 把css文件改成js文件
第二部 import {createGlobalStyle } from 'styled-components'; (全局样式组件方法)
style.js//1引入全局样式方法 import {createGlobalStyle } from 'styled-components'; //2定义并暴露全局样式 export const GlobalStyled =createGlobalStyle` body{ margin:0; padding:0; background:blue; }APP.js//3引入全局样式 并以组件的形式使用 import {GlobalStyled} from './style' function App() { return ( <div className="App"> <GlobalStyled/> hello world </div> ); } export default App;

第三部 import styled from 'styled-components'; (局部样式组件方法)
common公用的组件 中的index.js
import styled from 'styled-components';

export const HeaderWrapper=styled.div`
    height:56px;
    background:red;
`
common公用的组件的样式
import React,{Component} from 'react';
import {HeaderWrapper} from './style';
class Header extends Component{
    render(){
        return (
            <HeaderWrapper>hello world</HeaderWrapper>
        )
    }
}

export default Header;

安装scss
yarn add node-sass
scss用法
import React ,{Component} from 'react';
import './index.scss';

class TodoList extends Component{
    render(){
        return (
            <div>
                <ul>
                    <li>hello world</li>
                    <li>happy</li>
                </ul>
            </div>
        )
    }
}


export default TodoList;
安装ant-design PC端
yarn add antd --save
ant-design库的用法
import React ,{Component} from 'react';
import 'antd/dist/antd.min.css';
import './index.scss';
import {Button} from 'antd';
class TodoList extends Component{
    render(){
        return (
            <div>
                <Button type="primary" className="btn">Button</Button>
            </div>
        )
    }
}


export default TodoList;
安装 antd-mobile 移动端
yarn add antd-mobile@next
使用 不需要引入样式 antd-mobile会自动加载样式
import React, { Component } from 'react'
import { Button } from 'antd-mobile'
export default class Login extends Component {
    render() {
        return (
            <div>
                <Button color='primary'>Primary</Button>
            </div>
        )
    }
}
安装prop-types库
yarn add prop-types --save
prop-types 库的用法
import React,{Component} from 'react';
//1引入prop-types库
import PropTypes from 'prop-types';

class Child extends Component{
    constructor(props){
        super(props);
        this.state={
            item:this.props.content
        }

    this.handleClick=this.handleClick.bind(this);
    }
    handleClick(){
        this.props.delmethods(this.props.index)
    }
    render(){
        return (
            <div onClick={this.handleClick}>
                {this.state.item}
            </div>
        )
    }
}

//2数据类型校验
Child.propTypes= {
    // 表示content类型要是string 且必须要传递
    content:PropTypes.string.isRequired,
    delmethods:PropTypes.func,
    index:PropTypes.index,
    test:PropTypes.string
}

//3如果父组件没传递数据 可以定义默认值
Child.defaultProps={
    test:'hello'
}

export default Child;
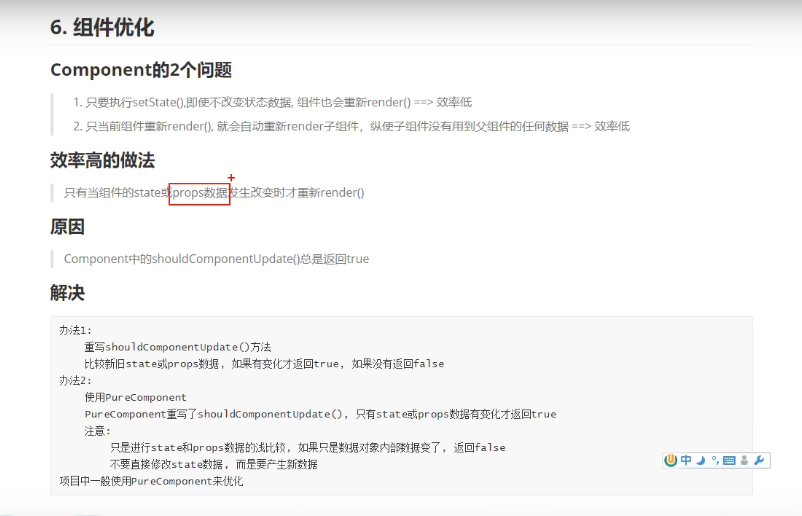
shouldComponentUpdate用法
shouldComponentUpdate(nextProps,nextState){
    if(nextProps.content!==this.props.content){
          return true;
  } else{
       return false;
    }
}
安装react-redux
yarn add react-redux --save
react-redux的用法
用法 主要就两部
- 第一步 被Provider包裹的子组件 内部可以直接调用store中的数据
- 第二部 connect(mapStateToProps,mapDispatchToProps)(TodoList)
- mapStateToProps 主要负责 将store中的state数据映射到TodoList的props属性中
- mapDidpatchToProps 主要负责将props中的方法可以通过dispatch方法发送action到store中的reducer内 修改store中的state数据
挂载节点 第一步使用Provider组件
index.js
import React from 'react';
import ReactDOM from 'react-dom';
import './index.css';
import reportWebVitals from './reportWebVitals';
import TodoList from './TodoList/index';
import store from './store/index';

//Provider组件  可以是内部的所有子组件都可以获得store的数据
import {Provider} from 'react-redux';

const App=(
  <Provider store={store}>
    <TodoList></TodoList>
  </Provider>
)


ReactDOM.render(
  App,
  document.getElementById('root')
);

// If you want to start measuring performance in your app, pass a function
// to log results (for example: reportWebVitals(console.log))
// or send to an analytics endpoint. Learn more: https://bit.ly/CRA-vitals
reportWebVitals();
store中的index.js
//引入redux  createStore  创建store
//applyMiddleware 方法允许redux 使用中间件
import { createStore, applyMiddleware, compose } from "redux";
import reducer from "./reducer";
import thunk from "redux-thunk";

const composeEnhancers = window.__REDUX_DEVTOOLS_EXTENSION_COMPOSE__
  ? window.__REDUX_DEVTOOLS_EXTENSION_COMPOSE__({
      // Specify extension’s options like name, actionsBlacklist, actionsCreators, serialize...
    })
  : compose;

const enhancer = composeEnhancers(
  applyMiddleware(thunk)
  // other store enhancers if any
);
//创建store  并把reducer存入store中
const store = createStore(
  reducer,
  enhancer
//   applyMiddleware(thunk)
  // rudex dev tools  chrome 插件 使用
  // window.__REDUX_DEVTOOLS_EXTENSION__ && window.__REDUX_DEVTOOLS_EXTENSION__()
);

export default store;
store中的reducer.js
const defaultState={
    inputValue:'',
    list:[1,3,4,5,5]
}

export default (state=defaultState,action)=>{
    if(action.type==='change_input_value'){
        const newState=JSON.parse(JSON.stringify(state));
        newState.inputValue=action.value;
        console.log(newState)
        return newState;
    }
    if(action.type==='add_todo_list'){
        const newState=JSON.parse(JSON.stringify(state));
        if(newState.inputValue===''){
            return newState;
        }
        newState.list.push(newState.inputValue);
        newState.inputValue='';
        return newState;
    }
    if(action.type==="delete_todo_list"){
        console.log(1)
        const newState=JSON.parse(JSON.stringify(state));
        newState.list.splice(action.value,1);
        return newState;
    }
    return state;
}
TodoList组件中的index.js
import React, { Component } from "react";
import { connect } from "react-redux";

//无状态组件是一个函数

const TodoList = (props) => {
  const { inputValue, changeInputValue, handleClick, handleDel } = props;
  return (
    <div>
      <div>
        <input type="text" onChange={changeInputValue} value={inputValue} />
        <button type="button" className="btn" onClick={handleClick}>
          输入
        </button>
      </div>
      <ul className="list">
        {props.list.map((item, index) => {
          return (
            <li onClick={handleDel.bind(this, index)} key={index}>
              {item}
            </li>
          );
        })}
      </ul>
    </div>
  );
};

// class TodoList extends Component {
//   constructor(props) {
//     super(props);
//   }
//   render() {
//       const { inputValue, changeInputValue, handleClick, handleDel } = this.props;
//       return (
//       <div>
//         <div>
//           <input type="text" onChange={changeInputValue} value={inputValue} />
//           <button type="button" className="btn" onClick={handleClick}>
//             输入
//           </button>
//         </div>
//         <ul className="list">
//           {this.props.list.map((item, index) => {
//             return (
//               <li onClick={handleDel.bind(this,index)} key={index}>
//                 {item}
//               </li>
//             );
//           })}
//         </ul>
//       </div>
//     );
//   }
// }

const mapStateToProps = (state) => {
  return {
    inputValue: state.inputValue,
    list: state.list,
  };
};

const mapDispatchToprops = (dispatch) => {
  return {
    changeInputValue(e) {
      const action = {
        type: "change_input_value",
        value: e.target.value,
      };
      // console.log(e.target.value)
      dispatch(action);
    },
    handleClick() {
      const action = {
        type: "add_todo_list",
      };
      dispatch(action);
    },
    handleDel(index) {
      const action = {
        type: "delete_todo_list",
        value: index,
      };
      dispatch(action);
    },
  };
};

//connect(mapStateToProps,mapDispatchToprops) 方法的作用使TodoList和store链接
//并按照mapStateToProps的规则下将store中的数据映射到TodoList的props中
//store.dispatch映射到TodoList组件的props上 可以让props上的方法能够调用dispatch来操作store中的数据
export default connect(mapStateToProps, mapDispatchToprops)(TodoList);
Ref的使用
第一种 字符串类写法 (不推荐 现在还可以使用 将来可能废弃 )
第二种 回调函数式写法(最为推荐)
import React, { Component } from 'react'

export default class home extends Component {
    showData=(c)=>{
        //函数
        this.input2=c;
        console.log(this.input2)
    }
    render() {
        return (
            <div>
                {/* ref 方式1 string形式   目前还可以用 未来可能废弃 */}
                <button onClick={()=>{console.log(this.refs.input1)}}>点击提示</button>
                <input ref='input1' type="text" onBlur={this.handleClick} placeholder='左侧侧提示' />
                {/* ref 方式2  callback 形式 */}
                <button onClick={()=>{console.log(this.input2)}}>点击提示</button>
                {/* <input type="text" placeholder='右侧提示' ref={(currentNode)=>{this.input2=currentNode}} /> */}
                {/* 箭头函数简写(内联函数写法,更新时会出发两次  功能不收影响  第一次值为null  第二次才为Dom节点;(每次函数执行完毕后会清空传入的currentNode 之后在重新执行)) */}
                {/* <input type="text" placeholder='右侧提示' ref={(c)=>this.input2=c} /> */}
                {/* 推荐写法 */}
                <input type="text" placeholder='右侧提示' ref={this.showData} />
            </div>
        )
    }
}
第三种 使用最新Api React.createRef 调用后返回一个容器,改容器可以存储ref所表示的节点
import React, { Component } from 'react'

export default class home extends Component {
    //1调用React.createRef()创造myRef容器(单个容器)
    myRef1=React.createRef();
    myRef2=React.createRef();
    //3 使用ref容器的方式
    showDate=()=>{
        console.log(this.myRef1);
        console.log(this.myRef2);
    }
    render() {
        return (
            <div>

                <button onClick={this.showDate}>点击提示</button>
                {/* ref 方式3 Api React.create()创建ref容器形式  */}
                <input type="text" placeholder='右侧提示' ref={this.myRef1} />
                <input type="text" placeholder='右侧提示' ref={this.myRef2} />
            </div>
        )
    }
}
受控组件和非受控组件
// 非受控组件
// 受控组件的作用 可以少写ref 随用随取
import React, { Component } from 'react'

export default class Login extends Component {

    state={
        username:'',
        password:''
    }

    //非受控组件使用ref
    LoginUser = (event) => {
        const { username, password } = this
        event.preventDefault();//阻止表单默认提交
        console.log(`你的账号是${username.value},你的密码是${password.value}`)
    }

    //受控组件方法 实时获取状态
    saveUserName = (e) => {
        console.log(e)
        this.setState({
            username: e.target.value
        })
    }
    savePassword = (e) => {
        this.setState({
            password:e.target.value
        })
    }
    render() {
        return (
            <div>
                {/* 非受控组件 */}
                <form action="" onSubmit={this.LoginUser}>
                    <div className="item">
                        <label htmlFor="">账号</label>
                        <input type="text" placeholder='请输入账号' ref={c => this.username = c} />
                    </div>
                    <div className="item">
                        <label htmlFor="">密码</label>
                        <input type="password" placeholder='请输入密码' ref={c => this.password = c} />
                    </div>
                    <div className="item">
                        <button>登录</button>
                    </div>
                </form>
                {/* 受控组件 */}
                <form action="" onSubmit={this.LoginUser}>
                    <div className="item">
                        <label htmlFor="">账号</label>
                        <input type="text" placeholder='请输入账号' onChange={this.saveUserName} />
                    </div>
                    <div className="item">
                        <label htmlFor="">密码</label>
                        <input type="password" placeholder='请输入密码' onChange={this.savePassword} />
                    </div>
                    <div className="item">
                        <button>登录</button>
                    </div>
                </form>
            </div>
        )
    }
}
高阶函数及柯理化函数应用(简写表单绑定数据)
import React, { Component } from 'react'

export default class Reg extends Component {
    /*
    高阶函数:如果一个函数符合下面两个规范中的任何一个,那该函数就是高阶函数
    1 若A函数,接收的参数是一个函数,那么A久可以称之为高阶函数
    2 若A函数,调用的返回值依然是一个函数,那么A久可以称之为高阶函数

    常见的高阶函数:Promise,setTimeout,arr.map()等

    函数的柯理化 :通过函数调用继续返回函数的方式,实现多次接收参数最后统一处理的函数编码形式;


    */
    LoginUser = (e) => {
        e.preventDefault();
    }

    //函数的柯理化
    saveFormDate=(dataType)=>{
        const that=this;
        return (event)=>{
            //[]会解析变量
            that.setState({
                [dataType]:event.target.value
            })
        }
    }

    notSaveFormDate=(dataType,e)=>{
        this.setState({
            [dataType]:e.target.value
        })
    }
    render() {
        return (
            <div>
                {/* 使用柯理化  */}
                <form action="" onSubmit={this.LoginUser}>
                    <div className="item">
                        <label htmlFor="">账号</label>
                        <input type="text" onChange={this.saveFormDate('username')} placeholder='账号' />
                    </div>
                    <div className="item"><label htmlFor="">密码</label>
                        <input type="password" placeholder='密码' onChange={this.saveFormDate('password')}/>
                    </div>
                    <div className="item"><button className="btn">登录</button></div>
                </form>

                {/*不使用柯理化 (通用方法) */}
                   <form action="" onSubmit={this.LoginUser}>
                    <div className="item">
                        <label htmlFor="">账号</label>
                        <input type="text" onChange={(e)=>{this.notSaveFormDate('username',e)}} placeholder='账号' />
                    </div>
                    <div className="item"><label htmlFor="">密码</label>
                        <input type="password" placeholder='密码' onChange={(e)=>{this.notSaveFormDate('password',e)}}/>
                    </div>
                    <div className="item"><button className="btn">登录</button></div>
                </form>
            </div>
        )
    }
}
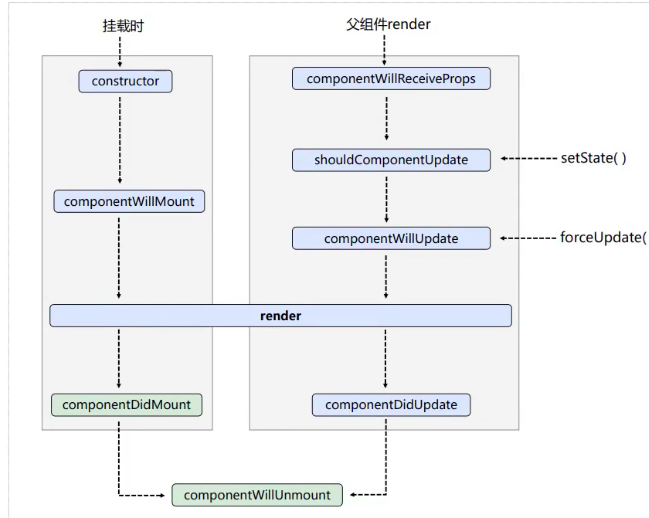
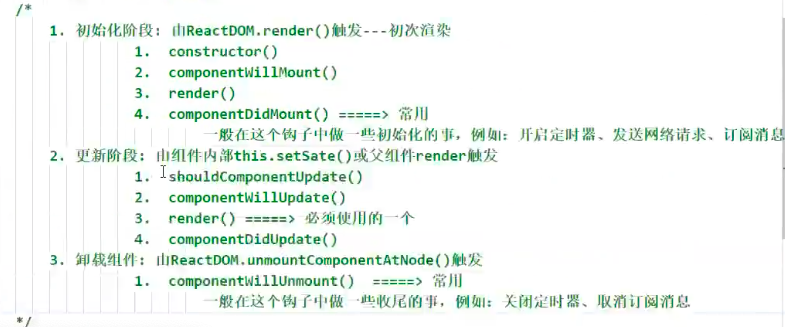
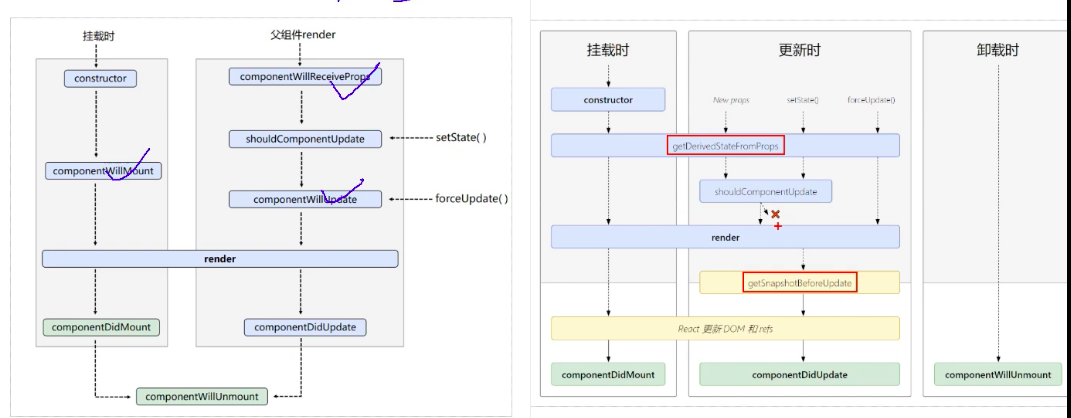
react 生命周期 旧
新生命周期
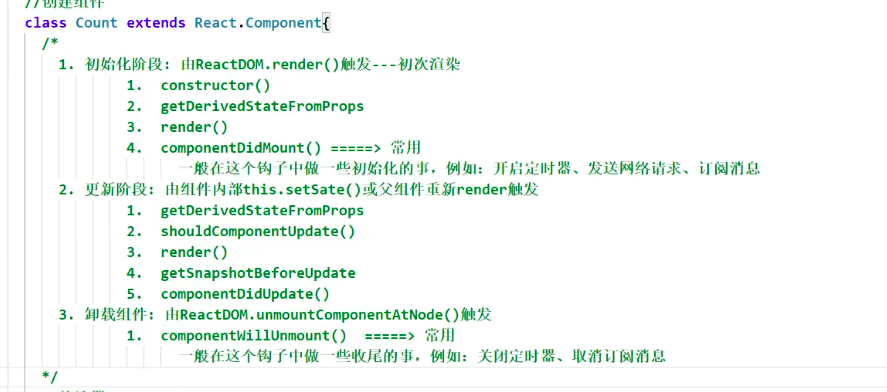
react新生命周期与旧生命周期对比
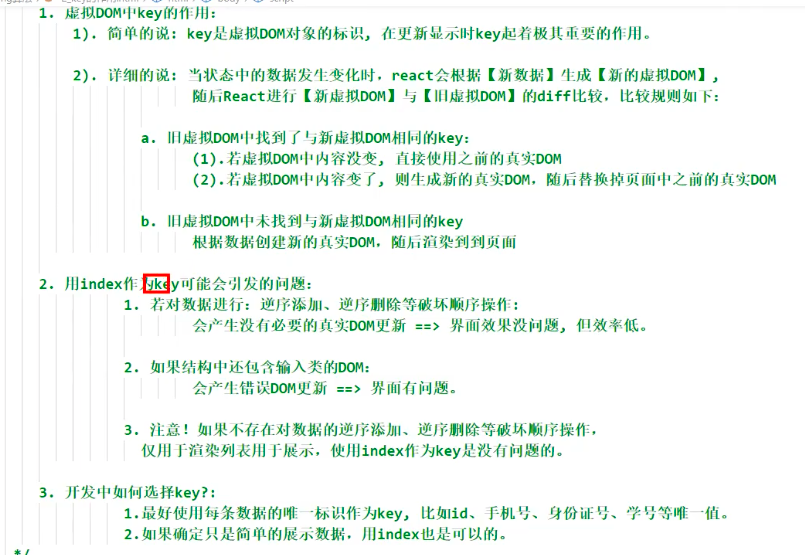
diff 算法
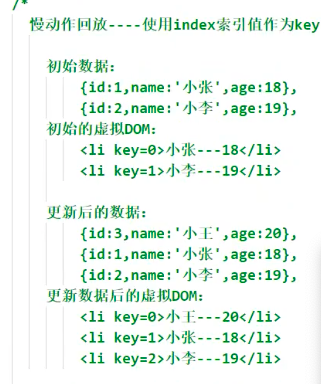
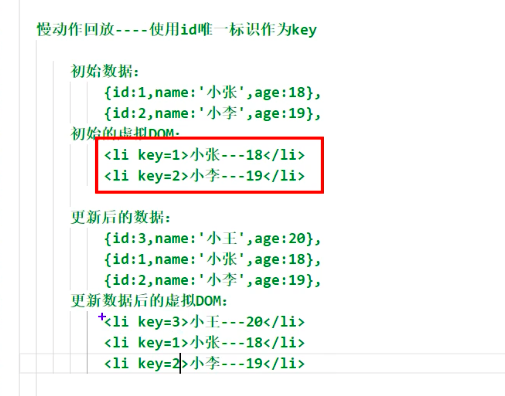
虚拟DOM相关
消息订阅-发布机制 实现组件之间的通信
下载库PubSubsJS
npm install pubsub-js --save
使用
/*
1) import PubSub from 'pubsub-js';
2) token=PubSub.subscribe("delete",function(data){});//订阅 在收到消息的组件中的componentDidmount(){使用}
    //用法
     componentDidMount() {
        this.token = PubSub.subscribe('msg', (_, data) => {
            //接收到的信息
            console.log(data)
            this.setState({
                List: data
            })
        })
    }
3) PubSub.publish("msg",data);//发布 在发布消息的组件中使用

4) PubSub.unsubscribe(token);//卸载 在收到消息的组件中的componentWillUnmount(){使用}
   //用法:组件卸载时
    componentWillUnmount() {
        //卸载订阅消息
        PubSub.unsubscribe(this.token)
    }
*/
路由
1 什么叫路由
- 一个路由就是一个 映射关系(key,value)
- key为path路径,value可能是function或component
2路由的分类
- 后端路由
- 理解:value是function,用来处理客户端提交的请求
- 注册路由 router.get(path,function(req,res)=>{})
- 工作过程: 当node接收到一个请求时,根据请求路径找到匹配的路由,调用路由种的函数来处理请求,返回相应数据
- 前端路由
- 浏览器路由,value是component,用于展示页面内容
- 注册路由:<Router path="/test" component={Test} >
- 工作过程:当浏览器的path变为test时,当前路由组件就会变为Test组件
- 后端路由
react-router-dom (react web 路由库)
安装 yarn add react-router-dom --save
- react 的一个插件库
- 专门用来实现一个SPA应用
- 基本react的项目基本会用到此库
路由的基本使用
- 明确好界面中的导航区,展示区
- 导航区的a标签改为Link标签: <Link to="/xxx">Demo</Link>
- 展示区写Route标签进行路径的匹配 : <Route path="/xxx" element={<Demo />} />
- <App>最外侧包裹了一个<BrowserRouter>或<HashRouter>
react-router-dom 相关的API
内置组件
- <BrowserRouter/> 整个路由 只能通过一个路由器管理
import React from 'react';
import ReactDOM from 'react-dom';
import './index.css';
import App from './App';
import 'antd/dist/antd.min.css';
import reportWebVitals from './reportWebVitals';
// 引入全局路由器
import {BrowserRouter} from 'react-router-dom'

ReactDOM.render(
  <React.StrictMode>
    {/* 路由器全局只能有一个 BroswerRouter*/}
    <BrowserRouter>
    <App />
    </BrowserRouter>
  </React.StrictMode>,
  document.getElementById('root')
);

// If you want to start measuring performance in your app, pass a function
// to log results (for example: reportWebVitals(console.log))
// or send to an analytics endpoint. Learn more: https://bit.ly/CRA-vitals
reportWebVitals();
- <HashRouter/>
- <Router/> 注册路由
- <Link/>
- <NavLink/> 使用和Link 一样 只是点击时可以添加需要的类名
import "./App.css";
import Home from "./views/Home";
import About from "./views/About";
import { Routes, Route, Link, NavLink } from "react-router-dom";

function App() {
  return (
    <div className="App">
      <h1>hello world</h1>
      <hr></hr>
      {/* 原生a标签跳转  React通过link标签(to 后面不识别大小写  建议小写) */}
      <Link to="/about" className="link">
        got to Aboout
      </Link>
      <hr></hr>
      <Link to="/" className="link">
        got to Home
      </Link>
      <hr></hr>
      {/* 点击NavLink时  会添上类名 在className中使用函数({isActive})=>isActive?'className':''*/}
      <NavLink
        to="/"
        className={({ isActive }) => (isActive ? "link clickActive" : "link")}
      >
        got to Home
      </NavLink>
      <hr></hr>
      <NavLink
        to="/about"
        className={({ isActive }) => (isActive ? "link  clickActive" : "link")}
      >
        got to Aboout
      </NavLink>
      {/* routes 表现 内部嵌套 具体的route路由页面 */}{" "}
      <Routes>
        <Route path="/" element={<Home />}></Route>{" "}
        <Route path="/about" element={<About />}></Route>{" "}
      </Routes>
    </div>
  );
}

export default App;
自己利用NavLink封装的MyNavLink组件 避免多写样式之类的内容
//封装组件
import React, { Component } from 'react'
import  {NavLink} from 'react-router-dom'

export default class MyNavLink extends Component {
    render() {
        console.log(this)
        return (
            <div>
                <NavLink className={({isActive})=>isActive?"link clickActive":"link"} {...this.props} />
            </div>
        )
    }
}

// 使用组件
import MyNavLink from "./components/myNavLink";
<MyNavLink to="/about" >About</MyNavLink>
<MyNavLink to="/" >Home</MyNavLink>
- <Switch/> 旧版本 新版本 修改成了<Routes /> 为了 提高匹配效率 匹配到了路由 就停止匹配
    {/* 旧版本是<Switch/> 新版本是<Routes /> */}
      <Routes>
        {/* 注册路由 */}
          <Route path="/" element={<Home />}></Route>{" "}
          <Route path="/about" element={<About />}></Route>{" "}
          <Route path="/about" element={<About />}></Route>{" "}
      </Routes>
- <Redirect/> 重定向 当 前面的Route 都匹配不到的时候 按<Redirect />的来
其他
- history对象
- match对象
- withRouter函数
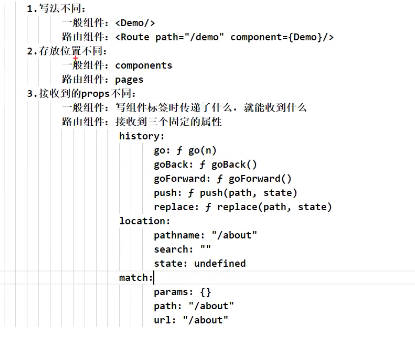
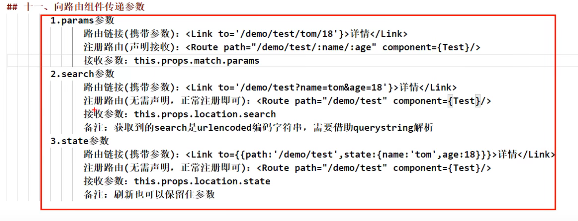
路由组件与一般组件
react中解决多级路径刷新页面样式丢失问题(即用绝对路径 或者将BroswerRouter换成HashRouter)

路由的模糊匹配与严格匹配

   <MyNavLink to="/about/a/b">About</MyNavLink>
      <MyNavLink to="/">Home</MyNavLink>
      {/* routes 表现 内部嵌套 具体的route路由页面 */}{" "}
      {/* 旧版本是<Switch/> 新版本是<Routes /> */}
      <Routes>
        {/* 注册路由 */}
          <Route path="/" element={<Home />}></Route>{" "}
          {/* exact 默认模糊匹配  exact={true}精准匹配  必须path与Link或NavLink 的to属性值一致才会匹配到*/}
          <Route exact={true} path="/about" element={<About />}></Route>{" "}
      </Routes>
自定义路由规则文件router.js
//改文件专门用于同一路由管理
import Login from '../pages/Login'
import User from '../pages/User'
import Home from '../pages/Home/'

//routes 数组中存储者所有的路由配置,每个路由配置都是一个对象

const routes = [
    {
        path: '/login',
        element: < Login / >
    },
    {
        path: '/user',
        element: < User / >
    },
    {
        path: '/',
        element: < Home / >
    },
]
export default routes;
使用
import "./App.css";
import { Routes, Route } from "react-router-dom";
import routes from "./config/router";
function App() {
  return (
    <div className="App">
      <Routes>
        {routes.map((item) => {
          // 全写
          //  return <Route path={item.path} element={item.element} key={item.path}></Route>
          // 简写 批量传递
          return <Route {...item} key={item.path}></Route>;
        })}
      </Routes>{" "}
    </div>
  );
}

export default App;
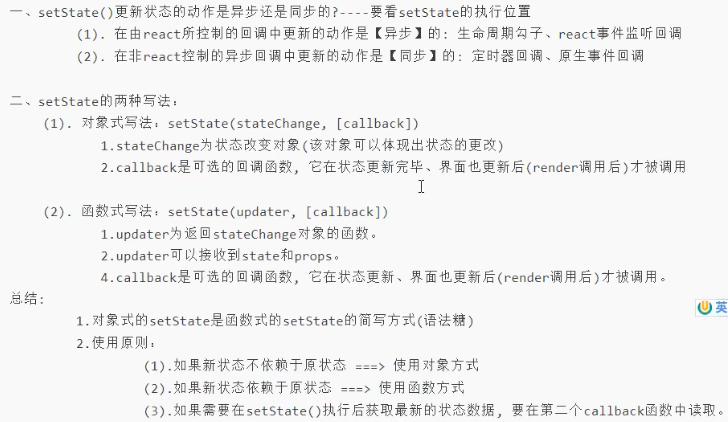
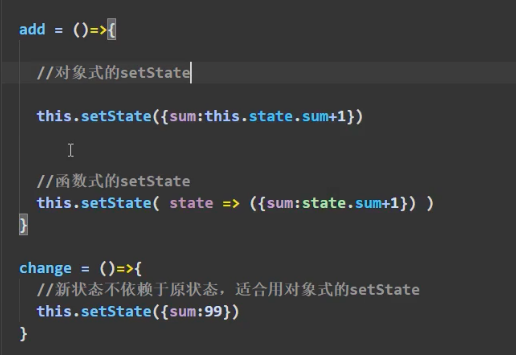
深入了解setState
lazyLoad 懒加载
路由组件的lazyLoad

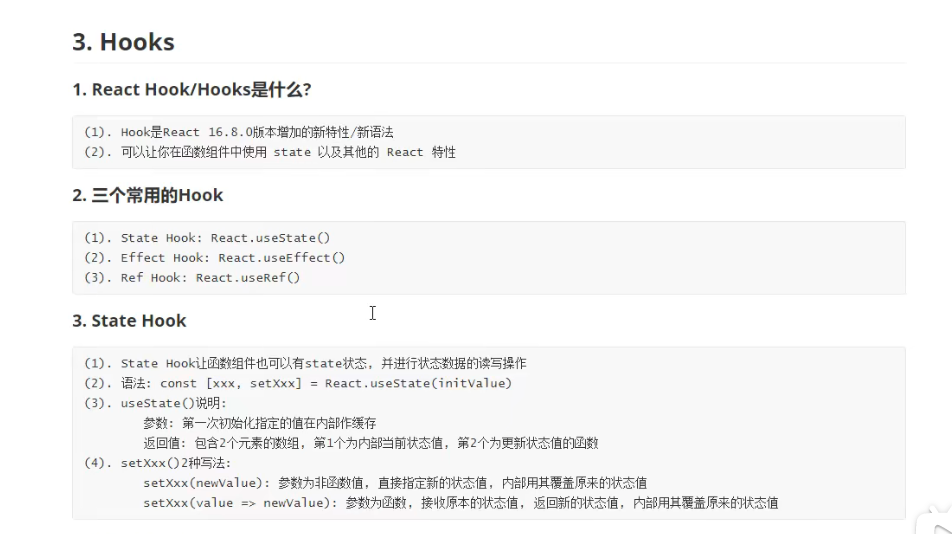
HooKs


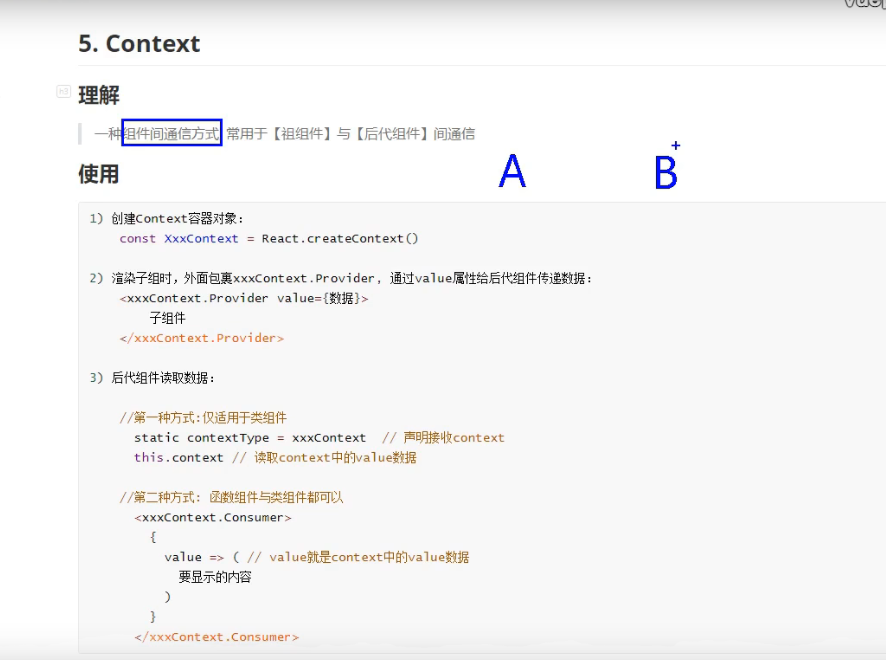
Context

 浙公网安备 33010602011771号