springboot-项目实战:增加员工
1 增加添加员工的按钮
在员工列表的上面增加一个添加员工的按钮
list.html
<h2><a class="btn btn-sm btn-success" th:href="@{/employeeAdd}">添加员工</a></h2>2 在员工控制器中编写处理跳转到员工添加页面请求的方法
package com.lv.controller;

import com.lv.dao.DepartmentDao;
import com.lv.dao.EmployeeDao;
import com.lv.pojo.Department;
import com.lv.pojo.Employee;
import org.springframework.beans.factory.annotation.Autowired;
import org.springframework.stereotype.Controller;
import org.springframework.ui.Model;
import org.springframework.web.bind.annotation.GetMapping;
import org.springframework.web.bind.annotation.RequestMapping;

import java.util.Collection;

@Controller
public class EmployeeController {
    @Autowired
    EmployeeDao employeeDao;
    @Autowired
    DepartmentDao departmentDao;
    @RequestMapping("/getAllEmployee")
    public String getAllEmployee(Model model){
        Collection<Employee> allEmployee = employeeDao.getAllEmployee();
        model.addAttribute("allEmployee",allEmployee);
        return "/emp/list";
    }
    @GetMapping("/employeeAdd")
    public String toAddEmployee(Model model){
        Collection<Department> allDepartment = departmentDao.getAllDepartment();
        model.addAttribute("allDepartment",allDepartment);
        return "emp/add";
    }
}
填写员工的部门字段时,需要查询出部门表,将部门表的数据,作为员工的部门字段的选项
3 编写添加员工页面
在emp文件夹下创建一个add.html 然后将 list.html的内容复制到里面,将展示员工的表格部分,修改为增加员工数据的表单,侧边栏和导航栏内容完全一致,不要修改.
add.html
<main role="main" class="col-md-9 ml-sm-auto col-lg-10 pt-3 px-4">
   <form th:action="@{/employeeAdd}" method="post">
      <div class="form-group">
         <label>LastName</label>
         <input type="text" class="form-control" name="lastName" placeholder="kuangshen">
      </div>
      <div class="form-group">
         <label>Email</label>
         <input type="email" class="form-control" name="email" placeholder="24736743@qq.com">
      </div>
      <div class="form-group">
         <label>Gender</label><br/>
         <div class="form-check form-check-inline">
            <input class="form-check-input" type="radio" name="gender" value="1">
            <label class="form-check-label">男</label>
         </div>
         <div class="form-check form-check-inline">
            <input class="form-check-input" type="radio" name="gender" value="0">
            <label class="form-check-label">女</label>
         </div>
      </div>
      <div class="form-group">
         <label>department</label>
         <!--我们在controller  接收的是一个Employee,所以我们需要提交的是其中的一个属性!-->
         <select class="form-control" name="department.id">
            <option th:each="department:${allDepartment}" th:text="${department.getDepartmentName()}" th:value="${department.getId()}"></option>
         </select>
      </div>
      <div class="form-group">
         <label>Date</label>
         <input type="text" class="form-control" name="date" placeholder="kuangstudy">
      </div>
      <button type="submit" class="btn btn-primary">添加</button>
   </form>
</main>
add.html 是通过 list.html 复制修改而成的,将list.html中展示员工数据的表格替换为以上的代码,其它的代码没有修改.
4 在员工控制器中编写增加员工的方法
EmployeeController.java
@PostMapping("/employeeAdd")
public String AddEmployee (Employee employee){
    employeeDao.employeeAdd(employee);
    return "redirect:/getAllEmployee";
}
5 对日期格式处理
springboot默认的日期格式是 yyyy/MM/dd 将这个格式修改为我们自己定义的方式,在springboot配置文件中指定日期格式
application.properties
#时间日期格式化
spring.mvc.format.date-time=yyyy-MM-dd HH:mm:ss
在员工实体类的日期字段上加入格式化注解
Employee.java
@DateTimeFormat(fallbackPatterns = "yyyy-MM-dd HH:mm:ss")
private Date date;
6 启动项目测试
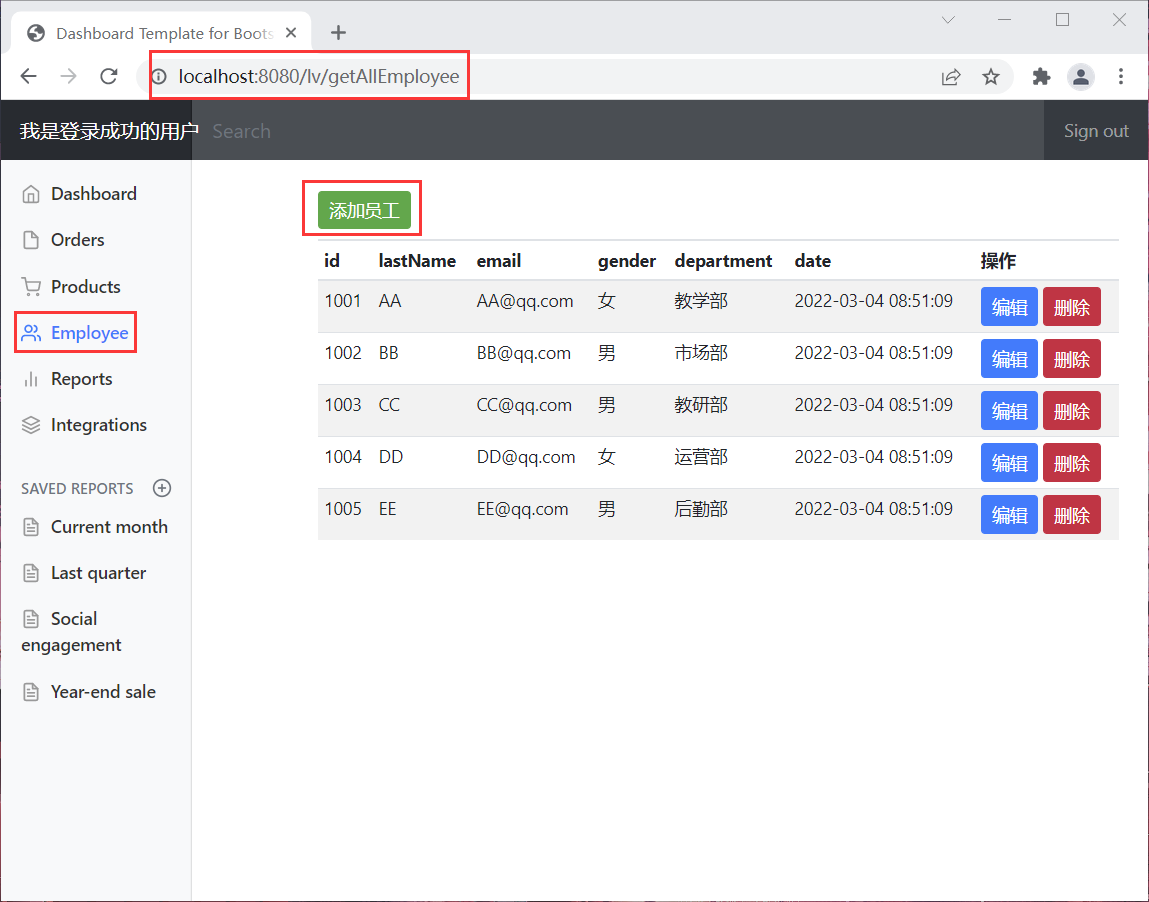
登录成功后,访问员工列表,点击添加员工按钮
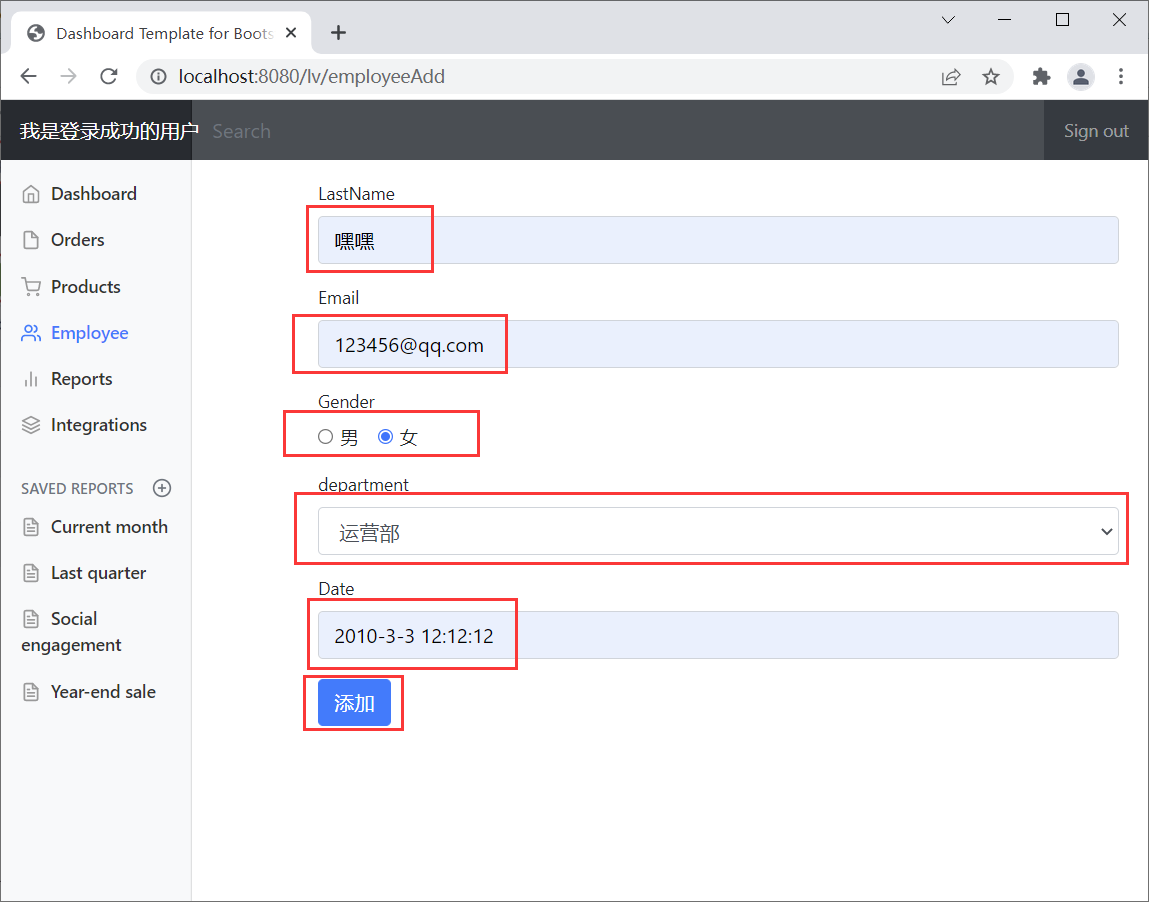
成功跳转到添加员工页面,输入增加的员工信息,注意:部门信息,是从已有部门中选择,日期要按照我们设置的格式填写,填写完成后点击添加按钮
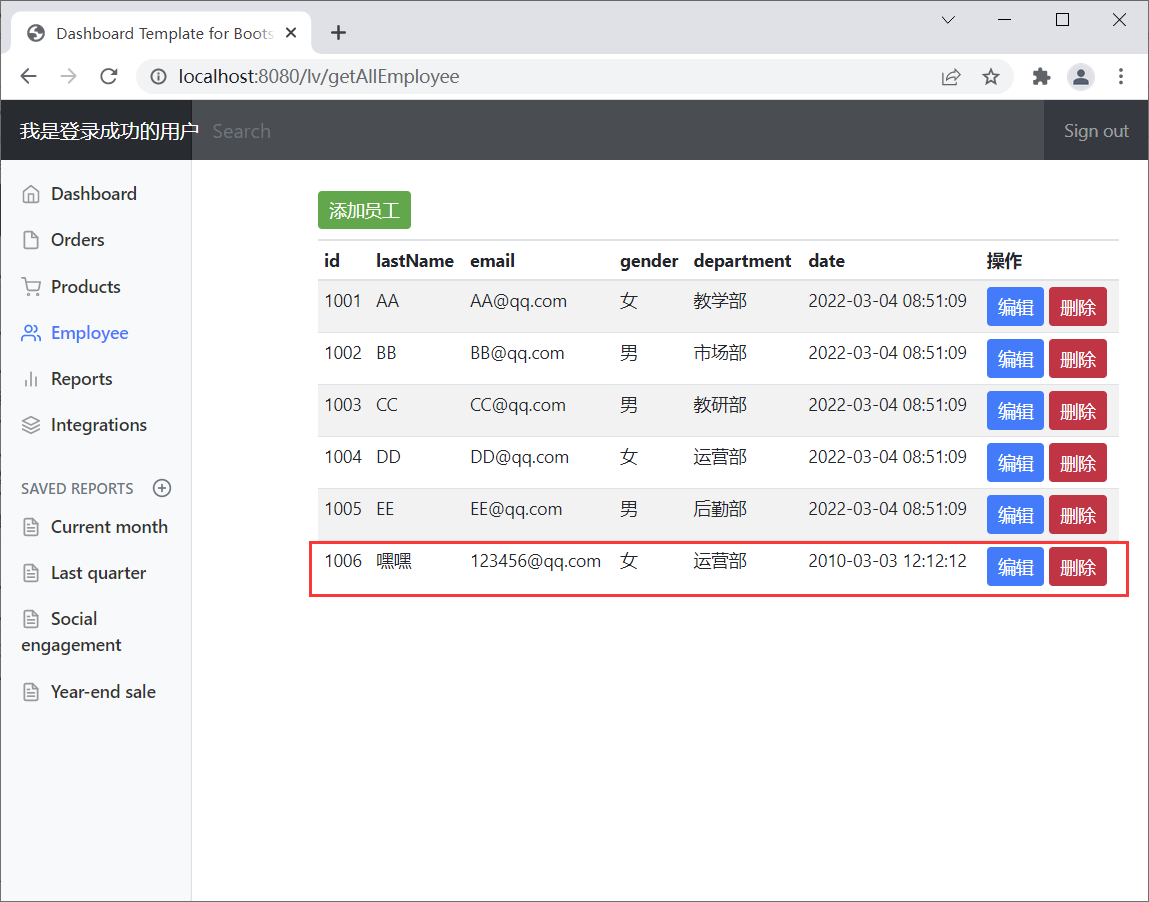
跳转到员工列表,确认添加成功
7 总结
- 相同的请求,通过不同的请求方式(post,get) 可以请求到不同的方法处理
- 员工对象的部门属性是一个部门对象类型,我们在前端提交时,只需要提交一个部门对象的一个属性比如:id.如果要提交一个对象,需要再写一个form表达,十分麻烦不推荐
- 日期处理:前端展示使用thymeleaf的日期格式化,接收日期类型数据要在springboot配置文件中配置日期格式,也可以使用默认的,这个格式要和实体类中的日期格式对应

 浙公网安备 33010602011771号