springMVC-Ajax
1 环境准备
1.1 新建普通maven项目添加web支持
1.2 配置pom.xml
1.2.1 引入依赖
<dependency>
    <groupId>org.springframework</groupId>
    <artifactId>spring-webmvc</artifactId>
    <version>5.2.0.RELEASE</version>
</dependency>
<dependency>
<groupId>org.projectlombok</groupId>
<artifactId>lombok</artifactId>
<version>1.18.20</version>
</dependency>1.2.2 加入静态资源过滤配置,否则会导致本地jquery导入无效
<!--静态资源导出问题-->
<build>
    <resources>
        <resource>
            <directory>src/main/java</directory>
            <includes>
                <include>**/*.properties</include>
                <include>**/*.xml</include>
                <include>**/*.css</include>
                <include>**/*.js</include>
                <include>**/*.html</include>
            </includes>
            <filtering>false</filtering>
        </resource>
        <resource>
            <directory>src/main/resources</directory>
            <includes>
                <include>**/*.properties</include>
                <include>**/*.xml</include>
                <include>**/*.css</include>
                <include>**/*.js</include>
                <include>**/*.html</include>
            </includes>
            <filtering>false</filtering>
        </resource>
    </resources>
</build>
1.3 配置web.xml
<?xml version="1.0" encoding="UTF-8"?>
<web-app xmlns="http://xmlns.jcp.org/xml/ns/javaee"
         xmlns:xsi="http://www.w3.org/2001/XMLSchema-instance"
         xsi:schemaLocation="http://xmlns.jcp.org/xml/ns/javaee http://xmlns.jcp.org/xml/ns/javaee/web-app_4_0.xsd"
         version="4.0">
    <servlet>
        <servlet-name>springmvc</servlet-name>
        <servlet-class>org.springframework.web.servlet.DispatcherServlet</servlet-class>
        <init-param>
            <param-name>contextConfigLocation</param-name>
            <param-value>classpath:applicationContext.xml</param-value>
        </init-param>
        <load-on-startup>1</load-on-startup>
    </servlet>
    <servlet-mapping>
        <servlet-name>springmvc</servlet-name>
        <url-pattern>/</url-pattern>
    </servlet-mapping>
    <filter>
        <filter-name>encoding</filter-name>
        <filter-class>org.springframework.web.filter.CharacterEncodingFilter</filter-class>
        <init-param>
            <param-name>encoding</param-name>
            <param-value>utf-8</param-value>
        </init-param>
    </filter>
    <filter-mapping>
        <filter-name>encoding</filter-name>
        <url-pattern>/*</url-pattern>
    </filter-mapping>
</web-app>
1.4 配置springmvc的配置文件 applicationContext.xml
<?xml version="1.0" encoding="UTF-8"?>
<beans xmlns="http://www.springframework.org/schema/beans"
       xmlns:xsi="http://www.w3.org/2001/XMLSchema-instance"
       xmlns:context="http://www.springframework.org/schema/context"
       xmlns:mvc="http://www.springframework.org/schema/mvc"
       xsi:schemaLocation="http://www.springframework.org/schema/beans
        http://www.springframework.org/schema/beans/spring-beans.xsd
        http://www.springframework.org/schema/context
        http://www.springframework.org/schema/context/spring-context.xsd
        http://www.springframework.org/schema/mvc
        http://www.springframework.org/schema/mvc/spring-mvc.xsd">
    <!--自动扫描指定包下的注解,将他放到Spring的IOC容器-->
    <context:component-scan base-package="com.lv.controller"/>
    <!--注解驱动-->
    <mvc:annotation-driven/>
    <!--静态资源过滤-->
    <mvc:default-servlet-handler/>
    <!--视图解析器:DispatcherServlet给他的ModelAndView-->
    <bean class="org.springframework.web.servlet.view.InternalResourceViewResolver" id="InternalResourceViewResolver">
        <!--前缀-->
        <property name="prefix" value="/WEB-INF/jsp/"/>
        <!--后缀-->
        <property name="suffix" value=".jsp"/>
    </bean>
    <!--JSON解决乱码配置-->
    <mvc:annotation-driven>
        <mvc:message-converters register-defaults="true">
            <bean class="org.springframework.http.converter.StringHttpMessageConverter">
                <constructor-arg value="utf-8"/>
            </bean>
            <bean class="org.springframework.http.converter.json.MappingJackson2HttpMessageConverter">
                <property name="objectMapper">
                    <bean class="org.springframework.http.converter.json.Jackson2ObjectMapperFactoryBean">
                        <property name="failOnEmptyBeans" value="false"/>
                    </bean>
                </property>
            </bean>
        </mvc:message-converters>
    </mvc:annotation-driven>
</beans>
1.5 导入jquery,可以使用在线CDN,也可以本地导入
1.6 在控制层编写一个AjaxController
package com.lv.controller;

import org.springframework.web.bind.annotation.RestController;

@RestController
public class AjaxController {

}
2 测试简单Ajax
2.1 编写index.jsp
<%@ page contentType="text/html;charset=UTF-8" language="java" %>
<html>
  <head>
    <title>$Title$</title>
    <script src="${pageContext.request.contextPath}/js/jquery-3.4.1.js"></script>
    <script>
      function a(){
        $.post({
          url:"${pageContext.request.contextPath}/a1",
          data:{"name":$("#username").val()},
          success:function (data,status){
            console.log("data="+data);
            console.log("status="+status);
          }
        })
      }
    </script>
  </head>
  <body>
  <%--失去焦点的时候,发起一个请求(携带信息)到后台--%>
  用户名:<input type="text" id="username" onblur="a()">
  </body>
</html>
2.2 在AjaxController中添加对应的方法
@RequestMapping("/a1")
public void a1(String name, HttpServletResponse response) throws IOException {
    System.out.println("a1:param=>"+name);
    if ("haha".equals(name)){
        response.getWriter().print("true");
    }else{
        response.getWriter().print("false");
    }
}
2.3 配置Tomcat测试
打开浏览器的控制台,可以发现当我们的鼠标离开输入框的时候,可以看到一个ajax请求.
3 测试Ajax返回集合对象
3.1 创建一个实体类User
package com.lv.pojo;

import lombok.AllArgsConstructor;
import lombok.Data;
import lombok.NoArgsConstructor;

@Data
@AllArgsConstructor
@NoArgsConstructor
public class User {
    private String name;
    private int age;
    private String sex;
}
3.2 编写前端页面
<%@ page contentType="text/html;charset=UTF-8" language="java" %>
<html>
<head>
<title>Title</title>
<script src="${pageContext.request.contextPath}/js/jquery-3.4.1.js"></script>
<script>
$(function () {
$("#btn").click(function () {
//$.post(url,param可以省略,success)
$.post("/a2",function (data) {
let html = "";
for (let i = 0; i < data.length; i++) {
html += "<tr>"+
"<td>"+data[i].name+"</td>" +
"<td>"+data[i].age+"</td>" +
"<td>"+data[i].sex+"</td>"
+"</tr>";
}
$("#content").html(html)
});
});
});
</script>
</head>
<body>
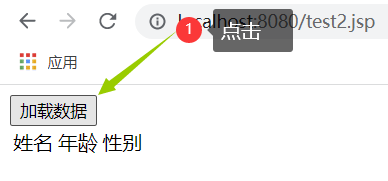
<input type="button" value="加载数据" id="btn">
<table>
<tr>
<td>姓名</td>
<td>年龄</td>
<td>性别</td>
</tr>
<tbody id="content">
</tbody>
</table>
</body>
</html>
3.3 在AjaxController中添加对应的方法
@RequestMapping("/a2")
public List<User> a2(){
    List<User> userList = new ArrayList<>();
    //添加数据
    userList.add(new User("哈哈",4,"男"));
    userList.add(new User("呵呵",5,"女"));
    userList.add(new User("喜喜",6,"男"));
    return userList;
}
3.4 配置Tomcat测试
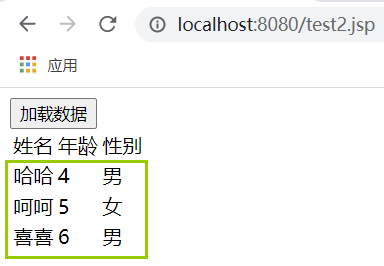
点击了加载数据按钮后,接收到了后台提交的数据,但是地址栏并没有发生改变
4 测试注册效果提示
4.1 在AjaxController中添加一个方法
@RequestMapping("/a3")
public String a3(String name,String pwd){
String msg = "";
if (name != null){
//这些数据应该在数据库中查询
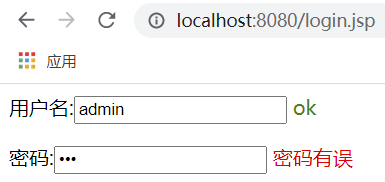
if ("admin".equals(name)){
msg = "ok";
}else {
msg = "用户名有误";
}
}
if (pwd != null){
//这些数据应该在数据库中查询
if ("123456".equals(pwd)){
msg = "ok";
}else {
msg = "密码有误";
}
}
return msg;
}4.2 编写前端页面 login.jsp
<%@ page contentType="text/html;charset=UTF-8" language="java" %>
<html>
<head>
    <title>Title</title>
    <script src="js/jquery-3.4.1.js"></script>
    <script>
        function a1() {
            $.post({
                url:"/a3",
                data:{"name":$("#name").val()},
                success:function (data) {
                    if (data==="ok"){
                        $("#userInfo").css("color","green");
                    }else {
                        $("#userInfo").css("color","red");
                    }
                    $("#userInfo").html(data);
                }
            });
        }
        function a2() {
            $.post({
                url:"/a3",
                data:{"pwd":$("#pwd").val()},
                success:function (data) {
                    if (data==="ok"){
                        $("#pwdInfo").css("color","green");
                    }else {
                        $("#pwdInfo").css("color","red");
                    }
                    $("#pwdInfo").html(data);
                }
            });
        }
    </script>
</head>
<body>
<p>
    用户名:<input type="text" id="name" onblur="a1()">
    <span id="userInfo"></span>
</p>
<p>
    密码:<input type="password" id="pwd" onblur="a2()">
    <span id="pwdInfo"></span>
</p>
</body>
</html>
4.4 配置Tomcat测试

 浙公网安备 33010602011771号