【shiro】13.验证码过滤器
通过之前的学习,我们知道如果自定义过滤器的使用。接下来,查看ruoyi源码,我们需要在过滤器中实现验证码。
前提
- 已新建SpringBoot项目
- 项目以成功集成shiro,并完成简单配置
- 已完成路由配置,包含登录页面/login和首页index
- 已经知道如何使用和自定义过滤器
思路
1. Shiro的配置页面,添加自定义过滤器。过滤器需要传递两个参数: captchaEnabled (验证码开关)和 captchaType (验证码类型)。
2. 新建自定义过滤器,继承抽象类 AccessControlFilter 。在这里实现方法 isAccessAllowed (过滤前操作)(重点)和 onAccessDenied 验证失败后处理方法。我们把页面获取到的验证码和Session中得到的验证码进行对比。每次对比成功后,都要清除Session。
3. 新建绘制验证码并保存Session的接口。
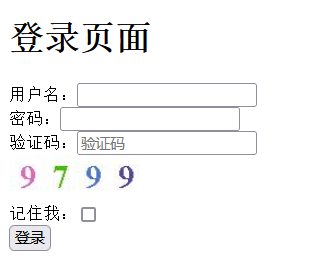
4. 前端页面,添加验证码提交和验证码图片,用于提交时对比和绘制验证码。
步骤
1. 添加自定义过滤器。在配置文件(application.yml)添加两个参数 captchaEnabled (验证码开关)和 captchaType (验证码类型)。
1 # shiro配置
2 shiro:
3   user:
4     loginUrl: /login
5     captchaEnabled : true
6     captchaType: math
ShiroConfiguration.java 添加配置器的引用。
 1 /**
 2  * 验证码开关
 3  */
 4 @Value("${shiro.user.captchaEnabled}")
 5 private boolean captchaEnabled;
 6
 7 /**
 8  * 验证码类型
 9  */
10 @Value("${shiro.user.captchaType}")
11 private String captchaType;
在拦截器添加登录页面的验证码接口

过滤器方法如下:
 1 /**
 2  * 自定义验证码
 3  * @return
 4  */
 5 private Filter myCaptcha() {
 6     MyCaptchaFilter myCaptchaFilter = new MyCaptchaFilter();
 7     myCaptchaFilter.setCaptchaEnabled(captchaEnabled);
 8     myCaptchaFilter.setCaptchaType(captchaType);
 9     return myCaptchaFilter;
10 }
2. 自定义验证码过滤器,继承抽象类 AccessControlFilter 。添加接收参数的方法。
 1 /**
 2  * 验证码开关
 3  */
 4 private boolean captchaEnabled = true;
 5
 6 /**
 7  * 验证码类型
 8  */
 9 private String captchaType= "math";
10
11 public void setCaptchaEnabled(boolean captchaEnabled) {
12     this.captchaEnabled = captchaEnabled;
13 }
14
15 public void setCaptchaType(String captchaType) {
16     this.captchaType = captchaType;
17 }
继承过滤前验证方法。当获取到的接口类型为“post”时且开启验证码时,进行验证,否则不进行验证。(验证方法,对比post请求的code和Session是否一致),返回true则放行下一个拦截器,返回false则执行 onAccessDenied 代码。
 1  @Override
 2 protected boolean isAccessAllowed(ServletRequest request, ServletResponse response, Object mappedValue) throws Exception {
 3     HttpServletRequest httpServletRequest = (HttpServletRequest) request;
 4     if(!captchaEnabled || !"post".equals(httpServletRequest.getMethod().toLowerCase())){
 5         return true;
 6     }
 7     return validateResponse(httpServletRequest, httpServletRequest.getParameter(ShiroConstants.CURRENT_VALIDATECODE));  //  public static final String CURRENT_VALIDATECODE = "validateCode";
 8 }
 9
10 private boolean validateResponse(HttpServletRequest request, String validateCode) {
11     Object obj = ShiroUtils.getSession().getAttribute("KAPTCHA_SESSION_KEY");
12     String code = String.valueOf(obj != null ? obj : "");
13     System.out.println("code:"+code);
14     System.out.println("validateCode:"+validateCode);
15     // 验证码清除,防止多次使用。
16     request.getSession().removeAttribute("KAPTCHA_SESSION_KEY");
17     if (StringUtils.isEmpty(validateCode) || !validateCode.equalsIgnoreCase(code))
18     {
19         return false;
20     }
21     return  true;
22 }
验证后的处理方法。返回true则放行下一个拦截器,返回false,则不放行下一个拦截器。
1 @Override
2 protected boolean onAccessDenied(ServletRequest request, ServletResponse response) throws Exception {
3     request.setAttribute(ShiroConstants.CURRENT_CAPTCHA, ShiroConstants.CAPTCHA_ERROR);//  request.setAttribute("captcha", "captchaError");
4     return false;
5 }
3.新建绘制验证码并保存Session的接口。实际使用中,验证码的绘制可能更复杂,单独引用在其他地方。这里,简单引用随机生成N位数字的方式。使用BufferImage设置背景和每个字符。
 1 **
 2  * 图片验证码
 3  *
 4  * @author ruoyi
 5  */
 6 @Controller
 7 @RequestMapping("/captcha")
 8 public class SysCaptchaController extends BaseController
 9 {
10     /**
11      * 页面验证码图片生成(并将图片存入session)
12      */
13     @GetMapping(value = "/captchaImage")
14     public ModelAndView getKaptchaImage(HttpServletRequest request, HttpServletResponse response) throws IOException {
15         int width = 120;
16         int height = 40;
17         BufferedImage bufferedImage = new BufferedImage(width, height, BufferedImage.TYPE_INT_RGB);
18         // 生成验证码
19         String code = generateCode(4);
20         // 绘制验证码
21         drawCaptcha(bufferedImage, code);
22         // 将验证码存入session
23         request.getSession().setAttribute("KAPTCHA_SESSION_KEY", code);
24         // 设置响应头
25         response.setContentType("image/jpeg");
26         response.setHeader("Pragma", "No-cache");
27         response.setHeader("Cache-Control", "no-cache");
28         response.setDateHeader("Expires", 0);
29         // 输出图片
30         ImageIO.write(bufferedImage,"jpg",response.getOutputStream());
31
32         return  null;
33     }
34
35     /**
36      * 生成验证码
37      * @param length
38      * @return
39      */
40     private String generateCode(int length){
41         Random random = new Random();
42         StringBuffer sb = new StringBuffer();
43         for (int i = 0; i < length; i++) {
44             sb.append(random.nextInt(10));
45         }
46         return sb.toString();
47     }
48
49     /**
50      * 绘制验证码(可以自定义验证码的样式和细节)
51      * @param bufferedImage
52      * @param code
53      */
54     private void drawCaptcha(BufferedImage bufferedImage, String code) {
55         Graphics graphics = bufferedImage.getGraphics();
56         Random random = new Random();
57         // 设置背景
58         graphics.setColor(Color.WHITE);
59         graphics.fillRect(0, 0, bufferedImage.getWidth(), bufferedImage.getHeight());
60         // 随机设置每个字符的颜色
61         for (int i = 0; i < code.length(); i++) {
62             Font font = new Font("Times New Roman", Font.BOLD, 30);
63             graphics.setColor(getColor(random));
64             graphics.setFont(font);
65             graphics.drawString(String.valueOf(code.charAt(i)), 30*i + 10, 30);
66         }
67
68         graphics.dispose();
69     }
70
71     // 字符随机颜色
72     private static Color getColor(Random random) {
73         return new Color(random.nextInt(256), random.nextInt(256), random.nextInt(256));
74     }
75
76 }
4. 前端页面,添加验证码提交和验证码图片,用于提交时对比和绘制验证码。 Math.random() 用于生成随机数。src路径变化,则会调用后台接口,改变验证码。
1 <div  th:if="${captchaEnabled==true}">
2     <div >
3         验证码:<input type="text" name="validateCode" placeholder="验证码" maxlength="5" />
4     </div>
5     <div >
6         <img th:src="/captcha/captchaImage"  title="点击刷新验证码" width="120" height="40" onclick="this.src='/captcha/captchaImage?'+Math.random()" />
7     </div>
8 </div>


