Cubieboard2(四) 系统构建 —— 基于 mainline
1 环境准备
1.1 编译环境准备
-
1)配置编译环境的几大要素:
- (1)OS 平台选择基于微软的 WSL(Windows Subsystem for Linux)的 Ubuntu 22.04(见其它文章);
- (2)读卡器+内存卡识别采用 usbipd(见其它文章);
- (3)交叉编译工具链采用 arm-linux-gnueabihf-gcc;
-
2)WSL 和 usbipd 见其它文章,这里仅记录交叉编译工具链的配置:
# 安装其它工具库
apt-get install build-essential libncurses5-dev u-boot-tools qemu-user-static \
                debootstrap git binfmt-support libusb-1.0-0-dev pkg-config

# (1)卸载原来的工具链
apt-get remove gcc-arm-linux-gnueabi*

# (2)下载工具链(可任选一个下载)
wget https://releases.linaro.org/components/toolchain/binaries/4.9-2017.01/arm-linux-gnueabihf/gcc-linaro-4.9.4-2017.01-x86_64_arm-linux-gnueabihf.tar.xz
wget https://releases.linaro.org/components/toolchain/binaries/5.5-2017.10/arm-linux-gnueabihf/gcc-linaro-5.5.0-2017.10-x86_64_arm-linux-gnueabihf.tar.xz
wget https://releases.linaro.org/components/toolchain/binaries/6.5-2018.12/arm-linux-gnueabihf/gcc-linaro-6.5.0-2018.12-x86_64_arm-linux-gnueabihf.tar.xz
wget https://releases.linaro.org/components/toolchain/binaries/7.5-2019.12/arm-linux-gnueabihf/gcc-linaro-7.5.0-2019.12-x86_64_arm-linux-gnueabihf.tar.xz
# (3)解压
mkdir /usr/local/arm
tar -xvf gcc-linaro-4.9.4-2017.01-x86_64_arm-linux-gnueabihf.tar.xz -C /usr/local/arm
tar -xvf gcc-linaro-5.5.0-2017.10-x86_64_arm-linux-gnueabihf.tar.xz -C /usr/local/arm
tar -xvf gcc-linaro-6.5.0-2018.12-x86_64_arm-linux-gnueabihf.tar.xz -C /usr/local/arm
tar -xvf gcc-linaro-7.5.0-2019.12-x86_64_arm-linux-gnueabihf.tar.xz -C /usr/local/arm
# (4)配置环境变量,在 /root/.bashrc 文件中添加:
#export PATH=$PATH:gcc-linaro-4.9.4-2017.01-x86_64_arm-linux-gnueabihf/bin
#export PATH=$PATH:gcc-linaro-5.5.0-2017.10-x86_64_arm-linux-gnueabihf/bin
#export PATH=$PATH:gcc-linaro-6.5.0-2018.12-x86_64_arm-linux-gnueabihf/bin
export PATH=$PATH:gcc-linaro-7.5.0-2019.12-x86_64_arm-linux-gnueabihf/bin
# (5)使工具链的环境变量生效
cd && source ~/.bashrc

# (6)测试
arm-linux-gnueabihf-gcc -v
Using built-in specs.
COLLECT_GCC=arm-linux-gnueabihf-gcc
......
gcc version 7.5.0 (Linaro GCC 7.5-2019.12)

# 情况说明:
1. 上面分别列出了 gcc 的 4.9、5.5、6.5、7.5 版本,根据自己要编译的源码选择对应的版本,
   比如 linux-sunxi 基于 linux-3.4 所以要选择 gcc 4.9 版本,而这里我们要编译 linux 的
   主线版本,所以选择 gcc 的最新版本 7.5
2. 通过修改 .bashrc 切换 gcc 版本时可能会遇到不生效的情况。原因是 $PATH 的内容会被继
   承,我们可以通过将 /usr/local/arm 下的旧 gcc 换个名字,然后重启下系统解决。
- 3)配置结果:
[root@Chris] [2024-09-13 14:44:07] # [~] :
-> cat /etc/os-release
PRETTY_NAME="Ubuntu 22.04.4 LTS"
NAME="Ubuntu"
VERSION_ID="22.04"
VERSION="22.04.4 LTS (Jammy Jellyfish)"
......

[root@Chris] [2024-09-13 14:44:16] # [~] :
-> lsusb
Bus 002 Device 002: ID 067b:2731 Prolific Technology, Inc. USB SD Card Reader

[root@Chris] [2024-09-13 14:44:19] # [~] :
-> lsblk
NAME   MAJ:MIN RM   SIZE RO TYPE MOUNTPOINTS
......
sdd      8:48   1  29.1G  0 disk
├─sdd1   8:49   1    64M  0 part
└─sdd2   8:50   1  29.1G  0 part

[root@Chris] [2024-09-13 14:44:20] # [~] :
-> arm-linux-gnueabihf-gcc -v
Using built-in specs.
COLLECT_GCC=arm-linux-gnueabihf-gcc
......
gcc version 7.5.0 (Linaro GCC 7.5-2019.12)
1.2 主线源码准备
源码可以从其官方网站下载压缩包,但是我更推荐通过 git 仓库下载。原因有两个:
一个是方便切换源码版本;另外就是方便随时查看修改内、还原错误修改。
1.2.1 linux 源码
- 1)linux 源码:3 个仓库任选其一
# linux 源码仓库在 gitlab、github 上由 Linus Torvalds 维护
git clone https://git.kernel.org/pub/scm/linux/kernel/git/torvalds/linux.git
git clone https://github.com/torvalds/linux.git

# 由于 github 连接不稳定等原因,我们可以通过其它方式获取源码 —— 由 Gitee 官方
# 提供的 Linux 源码的镜像仓库,每天同步一次。
git clone https://gitee.com/mirrors/Linux.git


# 由于这次编译主要是为了支持 Tenda 的 aic8800 无线网卡,其支持的内核版本为 V3.10-V6.2,
# 目前(2024.9.13)最新的 v6.1 版本为 v6.1-rc8,所以这里选择 v6.1-rc8 版本。

# 查看内核版本分支
git branch -a       # 查看所有分支
git fetch --tags    # 获取最新标签
git tag | grep v6   # 查看并筛选标签名
# 根据标签创建分支
git checkout tags/v6.1-rc8

# 已经做了修改,又需要在内核源码分支间切换时,可以使用 git stash,如:
# git stash [save "message"]    # 将未提交的更改保存到暂存区,并指定名称为 message(可省略)
# git stash pop                 # 恢复暂存区的更改
1.2.2 U-Boot 源码
- 1)u-boot 源码:2 个仓库任选其一
# 同理,u-boot 源码也提供两个仓库地址,任选一个即可
# github 仓库
git clone https://github.com/u-boot/u-boot.git
# gitee 镜像仓库
git clone https://gitee.com/mirrors/u-boot.git
1.2.3 启动文件 boot.scr
- 1)新建 boot.cmd 文件,并输入以下内容:
setenv stdout serial,hdmi
setenv stderr serial,hdmi
fatload mmc 0 0x46000000 uImage
fatload mmc 0 0x49000000 sun7i-a20-cubieboard2.dtb
setenv bootargs console=ttyS0,115200 rw [earlyprintk] root=/dev/mmcblk0p2 rootwait panic=10 ${extra}
bootm 0x46000000 - 0x49000000
- 2)在上述内容的设置 bootargs 时,没有添加 rw,会导致 “Read-only file system” 的错误。
- 3)编译出 boot.scr:
mkimage -C none -A arm -T script -d boot.cmd boot.scr
1.2.4 根文件系统 rootfs
这里我们使用 debootstrap 制作从镜像网站下载的根文件系统包。
- 1)生成 rootfs:
## man debootstrap :
 # --no-check-gpg :Disables checking gpg signatures of retrieved Release files.
 #
 # 从 man 的示例 “debootstrap stretch ./stretch-chroot http://deb.debian.org/debian” 可知:
 # 这里允许自定义下载源,官方的地址已经不支持 wheezy 版本,这里通过指定阿里源来指定 debian 版本为 fullseye 或 bookworm
 #
debootstrap --foreign --no-check-gpg --arch armhf bookworm . http://mirrors.aliyun.com/debian/
debootstrap --foreign --no-check-gpg --arch armhf bullseye . http://mirrors.aliyun.com/debian/

# 如果要制作 ubuntu 根文件系统,则需要指定 ubuntu 的源
debootstrap --foreign --no-check-gpg --arch armhf noble . https://mirrors.aliyun.com/ubuntu-ports/
debootstrap --foreign --no-check-gpg --arch armhf jammy . https://mirrors.aliyun.com/ubuntu-ports/

cp /usr/bin/qemu-arm-static usr/bin/
LC_ALL=C LANGUAGE=C LANG=C chroot . /debootstrap/debootstrap --second-stage
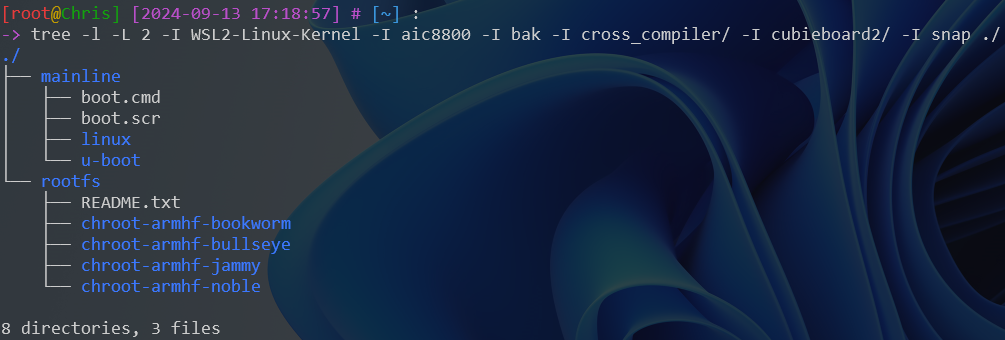
至此,所有的环境我们准备就绪,使用 tree 命令查看一下:
2 内核编译
2.1 添加 tenda aic8800 驱动(可选)
linux-sunxi 基于 linux-3.4 内核修改,而 Tenda U2 V5.0(基于 aic8800 芯片)支持的 linux 内核版本为 V3.10-V6.2。
尝试在升级内核后的 Cubieboard2 上安装 .deb 驱动包,但报错 linux-headers 问题以及 Invalid module format 问题,因此选择直接编译到内核中。
# 复制内核源码(来自其驱动的 deb 包解压)
cp ~/aic8800/drivers/aic8800/ -r drivers/net/wireless/

# 打开 drivers/net/wireless/Makefile 文件,添加:
obj-$(CONFIG_AIC_WLAN_SUPPORT) += aic8800/

# 打开 drivers/net/wireless/Kconfig 文件,添加:
source "drivers/net/wireless/aic8800/Kconfig"
- 查看修改结果:

2.2 编译 linux 内核
- 1)以 sunxi_defconfig 为基础,生成 .config 配置文件:
make ARCH=arm CROSS_COMPILE=arm-linux-gnueabihf- sunxi_defconfig

......
#
# configuration written to .config
#
在 arch/arm/configs/ 目录下有许多开发板的预定义配置文件,这里我们选择 Allwinner Cubieboard2 的 sunxi_defconfig
- 2)编译菜单项配置(这是一个需要不断调试的枯燥工作):
make ARCH=arm CROSS_COMPILE=arm-linux-gnueabihf- menuconfig
输入上述命令后,会弹出编译菜单项的窗口,根据自己的需求修改。我这里需要无线网卡 AIC8800、USB 大容量设备(用来接 USB 转 SSD)等。
*,表示该驱动将作为内核的一部分被编译进内核映像中,键入 “Y” 生效;M,则表示该驱动将作为一个独立的模块编译,并且可以在需要时通过 insmod 或 modprobe 加载,键入 “M” 生效;键入 “N” 表示不选中。
第一级 |
第二级 | 第三级 | 第四级 | 第五级 | 说明 |
|---|---|---|---|---|---|
| Enable loadable module support | |||||
| Networking support | Wireless | cfg80211 - wireless configuration API | Generic IEEE 802.11 Networking Stack (mac80211) | ||
| Device Drivers | Serial ATA and Parallel ATA drivers | Allwinner sunxi AHCI SATA support | SATA,默认已选中 | ||
| Device Drivers | Network device support | Universal TUN/TAP device driver support | Tun/Tap | ||
| Device Drivers | Network device support | Wireless LAN | AIC wireless Support | AIC8800 wlan Support AIC8800 Load Firmware Support |
USB 无线网卡 |
| Network device support | Wireless LAN | Ralink devices | USB 无线网卡 | ||
| Input device support | Keyboards (NEW) | sunxi IR support (NEW) | 红外线,未支持 | ||
| GPIO Support | GPIO Support for sunxi platform | GPIO | |||
| Multimedia support | Video capture adapters | V4L USB devices | USB Video Class (UVC) | 多媒体,摄像头 | |
| Device Drivers | Graphics support | Frame buffer devices | Support for frame buffer devices | Simple framebuffer support | |
| Device Drivers | Graphics support | Console display driver support | Framebuffer Console support | ||
| Device Drivers | USB support | USB Mass Storage support | 勾选其所有展开的菜单项(16) | USB 转 stat、USB 读卡器等支持 | |
| Device Drivers | USB support | USB Serial Converter support | USB Prolific 2303 Single Port Serial Driver | USB 转串口 | |
| Kernel hacking | Kernel debugging | ||||
| Kernel hacking | arm Debugging | Kernel low-level debugging functions | Kernel low-level debugging port | Kernel low-level debugging messages via sunxi UART0 | |
| Kernel hacking | arm Debugging | Early printk |
- 3)开始编译(i7-9750 12 核心花费 5 分钟):
make -j$(nproc) ARCH=arm CROSS_COMPILE=arm-linux-gnueabihf- zImage dtbs
......
  OBJCOPY arch/arm/boot/zImage
  Kernel: arch/arm/boot/zImage is ready

# 把 zImage 转换为 uImage
cd ~/mainline/linux
mkimage -A arm -O linux -T kernel -C none -a 0x46000000 -e 0x46000000 -n "Linux kernel uImage" -d arch/arm/boot/zImage ../uImage
- 4)复制 dtc(编译与反编译设备树文件)到 /usr/bin 目录备用:
cp ./scripts/dtc/dtc /usr/bin
3 U-Boot 编译
- 1)查看 Cubieboard2 配置文件:

- 2)编译生成 u-boot-sunxi-with-spl.bin 文件:
make ARCH=arm CROSS_COMPILE=arm-linux-gnueabihf- Cubieboard2_defconfig
make ARCH=arm CROSS_COMPILE=arm-linux-gnueabihf-

......
  OBJCOPY spl/u-boot-spl-nodtb.bin
  COPY    spl/u-boot-spl.bin
  SYM     spl/u-boot-spl.sym
  MKIMAGE spl/sunxi-spl.bin
  MKIMAGE u-boot.img
  COPY    u-boot.dtb
  MKIMAGE u-boot-dtb.img
  BINMAN  .binman_stamp
  OFCHK   .config
4 分区与烧录
4.1 sdcard 分区
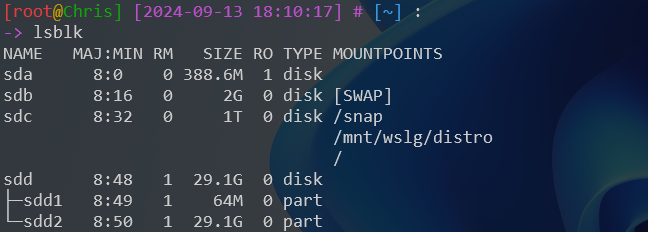
- 1)读卡器插入主机后,查看:
[root@Chris] [2024-09-13 18:00:33] # [~] :
-> lsblk
NAME   MAJ:MIN RM   SIZE RO TYPE MOUNTPOINTS
.....
sdd      8:48   1  29.1G  0 disk
└─sdd1   8:49   1  29.1G  0 part
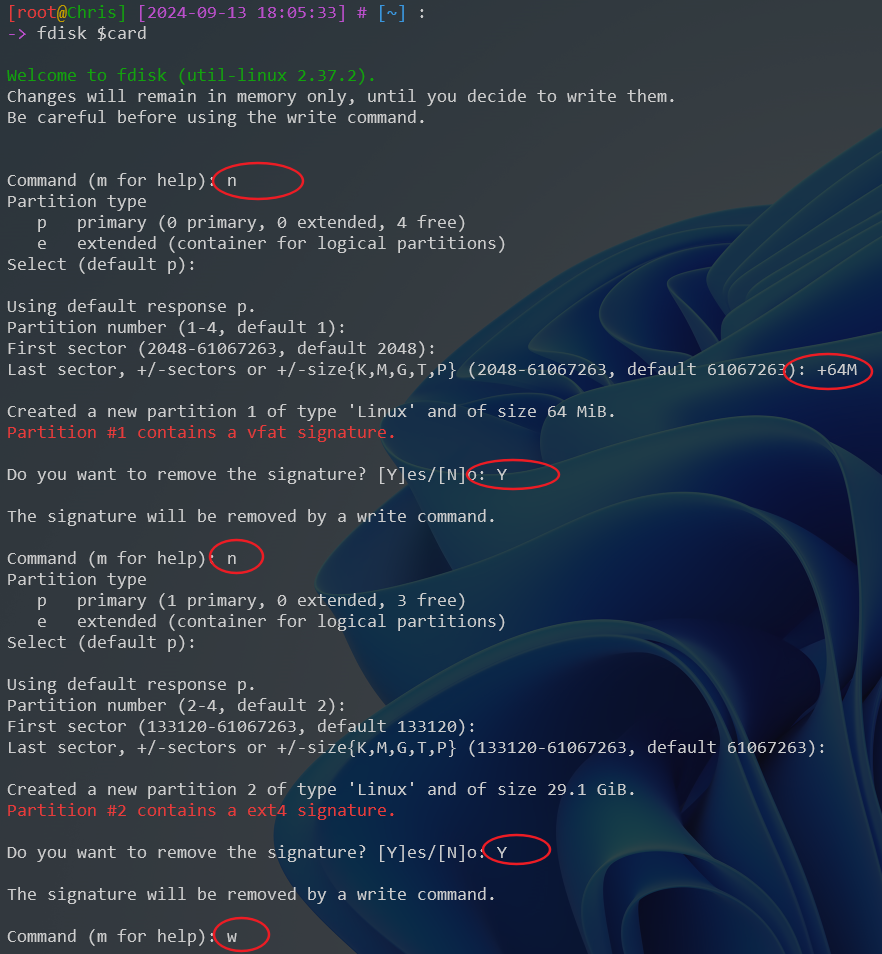
- 2)创建 DOS 分区表:

- 3)创建 2 个分区:
- 4)格式化:
mkfs.vfat ${card}1
mkfs.ext4 ${card}2
4.2 烧录 SPL
- 1)SPL(Second Program Loader,可以认为是 uboot 的 bootloader,用来加载完整 uboot 到 SDRAM 中)烧录:
dd if=u-boot-sunxi-with-spl.bin of=$card bs=1024 seek=8
sync

4.3 烧录第 1 分区
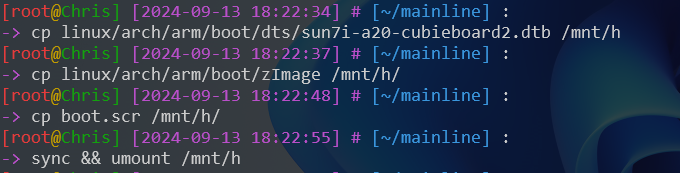
- 2)烧录镜像、dtb、启动文件 boot.scr 到 sdcard 的第一分区中:
cd ~/mainline/
mkdir /mnt/h

# 挂载分区 1
mount ${card}1                /mnt/h
cp linux/arch/arm/boot/dts/sun7i-a20-cubieboard2.dtb /mnt/h
cp linux/arch/arm/boot/zImage /mnt/h
cp boot.scr                   /mnt/h

# 卸载分区 1
sync && sudo umount /mnt/h
4.3 烧录第 2 分区
第二分区主要烧录根文件系统 rootfs。
- 1)配置根文件系统 rootfs:
cd ~/rootfs/chroot-armhf-bullseye/
chroot . passwd

echo "Cubieboard2"            > etc/hostname && cat etc/hostname
echo "127.0.0.1 Cubieboard2" >> etc/hosts && cat etc/hosts

# 安装内核驱动模块
cd ~/mainline/linux
make ARCH=arm CROSS_COMPILE=arm-linux-gnueabihf- INSTALL_MOD_PATH=~/rootfs/chroot-armhf-bullseye/ modules modules_install

cd ~/rootfs/chroot-armhf-bullseye/

# 初始化 inittab 文件
echo T0:2345:respawn:/sbin/getty -L ttyS0 115200 vt100 >> etc/inittab && cat etc/inittab

# 挂载 SSD
chroot . mkdir /data
echo UUID=8612ea26-f6a4-4b2e-b9bc-775a662b0dea /data ext2 defaults,noatime,nofail 0 0 >> etc/fstab

# 初始化 sources.list 文件
# vi etc/apt/sources.list

chroot . apt-get update
chroot . apt-get upgrade
chroot . apt-get install openssh-server locales wireless-tools wpasupplicant vim lrzsz net-tools ntpdate
echo "*/60 * * * * /usr/sbin/ntpdate ntp.sjtu.edu.cn" >> /var/spool/cron/crontabs/root

echo "export LC_ALL=\"zh_CN.UTF-8\""
echo "en_US.UTF-8 UTF-8" > etc/locale.gen
echo "zh_CN.UTF-8 UTF-8" >> etc/locale.gen
chroot . locale-gen


# 备份 rootfs。
cd ../ && tar -czvf chroot-armhf-bullseye-`date +%Y%m%d_%H%M%S`.tar.gz chroot-armhf-bullseye/
- 2)烧录到第 2 分区:
# 挂载分区 2
mount ${card}2 /mnt/h
# 烧录 rootfs
mv ~/rootfs/chroot-armhf-bullseye/* /mnt/h/
# 卸载分区 2
sync && umount /mnt/h
附录:基于 AIC8800 的 Tenda U2 V5 USB WIFI
-
参考:
- 驱动编译:https://cloud-atlas.readthedocs.io/zh-cn/latest/linux/ubuntu_linux/network/ubuntu_aic8800.html
- 内核驱动移植:https://www.cnblogs.com/weidongshan/articles/18367372
- AIC8800D Wi-Fi6/BT5.0 SoC USB移植手册:https://bbs.16rd.com/thread-586140-1-1.html
- RK3568 Debian AIC8800移植:https://blog.csdn.net/zyaaaac/article/details/133947137
- A20网络机顶盒移植4.5内核+U-Boot+rootfs:https://www.csdndocs.com/article/7504314
-
1)添加驱动程序:以基于 aic8800 的 USB WIFI 为例
-
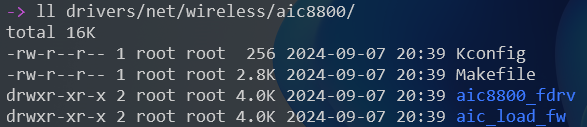
(1)将内核文件复制到 drivers/net/wireless 目录下
-
![]()
-
(2)修改 drivers/net/wireless/Kconfig 文件,添加下面一行内容:
source "drivers/net/wireless/aic8800/Kconfig"- (3)修改 drivers/net/wireless/Makefile 文件,添加下面一行内容:
obj-$(CONFIG_AIC_WLAN_SUPPORT) += aic8800/- (4)通过 make menuconfig 修改配置文件时,进行如下选择:
Device Drivers ---> [*] Network device support ---> [*] Wireless LAN ---> [*] AIC wireless Support <M> AIC8800 wlan Support <M> AIC8800 bluetooth Support (UART) -
-
2)Linux 内核编译参考:
# 安装工具链 apt-get install build-essential bc bison flex libncurses5-dev libssl-dev \ gcc-arm-linux-gnueabihf arm-linux-gnueabihf-g++ # 下载内核 git clone -b v5.4 https://github.com/torvalds/linux.git cd linux # 生成默认的内核配置文件 make ARCH=arm CROSS_COMPILE=arm-linux-gnueabihf- defconfig # 启动一个基于文本的交互式菜单,允许用户手动配置内核 make ARCH=arm CROSS_COMPILE=arm-linux-gnueabihf- menuconfig # 主要用于在现有配置基础上进行增量更新,以适应新的内核版本或更新的默认配置 make ARCH=arm CROSS_COMPILE=arm-linux-gnueabihf- olddefconfig # 编译内核镜像 make -j$(nproc) ARCH=arm CROSS_COMPILE=arm-linux-gnueabihf- uImage modules # 仅编译内核驱动 make -j$(nproc) ARCH=arm CROSS_COMPILE=arm-linux-gnueabihf- M=drivers/net/wireless/aic8800 modules # 清理 make ARCH=arm CROSS_COMPILE=arm-linux-gnueabihf- clean -
3)Tenda U2 V5 最小内核版本支持 3.10,在 3.18.140 版本编译成功
-
4)问题处理(编译 linux-3.11 版本时出现):ERROR: Kernel configuration is invalid.
现象: ERROR: Kernel configuration is invalid. include/generated/autoconf.h or include/config/auto.conf are missing. Run 'make oldconfig && make prepare' on kernel src to fix it. 处理: # 清理编译失败的文件 make mrproper # 生成默认的内核配置文件 make ARCH=arm CROSS_COMPILE=arm-linux-gnueabihf- defconfig # 启动一个基于文本的交互式菜单,允许用户手动配置内核 make ARCH=arm CROSS_COMPILE=arm-linux-gnueabihf- menuconfig # 主要用于在现有配置基础上进行增量更新,以适应新的内核版本或更新的默认配置 make ARCH=arm CROSS_COMPILE=arm-linux-gnueabihf- olddefconfig # 准备内核源码树,生成一些必要的头文件和其他辅助文件。 make ARCH=arm CROSS_COMPILE=arm-linux-gnueabihf- prepare # 生成内核编译过程中需要用到的脚本文件 make ARCH=arm CROSS_COMPILE=arm-linux-gnueabihf- scripts ... -
5)问题处理:
WARNING: Symbol version dump /root/linux-3.10.1/Module.symvers is missing; modules will have no dependencies and modversions. 先编译内核镜像,再编译内核驱动即可 make -j$(nproc) ARCH=arm CROSS_COMPILE=arm-linux-gnueabihf- uImage modules make -j$(nproc) ARCH=arm CROSS_COMPILE=arm-linux-gnueabihf- M=drivers/net/wireless/aic8800 modules -
6)问题处理:
# make ARCH=arm CROSS_COMPILE=arm-linux-gnueabihf- sunxi_defconfig

drivers/net/wireless/aic8800/aic8800_fdrv/Kconfig:4: syntax error
drivers/net/wireless/aic8800/aic8800_fdrv/Kconfig:3: unknown statement "---help---"
drivers/net/wireless/aic8800/aic8800_fdrv/Kconfig:4:warning: ignoring unsupported character '.'
drivers/net/wireless/aic8800/aic8800_fdrv/Kconfig:4: unknown statement "This"
make[1]: *** [scripts/kconfig/Makefile:94: sunxi_defconfig] Error 1
make: *** [Makefile:697: sunxi_defconfig] Error 2

通过 make mrproper 命令清理旧的编译缓存文件。

 浙公网安备 33010602011771号