Spring基础05
Spring基础05
Bean的作用域
-
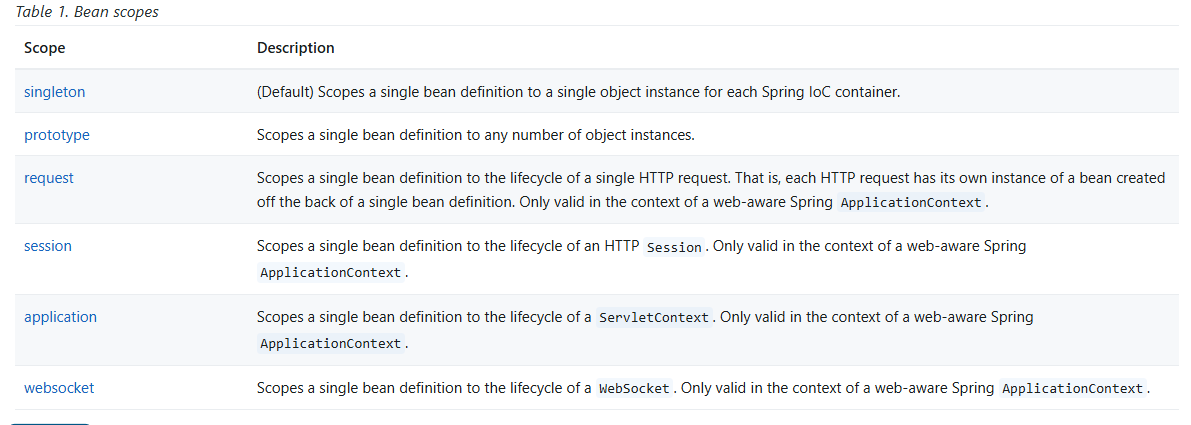
bean的作用域官网图示:
![]()
-
Bean的作用域分类:
-
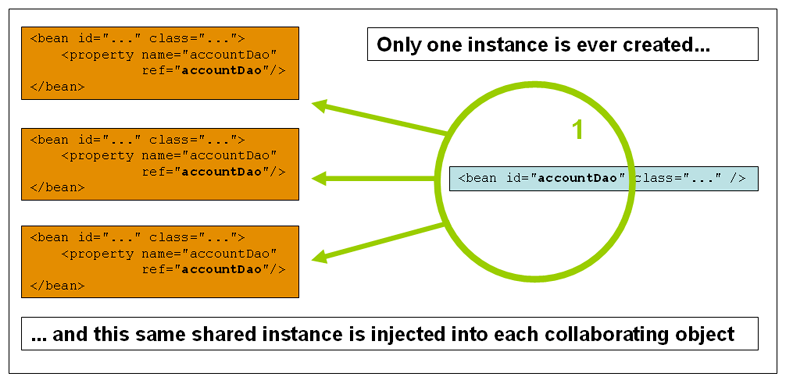
单例模式:Spring的默认机制,每次从容器中取出的都是同一个对象。
<!-- 默认为单例模式 --> <bean id="address" class="Address" scope="singleton"> </bean>![]()
-
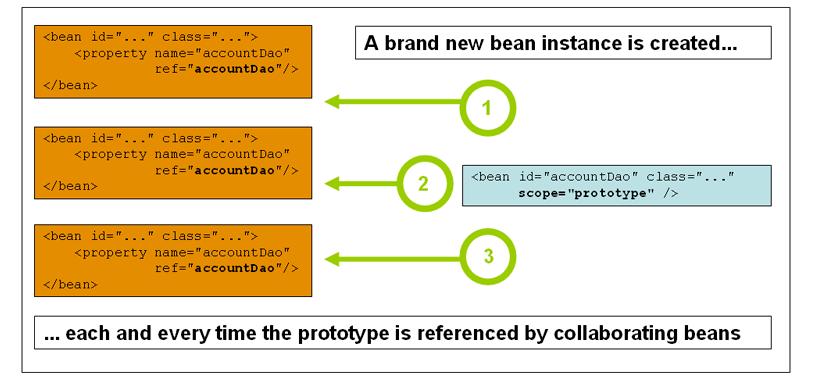
原型模式:每次从容器中get的时候,都会产生一个新对象。
<!-- 原型模式 --> <bean id="address" class="Address" scope="prototype"> </bean>![]()
-
其余request,session,application这些只能在web开发中使用到!
-
-
-
Bean的自动装配:
-
自动装配是Spring满足bean依赖的一种方式!
-
Spring会在上下文中自动寻找,并自动给bean装配属性!
-
在Spring中自动装配的方式:
- 在xml中显示的配置。
- 在java中显示配置。
- 隐式的自动装配bean。
-
使用注解实现自动装配:
- Spring2.5支持注解。
-
-
xm配置代码示例:
- 编写实体类:
public class Cat {
    public void shout(){
        System.out.println("miao~");
    }
}
public class Dog { public void shout(){ System.out.println("wang~"); } }public class People { private Cat cat; private Dog dog; private String name; public Cat getCat() { return cat; } public void setCat(Cat cat) { this.cat = cat; } public Dog getDog() { return dog; } public void setDog(Dog dog) { this.dog = dog; } public String getName() { return name; } public void setName(String name) { this.name = name; } @Override public String toString() { return "People{" + "cat=" + cat + ", dog=" + dog + ", name='" + name + '\'' + '}'; } }- 编写spring配置xml:
<?xml version="1.0" encoding="UTF-8"?>
<beans xmlns="http://www.springframework.org/schema/beans"
       xmlns:xsi="http://www.w3.org/2001/XMLSchema-instance"
       xsi:schemaLocation="http://www.springframework.org/schema/beans
		https://www.springframework.org/schema/beans/spring-beans.xsd">

    <bean id="cat" class="Cat"></bean>

    <bean id="dog" class="Dog"></bean>

     <bean id="people" class="People">
        <property name="name" value="张三"></property>
        <property name="cat" ref="cat"></property>
        <property name="dog" ref="dog"></property>
    </bean>

</beans>
<!-- byName: 会自动在容器上下文中查找,和自己对象set方法后面值对应的beanid--> <bean id="people" class="People" autowire="byName"> <property name="name" value="张三"></property> </bean> > <!-- byType: 会自动在容器上下文中查找,和自己对象属性类型相同的beanid--> <bean id="people" class="People" autowire="byType"> <property name="name" value="张三"></property> </bean>- 编写测试类:
import org.springframework.context.support.ClassPathXmlApplicationContext; public class Test { public static void main(String[] args) { ClassPathXmlApplicationContext classPathXmlApplicationContext = new ClassPathXmlApplicationContext("beans.xml"); People people = (People) classPathXmlApplicationContext.getBean("people"); people.getDog().shout(); people.getCat().shout(); } }-
注意点:
- byName的时候,需要保证所有的bean的id唯一,并且这个bean需要和自动注入的属性的set方法值一致。
- byType的时候,需要保证所有的bean的class唯一,并且这个bean需要和自动注入的属性的类型一致。
-
自动装配xml代码示例:
-
使用注解须知:
-
导入约束: context约束。
<beans xmlns:context="http://www.springframework.org/schema/context" xsi:schemaLocation="pring-beans.xsd http://www.springframework.org/schema/context https://www.springframework.org/schema/context/spring-context.xsd"> </beans> -
配置注解的支持: context:annotation-config/ 。
<?xml version="1.0" encoding="UTF-8"?>
<beans xmlns="http://www.springframework.org/schema/beans"
       xmlns:xsi="http://www.w3.org/2001/XMLSchema-instance"
       xmlns:context="http://www.springframework.org/schema/context"
       xsi:schemaLocation="http://www.springframework.org/schema/beans
		https://www.springframework.org/schema/beans/spring-beans.xsd
        http://www.springframework.org/schema/context
		https://www.springframework.org/schema/context/spring-context.xsd">

    <context:annotation-config/>

    <bean id="cat" class="Cat"></bean>

    <bean id="dog" class="Dog"></bean>

    <bean id="people" class="People"></bean>
</beans>
public class People { @Autowired private Cat cat; @Autowired // 可以在set方法上使用 private Dog dog; private String name; public Cat getCat() { return cat; } public Dog getDog() { return dog; } public String getName() { return name; } public void setName(String name) { this.name = name; } } -
如果自动装配场景比较复杂,无法只使用@Autowired注解完成时,我们可以使用@Qualifier(value=“xxx”)去配合@Autowired使用,指定一个唯一的bean对象注入!
import org.springframework.beans.factory.annotation.Autowired; import org.springframework.beans.factory.annotation.Qualifier; public class People { @Autowired private Cat cat; @Autowired @Qualifier(value = "dog1") private Dog dog; private String name; } -
@Resource注解
import javax.annotation.Resource; public class People { private Cat cat; @Resource(name = "dog1") private Dog dog; private String name; } -
@Resource和@Autowired的区别:
-
都是可以用来自动装配,都可以放在属性字段上。
-
@Autowired通过byType的方式实现,必须存在这个类型的对象,如果一种类型对应多个对象,则搭配@Qualifier(value="xxx")使用。
-
@Resource默认通过byName的方式实现,如果找不到名字,则通过byType实现,如果两种都找不到就会报错,使用@Resource(name = "xxx")解决报错。
-
-
-

 浙公网安备 33010602011771号