基于MRPC的BERT模型实战
目录
本项目根据MRPC数据集,首先对数据进行处理(包括对每句话进行分词操作和编码操作),然后创建BERT模型,接着根据Transformer结构(包括self-attention机制,attention_mask等),最终是二分类任务:判断两句话是否相连(这两句话是否可判断为同一句话),再连全连接层,加入偏置参数,定义损失函数。由此对模型进行训练,最终预测准确率约83%。
优点:
- 无需像RNN那样等待上一步的结果,可并行计算,层数多,速度快。
- 利用self-attention机制,不同词的重要性不同。
- 表示词向量时考虑了上下文,不同语境相同词表达的意思不同。
1.数据处理
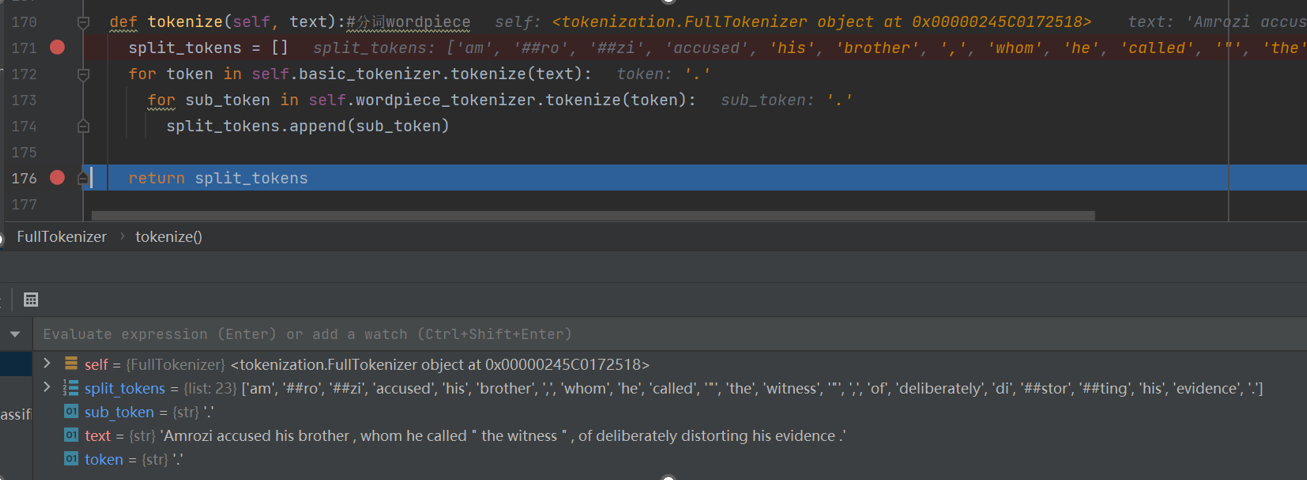
(1)对每句话进行分词操作
- 特殊字符:[CLS]-句子开始(放在序列第一个位置,由于矩阵乘法Q*K,[CLS]整合了全局特征,最后进行分类任务时,只考虑[CLS]的向量即可),[SEP]-句子结束标志
  label_map = {}
  for (i, label) in enumerate(label_list): #构建标签
    label_map[label] = i#0和1两种标签

  tokens_a = tokenizer.tokenize(example.text_a) #第一句话分词
  tokens_b = None
  if example.text_b:
    tokens_b = tokenizer.tokenize(example.text_b) #第二句话分词

  if tokens_b:#有b
    # Modifies `tokens_a` and `tokens_b` in place so that the total
    # length is less than the specified length.
    # Account for [CLS], [SEP], [SEP] with "- 3" #保留3个特殊字符,3个特殊字符表示两句话,2个特殊字符表示1句话
    _truncate_seq_pair(tokens_a, tokens_b, max_seq_length - 3) #如果这俩太长了就截断操作
  else:#无b
    # Account for [CLS] and [SEP] with "- 2"
    if len(tokens_a) > max_seq_length - 2:
      tokens_a = tokens_a[0:(max_seq_length - 2)]
第一句话分词结果
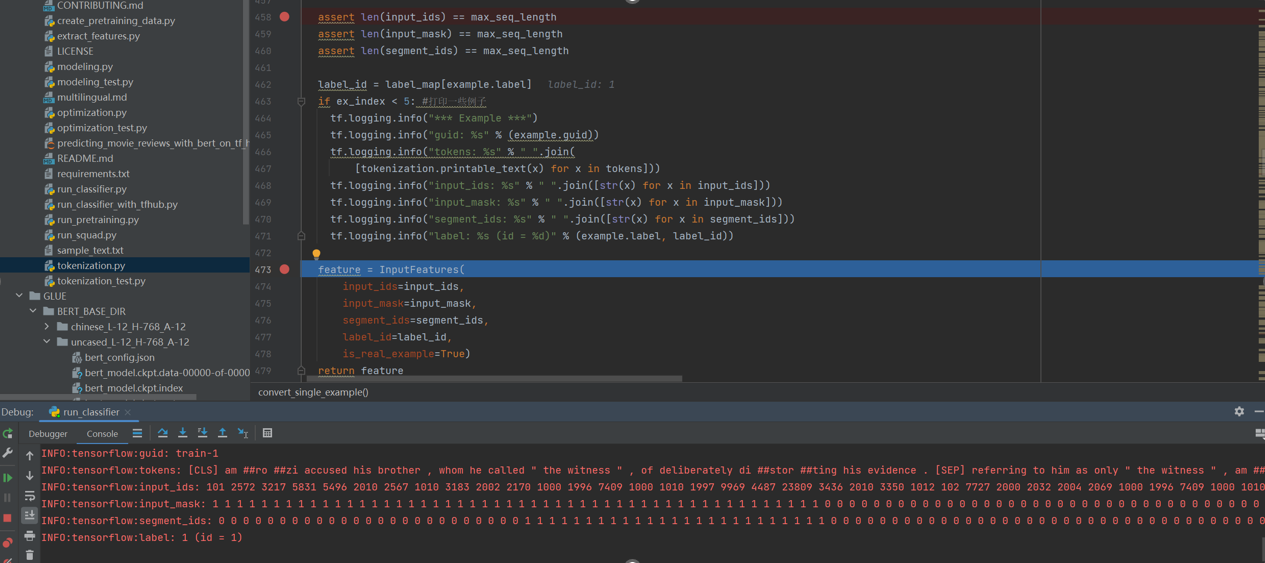
(2)对每句话进行编码操作
- eg:两句话:tokens: [CLS] is this jack ##son ##ville ? [SEP] no it is not . [SEP]
编码:
token:加入标识符的第一句话和第二句话
type_ids: 0 0 0 0 0 0 0 01 1 1 1 1 1 #表示来自哪句话,0表示第一句,1表示第二句
input_ids:该句话根据vacab.txt翻译成对于的序号
input_mask:是内容填1,共128位,不足补0,后续self attention只关注1的位置
segment_ids:第一句为0,第二句为1,不足128位补0
  tokens = []#每个词
  segment_ids = []#编码
  tokens.append("[CLS]")
  segment_ids.append(0)#CLS编码为0
  for token in tokens_a:#遍历tokens_a每一个词
    tokens.append(token)#拿到每一个词
    segment_ids.append(0)#编码均为0
  tokens.append("[SEP]")#第一句话结束后添加连接符
  segment_ids.append(0)#编码为0

  if tokens_b:
    for token in tokens_b:#遍历tokens_b每一个词
      tokens.append(token)#拿到每一个词
      segment_ids.append(1)#编码均为1
    tokens.append("[SEP]")#第二句话结束后添加结束符
    segment_ids.append(1)#编码为1

  input_ids = tokenizer.convert_tokens_to_ids(tokens) #转换成ID,根据语料库的大表vacab.txt

  # The mask has 1 for real tokens and 0 for padding tokens. Only real
  # tokens are attended to.
  input_mask = [1] * len(input_ids) #由于后续可能会有补齐操作,设置了一个mask目的是让attention只能放到mask为1的位置,不关注补的0的位置

  # Zero-pad up to the sequence length.
  while len(input_ids) < max_seq_length: #PAD的长度取决于设置的最大长度
    input_ids.append(0)
    input_mask.append(0)
    segment_ids.append(0)
结果
继续遍历每一个样本
2.创建模型
(1)定义模型
  model = modeling.BertModel(#创建模型
      config=bert_config,
      is_training=is_training,
      input_ids=input_ids,#(8,128)8表示bichsize
      input_mask=input_mask,#(8,128)
      token_type_ids=segment_ids,#(8,128)
      use_one_hot_embeddings=use_one_hot_embeddings)#TPU考虑
(2)构建BERT模型embedding层
    with tf.variable_scope(scope, default_name="bert"):#构建BERT模型
      with tf.variable_scope("embeddings"):#embedding层
        # Perform embedding lookup on the word ids.
        (self.embedding_output, self.embedding_table) = embedding_lookup(
            input_ids=input_ids,
            vocab_size=config.vocab_size,
            embedding_size=config.hidden_size,#把词映射成768维
            initializer_range=config.initializer_range,#初始化取值范围
            word_embedding_name="word_embeddings",
            use_one_hot_embeddings=use_one_hot_embeddings)
(3)词根据uncased_L-12_H-768_A-12预训练模型把8*128=1024个词映射成768维向量
  if input_ids.shape.ndims == 2:
    input_ids = tf.expand_dims(input_ids, axis=[-1])#把8*128转换成8*128*1

  embedding_table = tf.get_variable( #词映射矩阵,30522, 768
      name=word_embedding_name,
      shape=[vocab_size, embedding_size],
      initializer=create_initializer(initializer_range))

  flat_input_ids = tf.reshape(input_ids, [-1])
  if use_one_hot_embeddings:
    one_hot_input_ids = tf.one_hot(flat_input_ids, depth=vocab_size)
    output = tf.matmul(one_hot_input_ids, embedding_table)
  else:
    output = tf.gather(embedding_table, flat_input_ids) #CPU,GPU运算1024, 768 一个batch里所有的映射768维结果

  input_shape = get_shape_list(input_ids)

  output = tf.reshape(output,
                      input_shape[0:-1] + [input_shape[-1] * embedding_size]) #(8, 128, 768)
  return (output, embedding_table)
(4)加入额外编码特征(type_id)
- 因为词所在的位置会对结构产生影响,所以需要加入额外编码特征和位置编码特征。
  input_shape = get_shape_list(input_tensor, expected_rank=3)#输入是8*128*768
  batch_size = input_shape[0]
  seq_length = input_shape[1]
  width = input_shape[2]

  output = input_tensor#加入了位置编码信息不改变shape值8*128*768

  if use_token_type:#对于第一句话为0第二句为1的type进行编码
    if token_type_ids is None:
      raise ValueError("`token_type_ids` must be specified if"
                       "`use_token_type` is True.")
    token_type_table = tf.get_variable(#(2, 768)只有第一句和第二句两种不同的可能性
        name=token_type_embedding_name,
        shape=[token_type_vocab_size, width],
        initializer=create_initializer(initializer_range))
    # This vocab will be small so we always do one-hot here, since it is always
    # faster for a small vocabulary.
    flat_token_type_ids = tf.reshape(token_type_ids, [-1])#(1024)
    one_hot_ids = tf.one_hot(flat_token_type_ids, depth=token_type_vocab_size)#1024,2,两种可能性,加速
    token_type_embeddings = tf.matmul(one_hot_ids, token_type_table)#矩阵乘法(1024*2)(2*768)=1024,768
    token_type_embeddings = tf.reshape(token_type_embeddings,
                                       [batch_size, seq_length, width]) #8, 128, 768
    output += token_type_embeddings#加法type id信息融入到原始编码
(5)加入位置编码特征
  if use_position_embeddings:
    assert_op = tf.assert_less_equal(seq_length, max_position_embeddings)
    with tf.control_dependencies([assert_op]):
      full_position_embeddings = tf.get_variable(#512*768 位置限制最大512

          name=position_embedding_name,
          shape=[max_position_embeddings, width],
          initializer=create_initializer(initializer_range))
      # Since the position embedding table is a learned variable, we create it
      # using a (long) sequence length `max_position_embeddings`. The actual
      # sequence length might be shorter than this, for faster training of
      # tasks that do not have long sequences.
      #
      # So `full_position_embeddings` is effectively an embedding table
      # for position [0, 1, 2, ..., max_position_embeddings-1], and the current
      # sequence has positions [0, 1, 2, ... seq_length-1], so we can just
      # perform a slice.
      position_embeddings = tf.slice(full_position_embeddings, [0, 0],
                                     [seq_length, -1]) #位置编码给的挺大,为了加速只需要取出有用部分就可以 128, 768
      num_dims = len(output.shape.as_list())

      # Only the last two dimensions are relevant (`seq_length` and `width`), so
      # we broadcast among the first dimensions, which is typically just
      # the batch size.
      position_broadcast_shape = []
      for _ in range(num_dims - 2):
        position_broadcast_shape.append(1)
      position_broadcast_shape.extend([seq_length, width]) # [1, 128, 768] 表示位置编码跟输入啥数据无关,因为原始的embedding是有batchsize当做第一个维度,这里为了计算也得加入
      position_embeddings = tf.reshape(position_embeddings,
                                       position_broadcast_shape)
      output += position_embeddings#8*128*768

  output = layer_norm_and_dropout(output, dropout_prob)#最后的output融入了typeid的信息以及位置编码的信息
  return output
3.transformer结构
(1)self-attention:计算机根据上下文语境自己调整每个词的权重的分配
  def transpose_for_scores(input_tensor, batch_size, num_attention_heads,
                           seq_length, width):
    output_tensor = tf.reshape(
        input_tensor, [batch_size, seq_length, num_attention_heads, width])

    output_tensor = tf.transpose(output_tensor, [0, 2, 1, 3])
    return output_tensor

  from_shape = get_shape_list(from_tensor, expected_rank=[2, 3])#[1024, 768]
  to_shape = get_shape_list(to_tensor, expected_rank=[2, 3])#[1024, 768]

  if len(from_shape) != len(to_shape):
    raise ValueError(
        "The rank of `from_tensor` must match the rank of `to_tensor`.")

  if len(from_shape) == 3:
    batch_size = from_shape[0]
    from_seq_length = from_shape[1]
    to_seq_length = to_shape[1]
  elif len(from_shape) == 2:
    if (batch_size is None or from_seq_length is None or to_seq_length is None):
      raise ValueError(
          "When passing in rank 2 tensors to attention_layer, the values "
          "for `batch_size`, `from_seq_length`, and `to_seq_length` "
          "must all be specified.")
(2)构建QKV矩阵
- Q:query,要去查询的
- K:key,等着被查的
- V:value,实际的特征信息
  # Scalar dimensions referenced here:
  #   B = batch size (number of sequences) 8
  #   F = `from_tensor` sequence length 128
  #   T = `to_tensor` sequence length 128
  #   N = `num_attention_heads` 12
  #   H = `size_per_head` 64

  from_tensor_2d = reshape_to_matrix(from_tensor)#(1024, 768)
  to_tensor_2d = reshape_to_matrix(to_tensor)
  #B:batchsize F:`from_tensor` T:`to_tensor` N:`num_attention_heads` H:`size_per_head`
  # `query_layer` = [B*F, N*H],8*128,12*64
  query_layer = tf.layers.dense(#构建查询矩阵1024*768
      from_tensor_2d,#Q矩阵由from_tensor_2d而来
      num_attention_heads * size_per_head,#12*64
      activation=query_act,
      name="query",
      kernel_initializer=create_initializer(initializer_range))

  # `key_layer` = [B*T, N*H]8*128,12*64
  key_layer = tf.layers.dense(
      to_tensor_2d,#K矩阵由to_tensor_2d而来
      num_attention_heads * size_per_head,
      activation=key_act,
      name="key",
      kernel_initializer=create_initializer(initializer_range))

  # `value_layer` = [B*T, N*H]8*128,12*64
  value_layer = tf.layers.dense(#帮助得到实际特征是什么
      to_tensor_2d,#V矩阵由to_tensor_2d而来
      num_attention_heads * size_per_head,
      activation=value_act,
      name="value",
      kernel_initializer=create_initializer(initializer_range))
(3)计算内积+softmax
- q与k的内积表示有多匹配,无关时内积为0,内积越大相关性越高
- 最终的得分值经过softmax,将分值转换成概率。其中(q*K)/✓dk,使得分值不随向量维度的增大而增加
- 每个词的q会跟整个序列中每一个k计算得分,然后基于得分再分配特征。softmax((qK)/✓dk)v
示意图如下:

# `query_layer` = [B, N, F, H] #为了加速计算内积
query_layer = transpose_for_scores(query_layer, batch_size,
num_attention_heads, from_seq_length,
size_per_head)#8,128,12,64->8,12,128,64,便于做内积
# `key_layer` = [B, N, T, H] #为了加速计算内积
key_layer = transpose_for_scores(key_layer, batch_size, num_attention_heads,
to_seq_length, size_per_head)
# Take the dot product between "query" and "key" to get the raw
# attention scores.
# `attention_scores` = [B, N, F, T]
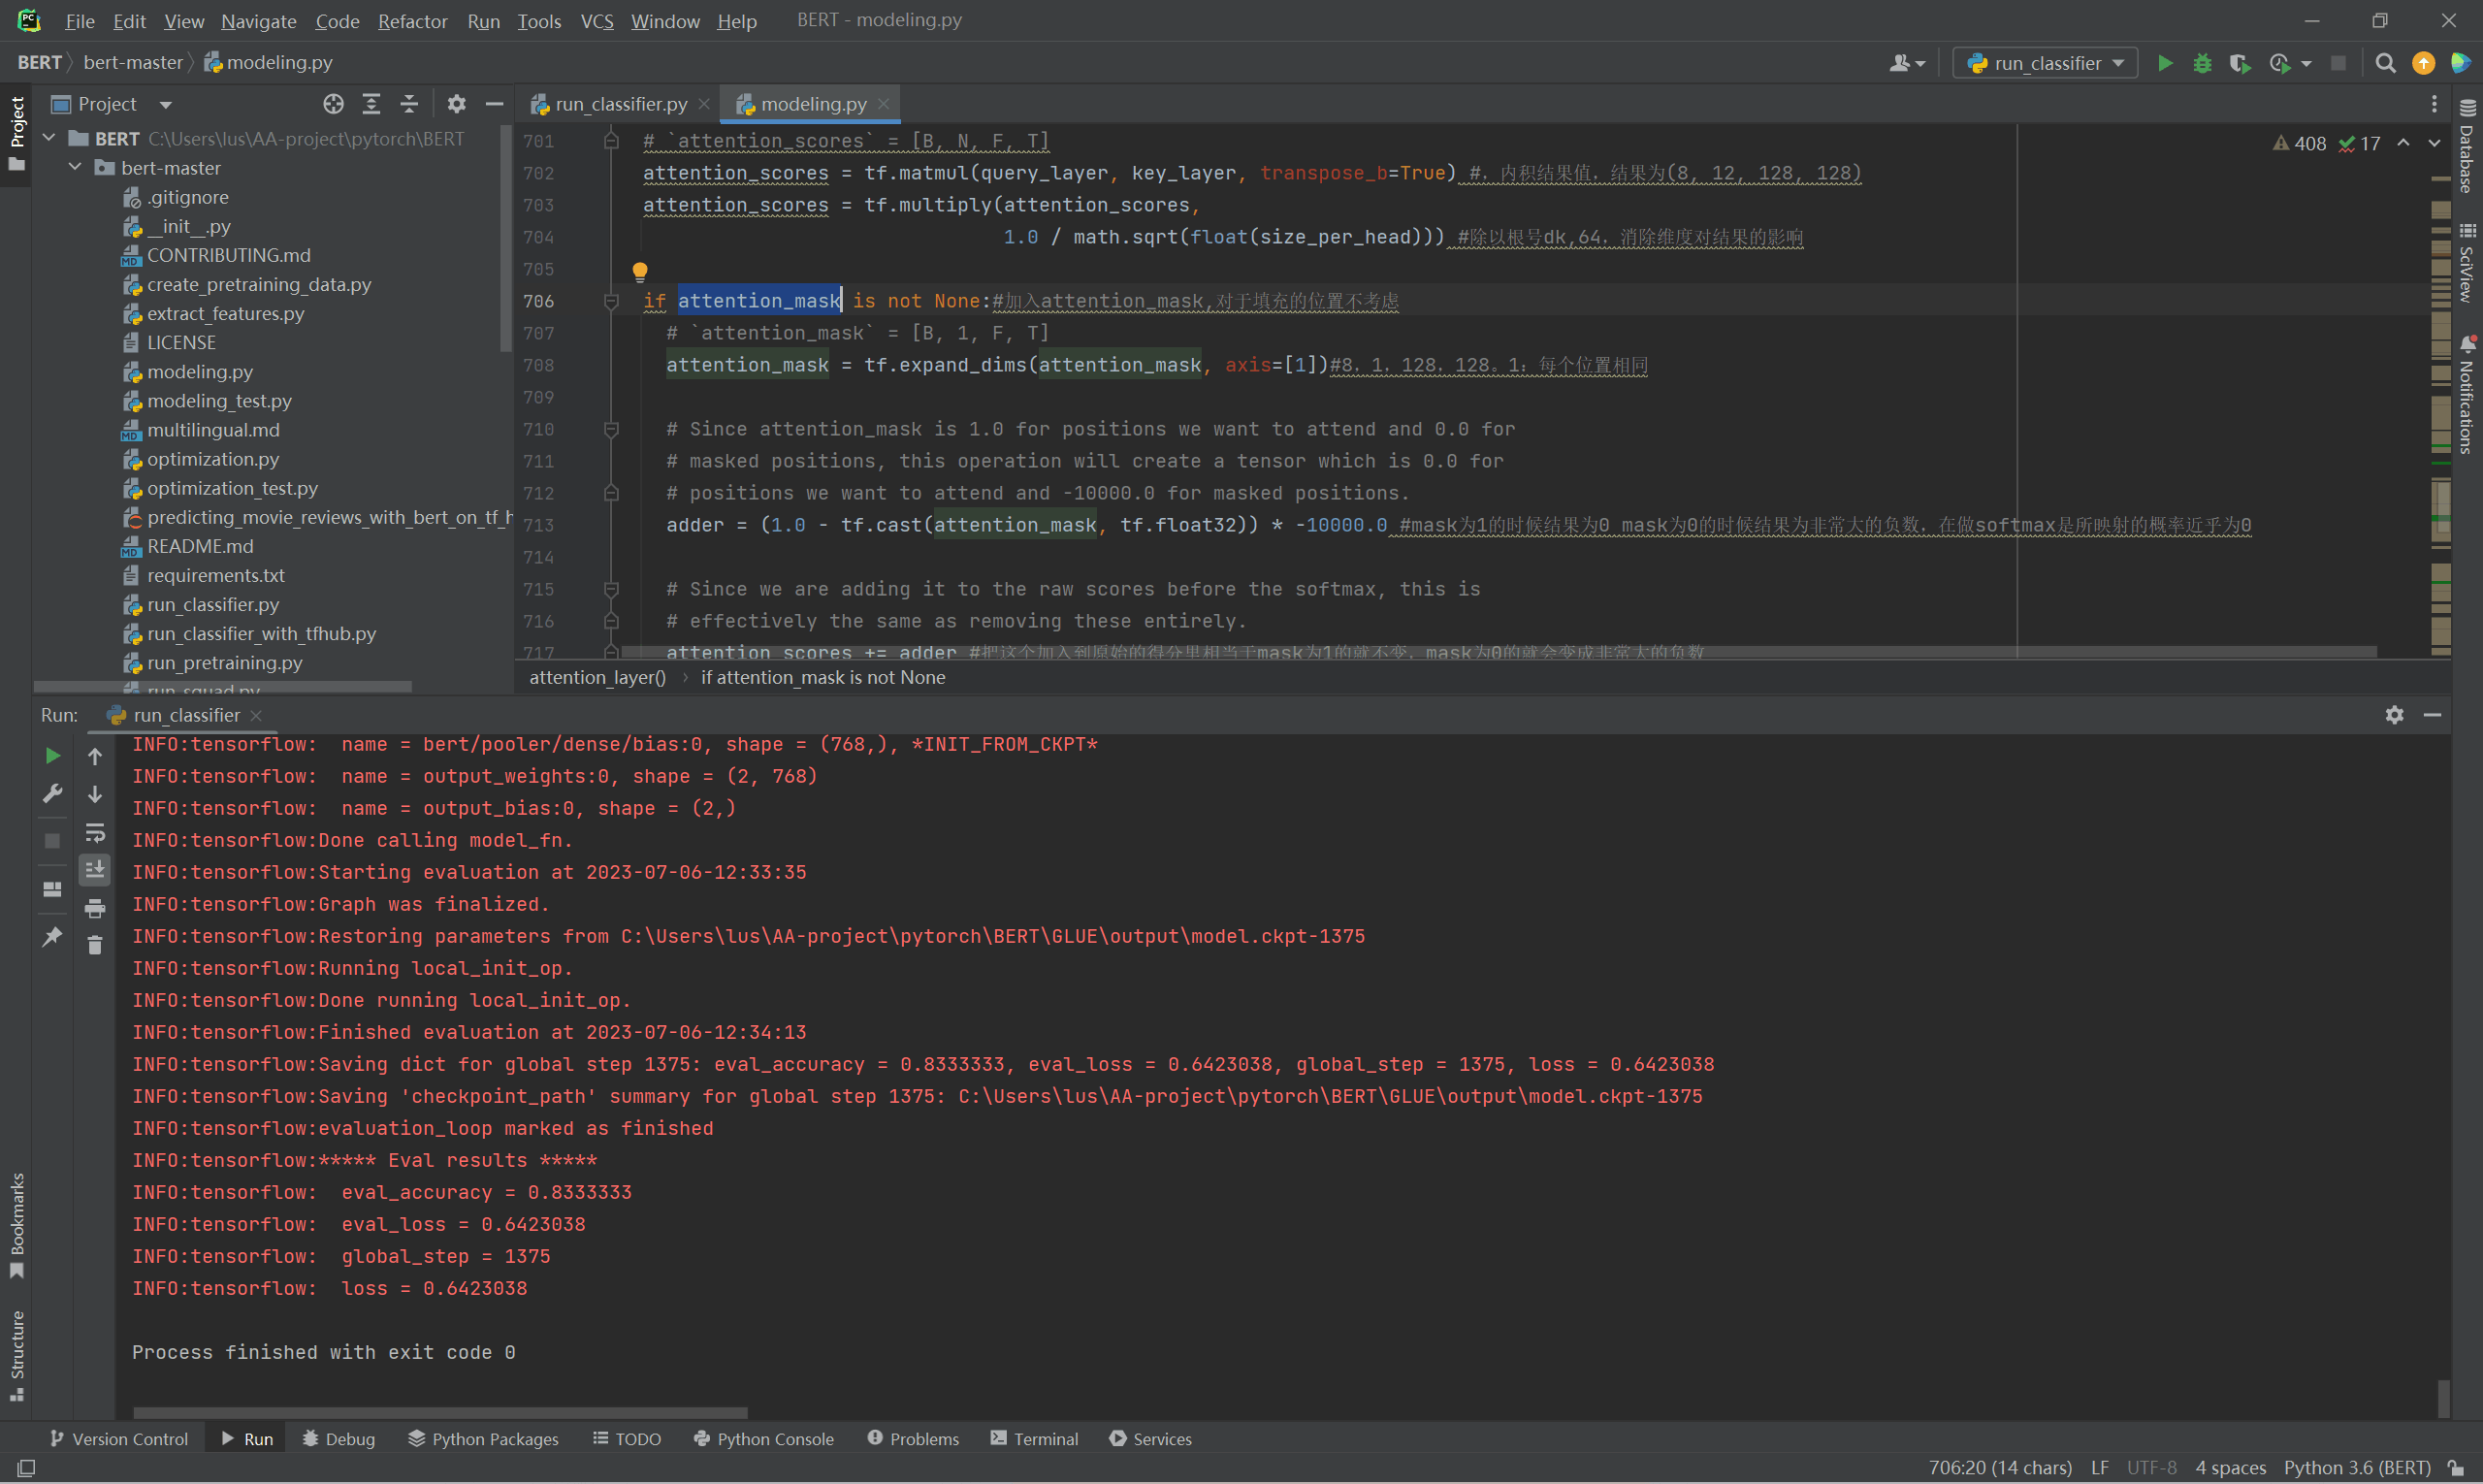
attention_scores = tf.matmul(query_layer, key_layer, transpose_b=True) #,内积结果值,结果为(8, 12, 128, 128)
attention_scores = tf.multiply(attention_scores,
1.0 / math.sqrt(float(size_per_head))) #除以根号dk,64,消除维度对结果的影响
if attention_mask is not None:#加入attention_mask,对于填充的位置不考虑
# `attention_mask` = [B, 1, F, T]
attention_mask = tf.expand_dims(attention_mask, axis=[1])#8,1,128,128。1:每个位置相同
# Since attention_mask is 1.0 for positions we want to attend and 0.0 for
# masked positions, this operation will create a tensor which is 0.0 for
# positions we want to attend and -10000.0 for masked positions.
adder = (1.0 - tf.cast(attention_mask, tf.float32)) * -10000.0 #mask为1的时候结果为0 mask为0的时候结果为非常大的负数,在做softmax是所映射的概率近乎为0
# Since we are adding it to the raw scores before the softmax, this is
# effectively the same as removing these entirely.
attention_scores += adder #把这个加入到原始的得分里相当于mask为1的就不变,mask为0的就会变成非常大的负数
# Normalize the attention scores to probabilities.
# `attention_probs` = [B, N, F, T]
attention_probs = tf.nn.softmax(attention_scores) #再做softmax此时负数做softmax相当于结果为0了就相当于不考虑了,结果为概率值(权重),8,12,128,128
# This is actually dropping out entire tokens to attend to, which might
# seem a bit unusual, but is taken from the original Transformer paper.
attention_probs = dropout(attention_probs, attention_probs_dropout_prob)
# `value_layer` = [B, T, N, H]
value_layer = tf.reshape(
value_layer,
[batch_size, to_seq_length, num_attention_heads, size_per_head])#(8, 128, 12, 64)
# `value_layer` = [B, N, T, H]
value_layer = tf.transpose(value_layer, [0, 2, 1, 3]) #(8, 12, 128, 64)转换成可以与权重矩阵进行乘法计算的维度,transpose操作便于矩阵计算,加速
# `context_layer` = [B, N, F, H]
context_layer = tf.matmul(attention_probs, value_layer)#计算最终结果特征 (8, 12, 128, 64)
# `context_layer` = [B, F, N, H]
context_layer = tf.transpose(context_layer, [0, 2, 1, 3])#转换回[8, 128, 12, 64]
if do_return_2d_tensor:
# `context_layer` = [B*F, N*H]
context_layer = tf.reshape(
context_layer,
[batch_size * from_seq_length, num_attention_heads * size_per_head])
else:
# `context_layer` = [B, F, N*H]
context_layer = tf.reshape(
context_layer,
[batch_size, from_seq_length, num_attention_heads * size_per_head]) #(1024, 768)
return context_layer # (1024, 768)
(4)attention_mask
- 对矩阵的每一个元素再分一个维度,比如第一个位置添加维度(1111有几个1表示attention时该跟几个计算,其余为0(modeling.py)
      with tf.variable_scope("encoder"):
        # This converts a 2D mask of shape [batch_size, seq_length] to a 3D(2D转3D)
        # mask of shape [batch_size, seq_length, seq_length] which is used
        # for the attention scores.
        attention_mask = create_attention_mask_from_input_mask(#对矩阵的每一个元素再分一个维度,比如第一个位置添加维度(1111有几个1表示attention时该跟哪几个计算,其余为0)
            input_ids, input_mask)#输入8*128输出8*128*128
  if attention_mask is not None:#加入attention_mask,对于填充的位置不考虑
    # `attention_mask` = [B, 1, F, T]
    attention_mask = tf.expand_dims(attention_mask, axis=[1])#8,1,128,128。1:每个位置相同

    # Since attention_mask is 1.0 for positions we want to attend and 0.0 for
    # masked positions, this operation will create a tensor which is 0.0 for
    # positions we want to attend and -10000.0 for masked positions.
    adder = (1.0 - tf.cast(attention_mask, tf.float32)) * -10000.0 #mask为1的时候结果为0 mask为0的时候结果为非常大的负数,在做softmax是所映射的概率近乎为0

    # Since we are adding it to the raw scores before the softmax, this is
    # effectively the same as removing these entirely.
    attention_scores += adder #把这个加入到原始的得分里相当于mask为1的就不变,mask为0的就会变成非常大的负数

  # Normalize the attention scores to probabilities.
  # `attention_probs` = [B, N, F, T]
  attention_probs = tf.nn.softmax(attention_scores) #再做softmax此时负数做softmax相当于结果为0了就相当于不考虑了,结果为概率值(权重),8,12,128,128

  # This is actually dropping out entire tokens to attend to, which might
  # seem a bit unusual, but is taken from the original Transformer paper.
  attention_probs = dropout(attention_probs, attention_probs_dropout_prob)

  # `value_layer` = [B, T, N, H]
  value_layer = tf.reshape(
      value_layer,
      [batch_size, to_seq_length, num_attention_heads, size_per_head])#(8, 128, 12, 64)

  # `value_layer` = [B, N, T, H]
  value_layer = tf.transpose(value_layer, [0, 2, 1, 3]) #(8, 12, 128, 64)转换成可以与权重矩阵进行乘法计算的维度,transpose操作便于矩阵计算,加速

  # `context_layer` = [B, N, F, H]
  context_layer = tf.matmul(attention_probs, value_layer)#计算最终结果特征 (8, 12, 128, 64)

  # `context_layer` = [B, F, N, H]
  context_layer = tf.transpose(context_layer, [0, 2, 1, 3])#转换回[8, 128, 12, 64]

  if do_return_2d_tensor:
    # `context_layer` = [B*F, N*H]
    context_layer = tf.reshape(
        context_layer,
        [batch_size * from_seq_length, num_attention_heads * size_per_head])
  else:
    # `context_layer` = [B, F, N*H]
    context_layer = tf.reshape(
        context_layer,
        [batch_size, from_seq_length, num_attention_heads * size_per_head]) #(1024, 768)

  return context_layer # (1024, 768)
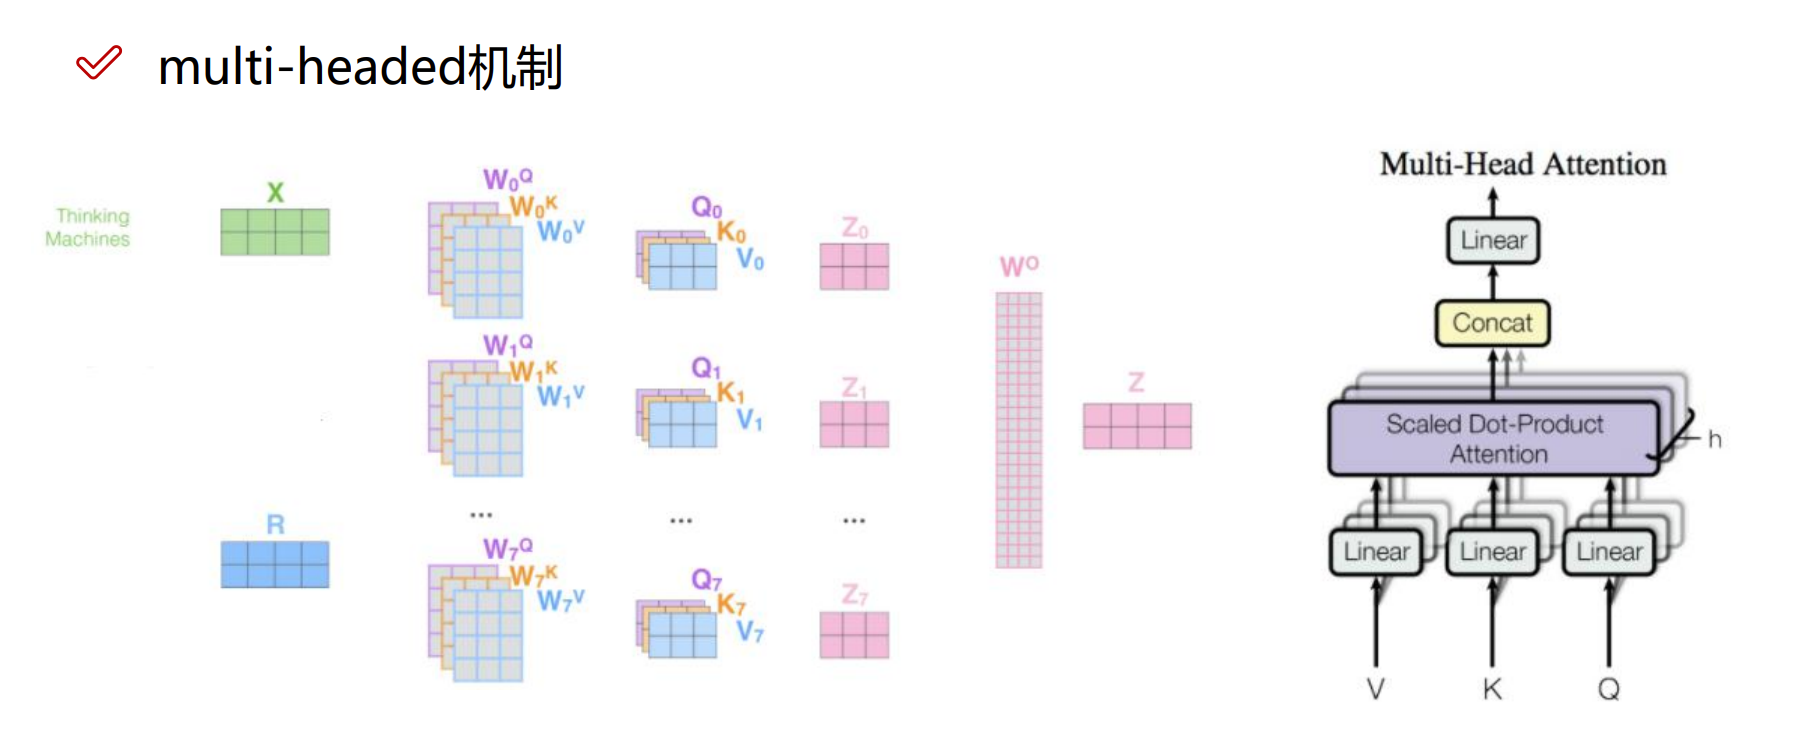
(5)连接全连接层,加入残差连接
- 由于transforme的multi-headed机制:通过构建不同的QKV矩阵得到多个特征表达,最后将所有特征拼接在一起,所以最后可以使用全连接层来降维。
示意图如下:
        with tf.variable_scope("output"): #1024, 768 残差连接
          attention_output = tf.layers.dense(#全连接层
              attention_output,
              hidden_size,
              kernel_initializer=create_initializer(initializer_range))
          attention_output = dropout(attention_output, hidden_dropout_prob)
          attention_output = layer_norm(attention_output + layer_input)#残差连接

      # The activation is only applied to the "intermediate" hidden layer.
      with tf.variable_scope("intermediate"): #全连接层 (1024, 3072)
        intermediate_output = tf.layers.dense(
            attention_output,
            intermediate_size,
            activation=intermediate_act_fn,
            kernel_initializer=create_initializer(initializer_range))

      # Down-project back to `hidden_size` then add the residual.
      with tf.variable_scope("output"): #再变回一致的维度,1024, 768
        layer_output = tf.layers.dense(
            intermediate_output,
            hidden_size,
            kernel_initializer=create_initializer(initializer_range))
        layer_output = dropout(layer_output, hidden_dropout_prob)
        layer_output = layer_norm(layer_output + attention_output)
        prev_output = layer_output
        all_layer_outputs.append(layer_output)

  if do_return_all_layers:
    final_outputs = []
    for layer_output in all_layer_outputs:
      final_output = reshape_from_matrix(layer_output, input_shape)
      final_outputs.append(final_output)
    return final_outputs
  else:
    final_output = reshape_from_matrix(prev_output, input_shape)
    return final_output
4.完整网络结构
- 拿到向量,最终是二分类任务,再连全连接层,加入偏置参数,定义损失函数。
  # In the demo, we are doing a simple classification task on the entire
  # segment.
  #
  # If you want to use the token-level output, use model.get_sequence_output()
  # instead.
  output_layer = model.get_pooled_output()#取句子时只需要取第一个cls标识符

  hidden_size = output_layer.shape[-1].value

  output_weights = tf.get_variable(#权重参数2*768
      "output_weights", [num_labels, hidden_size],
      initializer=tf.truncated_normal_initializer(stddev=0.02))

  output_bias = tf.get_variable(#偏置参数2*768
      "output_bias", [num_labels], initializer=tf.zeros_initializer())

  with tf.variable_scope("loss"):#定义损失函数
    if is_training:
      # I.e., 0.1 dropout
      output_layer = tf.nn.dropout(output_layer, keep_prob=0.9)

    logits = tf.matmul(output_layer, output_weights, transpose_b=True)#输出*权重
    logits = tf.nn.bias_add(logits, output_bias)#加上偏置项
    probabilities = tf.nn.softmax(logits, axis=-1)#softmax
    log_probs = tf.nn.log_softmax(logits, axis=-1)#交叉商计算损失

    one_hot_labels = tf.one_hot(labels, depth=num_labels, dtype=tf.float32)

    per_example_loss = -tf.reduce_sum(one_hot_labels * log_probs, axis=-1)
    loss = tf.reduce_mean(per_example_loss)

    return (loss, per_example_loss, logits, probabilities)
5.结果

 浙公网安备 33010602011771号