线程池(FutureTask)
Future
常见的两种创建线程的方式。一种是直接继承Thread,另外一种就是实现Runnable接口。但这两种方式都有一个缺陷就是:在执行完任务之后无法获取执行结果。从Java 1.5开始,就提供了Callable和Future,通过它们可以在任务执行完毕之后得到任务执行结果。
Future
首先,我们需要清楚,Futrue是个接口。Future就是对于具体的Runnable或者Callable任务的执行结果进行取消、查询是否完成、获取结果。必要时可以通过get方法获取执行结果,该方法会阻塞直到任务返回结果。
public interface Future<V> {
    // 任务取消方法
    boolean cancel(boolean mayInterruptIfRunning);
    // 判断任务是否取消
    boolean isCancelled();
    // 判断任务是否完成
    boolean isDone();
    // 阻塞获取任务结果
    V get() throws InterruptedException, ExecutionException;
    // 阻塞获取任务结果,并设置阻塞超时时间
    V get(long timeout, TimeUnit unit)
        throws InterruptedException, ExecutionException, TimeoutException;
}

public interface RunnableFuture<V> extends Runnable, Future<V> {
    /**
     * Sets this Future to the result of its computation
     * unless it has been cancelled.
     */
    void run();
}
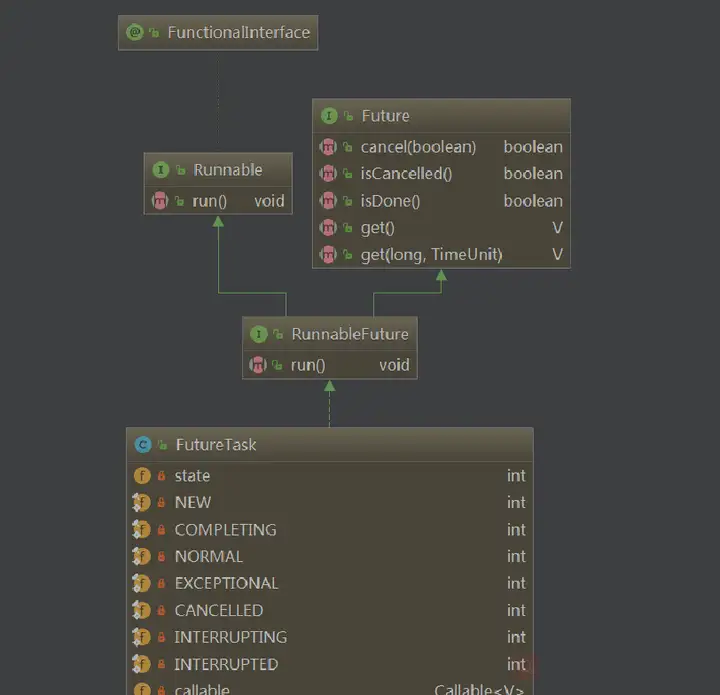
接口定义行为,我们通过上图可以看到实现Future接口的子类会具有哪些行为:
- 我们可以取消这个执行逻辑,如果这个逻辑已经正在执行,提供可选的参数来控制是否取消已经正在执行的逻辑。
- 我们可以判断执行逻辑是否已经被取消。
- 我们可以判断执行逻辑是否已经执行完成。
- 我们可以获取执行逻辑的执行结果。
- 我们可以允许在一定时间内去等待获取执行结果,如果超过这个时间,抛
TimeoutException
FutureTask
FutureTask是Future的具体实现。FutureTask实现了RunnableFuture接口。RunnableFuture接口又同时继承了Future 和 Runnable 接口。所以FutureTask既可以作为Runnable被线程执行,又可以作为Future得到Callable的返回值。
类图如下:
public class FutureTask<V> implements RunnableFuture<V> {
    // 状态机:存在以下7中状态(任务的执行状态)
    private volatile int state;
    // 新建
    private static final int NEW          = 0;
    // 任务完成中
    private static final int COMPLETING   = 1;
    // 任务正常完成
    private static final int NORMAL       = 2;
    // 任务异常
    private static final int EXCEPTIONAL  = 3;
    // 任务取消
    private static final int CANCELLED    = 4;
    // 任务中断中
    private static final int INTERRUPTING = 5;
    // 任务已中断
    private static final int INTERRUPTED  = 6;

    // 支持结果返回的任务
    private Callable<V> callable;

    // 任务执行结果:包含正常和异常的结果,通过get方法获取
    private Object outcome;

    // 任务执行线程
    private volatile Thread runner;

    // 栈结构的等待队列,该节点是栈中的最顶层节点
    private volatile WaitNode waiters;
}
state状态机是FutureTask用于标记任务执行的状态情况,在源码中作者也描述了这些状态可能的变化情况:
- 任务正常执行:NEW -> COMPLETING -> NORMAL
- 任务执行异常:NEW -> COMPLETING -> EXCEPTIONAL
- 任务被取消:NEW -> CANCELLE
- 任务被中断:NEW -> INTERRUPTING -> INTERRUPTED
callable是FutureTask具体要执行的任务,由外部传入
outcome是任务执行完后的返回结果
runner是真正执行任务的worker
waiters是一个等待节点,而是是最顶层节点,类似头节点。FutureTask中的等待队列主要作用用于当多线程同时请求get方法获取结果时,这些线程可能要同时阻塞,因此将这些线程的阻塞信息保存在了等待节点中,并构成一个栈的等待结构
FutureTask源码分析
构造函数
FutureTask有两个构造函数:
public FutureTask(Callable<V> callable) {
    if (callable == null)
        throw new NullPointerException();
    this.callable = callable;
    this.state = NEW;       // ensure visibility of callable
}

public FutureTask(Runnable runnable, V result) {
    this.callable = Executors.callable(runnable, result);
    this.state = NEW;       // ensure visibility of callable
}
这两个构造函数区别在于,如果使用第一个构造函数最后获取线程实行结果就是callable的执行的返回结果;而如果使用第二个构造函数那么最后获取线程实行结果就是参数中的result,接下来让我们看一下FutureTask的run方法。
同时两个构造函数都把当前状态设置为NEW。
FutureTask提供了两个构造方法,支持runnable和callable两种任务,但其实最终都是转换为callable任务
runnable转为callable的方法,其实就是通过RunnableAdapter适配器,RunnableAdapter本身是实现了callable接口,然后在call方法中,实际执行的是runnable的run方法,另外将传入的结果参数原封不动的作为结果返回。具体源码如下:
public static <T> Callable<T> callable(Runnable task, T result) {
    if (task == null)
        throw new NullPointerException();
    return new RunnableAdapter<T>(task, result);
}

static final class RunnableAdapter<T> implements Callable<T> {
    final Runnable task;
    final T result;
    RunnableAdapter(Runnable task, T result) {
        this.task = task;
        this.result = result;
    }
    public T call() {
        task.run();
        return result;
    }
}
run方法
构造完FutureTask后,会把它当做线程的参数传进去,然后线程就会运行它的run方法。所以我们先来看一下run方法:
public void run() {
	//如果状态不是new,或者runner旧值不为null(已经启动过了),就结束
	if (state != NEW ||
		!UNSAFE.compareAndSwapObject(this, runnerOffset,
									 null, Thread.currentThread()))
		return;
	try {
		Callable<V> c = callable; // 这里的callable是从构造方法里面传人的
		if (c != null && state == NEW) {
			V result;
			boolean ran;
			try {
				result = c.call(); //执行任务,并将结果保存在result字段里。
				ran = true;
			} catch (Throwable ex) {
				result = null;
				ran = false;
				setException(ex); // 保存call方法抛出的异常
			}
			if (ran)
				set(result); // 保存call方法的执行结果
		}
	} finally {
		// runner must be non-null until state is settled to
		// prevent concurrent calls to run()
		runner = null;
		// state must be re-read after nulling runner to prevent
		// leaked interrupts
		int s = state;
		if (s >= INTERRUPTING)
			handlePossibleCancellationInterrupt(s); // // 如果被置为了中断状态则进行中断的处理
	}
}
其中,catch语句中的setException(ex)如下:
//发生异常时设置state和outcome
protected void setException(Throwable t) {
    // 将状态机由NEW更新为COMPLETING
    if (UNSAFE.compareAndSwapInt(this, stateOffset, NEW, COMPLETING)) {
        // 将异常信息保存到输出结果中
        outcome = t;
        // 更新状态机为处理异常的最终状态-EXCEPTIONAL
        UNSAFE.putOrderedInt(this, stateOffset, EXCEPTIONAL); // final state
        // 通用的完成操作,主要作用就是唤醒阻塞在waiters队列中请求get的线程,后面再详细
        finishCompletion();
    }
}
而正常完成时,set(result);方法如下:
//正常完成时,设置state和outcome
protected void set(V v) {
//正常完成时,NEW->COMPLETING->NORMAL
if (UNSAFE.compareAndSwapInt(this, stateOffset, NEW, COMPLETING)) {
 outcome = v;
 UNSAFE.putOrderedInt(this, stateOffset, NORMAL);
		finishCompletion(); // 唤醒get方法阻塞的线程
	}
}
这两个set方法中,都是用到了finishCompletion()去唤醒get方法阻塞的线程。下面来看看这个方法:
//移除并唤醒所有等待的线程,调用done,并清空callable
private void finishCompletion() {
        // assert state > COMPLETING;
        for (WaitNode q; (q = waiters) != null;) {
            if (UNSAFE.compareAndSwapObject(this, waitersOffset, q, null)) {
                for (;;) {
                    Thread t = q.thread;
                    if (t != null) {
                        q.thread = null;
                        LockSupport.unpark(t); //唤醒线程
                    }
                    //接下来的这几句代码是将当前节点剥离出队列,然后将q指向下一个等待节点。被剥离的节点由于thread和next都为null,所以会被GC回收。
                    WaitNode next = q.next;
                    if (next == null)
                        break;
                    q.next = null; // unlink to help gc
                    q = next;
                }
                break;
            }
        }

        done(); //这个是空的方法,子类可以覆盖,实现回调的功能。
        callable = null;        // to reduce footprint
    }
好,到这里我们把运行以及设置结果的流程分析完了。那接下来看一下怎么获得执行结果把。也就是get方法。
get方法
get方法有两个,一个是有超时时间设置,另一个没有超时时间设置。
public V get() throws InterruptedException, ExecutionException {
    int s = state;
    if (s <= COMPLETING)
        s = awaitDone(false, 0L);
    return report(s);
}

public V get(long timeout, TimeUnit unit) throws InterruptedException, ExecutionException, TimeoutException {
        // get(timeout, unit) 也很简单, 主要还是在 awaitDone里面
        if(unit == null){
            throw new NullPointerException();
        }
        int s = state;
        // 判断state状态是否 <= Completing, 调用awaitDone进行自旋等待
        if(s <= COMPLETING && (s = awaitDone(true, unit.toNanos(timeout))) <= COMPLETING){
            throw new TimeoutException();
        }
        // 根据state的值进行返回结果或抛出异常
        return report(s);
    }
两个get方法都用到了awaitDone()。这个方法的作用是: 等待任务执行完成、被中断或超时。看一下源码:
    //等待完成,可能是是中断、异常、正常完成,timed:true,考虑等待时长,false:不考虑等待时长
    private int awaitDone(boolean timed, long nanos) throws InterruptedException {
        final long deadline = timed ? System.nanoTime() + nanos : 0L; //如果设置了超时时间
        WaitNode q = null;
        boolean queued = false;
        for (;;) {
         /**
         *  有优先级顺序
         *  1、如果线程已中断,则直接将当前节点q从waiters中移出
         *  2、如果state已经是最终状态了,则直接返回state
         *  3、如果state是中间状态(COMPLETING),意味很快将变更过成最终状态,让出cpu时间片即可
         *  4、如果发现尚未有节点,则创建节点
         *  5、如果当前节点尚未入队,则将当前节点放到waiters中的首节点,并替换旧的waiters
         *  6、线程被阻塞指定时间后再唤醒
         *  7、线程一直被阻塞直到被其他线程唤醒
         *
         */
            if (Thread.interrupted()) {// 1
                removeWaiter(q);
                throw new InterruptedException();
            }

            int s = state;
            if (s > COMPLETING) {// 2
                if (q != null)
                    q.thread = null;
                return s;
            }
            else if (s == COMPLETING) // 3
                Thread.yield();
            else if (q == null) // 4
                q = new WaitNode();
            else if (!queued) // 5
                queued = UNSAFE.compareAndSwapObject(this, waitersOffset, q.next = waiters, q);
            else if (timed) {// 6
                nanos = deadline - System.nanoTime();
                if (nanos <= 0L) {
                    removeWaiter(q); //从waiters中移出节点q
                    return state;
                }
                LockSupport.parkNanos(this, nanos);
            }
            else // 7
                LockSupport.park(this);
        }
    }
接下来看下removeWaiter()移除等待节点的源码:
private void removeWaiter(WaitNode node) {
	if (node != null) {
		node.thread = null; // 将移除的节点的thread=null, 为移除做标示
		retry:
		for (;;) {          // restart on removeWaiter race
			for (WaitNode pred = null, q = waiters, s; q != null; q = s) {
				s = q.next;
				//通过 thread 判断当前 q 是否是需要移除的 q节点,因为我们刚才标示过了
				if (q.thread != null)
					pred = q; //当不是我们要移除的节点,就往下走
				else if (pred != null) {
					//当p.thread==null时,到这里。下面这句话,相当于把q从队列移除。
					pred.next = s;
					//pred.thread == null 这种情况是在多线程进行并发 removeWaiter 时产生的
					//此时正好移除节点 node 和 pred, 所以loop跳到retry, 从新进行这个过程。想象一下,如果在并发的情况下,其他线程把pred的线程置为空了。那说明这个链表不应该包含pred了。所以我们需要跳到retry从新开始。
					if (pred.thread == null) // check for race
						continue retry;
				}
				//到这步说明p.thread==null 并且 pred==null。说明node是头结点。
				else if (!UNSAFE.compareAndSwapObject(this, waitersOffset,
													  q, s))
					continue retry;
			}
			break;
		}
	}
}
最后在get方法中调用report(s),根据状态s的不同进行返回结果或抛出异常。
private V report(int s) throws ExecutionException {
	Object x = outcome;  //之前我们set的时候,已经设置过这个值了。所以直接用。
	if (s == NORMAL)
		return (V)x;  //正常执行结束,返回结果
	if (s >= CANCELLED)
		throw new CancellationException(); //被取消或中断了,就抛异常。
	throw new ExecutionException((Throwable)x);
}
cancel方法
任务取消时会先检查是否允许取消,当任务已经完成或者正在完成(正常执行并继续处理结果 或 执行异常处理异常结果)时不允许取消。
cancel方法有个boolean入参,若为false,则只唤醒所有等待的线程,不中断正在执行的任务线程。若为true则直接中断任务执行线程,同时修改状态机为INTERRUPTED。
public boolean cancel(boolean mayInterruptIfRunning) {
	// 不允许取消的情况:状态机不是NEW 或CAS更新状态机失败
	if (!(state == NEW &&
		  UNSAFE.compareAndSwapInt(this, stateOffset, NEW,
			  mayInterruptIfRunning ? INTERRUPTING : CANCELLED)))
		return false;
	try {    // in case call to interrupt throws exception
		// 如果要求中断执行中的任务,则直接中断任务执行线程,并更新状态机为最终状态INTERRUPTED
		if (mayInterruptIfRunning) {
			try {
				Thread t = runner;
				if (t != null)
					t.interrupt();
			} finally { // final state
				UNSAFE.putOrderedInt(this, stateOffset, INTERRUPTED);
			}
		}
	} finally {
		finishCompletion();
	}
	return true;
}
handlePossibleCancellationInterrupt()-处理可能的取消中断
这个方法名称很长,看起来比较模糊,其实它的作用就是——当发起中断的线程A将状态机更新为INTERRUPTING,还没继续中断任务任务线程前,CPU切换到任务执行线程B了,此时线程B执行本方法让出CPU,让发起中断的线程A能继续处理中断B的操作。(要结合cancel方法才能完全理解这句话)
private void handlePossibleCancellationInterrupt(int s) {
    if (s == INTERRUPTING)
        while (state == INTERRUPTING)
            Thread.yield(); // wait out pending interrupt
}
FutureTask使用示例
举个例子,假设我们要执行一个算法,算法需要两个输入 input1 和 input2, 但是input1和input2需要经过一个非常耗时的运算才能得出。由于算法必须要两个输入都存在,才能给出输出,所以我们必须等待两个输入的产生。接下来就模仿一下这个过程。
public class FutureTaskTest {

    public static void main(String[] args) throws InterruptedException, ExecutionException {
        long starttime = System.currentTimeMillis();
        //input2生成, 需要耗费3秒
        FutureTask<Integer> input2_futuretask = new FutureTask<>(new Callable<Integer>() {
            @Override
            public Integer call() throws Exception {
                Thread.sleep(3000);
                return 5;
            }
        });
        new Thread(input2_futuretask).start();
        //input1生成,需要耗费2秒
        FutureTask<Integer> input1_futuretask = new FutureTask<>(new Callable<Integer>() {
            @Override
            public Integer call() throws Exception {
                Thread.sleep(2000);
                return 3;
            }
        });
        new Thread(input1_futuretask).start();
        Integer integer2 = input2_futuretask.get();
        Integer integer1 = input1_futuretask.get();
        System.out.println(algorithm(integer1, integer2));
        long endtime = System.currentTimeMillis();
        System.out.println("用时:" + String.valueOf(endtime - starttime));
    }
    //这是我们要执行的算法
    public static int algorithm(int input, int input2) {
        return input + input2;
    }
}
输出结果:
8
用时:3001毫秒
我们可以看到用时3001毫秒,与最费时的input2生成时间差不多。
总结
1、FutureTask实现了Runnable接口,因此可以作为一个线程执行任务处理,比如在线程池中submit方法就是用FutureTask类包装了一个runnable或callable任务。
2、FutureTask内部有个状态机,用于记录任务的处理状态,比如有三种最终状态:正常完成、执行异常、任务取消
3、通过get方法阻塞获取任务执行结果,同时内部维护了一个阻塞等待栈,用于多线程并发调用get方法时,同时将这些线程阻塞并保存它们的阻塞信息,以便在任务执行完成后进行唤醒
4、支持任务的取消操作,但是前提是任务还没完全执行成功的情况下才允许取消,取消分为两种:只唤醒阻塞等待结果的线程、唤醒线程同时强制中断任务执行线程
补充
Future 和 Promise
前面我们已经知道了Future的用法,将回调接口交给线程池去执行,这一步是非阻塞的,返回了一个运算结果的占位符。然后通过get()阻塞的方式获取到结果。在同时处理时能并行化
相比之下,Promise的概念并非Java原生的,而是其他编程语言中一种通用的抽象概念。Promise充当一个代理,用于表示在Promise创建时可能未知的值。与Future不同,Promise通常提供更交互式的方法,允许开发人员即使在启动异步计算后也能影响它
使用Promise
Java可能没有像JavaScript中那样严格遵循Promise规范的专用Promise类。但是,我们可以使用java.util.concurrent.CompletableFuture来实现类似的功能。CompletableFuture提供了一种灵活的方式来处理异步任务,与Promise共享一些特性。需要注意的是,它们并不完全相同。
下面我们将探讨如何使用CompletableFuture在Java中实现类似Promise的行为:
ExecutorService executorService = Executors.newSingleThreadExecutor();
CompletableFuture<String> completableFutureResult = CompletableFuture.supplyAsync(() -> {
    try {
        Thread.sleep(2000);
    } catch (InterruptedException e) {
        e.printStackTrace();
    }
    return "CompletableFuture Result";
}, executorService);

completableFutureResult.thenAccept(result -> {
      System.out.println("Promise Result: " + result);
  })
  .exceptionally(throwable -> {
      System.err.println("Error occurred: " + throwable.getMessage());
      return null;
  });

System.out.println("Doing other tasks...");

executorService.shutdown();
当我们运行这段代码时,我们会看到以下输出:
Doing other tasks...
Promise Result: CompletableFuture Result
我们创建了一个名为completableFutureResult的CompletableFuture。使用supplyAsync()方法来启动一个异步计算。提供的lambda函数代表异步任务。
接下来,我们使用thenAccept()和exceptionally()将回调附加到CompletableFuture上。thenAccept()回调处理异步任务的成功完成,类似于Promise的解析,而exceptionally()处理任务期间可能发生的任何异常,类似于Promise的拒绝。
关键差异
控制流
一旦Future的值被设置,控制流将继续向下进行,不受后续事件或更改的影响。与此同时,Promise(或CompletableFuture)提供了诸如thenCompose()和whenComplete()等方法,用于根据最终结果或异常进行条件执行。
下面我们将创建一个使用CompletableFuture进行分支控制流的示例:
CompletableFuture<Integer> firstTask = CompletableFuture.supplyAsync(() -> {
      return 1;
  })
  .thenApplyAsync(result -> {
      return result * 2;
  })
  .whenComplete((result, ex) -> {
      if (ex != null) {
          // handle error here
      }
  });
在代码中,我们使用thenApplyAsync()方法来演示异步任务的链式处理。
错误处理
Future和Promise都提供了处理错误和异常的机制。Future依赖于计算期间抛出的异常:
ExecutorService executorService = Executors.newSingleThreadExecutor();
Future<String> futureWithError = executorService.submit(() -> {
    throw new RuntimeException("An error occurred");
});

try {
    String result = futureWithError.get();
} catch (InterruptedException | ExecutionException e) {
    e.printStackTrace();
} finally {
    executorService.shutdown();
}
在CompletableFuture中,exceptionally()方法用于处理异步计算期间发生的任何异常。如果发生异常,它将打印错误消息并提供一个回退值:
CompletableFuture<String> promiseWithError = new CompletableFuture<>();
promiseWithError.completeExceptionally(new RuntimeException("An error occurred"));

promiseWithError.exceptionally(throwable -> {
    return "Fallback value";
});
读写访问
Future 提供了一个只读视图,允许我们在计算完成后检索结果:
Future<Integer> future = executor.submit(() -> 100);
// Cannot modify future.get() after completion
相比之下,CompletableFuture 不仅允许我们读取结果,还允许我们在异步操作开始后动态地设置值:
ExecutorService executorService = Executors.newSingleThreadExecutor();
CompletableFuture<Integer> totalPromise = CompletableFuture.supplyAsync(() -> {
    try {
        Thread.sleep(1000);
    } catch (InterruptedException e) {
        e.printStackTrace();
    }
    return 100;
}, executorService);

totalPromise.thenAccept(value -> System.out.println("Total $" + value ));
totalPromise.complete(10);
最初,我们设置异步任务以返回100作为结果。然而,我们干预并在任务自然完成之前明确地使用值10来完成任务。这种灵活性突显了CompletableFuture的可写特性,允许我们在异步执行期间动态更新结果。

 浙公网安备 33010602011771号