
[OpenCV实战]30 使用OpenCV实现图像孔洞填充
在本教程中,我们将学习如何填充二值图像中的孔。考虑下图左侧的图像。假设我们想要找到一个二值掩模,它将硬币与背景分开,如下图右侧图像所示。在本教程中,包含硬币的圆形区域也将被称为前景。

请注意,硬币的边界是黑色的,与白色背景不同。因此,我们使用简单的图像阈值来将边界与背景分开。换句话说,我们说强度高于某个值(阈值)的像素是背景,其余像素是前景。上图中间图像显示通过阈值分割获得图像(黑色代表背景,白色代表前景)。不幸的是,即使边界被很好地提取(它是纯白色),硬币的内部也具有与背景类似的强度。因此,阈值操作不能将其与背景分开。我们如何用白色填充圆形边界内的所有像素?然后将其分开。
1 imfill in OpenCV
MATLAB有一个名为imfill的函数 ,可以让你填充孔洞。OpenCV中没有imfill功能,但我们肯定可以写一个!我们知道像素点(0,0)连接到背景。因此,我们可以通过从像素(0,0)执行填充操作来提取背景。不受漫水填充操作影响的像素必然位于边界内。阈值图像与漫水填充图像或非运算后图像为前景掩模!
漫水填充算法是用来标记一片区域的:设置一个种子点,然后种子点附近的相似点都被填充同一种颜色。该算法应用性很广,比如目标识别,photoshop 的魔术棒功能等等,是填充类算法中应用最为广泛的一个算法。漫水填充也可以用来从输入图像获取掩码区域,掩码会加速处理过程,或者只处理掩码指定的像素点。其中掩膜Mask用于进一步控制那些区域将被填充颜色。漫水填充在OpenCV中通过floodfill函数实现,具体见:
https://blog.csdn.net/qq_37385726/article/details/82313004
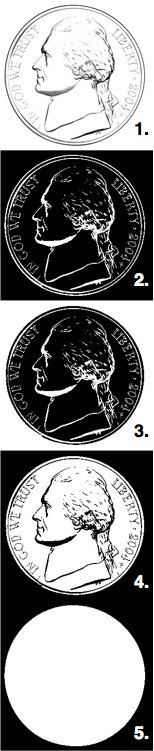
在OpenCV中实现imfill结果类似下图,步骤如下:
1)读取图像,并转换为灰度图像,如下图1所示;
2)对输入图像进行阈值分割以获得二值图像,如下图2所示;
3)对于阈值分割后的图像进行漫水填充,从像素(0,0)填充颜色。请注意,步骤2和步骤3的输出之间的差异在于步骤3中的背景现在是白色的,如下图3所示。
4)反转漫水填充后的图像(即黑色变为白色,白色变为黑色),如下图4所示。
5)使用按位OR运算将阈值图像与反向漫水填充图像组合以获得填充有孔的最终前景掩模。步骤4中的图像在边界内具有一些黑色区域。根据设计,步骤2中的图像填充了这些孔。因此,我们将两者结合起来获得掩模,如下图5所示。
2 完整代码
还有其他方法可以解决同样的问题。一种方法是使用形态学闭运算操作。但是,要进行形态学操作,您需要知道孔的最大尺寸。另一种方法是使用findContours查找轮廓,然后使用drawContours填充它。我更喜欢这篇文章中所描述的技术的简单性和速度。
本文所有代码见:
https://github.com/luohenyueji/OpenCV-Practical-Exercise
C++:
#include "pch.h"
#include <opencv2/opencv.hpp>

using namespace cv;

int main()
{
    // Read image 读取图像
    Mat im_in = imread("./image/nickel.jpg", IMREAD_GRAYSCALE);


    // Threshold.
    // Set values equal to or above 220 to 0.
    // Set values below 220 to 255.
	//阈值分割
    Mat im_th;
    threshold(im_in, im_th, 220, 255, THRESH_BINARY_INV);

    // Floodfill from point (0, 0) 以点(0,0)为种子点,进行漫水填充
    Mat im_floodfill = im_th.clone();
    floodFill(im_floodfill, cv::Point(0,0), Scalar(255));

    // Invert floodfilled image 反转图像
    Mat im_floodfill_inv;
    bitwise_not(im_floodfill, im_floodfill_inv);

    // Combine the two images to get the foreground. 获得前景
    Mat im_out = (im_th | im_floodfill_inv);

    // Display images 图像展示
    imshow("Thresholded Image", im_th);
    imshow("Floodfilled Image", im_floodfill);
    imshow("Inverted Floodfilled Image", im_floodfill_inv);
    imshow("Foreground", im_out);
    waitKey(0);
	return 0;
}
python:
#!/usr/bin/env python

import cv2;
import numpy as np;

# Read image
im_in = cv2.imread("./image/nickel.jpg", cv2.IMREAD_GRAYSCALE);

# Threshold.
# Set values equal to or above 220 to 0.
# Set values below 220 to 255.

th, im_th = cv2.threshold(im_in, 220, 255, cv2.THRESH_BINARY_INV);

# Copy the thresholded image.
im_floodfill = im_th.copy()

# Mask used to flood filling.
# Notice the size needs to be 2 pixels than the image.
h, w = im_th.shape[:2]
mask = np.zeros((h+2, w+2), np.uint8)

# Floodfill from point (0, 0)
cv2.floodFill(im_floodfill, mask, (0,0), 255);

# Invert floodfilled image
im_floodfill_inv = cv2.bitwise_not(im_floodfill)

# Combine the two images to get the foreground.
im_out = im_th | im_floodfill_inv

# Display images.
cv2.imshow("Thresholded Image", im_th)
cv2.imshow("Floodfilled Image", im_floodfill)
cv2.imshow("Inverted Floodfilled Image", im_floodfill_inv)
cv2.imshow("Foreground", im_out)
cv2.waitKey(0)
3 参考
https://www.learnopencv.com/filling-holes-in-an-image-using-opencv-python-c/
本文来自博客园,作者:落痕的寒假,转载请注明原文链接:https://www.cnblogs.com/luohenyueji/p/16970312.html

