帧动画与补间动画的使用,
一:帧动画(FameAnimation)
帧动画是一帧一帧的播放的,通过快数播放图片达到动画的效果
帧动画的使用有两种方式:
1:通过xml配置帧动画
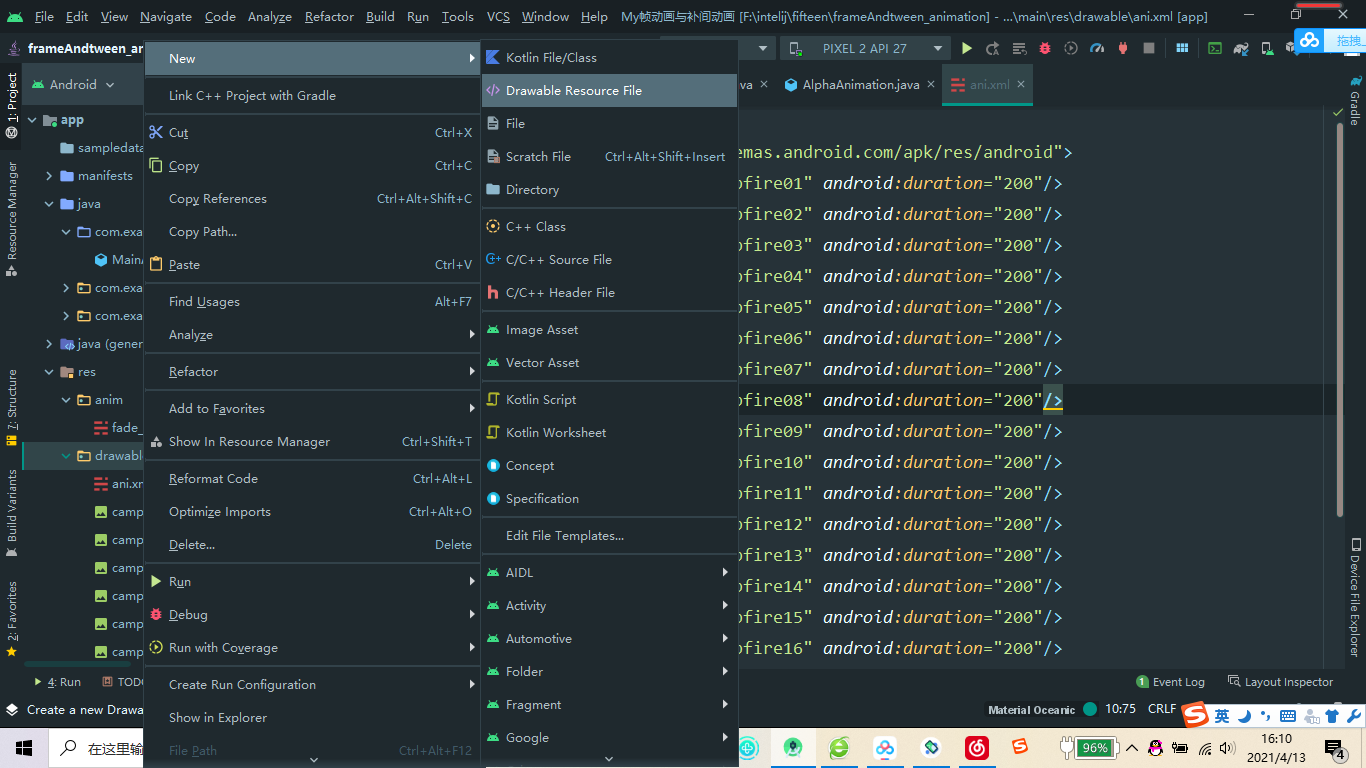
在drawable文件下创建xml文件

将文件改为anim_list,并将图片一张一张的按播放的顺序添加上去,先播放的先添加,duration设置时间
<?xml version="1.0" encoding="utf-8"?>
<animation-list xmlns:android="http://schemas.android.com/apk/res/android">
    <item android:drawable="@drawable/campfire01" android:duration="200"/>
    <item android:drawable="@drawable/campfire02" android:duration="200"/>
    <item android:drawable="@drawable/campfire03" android:duration="200"/>
    <item android:drawable="@drawable/campfire04" android:duration="200"/>
    <item android:drawable="@drawable/campfire05" android:duration="200"/>
    <item android:drawable="@drawable/campfire06" android:duration="200"/>
    <item android:drawable="@drawable/campfire07" android:duration="200"/>
    <item android:drawable="@drawable/campfire08" android:duration="200"/>
    <item android:drawable="@drawable/campfire09" android:duration="200"/>
    <item android:drawable="@drawable/campfire10" android:duration="200"/>
    <item android:drawable="@drawable/campfire11" android:duration="200"/>
    <item android:drawable="@drawable/campfire12" android:duration="200"/>
    <item android:drawable="@drawable/campfire13" android:duration="200"/>
    <item android:drawable="@drawable/campfire14" android:duration="200"/>
    <item android:drawable="@drawable/campfire15" android:duration="200"/>
    <item android:drawable="@drawable/campfire16" android:duration="200"/>
    <item android:drawable="@drawable/campfire17" android:duration="200"/>
</animation-list>
     通过src可将该drawable资源文件添加到图片上去:android:src="@drawable/ani",
     获取图片的drawable并将其转换为AnimationDrawable通过start()启动动画
(imageView2.drawable as AnimationDrawable).apply {
    start()
}//imageView2是图片的id

2:通过代码配置帧动画:创建AnimationDrawable对象->为其添加用于动画的图片->将AnimationDrawable添加到相应的view上->启动动画
AnimationDrawable().apply {
//通过addFrame(1,2)为帧动画添加一帧的图片,1:需要要一个Drawable(通过getDrawable()获取),2:动画的时长
    getDrawable(R.drawable.campfire01)?.let {
        addFrame(it,100)
    }
    getDrawable(R.drawable.campfire02)?.let {
        addFrame(it,100)
    }
    getDrawable(R.drawable.campfire03)?.let {
        addFrame(it,100)
    }
}.also {
//将AnimationDrawable添加到相应的view上
 imageView2.setImageDrawable(it)
//启动动画
 it.start()}

二:补间动画(TweenAnimation)
1:补间动画只是在视觉上给了我们一种动画的感觉,但是控件本身的位置状态是没有被改变的,如把控件C从A位置移动到B位置,
    在视觉上控件C已经被移动到了B位置上,但是如果需要点击控件C那么需要点击A的位置,即使控件还在A位置。

2:补间动画分为:
AlphaAnimation :透明度变化的动画
TranslateAnimation:位子移动的动画
ScaleAnimation:大小伸缩的动画
RotateAnimation:旋转的动画
AnimationSet:动画的结合,将以上几种动画结合在一起

3:补间动画常用的属性:
fillafter:True或者false,是否保持动画结束后的状态
fillbefer:是否回到动画开始的状态,默认是设置为true
duration:动画的时间
repeat():重置
repeatMode:在次动画的模式(RESTART:从头开始,REVEASE:从尾开始,即从上一次动画结束的位置开始)
repeatCount:动画重复的次数,INFINITE:无数次
start():开始动画
cancel():取消动画
4:setAnimationListener:为动画添加动画
it.setAnimationListener(object :Animation.AnimationListener{
    override fun onAnimationRepeat(animation: Animation?) {
     /*动画当动画通过 setRepeatMode() / setRepeatCount()
      或 repeat() 方法重复执行时,这个方法被调用。
    */
    }
    override fun onAnimationEnd(animation: Animation?) {
      //当动画结束时使用
    }
    override fun onAnimationStart(animation: Animation?) {
      //当动画开始时使用
    }
})

5:补间动画实现的方式;
   (1):xml配置
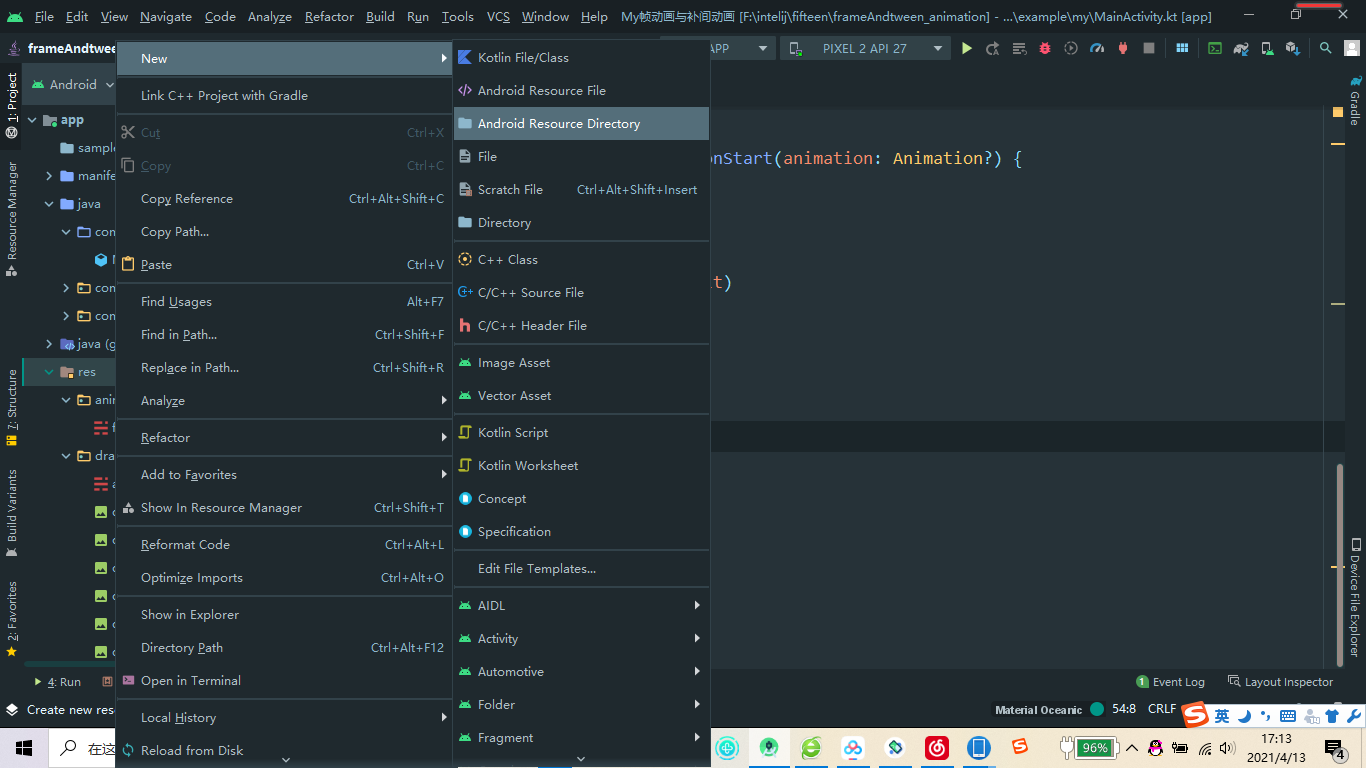
      在res文件下创建一个Resource Ddirectory文件anim(动画的都放在这个文件里面)

在创建的anim文件下创建Resource File文件
将文件开头的set改为自己需要的模式,并配置xml文件,这儿的透明度的变化便是从0到1
我需要改变透明度的变化便改为alpha了,若是需要拉伸则改为scale
<alpha xmlns:android="http://schemas.android.com/apk/res/android"
    android:fromAlpha="0.0"
    android:toAlpha="1.0"
    />
获取创建的xml文件并设置其属性,后再启动动画
  //xml配置淡入
private  fun fade_inandout_xml(){
//通过AnimationUtils.loadAnimation(1(上下文),2(配置的xml文件资源))获取文件
      AnimationUtils.loadAnimation(this,R.anim.fade_in).apply {
//配置相应的属性,这些属性也可以设置在xml文件中,但是xml文件中不提示
          duration = 2000
          fillAfter = true
          repeatMode = Animation.RESTART
      }.also {
//监听动画
          it.setAnimationListener(object :Animation.AnimationListener{
              override fun onAnimationRepeat(animation: Animation?) {
               /*动画当动画通过 setRepeatMode() / setRepeatCount()
                或 repeat() 方法重复执行时,这个方法被调用。
              */
              }
              override fun onAnimationEnd(animation: Animation?) {
                //当动画结束时使用
              }
              override fun onAnimationStart(animation: Animation?) {
                //当动画开始时使用
              }
          })
//通过startAnimation()将动画添加到视图上并且启动动画
          imageView2.startAnimation(it)

      }
  }
移动:
<translate xmlns:android="http://schemas.android.com/apk/res/android"
    android:fromXDelta="0"
    android:toXDelta="200" 在x轴上的变化
    android:fromYDelta="0"
    android:toYDelta="0"  在y轴上的变化
    />
这个操作都是一样的,以下就不一一写了
AnimationUtils.loadAnimation(this,R.anim.trans).apply {
    duration = 2000
    fillAfter = true
}.also {
    imageView2.startAnimation(it)
}
拉伸
<?xml version="1.0" encoding="utf-8"?>
<scale xmlns:android="http://schemas.android.com/apk/res/android"
设置宽度从0拉伸到50
    android:fromXScale="0dp"
    android:toXScale="50dp"
设置高度从0拉伸到50
    android:fromYScale="0dp"
    android:toYScale="50dp"
设置拉伸时的位置,还有一个对应的pivotType属性有三个值与pivotx(y)对应:Animation.ABSOLUTE绝对值pivotx(y)
就是设置的绝对值,此时下方的伸缩点就在屏幕上200,200的位置
,Animation.RELATIVE_TO_SELF相对自身而言,pivotx就是设置相对自身的在x位置上的200倍的位置
,Animation.RELATIVE_TO_PARENT相对父容器而言,pivotx在x上的位置在父容器的宽度的200倍的位置
xml配置文件中默认为Animation.ABSOLUTE
    android:pivotX="200"
    android:pivotY="200"
    />

旋转:
<?xml version="1.0" encoding="utf-8"?>
<rotate xmlns:android="http://schemas.android.com/apk/res/android"
从0度转180度
    android:fromDegrees="0"
    android:toDegrees="180"
位置,不设置就默认为控件本身的原位置
    android:pivotX="0"
    android:pivotY="180"
    />
集合:
使用百分比就是相对自身而言的
<?xml version="1.0" encoding="utf-8"?>
<set xmlns:android="http://schemas.android.com/apk/res/android"
    android:duration="2000">
<scale android:fromXScale="0%" android:toXScale="100%"
    android:fromYScale="0%" android:toYScale="100%"
    android:pivotY="50%" android:pivotX="50%"
    />
    <rotate android:fromDegrees="0" android:toDegrees="180"
        android:pivotX="50%" android:pivotY="50%"/>
</set>
  (2):代码实现
     透明度
AlphaAnimation(0.0f,1.0f).apply {
    duration = 3000
    fillAfter = true
    repeatMode = Animation.REVERSE
}.also {
    imageView2.startAnimation(it)
}
    移动:
  TranslateAnimation(Animation.RELATIVE_TO_SELF,0f,
                       Animation.RELATIVE_TO_SELF,1f,
                       Animation.RELATIVE_TO_SELF,0f,
                       Animation.RELATIVE_TO_SELF,1f).apply {
                             duration = 2000
                                fillAfter = true
                         }.also {
                                imageView2.startAnimation(it)
                                 }
拉伸:
ScaleAnimation(0f,500f,0f,500f).apply {
    duration = 2000
    imageView2.startAnimation(this)
}
旋转:
RotateAnimation(0f,180f).apply {
    duration = 2000
    imageView2.startAnimation(this)
}
集合:
val scale = ScaleAnimation(0f,50f,0f,50f)
  val rotate = RotateAnimation(0f,180f)
  AnimationSet(true).apply {
添加动画
      addAnimation(scale)
      addAnimation(rotate)
      duration = 2000
      imageView2.startAnimation(this)
  }


