
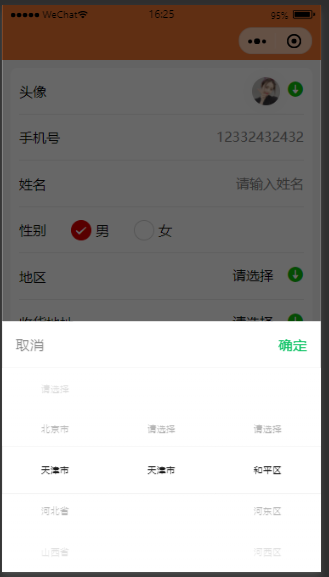
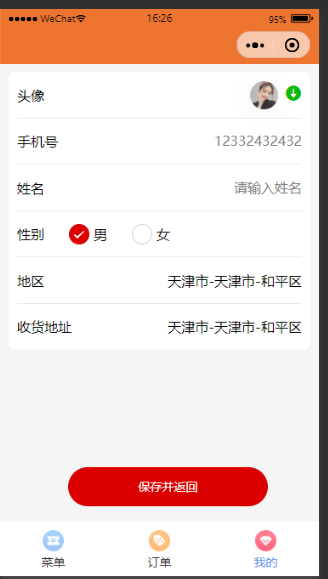
微信小程序taro框架之省市区选择器
2020-08-24 16:30 小罗世界 阅读(2056) 评论(1) 收藏 举报第一次学习taro框架,说实话,压力非常大,因为公司大佬全走了


import React, { Component } from 'react'
import { View, Input, Icon, RadioGroup, Radio, Label, Picker,Text } from '@tarojs/components'
import { AtAvatar } from 'taro-ui'
import './index.scss'


export default class Profile extends Component {
  constructor(props) {
    super(props)
    this.state = {
      list: [
        {
          value: '男',
          text: '男',
          checked: true
        },
        {
          value: '女',
          text: '女',
          checked: false
        }
      ],
      region: ['请选择', '请选择', '请选择'],
      customItem: '请选择'
    }
    this.handlerOnChange = this.handlerOnChange.bind(this)
  }

  bindRegionChange (e) {
    console.log('picker发送选择改变,携带值为', e.detail.value)
    this.setState({
      region: e.detail.value
    })
  }
  handlerOnChange (e) {
    console.log(e.detail.value)
  }
  render () {
    return (
      <View className="info-page">
        <View className='info-box'>

          <View className='info-line'>
            <View className='info-line-left'>头像</View>
            <View className='info-line-right'>
              <View><AtAvatar className='info-line-right-left' circle image='https://timgsa.baidu.com/timg?image&quality=80&size=b9999_10000&sec=1598014027239&di=d169d66440dbc24ecb340aa3c7034db0&imgtype=0&src=http%3A%2F%2Fb-ssl.duitang.com%2Fuploads%2Fitem%2F201707%2F10%2F20170710210234_y3Kf5.jpeg'></AtAvatar></View>
              <View className='info-line-rigth-right'><Icon size='20' type='download' /></View>
            </View>
          </View>

          <View className='info-line'>
            <View className='info-line-left'>手机号</View>
            <Input className='info-line-right number-info' placeholder='12332432432'>
            </Input>
          </View>
          <View className='info-line'>
            <View className='info-line-left'>姓名</View>
            <Input className='info-line-right username-info' placeholder='请输入姓名'>
            </Input>
          </View>
          <View className='info-line-sex'>
            <View className='line-sex'>性别</View>
            <RadioGroup onChange={this.handlerOnChange}>
              {this.state.list.map((value, index) => {
                return (
                  <Label for={index} key={index}>
                    <Radio className='line-man' value={value.value} checked={value.checked} color='#DB0000'>{value.text}</Radio>
                  </Label>
                )
              })}
            </RadioGroup>
          </View>
          <View className='info-line'>
            <View className='info-line-left'>地区 </View>
            <View className='info-line-right'>
              <Picker mode='region' value={this.state.region} customItem={this.state.customItem} onChange={this.bindRegionChange.bind(this)}>
                <View className='picker'>
                  {this.state.region[0] === '请选择'
                    ? <View style='display:flex;'>
                      <View style='margin-right:16px'>请选择</View>
                      <View ><Icon size='20' type='download' />
                      </View>
                    </View>
                    : <View>{this.state.region[0]}-{this.state.region[1]}-{this.state.region[2]}</View>}
                </View>
              </Picker>
            </View>
          </View>
          <View className='info-line' style='border:none'>
            <View className='info-line-left'>收货地址</View>
            <View className='info-line-right'>
            <Picker mode='region' value={this.state.region} customItem={this.state.customItem} onChange={this.bindRegionChange.bind(this)}>
                <View className='picker'>
                  {this.state.region[0] === '请选择'
                    ? <View style='display:flex;'>
                      <View style='margin-right:16px'>请选择</View>
                      <View ><Icon size='20' type='download' />
                      </View>
                    </View>
                    : <View>{this.state.region[0]}-{this.state.region[1]}-{this.state.region[2]}</View>}
                </View>
              </Picker>
            </View>
          </View>
        </View>
        <View className='bottom-button'><Text>保存并返回</Text></View>
      </View>
    )
  }
}
,我一个新手来维护。这是第一次学习,省市区选择器,不多说,代码上
.info-page{
  padding-left: 20px;
  padding-top: 20px;
  padding-right: 20px;
  background-color:rgba(245,245,245,1);
  height: 100vh;
  overflow: hidden;
  .info-box{
    // width: 710px;
    background-color:white;
    padding:0px 20px;
    border-radius: 16px;
    .info-line{
      height: 108px;
      display: flex;
      justify-content: space-between;
      align-items: center;
      border-bottom: 1px solid #E9E9E9;
      .info.line.left{
        font-size:28px;
        line-height: 48px;
        font-weight: 400;
      }
      .info-line-right{
        display: flex;
        justify-content: space-between;
        align-items: center;
        .info-line-right-left{
          width:66px;
          height: 66px;
          margin-right: 16px;
        }
      }
      .number-info{
        text-align: end;
      }
     .username-info{
      text-align: end;
     }
    }
    .info-line-sex{
      height: 108px;
      display: flex;
      // justify-content: start;
      align-items: center;
      border-bottom: 1px solid #E9E9E9;
      .line-sex{
        text-align: start;
      }
      .line-man{
        margin-left:58px;
      }
      .line-woman{
        margin-left:58px;
      }
    }


  }
  .bottom-button{
    width: 470px;
    height: 92px;
    margin-top: 276px;
    background-color: #DB0000;
    border-radius: 46px;
    display: -webkit-box;
    -webkit-box-pack: center;
    -webkit-box-align: center;
    margin-left: 140px;
    font-size: 28px;
    color:white
  }
}
上图看效果,但是效果不是很好。更多学习资料官网,但是对于一个新手来说,官网代码示例很少,必须自己慢慢的摸索。
所以希望对自己有帮助。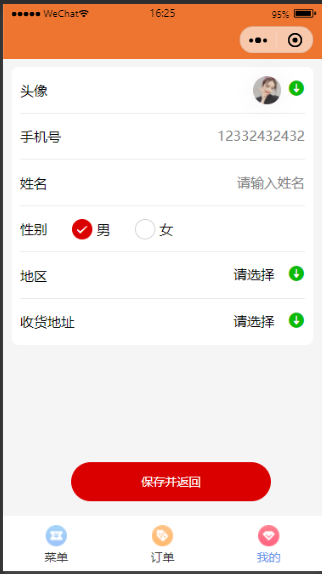

 浙公网安备 33010602011771号